Is a certain room in your home feeling stuffy or unusually warm compared to the rest of the house? Are your vents barely blowing any air? It’s possible that you have disconnected air ducts, and the good news is, you can fix it yourself! In this blog post, we’ll show you how to reconnect your air ducts and increase airflow to improve the comfort of your home.
But before we dive into the solutions, let’s answer some common questions you may have. Can you clean or patch ductwork? Can you use duct tape or Flex Seal on the ducts? How do you secure ductwork? And how do you know if your air ducts are bad or clogged? We’ll cover it all, so keep reading to find out how you can fix and optimize your air duct system.

Can I Reconnect My Air Ducts and Improve Airflow Myself
Yes, you absolutely can! Reconnecting the air ducts is a relatively simple process that doesn’t require specialized skills. With some basic tools and a little know-how, you can have your air ducts back in action in no time. Not only will this resolve issues with individual rooms feeling hot or experiencing low airflow, but it can also help reduce energy waste and lower your utility bills.
So, if you’re ready to tackle the problem head-on and get better airflow throughout your home, let’s get started with reconnecting those disconnected air ducts!
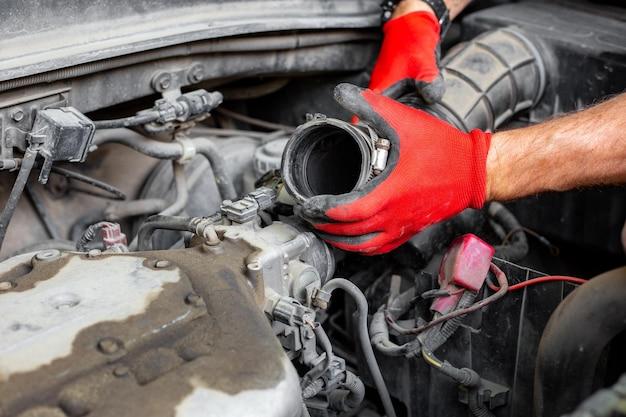
How to Repair a Disconnected Air DuctLike a Pro!
So, you’re standing in front of your HVAC system, scratching your head, wondering why you’re not getting any cool air. Well, my friend, it’s quite possible that you have a disconnected air duct lurking somewhere in your ventilation system. But fear not! In this guide, we’ll walk you through the steps to fix that disconnected air duct like a seasoned pro. Let’s get started!
Locate and Assess the Disconnected Air Duct
Alrighty then, the first step is to play detective and locate the rogue air duct. In most cases, unfastened air ducts can be found in attics, crawlspaces, or basements. Put on that Sherlock Holmes hat, grab a flashlight, and venture into these areas with the determination of an Olympic athlete. Make sure to check all the nooks and crannies, because this duct won’t fix itself, my friend!
Once you’ve found the disconnected air duct, do a quick assessment. Is it just a loose connection, or have the nefarious duct goblins at it again? Give it a thorough inspection, looking out for any tears, holes, or other signs of trouble. We want to know what we’re dealing with before we unleash our repair skills!
Gearing Up for the Fix
Alright, now it’s time to gear up! Put on your DIY hat, grab your trusty duct tape (the hero of this story), and get ready to show that disconnected air duct who’s boss. Remember, we’re fixing it, not just putting a band-aid on it! So roll up those sleeves and let’s dive in.
Clean and Prep the Duct
Now, before we start reattaching the duct, let’s give it a good cleaning. Dust bunnies and debris might have accumulated in the disconnected section, and we don’t want to send them back into circulation. Grab a brush or vacuum and remove any unwanted passengers from that duct. A little TLC goes a long way, my friend!
Once the duct is clean, make sure both ends are properly trimmed and free from any damage. We want to start fresh and give that air duct a fighting chance. Trust me, it will thank you later!
Reattach the Air Duct with Finesse
Alrighty, now comes the fun part! Take that trusty duct tape and wrap it around the disconnected ends, securing them tightly together. Make sure you’ve got a good grip and the connection is nice and snug. We don’t want any future surprise visits from the “disconnected air duct fairy.”
But wait, there’s more! To ensure an airtight seal and prevent future mishaps, apply a generous layer of foil tape over the connected area. This little trick will give your air duct that extra bit of finesse it deserves. Bravo, maestro!
Test it Out and Bask in Your Repair Skills
With the air duct reattached and sealed like a champ, it’s time to put your HVAC system back in action! Crank up that thermostat and let the cool air flow through your home. Ahhh, sweet success!
But hold your horses, my friend! Don’t just stand there basking in the glory of your repair skills. Take a moment to observe. Is the air flowing smoothly? Can you feel the refreshing coolness embracing your skin? If the answer is yes, then pat yourself on the back. You did it! You repaired that disconnected air duct like a true pro!
Disclaimer: The tips provided in this guide are for informational purposes only. If you encounter any difficulties or feel unsure about the repair process, it’s recommended to consult a professional HVAC technician. Safety first, folks!
FAQ: How to Fix Disconnected Air Duct
Having disconnected air ducts can be quite a hassle. Not only do they affect your home’s comfort, but they can also lead to energy waste and higher utility bills. Fortunately, you don’t have to be an HVAC expert to tackle this issue. In this FAQ-style guide, we will answer some commonly asked questions about fixing disconnected air ducts and help you restore efficient airflow in your home.
Can I Clean My Air Ducts Myself
Absolutely! Cleaning your air ducts is a task that you can tackle on your own. Start by turning off your HVAC system and removing the vent covers. Then, use a vacuum cleaner with a long hose attachment to remove dust, debris, and any other particles that may have accumulated in the ducts. For a thorough cleaning, you can also consider using a brush or a specially designed duct cleaning tool. Remember to clean both supply and return air ducts for optimal results.
Can You Patch Ductwork
Yes, you can patch ductwork to fix disconnected sections. Start by identifying the area where the ducts have come apart. Then, use a high-quality foil tape or mastic sealant to rejoin the disconnected components. Ensure that the surface is clean and dry before applying the patch. For larger holes or gaps, it may be necessary to use a sheet metal patch and secure it with sheet metal screws. Patching your ductwork can help restore proper airflow and enhance the overall efficiency of your HVAC system.
How Do You Secure Ductwork
Securing ductwork is crucial to avoid future disconnections. Here’s how you can do it:
- Inspect the entire duct system: Identify any loose connections, gaps, or areas where the ducts have become detached.
- Clean the surfaces: Remove dirt, dust, or debris from the end of each duct that needs to be secured.
- Apply sealant: Use foil tape or mastic sealant to tightly seal the joints or connections.
- Use screws: For extra reinforcement, you can use sheet metal screws to secure the ducts together.
- Insulate the ducts: Adding insulation around your ductwork can help prevent heat loss or gain and improve the overall energy efficiency of your system.
By following these steps, you can ensure that your ductwork remains securely in place, promoting better airflow throughout your home.
How Do I Know If I Have Bad Ductwork
Several signs can indicate that you have bad ductwork. Keep an eye out for the following:
- Inconsistent room temperature: If some rooms are significantly hotter or colder than others, it could be a sign that your ductwork is poorly designed or has air leaks.
- Increased energy bills: If your utility bills have been steadily rising without an apparent explanation, it may be due to air leaks in your ductwork, resulting in energy waste.
- Poor indoor air quality: Leaky ducts can allow dust, pollen, and other allergens to enter and circulate in your home, negatively impacting indoor air quality.
- Noisy operation: Unusually loud or rattling sounds coming from your ductwork could signify loose connections or damaged ducts.
- Reduced airflow: If you notice weak airflow or inconsistent air coming out of your vents, it could indicate a problem with your ductwork.
If you suspect that you have bad ductwork, it’s best to consult with a professional HVAC technician who can assess the condition of your ducts and recommend the necessary repairs or replacements.
What Is a Vent Elbow
A vent elbow is a crucial component of your HVAC system’s ductwork that allows for directional changes in airflow. It is a curved piece that connects two duct sections at an angle, typically 90 degrees. Vent elbows are commonly used in situations where a straight path for ductwork is not feasible, such as navigating around obstacles or fitting into tight spaces. Properly installed vent elbows ensure smooth airflow and efficient distribution of conditioned air throughout your home.
Why Is There Barely Any Air Coming Out of Vents
Insufficient airflow from your vents can be frustrating, especially during hot summers or cold winters. Here are a few reasons why there might be barely any air coming out:
- Blocked or dirty air filters: Clogged air filters restrict airflow and can significantly impact the performance of your HVAC system. Regularly clean or replace your filters to ensure proper airflow.
- Closed or obstructed vents: Check if any vents in your home are closed or blocked by furniture, curtains, or other objects. Clear any obstruction and ensure vents are fully open.
- Disconnected or leaky air ducts: Disconnected or leaky ductwork can lead to air loss before it reaches the vents. Repairing or sealing the ducts will enhance airflow.
- Inadequate system capacity: If your HVAC system is undersized or outdated, it may struggle to deliver sufficient airflow to meet your home’s demands. Consult with an HVAC professional to assess your system’s capacity.
Identifying and addressing the root cause is essential for restoring proper airflow. If you’re unable to determine the problem or the issue persists, it’s advisable to seek professional assistance.
Can I Replace Ductwork Myself
While some DIY enthusiasts may attempt to replace ductwork themselves, it is generally recommended to leave this task to professionals. Replacing ductwork involves complex calculations for optimal airflow, proper installation techniques, and ensuring compliance with building codes. Additionally, specialized tools and equipment may be necessary to complete the job safely and efficiently. To avoid costly mistakes and ensure that your new ductwork functions optimally, it’s best to hire an experienced HVAC contractor who can handle the replacement process.
How Do You Attach Duct to Vent
Attaching ducts to vents requires attention to detail and a secure connection to ensure efficient airflow. Follow these steps for a proper attachment:
- Measure and cut the duct: Start by measuring the length required to connect the duct to the vent. Use a sharp utility knife or duct cutter to make a clean cut.
- Slide the collar over the duct: A collar is a metal or plastic ring that provides a secure connection point. Slide the collar over the end of the duct, ensuring it fits snugly.
- Secure the collar: Use foil tape or sheet metal screws to secure the collar in place, making sure it is tightly fastened.
- Attach the collar to the vent: Position the collar over the vent and secure it using screws or any recommended method provided by the manufacturer.
By following these steps, you can ensure a proper attachment between your ducts and vents and promote efficient airflow throughout your home.
Can You Use Flex Seal on Ductwork
Flex Seal, a popular product for sealing leaks, can be used on certain types of ductwork, but it’s important to exercise caution. Flex Seal is suitable for small, temporary fixes in specific cases, such as ducts made of metal or plastic. However, it may not provide a long-term, permanent solution for larger or more critical duct leaks. For significant air leaks or disconnected sections, it is best to use other professional-grade sealing techniques like foil tape or mastic sealant. In any case, it’s recommended to consult with an HVAC professional before using any sealant on your ductwork.
Why Is My Room So Hot Compared to the Rest of the House
If you notice that a particular room in your house is significantly hotter than the rest, several factors could be at play:
- Inadequate insulation: Poor insulation can lead to heat transfer, making a room hotter than desired. Check the insulation in the walls, ceiling, and floors of the affected room.
- Blocked vents or registers: Ensure that the vents or registers in the hot room are fully open and not obstructed by furniture, rugs, or other items.
- Leaky or disconnected ducts: Air leaks or disconnected ducts near the hot room can result in insufficient cooling. Inspect the ductwork and address any issues.
- Solar heat gain: Rooms with more windows or direct sunlight exposure tend to get hotter. Consider using blinds, curtains, or reflective window coatings to minimize solar heat gain.
- Inefficient HVAC system: An aging or undersized HVAC system may struggle to cool certain areas effectively. Consult with an HVAC technician to evaluate your system’s capacity and performance.
Identifying the specific cause and implementing appropriate solutions can help restore a comfortable temperature balance throughout your home.
Can I Use Duct Tape on Ductwork
Contrary to its name, duct tape is not recommended for repairing ductwork. While it is handy for many household tasks, traditional duct tape is not suitable for long-lasting duct repairs. Over time, the adhesive on duct tape can deteriorate, leading to loose connections and air leaks. Instead, opt for foil tape or mastic sealant specifically designed for sealing ductwork. These products provide a more durable and reliable seal, ensuring optimal airflow and energy efficiency.
How Do I Reconnect My Air Ducts
Reconnecting air ducts requires careful attention to detail to ensure a secure and efficient connection. Follow these steps to reconnect your air ducts:
- Clean the surfaces: Clear any dirt, dust, or debris from the ends of the disconnected ducts.
- Align the ducts: Ensure that the ends of the ducts line up properly for a seamless connection.
- Use foil tape or mastic sealant: Apply a generous amount of foil tape or mastic sealant around the connection point to create an airtight seal. Ensure that all edges are properly sealed.
- Secure with screws: Depending on the size of the ducts, you may need to secure them using self-tapping sheet metal screws to provide additional stability. Place the screws along the joint to prevent any future disconnections.
By following these steps, you can successfully reconnect your air ducts and restore proper airflow within your HVAC system.
How Do You Increase Airflow in Ductwork
If you’re looking to enhance airflow in your ductwork, consider implementing the following tips:
- Clean or replace air filters: Clogged filters restrict airflow, so regular cleaning or replacement is essential.
- Remove obstructions: Ensure that furniture, rugs, or other objects are not blocking the vents or registers.
- Check for air leaks: Inspect the ductwork for any signs of leaks or disconnected sections. Seal any gaps with foil tape or mastic sealant.
- Balance the system: Adjust the dampers in your ductwork to balance airflow and ensure equal distribution throughout your home.
- Insulate the ducts: Adding insulation to your ductwork can help maintain the desired air temperature and reduce heat loss or gain.
- Consider booster fans: If certain areas have persistent airflow issues, installing booster fans can help increase airflow to those regions.
Implementing these measures can optimize airflow in your ductwork and improve the overall comfort of your home.
How Do I Find a Disconnected Duct
Finding a disconnected duct can be a bit tricky, but there are a few indicators that can help you identify the issue:
- Inconsistent airflow: If some vents blow significantly less air than others, it may indicate a disconnected duct in the system.
- Unusual noises: Disconnected ducts can lead to rattling or hissing sounds when the HVAC system is running. Listen for any unusual noises near the vents or ductwork.
- Visible gaps or sagging: Examine the visible sections of your ductwork for any noticeable gaps, loose connections, or sagging ducts.
If you suspect a disconnected duct, it’s best to consult with an HVAC professional who can conduct a thorough inspection using specialized tools, such as a duct pressure tester or thermal imaging camera, to pinpoint the exact location of the disconnection.
How Do I Know If My Ducts Are Clogged
Clogged ducts can have a significant impact on the performance of your HVAC system. Look out for these signs that may indicate clogged ducts:
- Weak or uneven airflow: If some vents have reduced airflow or feel weaker than others, it could be due to a clog in the ducts.
- Increased dust buildup: Excessive dust accumulation around the vents or on furniture can suggest clogged ducts, as the trapped dust is not being properly distributed.
- Unpleasant odors: Mold, mildew, or musty odors coming from your vents may indicate clogged ducts, which can promote the growth of harmful pollutants.
- Inconsistent indoor temperatures: If certain areas of your home are consistently warmer or cooler than others, it may be a result of clogged ducts restricting proper airflow.
If you suspect that your ducts are clogged, it’s best to have them professionally inspected and cleaned. Regular duct cleaning can help eliminate debris, improve indoor air quality, and ensure optimal system performance.
How Do I Increase the Airflow in My Vents
Improving airflow in your vents can enhance the overall efficiency of your HVAC system. Consider the following methods to increase airflow:
- Remove obstructions: Ensure that vents, registers, and grilles are unobstructed by furniture, drapes, or other objects.
- Adjust dampers: Locate the dampers in your ductwork and adjust them to allow for better airflow to specific areas of your home.
- Clean or replace air filters: Clogged filters can significantly restrict airflow. Regularly clean or replace them to maintain optimal airflow.
- Seal air leaks: Inspect your ductwork for any leaks or gaps and seal them with foil tape or mastic sealant to prevent air loss.
- Check blower settings: Verify that your blower is set to the correct speed. A low speed could result in reduced airflow.
- Consider HVAC system maintenance: Proper maintenance, such as regular cleaning, lubrication, and inspection of your HVAC system, can improve its efficiency and enhance airflow.
By implementing these strategies, you can increase the airflow in your vents and enjoy better comfort and energy efficiency in your home.
Fixing disconnected air ducts may seem like a daunting task, but with a bit of know-how and some handy tips, you can tackle the issue with confidence. Regular maintenance and addressing any ductwork-related problems promptly will help ensure that your HVAC system operates efficiently, keeping your home comfortable and your energy bills under control.
Remember, if you’re unsure or uncomfortable performing any ductwork repairs yourself, it’s always wise to consult with a professional HVAC technician. They have the expertise and tools to handle more complex issues, ensuring that your ductwork is in top-notch condition. So, bid farewell to those disconnected air duct woes and enjoy efficient airflow throughout your home!