Are you planning to install a new HVAC system in your home? Are you wondering if it’s an easy DIY project or if you need to hire a professional? HVAC installation can be a complex process, but with the right knowledge and tools, you can successfully install a new system or upgrade an old one. In this blog post, we’ll cover the basic steps involved in HVAC installation, including ductwork installation and best practices to follow. We’ll also answer some common questions about HVAC installation, such as how long it takes to install a new system and whether it includes ductwork. So, let’s get started!
HVAC Installation Steps
If you’ve decided to take on the task of installing HVAC yourself, then kudos to you, brave soul. HVAC installation can be a daunting task, but it doesn’t have to break the bank. Here are some essential steps to guide you through the process:
Step 1: Gather The Supplies
Before you start to take on any installation, make sure you have everything you need. Gathering all the necessary supplies beforehand will save you on trips to the store. So, what will you need? A ladder, pipe wrench, pliers, adjustable wrench, refrigerant, and of course, the air conditioning unit itself. It’s essentials to have all these tools in place before starting your work.
Step 2: Get Your Hands Dirty
Once you’ve got all your supplies, it’s time to roll up your sleeves and get to work. Start by installing the refrigerant lines. Then, you will need to secure the pipes using pipe clamps or insulation tapes. Next, install the air handler and duct system.
Step 3: Hook Up the Electrical Connections
This step is crucial, and you want to ensure that you’re doing it right to avoid any electrical hazards. Turn off the power supply and run wires to the HVAC unit using wire nuts. If you’re unsure about what to do, call an electrician to guide you through the process.
Step 4: Check for Leaks
Before turning on your newly installed HVAC, make sure to check for any leaks. Leaks can cause significant damage and pose a safety risk. Use soapy water to detect any leaks on the refrigerant lines.
Step 5: Test Run Your HVAC
At this point, you’ve done everything right- congratulations! But, you don’t want to get too excited and turn on your HVAC without testing it first. Turn on the power supply and let the system run for some time. Check the temperature and ensure it’s working as it’s supposed to.
In conclusion, installing HVAC is no easy feat, but with the right tools, guidance, and a bit of humor, it’s entirely achievable. Happy installation!
HVAC Installation Steps: AC Installation Steps
So, you’re planning to install an AC unit? Don’t sweat it! (Pun intended, obviously.) Here are some easy-to-follow steps to guide you through the process:
Choose the Right Type of AC Unit
First things first: you need to choose the right type of AC unit for your space. There are several different types to choose from, including window units, wall-mounted units, portable units, and central air conditioning systems.
Each type has its own pros and cons, so take the time to consider which one will work best for your needs. Factors to consider include the size of your space, the amount of sunlight it gets, whether you have any pets, and the layout of your home.
Determine the Size You Need
Once you’ve chosen the type of AC unit you want, it’s time to determine what size you need. AC units are rated by “tonnage,” which refers to their cooling capacity. The larger your space, the more tonnage you’ll need.
To determine the right size for your space, you’ll need to take into account its square footage, ceiling height, insulation, and other factors. An HVAC professional can help you figure out what size unit you need.
Install the Unit
Now it’s time for the actual installation process. If you’re handy and have some basic DIY skills, you may be able to install the unit yourself. Otherwise, you’ll want to hire a professional HVAC technician to do it for you.
The installation process will vary depending on the type of unit you choose. For a window unit, you’ll need to install it in the window frame and secure it in place. For a wall-mounted unit, you’ll need to cut a hole in the wall and install the unit there.
Adjust the Settings and Enjoy!
Once the unit is installed, it’s time to adjust the settings and enjoy your new, cool space! Make sure you set the thermostat to the desired temperature and adjust the fan speed as needed.
With these easy steps, you’ll be able to install your new AC unit like a pro. And with the hot summer months ahead, you’ll be thankful you did!
Is Installing HVAC Easy
Are you thinking of installing an HVAC system yourself? Well, hold on to your hats because this is going to be a wild ride. Before we get to the answer, let’s take a look at the steps involved.
Step 1: Research
First, you need to do your research. You don’t want to start tearing your house apart and realize halfway through that you have no idea what you’re doing. Take some time and research the different types of HVAC systems and their installation processes.
Step 2: Prepare for the Job
Once you have a good understanding of what you’re getting into, it’s time to prepare. Get all the necessary tools and equipment, including safety gear, and make sure you have everything you need before you start.
Step 3: Installation
This is where the real fun begins. You’ll need to install the ductwork, wiring, and components one at a time. This process can take a fair amount of time, and even with a helper, it may take a few days to complete.
Step 4: Testing
Once everything is installed, you’ll need to test the system. This includes checking the refrigerant levels, ensuring proper airflow, and testing for leaks.
So, Is Installing HVAC Easy
The answer is no. It’s not an easy task and not for the faint of heart. HVAC installation requires a certain skill set and knowledge that can only come from training and experience. Even with professional assistance, it’s not something you can quickly learn overnight.
In conclusion, unless you’re a professional HVAC technician, it’s best to leave the installation to the experts. Spend your time doing something else, like watching Netflix or taking a nap, and avoid getting your hands dirty.
How to Install HVAC Ductwork
Installing HVAC ductwork can seem like a daunting task, but with the right tools and expertise, it can be a breeze. Here are some simple steps to help you with your installation process:
Step 1: Measure Twice, Cut Once
The key to successful ductwork installation is accurate measurements. Make sure to measure all the areas where the ductwork will go to ensure a proper fit. Use a good quality tape measure to measure the length and width of the area and mark it down on a notepad. Before cutting the ducts, double-check your measurements to avoid wastage.
Step 2: Choose the Right Duct
There are different types of ducts available to suit various installations. Sheet metal ducts are the most popular, while fiberglass ducts offer insulation benefits. Flexible ducts are also an option for tighter spaces. Choose the best duct that matches your installation area and ductwork specifications.
Step 3: Plan the Route
Before installing, plan the route of the ductwork. Determine the layout of the duct and the best path to take. Map out any obstacles, such as joists or beams, that may affect the ductwork’s passage. This planning will help ensure that the installation process is as smooth as possible.
Step 4: Cut and Hang the Ducts
Once you’ve planned the routing for the ductwork, it’s time to start cutting it to size. Take your time and ensure that the cuts are clean and accurate. After cutting, install hangers for support and attach the ductwork to the hangers. Be sure to double check your measurements to avoid any missteps.
Step 5: Seal Up the Ductwork
To ensure that your HVAC system runs efficiently and effectively, the ductwork needs to be sealed correctly. Use duct tape or mastic sealant to seal all the joints, seams, and connections.
Step 6: Test the System
After completion of the installation, test the HVAC system to ensure it is running correctly. Check for air leaks, vibrations, and make sure the system is delivering the required airflow. This testing will confirm that the installation is working efficiently.
Installing HVAC ductwork may seem hard, but it’s all about careful planning, preparation, and execution. By following these installation steps, you can ensure that the installation is done correctly, and your HVAC system will run efficiently for years to come.
Installation of HVAC System PDF
Are you tired of reading lengthy, confusing installation manuals? Look no further! We’ve compiled a straightforward installation guide that’s easy to understand and follow. Download the installation of HVAC system PDF, grab a cup of coffee, and let’s get started.
Preparing for Installation
Before starting the installation process, gather the necessary tools and equipment. These include:
- HVAC system components
- Measuring tape
- Screwdriver
- Level
- Drill
- Duct tape
Make sure to turn off the power supply and carefully read the installation manual or PDF guide.
Installing the HVAC System
- Locate the ideal position for the HVAC system outdoors and mark the area using a measuring tape.
- Position the concrete pad to prevent the unit from shifting or being damaged by flooding.
- Place the HVAC system on the pad and level it using a level tool.
- Connect the refrigerant lines to the HVAC system according to the manufacturer’s specifications.
- Connect the electrical wiring according to the wiring diagram provided.
- Assemble the ductwork and connect it to the HVAC system.
- Install an air filter and attach the ductwork to the HVAC system and the air handler.
- Test the system to ensure it works properly.
HVAC System Maintenance
Regular maintenance of the HVAC system is essential to ensure it operates efficiently and prolong its lifespan. Here are a few tips to keep in mind:
- Change the air filter regularly.
- Clean the condenser and evaporator coils.
- Inspect the ductwork and repair any leaks.
- Schedule an annual maintenance check-up by a professional HVAC technician.
By following these steps, you can install the HVAC system with ease and keep it running smoothly. With the installation of HVAC system PDF, you can refer back to it anytime and avoid any mistakes during the installation process.
HVAC Installation Best Practices
Now that you know the basic steps involved in HVAC installation, it’s time to delve into best practices. Here are some key recommendations to ensure a smooth and hassle-free HVAC installation process:
Prioritize Energy Efficiency
Heating and cooling account for a significant portion of your household’s energy consumption, so it pays to invest in energy-saving HVAC systems. Opt for high-efficiency units that meet ENERGY STAR® requirements, and pay attention to SEER (seasonal energy efficiency ratio) and HSPF (heating seasonal performance factor) ratings. Bonus points: these systems not only help reduce your carbon footprint, but they can also save you money on utility bills in the long run.
Consider Your Future Needs
HVAC systems typically last around 15-20 years, so it’s essential to plan for your future needs when selecting and installing a unit. For instance, if you’re planning to add a room or expand your family, you’ll need an HVAC system that can accommodate these changes. It’s also essential to consider the climate in your region and choose a unit that can handle extreme temperatures.
Hire A Professional HVAC Installer
While it may be tempting to save money and install your HVAC system yourself, it’s always best to hire a professional. Not only do they have the necessary training and experience to do the job right, but they can also ensure that the unit is installed safely and up to local codes and regulations. Plus, hiring a professional often comes with a warranty to protect your investment.
Don’t Skimp On Maintenance
Installing a new HVAC system is just the beginning – proper maintenance is essential to keep it running efficiently for years to come. Schedule regular check-ups and tune-ups with a licensed HVAC technician to ensure that the system is clean and operating at peak performance. Not only will this help prevent costly breakdowns, but it can also extend the lifespan of your unit.
Keep It Clean
HVAC systems require proper ventilation and air filtration to function correctly. Ensure that your unit’s air filter is cleaned or replaced regularly to prevent the buildup of dust and debris, and keep the outdoor unit’s area free from clutter, leaves, and other debris. This not only helps the system run smoothly but also improves the air quality in your home.
By following these best practices, you can ensure that your HVAC unit is installed correctly, functions efficiently, and provides reliable heating and cooling for years to come.
Installing HVAC System in an Old House
If you’re living in an old house, chances are you’re dealing with some unique challenges when it comes to installing an HVAC system. Here are some tips to help you navigate the process.
Assess Your Home’s Needs
Before you start shopping for an HVAC system, you’ll need to assess your home’s unique needs. Because old houses often have unique layouts and sizes, you may require a more customized system. Consider factors like the size and layout of your home, the number of rooms, and the existing insulation and ventilation systems.
Seek Professional Assistance
Older homes often have unique and complex issues that require the help of an expert. Ensure you have sought professional assistance to help with the entire process of HVAC installation in an old home. An experienced HVAC contractor can help you create a plan that meets your specific needs and budget.
Plan for Ductwork
Ductwork is a critical component of HVAC systems, and it’s also one of the most challenging to install in an old house. You may need to get creative, especially if you have a multi-story home with no existing ductwork system. One approach is to install a ductless mini-split system to bypass the need for ductwork. It’s a more affordable option and provides zoned cooling and heating options.
Upgrade Insulation and Ventilation
Older homes often lack adequate insulation and ventilation systems, which can impact the energy efficiency of an HVAC system. Poor insulation and ventilation lead to energy loss through the attic and gaps of the house, leading to higher energy bills. Consider upgrading your insulation and ventilation systems when installing HVAC in your home.
Choose the Right System
Older homes may require a customized HVAC system designed to meet your specific needs. You may require unique features like ground source heating or cooling systems. The right HVAC system will help to ensure that you’re comfortable throughout the year and can maintain comfortable temperatures in your home.
While installing an HVAC system in an old house may be a challenge, it’s certainly not impossible. By following the tips in this article, you can find a system that meets your needs, ensure professional assistance, upgrade your insulation and ventilation systems, plan for ductwork, and choose the right system for your home. Remember, an expert HVAC contractor will help you navigate HVAC installation in an old home and make the process more comfortable and friendly.
What Are the 5 Main Procedures in HVAC
Whether you are installing a new HVAC system or upgrading an old one, there are specific steps that you need to follow to ensure the system operates effectively and efficiently. Here are the five main procedures to follow:
1. Load Calculation
Before you install a new HVAC system, you must calculate the load requirements for the house. This step involves assessing the size of the house, the number of windows, and the insulation to determine the heating and cooling needs of the house. Having accurate load calculations is crucial to ensure the system operates at optimal efficiency and prevents oversizing or undersizing.
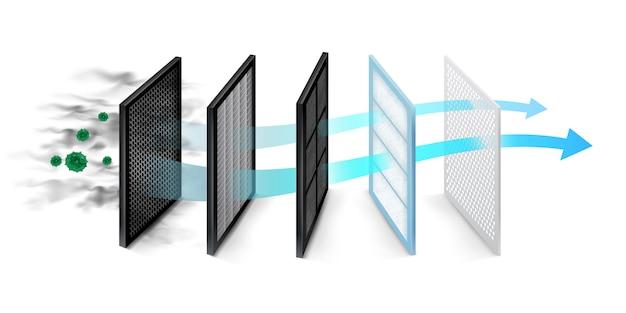
2. Ductwork
During the installation of an HVAC system, you must also pay attention to the ductwork. Ductwork is the system of pipes and vents that connect the heating and cooling units to the rooms in your house. Proper ductwork design ensures that the air flows efficiently and reaches every room. Faulty ductwork will lead to a waste of energy and an uneven temperature distribution, resulting in hot or cold spots in your house.
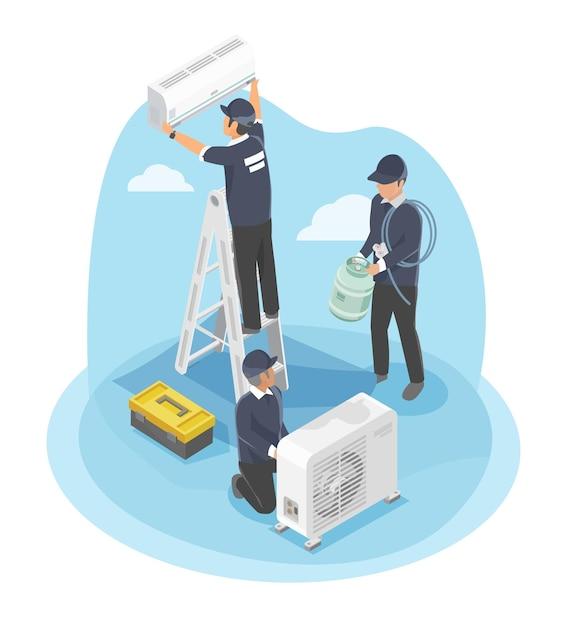
3. Unit Installation
The next step in installing an HVAC system is to install the heating and cooling units properly. The installation process should be done by a qualified HVAC technician who follows the manufacturer’s installation guidelines. Proper installation will ensure that the system operates efficiently, uses less energy, and lasts longer.
4. Electrical and Gas Connections
During the installation process, the HVAC technician will also connect the electrical and gas lines. The electrical connections are essential for running the system’s electrical components, while the gas connections are necessary for units powered by natural gas or propane. Poor electrical or gas connections can lead to safety hazards and damage the system.
5. System Testing
After installation, the HVAC system must undergo thorough testing to ensure that it is working correctly. System testing involves checking the electrical and gas connections, airflow, and temperature control settings. HVAC technicians will also check the system’s efficiency to ensure that it meets the manufacturer’s specifications.
In conclusion, following these five main procedures for HVAC installation will ensure that your system operates efficiently, saving you money on energy bills and avoiding costly repairs in the future.
Does HVAC Installation Include Ductwork
So, you’ve finally decided to ditch your old HVAC and upgrade to a better one. Good job, buddy! But before you start throwing around filthy lucre, there’s something you need to know. Does HVAC installation include ductwork? I mean, is this a package deal or what? Well, let’s find out.
The Short Answer
Yes, HVAC installation often includes ductwork. But before you start worrying, let’s break this down into smaller pieces so that you can understand what these terms mean.
HVAC 101
HVAC stands for Heating, Ventilation, and Air Conditioning. It’s an important system in our homes that helps regulate the temperature, humidity, and air quality. The HVAC system works by heating or cooling the air and distributing it throughout the home using a network of ducts.
Ductwork Explained
Now, let’s talk about the ducts. Ducts are tubes made of metal, plastic, or fiberglass that carry heated or cooled air throughout the house. These ducts are usually installed in the attic or crawlspace and connect to each room through vents.
Does HVAC installation include ductwork
The answer is simple- it depends. If you are installing a central air conditioning system or a forced-air heating system, then your HVAC installation will include ductwork. However, if you are installing a ductless system, then obviously, you won’t need ductwork.
In conclusion, HVAC installation often includes ductwork, but not always. If you are planning to install a new HVAC system, then you need to consider whether you need ducts or not. Always consult with a professional HVAC technician before you make any decisions. And remember, installing a new system might seem like a daunting task, but with the right information and professional help, it can be a breeze.
How Long Does it take to Install HVAC in a New House
If you’re building a new house or renovating an old one, you’ll need an HVAC (Heating, Ventilation, and Air Conditioning) system installed. The big question on everyone’s mind is, “how long will it take?” The answer is, it depends on several factors.
Size of the House
The size of the house is the most significant factor that affects the installation time of an HVAC system. The bigger the house, the more ductwork, vents, and equipment will be required. If you have a small house of around 1,000 square feet, it can take two to three days to get the system installed. However, if you have a large house of around 4,000 square feet, it can take up to a week.
The Complexity of the HVAC System
Another factor that can affect the installation time is the complexity of the system. If you have a simple HVAC system, the installation time can be reduced. A complicated system, on the other hand, will take more time to install. A simple system can take anywhere from one to three days, while a complex system can take up to a week to install.
Location of the House
The location of the house can also affect installation time. If the house is in an area that is difficult to access, it can take more time to install the system. For example, if your house is on a slope, it can take more time to install the HVAC as the contractor will have to level the ground first. Similarly, if your house is in a densely populated area, it can take more time to transport equipment and materials to the site.
In conclusion, the time it takes to install an HVAC system in a new house depends on several factors, such as the size of the house, the complexity of the HVAC system, and the location of the house. As you can see, there is no one-size-fits-all answer to this question. However, hiring a professional and experienced HVAC contractor can speed up the installation process significantly.