When it comes to our home’s heating and cooling systems, the last thing we want to deal with is water in our floor vents. Yet, it’s not an uncommon issue, and it can be quite a nuisance. If you’ve ever found yourself wondering why there’s water in your vents or how to fix this problem, you’re in the right place. In this comprehensive blog post, we’ll explore the causes of water in floor vents, discuss possible solutions, and provide tips to prevent it from happening in the future. So, let’s dive in and uncover the mysteries of water in floor vents!
Water in Floor Vents: A Slab Dilemma
Understanding the Water Woes
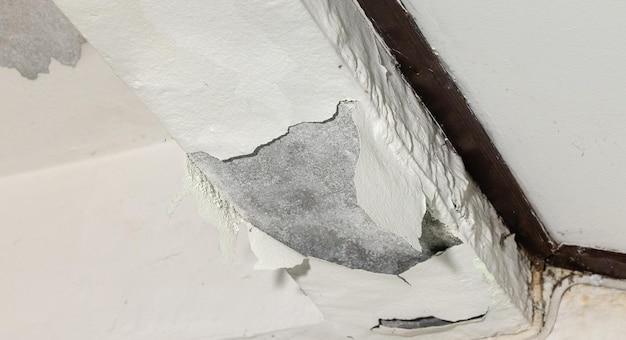
Water in floor vents can turn any homeowner’s blissful day into a soggy mess. Dealing with this pesky issue is often linked to the underlying foundation, particularly in homes with a slab construction. So, what causes water to infiltrate your floor vents, wreaking havoc on your living space? Let’s dive in!
The Sneaky Culprit: Slab Leaks
Slab leaks are pesky intruders that sneak into our homes, causing water to seep into unwanted places. These leaks happen when pipes within the concrete slab foundation start to leak due to deterioration, ground movement, or poor installation. The trapped water then looks for escape routes and may find its way into your floor vents.
Signs of a Slab Leak Gone Wild
Spotting a slab leak isn’t always a walk in the park, but there are some telltale signs to watch out for:
Waterlogging Woes
If you find wet spots or puddles near your floor vents, chances are you’ve got a slab leak on your hands. Don’t be too quick to blame your pet just yet!
Unusual Sounds
Do you hear the sound of running water when all the taps are turned off? If you can’t spot a mischievous water ghost, think slab leak.
Rising Water Bills
Have you noticed an unexpected increase in your water bills? It’s time to investigate further. A slab leak could be the hidden thief guzzling down your precious water supply.
Consequences of Neglecting the Issue
Ignoring water in floor vents can lead to some unpleasant consequences:
Mold Menace
Excess moisture creates the perfect breeding ground for mold. Neglecting the issue could leave you with unsightly patches of mold, and worse, potential health hazards.
Structural Woes
Prolonged exposure to moisture can compromise the structural integrity of your home. From weakened foundations to warped floors, the damage can be extensive.
Nasty Odors
As the water stagnates, unpleasant odors can permeate throughout your home, creating an unwelcoming atmosphere that not even scented candles can mask.
Fixing the Flow in Your Floor Vents
Don’t fret; there’s light at the end of this watery tunnel. Here are some potential solutions to consider:
Professional Plumbing Intervention
Calling in the experts is often the best way to address a slab leak. They can pinpoint the source of the issue and make the necessary repairs, saving you a whole lot of hassle.
Ventilation Vigilance
Improving the ventilation around your floor vents can help mitigate future water woes. Ensure proper airflow and limit moisture buildup by keeping furniture and carpets away from the vents.
Foundation Evaluation
If slab leaks persist, it might be worth seeking professional assistance to evaluate your home’s foundation. Identifying and rectifying any underlying issues can help prevent future water intrusions.
Water in floor vents may seem like a daunting problem, but armed with knowledge and the right professionals by your side, you’ll be able to overcome this soggy obstacle with ease. Remember, a dry home is a happy home!
Sand in Floor Vents
Are you experiencing the frustrating issue of sand in your floor vents? Don’t panic, you’re not alone! Sand infiltration in floor vents is a common problem for many homeowners. In this subsection, we’ll delve into the causes of this pesky issue and provide some practical solutions to help you rid your vents of that unwanted sand.
Understanding the Nature of the Problem
Sand in floor vents can be a real headache. It not only affects the airflow in your home but can also cause allergies and respiratory problems if left unaddressed. This issue usually arises because of sand particles being blown into your vents by strong winds or carried in on shoes and pet paws. The result? A dramatic desert scene unfolding right in your living room!
Tackling the Sand Invasion
Keeping the Sand Out
Prevention is the key! To minimize the amount of sand finding its way into your floor vents, there are a few simple yet effective methods you can employ. Placing doormats at the entrances and encouraging family members and guests to wipe their feet before entering can make a world of difference. Additionally, regularly sweeping and vacuuming the areas near your vents will help to keep the sand accumulation at bay.
Cleaning the Vents
If you already have sand in your floor vents, fear not – there are solutions! While cleaning the vents may seem daunting, it doesn’t need to be a Herculean task. Start by turning off your HVAC system and removing the vent covers. Carefully clean the covers using a vacuum cleaner or a soft brush to dislodge any sand particles. For deeper cleaning, consider using compressed air to blow out the remaining sand from the vents.
Covering the Vents
For an extra layer of protection, using vent covers can prevent sand from entering your floor vents altogether. Vent covers are designed to allow proper airflow while filtering out unwanted particles. They are easy to install, typically requiring no tools, and come in various styles to suit your decor. Adding these covers to your vents can provide a much-needed shield against the relentless sand invasion.
Dealing with sand in floor vents may seem like an endless battle, but with the right precautions and cleaning techniques, you can regain control over your indoor environment. Remember to stay vigilant, keep those doormats handy, and regularly clean and maintain your vents to keep that sand at bay. Soon, you’ll be able to enjoy a sand-free sanctuary in the comfort of your own home. Happy vent cleaning!
How to Fix Floor Vents
Identifying the Problem
If you’ve noticed water in your floor vents, don’t panic! It’s a common issue that can be easily fixed. The first step is to identify the source of the problem. Check for any leaks or water damage in the surrounding areas. Often, water in floor vents is caused by moisture or condensation buildup in your HVAC system.
Check Your HVAC System
Start by inspecting your HVAC system. Look for any clogs or leaks in the pipes or ducts. If you notice any cracks or damaged parts, they may need to be repaired or replaced. Cleaning the ducts and vents is also essential to ensure proper airflow. Dust, dirt, and debris can accumulate over time, leading to issues like water buildup. A regular maintenance routine will prevent such problems.
Insulate Your Ductwork
Adding insulation to your ductwork can help prevent condensation that may cause water in your floor vents. Insulating the ducts will maintain the temperature and prevent the cold air from coming into contact with warm surfaces, thus reducing condensation. You can easily find duct insulation materials at your local hardware store. Proper insulation will not only solve your water problem but also increase energy efficiency.
Adjust Your Ventilation Settings
Another commonly overlooked cause of water in floor vents is excessive humidity in your home. Check your ventilation settings and adjust them accordingly. Ensure that your bathroom and kitchen exhaust fans are working properly to remove excess moisture from these areas. Consider using a dehumidifier to regulate the humidity levels throughout your home.
Call a Professional
If you’ve tried these fixes and still have water in your floor vents, it’s best to call a professional HVAC technician. They have the expertise to diagnose and resolve more complex issues. A thorough inspection by a professional can help identify any underlying problems that may require additional repairs.
Water in floor vents can be a nuisance, but with the right steps, it can be resolved. From checking your HVAC system and insulating your ductwork to adjusting ventilation settings, taking these measures will ensure your floor vents remain free from water buildup. Remember, if all else fails, don’t hesitate to reach out to a professional for assistance.
Standing Water in Air Vents
A Damp Dilemma: Dealing with Water in Air Vents
Have you ever noticed water pooling in your air vents? If so, you’re not alone. It’s a common issue that many homeowners face, and it can be quite a nuisance. In this section, we’ll delve into the topic of standing water in air vents, explore the possible causes, and provide some tips to help you resolve this damp dilemma.
How Does Water End Up in Air Vents?
One of the most common reasons for standing water in air vents is condensation. When warm air from your HVAC system comes into contact with cool air in the ducts, condensation can occur. This can be exacerbated if your air ducts are poorly insulated or if there are gaps and cracks where moisture can enter.
Another possible cause of water accumulation is a plumbing leak. If you have pipes running near or through your HVAC system, a leak could result in water finding its way into the vents. Additionally, if your air conditioner’s drain line is clogged or damaged, it may cause water to back up and enter the air vents.
The Consequences of Standing Water in Air Vents
While a small amount of water in your air vents may not seem like a big deal, it can lead to some serious issues if left unaddressed. The presence of water creates a moist environment that is perfect for mold and mildew growth. These can not only cause unpleasant odors but also potential health risks.
Furthermore, standing water can damage your ductwork and HVAC system over time. It may cause rusting, corrosion, and even structural weaknesses, compromising their efficiency and lifespan. It’s crucial to tackle this issue promptly to prevent further damage and improve your indoor air quality.
Resolving Standing Water Woes
To get rid of standing water in your air vents, you need to identify and address the underlying cause. Start by checking for any plumbing leaks or clogs in your HVAC system’s drain line. Fixing these issues should prevent water from entering your vents in the first place.
Proper insulation is also key to reducing condensation. Consider upgrading your duct insulation or sealing any gaps and cracks in your air ducts to minimize the temperature difference between the warm air and cool ducts.
Regular maintenance of your HVAC system is essential. Schedule annual inspections and cleanings to ensure everything is in good working order and to catch any potential problems before they escalate.
A Dry and Delightful Home
Dealing with standing water in air vents may seem like a daunting task, but with the right approach, you can combat this damp dilemma. By addressing the underlying causes, you can say goodbye to those puddles and hello to a dry, comfortable, and healthy home. Remember, a little maintenance can go a long way in preventing water woes in your air vents!
Does a Floor Sink Need a Vent
When it comes to floor sinks and water drainage systems, it’s important to understand the role of vents. You might be wondering, does a floor sink really need a vent? Well, let’s dive into the topic and find out!
The Purpose of Vents in Floor Sinks
Floor sinks are common fixtures in commercial kitchens, basements, and other areas where water drainage is essential. They are designed to prevent water buildup and provide an efficient way to remove liquids. But what about the vents?
Enhancing Drainage Efficiency
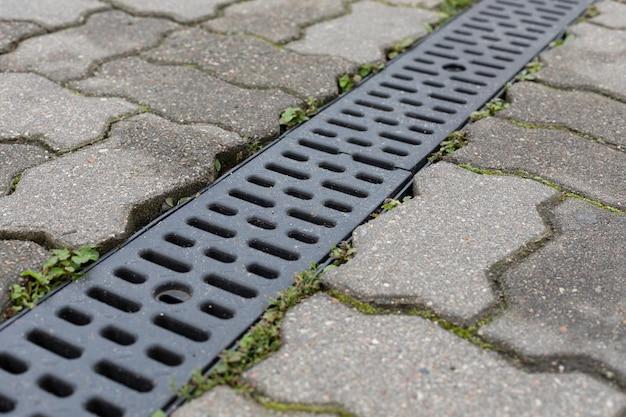
Vents in floor sinks serve a crucial purpose: they improve the drainage efficiency. By allowing air to escape from the plumbing system, vents prevent the formation of airlocks and ensure smooth water flow. Without proper venting, water can back up, leading to slow draining or even blockages.
Avoiding Odor Issues
Another important function of vents is to prevent unpleasant odors from entering your space. As water drains from the floor sink, the vent allows sewer gases to escape, ensuring a fresh and odor-free environment. Imagine the stench that would fill your kitchen if the vent was missing!
Signs of a Venting Problem
So, how can you tell if your floor sink vent is not working properly? Here are a few signs to watch out for:
Slow Draining
If you notice that water takes an unusually long time to drain from your floor sink, it could be due to a venting issue. Air bubbles or gurgling sounds during drainage are also indicators of a venting problem.
Foul Odors
Unpleasant smells emanating from the drain are a clear indicator that the floor sink’s venting system is not functioning as it should. It’s time to check and fix the vent!
To ensure proper functionality and maintenance of your floor sink, a vent is a must-have. Not only does it enhance drainage efficiency, but it also keeps your space free from unpleasant odors. So, if you ever find yourself asking, “Does a floor sink need a vent?” – the answer is a resounding yes!
Remember, having a vent in your floor sink is like having a superhero protecting your drainage system. So, next time you encounter any drainage or odor issues, make sure to check the vent – it might just save the day (and your nose)!
Now that we’ve unraveled the mystery of floor sink vents, stay tuned for our next subsection, where we’ll explore the common causes of water in floor vents. Until then, happy draining!
Why is there water in my vents
The Mystery of Damp Vents Unveiled
If you’ve ever noticed water in your vents, you might have found yourself scratching your head in confusion. How in the world did water get in there? Well, fear not, dear reader, for we are here to shed some light on this perplexing phenomenon. In this section, we’ll explore a few common reasons why water finds its way into your vents and provide some tips on how to address the issue. So, grab your detective hat and let’s solve this mystery together!
Humidity, the Stealthy Culprit
One possible explanation for moisture in your vents is the level of humidity in your home. When the air inside your house is particularly humid, condensation can occur on surfaces within your ventilation system. Think of it as your vents sweating under the pressure of all that moisture. This can not only lead to water buildup but also create a favorable environment for mold and mildew to thrive. To combat this, consider using a dehumidifier or improving ventilation in your home to keep the humidity at bay.
Rain, Rain, Go Away…Not Into My Vents!
Another reason for water intrusion in your vents may be due to external factors, such as heavy rainfall or improper drainage. If your vents are located near the ground and aren’t adequately protected, rainwater can find its way inside and cause unwanted dampness. Checking for any obstructions or ensuring proper drainage around the vent openings can help prevent this from happening. So, let’s keep the rain where it belongs – outside!
Plumbing Woes: A Sneaky Source of Vent Moisture
While it might not be the first thing that comes to mind, plumbing issues can also contribute to the water woes in your vents. Leaky pipes or plumbing fixtures located near your vents can result in water seeping into the ductwork. This can occur when there are damaged or loose connections between plumbing pipes and the vent system. If you suspect a plumbing problem, it’s best to reach out to a professional plumber to help identify and fix the issue. Remember, prevention is better than soggy vents!
Hasta la Vista, Water in Vents!
Now that we’ve explored a few potential reasons for water in your vents, it’s time to take action and bid farewell to this unwanted guest. Depending on the cause, you may need to employ different solutions, from controlling humidity levels to addressing plumbing issues or improving drainage. If the problem persists or seems more complex, it’s always a good idea to consult with a qualified HVAC technician who can assess the situation and provide appropriate recommendations.
Wrapping Up the Watery Vent Saga
Water in your vents may have initially left you puzzled, but armed with this newfound knowledge, you can tackle the issue head-on. Remember, understanding the common causes of vent moisture is the first step towards finding the solution. By addressing humidity, safeguarding against rain infiltration, and keeping an eye on your plumbing, you’ll be well on your way to enjoying dry and happy vents, and a cozy home. So, wave goodbye to the water in your vents and say hello to a worry-free indoor environment!
Why Is There a Vent in My Floor
Introduction
Floor vents are a common feature in many homes, but have you ever wondered why they are there? In this section, we will explore the reasons behind the presence of floor vents and their importance in maintaining a comfortable and healthy living environment.
Maintaining Air Circulation
One of the primary purposes of a floor vent is to ensure proper air circulation throughout your home. Without ventilation, air becomes stagnant and can lead to a stuffy and unpleasant environment. Floor vents allow air to flow freely, distributing it evenly and preventing it from becoming stagnant.
Controlling Temperature
Another reason for having vents in your floor is to help control the temperature in your home. During the hot summer months, you can open the vents to allow cool air to enter, providing relief from the heat. In the winter, you can close the vents or regulate them to let warm air from your heating system circulate, keeping your home cozy and comfortable.
Preventing Moisture Buildup
Floor vents also play a vital role in preventing moisture buildup in your home. If there is excess moisture in the air, it can lead to the growth of mold and mildew, which can be harmful to your health. By allowing air to circulate through your floor vents, you can reduce the risk of moisture buildup and keep your home dry and mold-free.
Allowing for Proper Ventilation Systems
In addition to maintaining a comfortable living environment, floor vents play a crucial role in supporting the operation of your ventilation system. Whether you have a central HVAC system or individual room vents, the floor vents act as entry and exit points for the air to flow. This ensures that your ventilation system functions efficiently and effectively.
Conclusion
So, the next time you come across a vent in your floor, remember the important role it plays in maintaining adequate air circulation, controlling temperature, preventing moisture buildup, and supporting your home’s ventilation system. Embrace it as a valuable component of your home’s infrastructure, and take advantage of its benefits for a healthier and more comfortable living space.
Cost to Abandon In-Slab Ductwork
Abandoning in-slab ductwork might sound like a daunting task, but don’t worry, it doesn’t have to drain your bank account! In fact, the cost to abandon in-slab ductwork can vary depending on several factors, including the size of your home, the complexity of the existing ductwork, and the local labor rates. Let’s dive into the details and get a clearer picture.
Evaluating the Existing Ductwork
Before we uncover the potential costs, it’s essential to assess the condition of your in-slab ductwork. If the ductwork is severely damaged or in disrepair, abandoning it might be the best solution. A professional HVAC contractor can conduct a thorough inspection to determine the extent of the damage and provide an accurate cost estimate for the abandonment process.
Removing the Ductwork
The first step in abandoning in-slab ductwork is removing the existing ducts. This process involves demolishing the concrete slab, accessing the ductwork, and carefully removing it. The cost for this step can vary based on the size of your home and the complexity of the ductwork layout. However, you can expect it to be a significant portion of the overall cost.
Sealing the Openings
Once the ductwork is removed, the next step is to seal the openings in the slab. This ensures that no water or other unwanted elements find their way into your floor vents in the future. Again, the cost for this step will depend on the size of the openings and the materials used for sealing. A professional contractor can guide you through the best options for sealing the openings effectively.
Re-routing the Air Distribution System
Now that the in-slab ductwork is a thing of the past, you’ll need an alternative air distribution system. This might involve installing new ductwork in the walls or ceiling, or even opting for a ductless HVAC system. The cost of re-routing the air distribution system will depend on the complexity of your home’s layout and your chosen HVAC solution.
While it’s difficult to give an exact figure for the cost to abandon in-slab ductwork, you can expect it to be a significant investment. However, keep in mind that this decision can provide long-term benefits, such as improved air quality, energy efficiency, and enhanced comfort. Don’t forget to obtain multiple quotes from reputable HVAC contractors to ensure you’re getting the best deal without compromising on quality.
In conclusion, if you’re facing water-related issues or other problems with your in-slab ductwork, it’s worth considering the cost to abandon it. By evaluating the existing ductwork, removing it, sealing the openings, and re-routing the air distribution system, you can transform your home’s HVAC system into a more efficient and reliable one. Remember, consult with professionals, assess the costs, and weigh the benefits before making a decision.
Filling Floor Vents with Concrete
If you’re dealing with water in your floor vents, it’s important to address the issue promptly to prevent any further damage. One potential solution to consider is filling the floor vents with concrete. This method not only helps stop the water from entering your vents but also provides a more permanent fix. Here’s what you need to know:
Why Fill Floor Vents with Concrete
Floor vents are designed to allow air circulation and temperature control throughout your home. However, when water finds its way into the vents, it can lead to a host of problems such as mold growth, damage to your flooring, and even structural issues. By filling the vents with concrete, you can effectively seal them off, preventing any water from entering.
Assessing the Situation
Before proceeding to fill the floor vents with concrete, it’s crucial to assess the situation. Determine the source of the water and address any underlying issues that may be causing it. Check for any cracks or leaks in your foundation and make sure your drainage system is functioning properly. Fixing these issues beforehand will help ensure a more successful outcome.
Gather the Necessary Supplies
To fill the floor vents with concrete, you’ll need a few supplies. Start by gathering a high-quality concrete mix, a mixing bucket, water, a trowel, and a caulking gun. Make sure you have the correct measurements for your vents so that you can properly fill them without leaving any gaps.
Preparing the Vents
Before pouring the concrete, it’s important to prepare the vents. Clean out any debris or blockages, such as dust, dirt, or loose grates. Once the vents are clean, use a caulking gun to apply a layer of waterproof sealant around the edges. This additional step helps to further prevent water from seeping through.
Pouring and Leveling the Concrete
Next, it’s time to mix the concrete according to the manufacturer’s instructions. Once the mixture is ready, pour it into the floor vents, ensuring that you fill them completely. Use a trowel to smooth out the surface and level the concrete. Be careful not to apply too much pressure, as this could cause the vents to crack or break.
Allowing the Concrete to Cure
After filling the floor vents with concrete, allow the mixture to cure fully. Follow the recommended drying time provided by the manufacturer. During this period, ensure proper ventilation in your home to aid in the drying process. Once the concrete is fully cured, you can replace the vent grates, and your floors will be protected from any water infiltration.
When it comes to tackling water in your floor vents, filling them with concrete can be an effective solution. By following the steps outlined above, you’ll be able to seal off the vents, preventing water from causing further damage. Remember to address any underlying issues and allow the concrete to cure properly. With these precautions taken, you can enjoy a dry and secure home.

Water in Floor Vents After Heavy Rain
The Unexpected Consequence
Have you ever experienced the unpleasant surprise of finding water in your floor vents after a heavy rain? It can be quite a headache to deal with, but fear not, because we are here to break down this issue for you and offer some helpful solutions.
Understanding the Problem
When heavy rain occurs, excess water can seep into your home through various entry points, and floor vents are unfortunately no exception. The moisture can infiltrate the vent system, ultimately making its way into your living space. This can lead to a range of issues, including damp carpets, musty odors, and even potential damage to your HVAC system.
Causes and Solutions
Inadequate Drainage
One common cause of water in floor vents after heavy rain is inadequate drainage. If the water from outside has nowhere to go, it can accumulate around your home’s foundation, eventually finding its way into your vents. To address this issue, it’s essential to ensure proper drainage around your property. Regularly clean and unclog gutters, downspouts, and drains to prevent water buildup.
Improper Vent Installation
Another possible cause of water infiltration is improper vent installation. If the vents were not sealed correctly during construction or have become damaged over time, water can seep in through gaps or cracks. In this case, professional assistance may be required to identify and address any leak points in your vent system.
Clogged Vent Pipes
Clogged vent pipes can also contribute to the problem. Debris like leaves, twigs, or animal nests can obstruct the free flow of water, causing it to back up and enter your vents. Regularly inspect and clean your vent pipes to ensure they remain unobstructed.
Preventive Measures
To minimize the risk of water in your floor vents after heavy rain, there are a few preventive measures you can take:
Install Vent Covers
Consider installing vent covers to help prevent water from directly entering the vents. These covers are designed to keep out debris while still allowing proper airflow.
Redirect Water Away from Vents
If you notice water pooling near your vents during heavy rain, take steps to redirect the water away from your home. This can be achieved through grading, sloping the ground away from the house, or installing drainage systems such as French drains.
Water in floor vents after heavy rain can be a nuisance, but by understanding the causes and implementing preventive measures, you can effectively manage this issue. Regular maintenance, proper drainage, and installation of vent covers can go a long way in keeping your vents dry and your living space comfortable. Remember, if the problem persists or worsens, it’s always a good idea to consult a professional to ensure the long-term integrity of your HVAC system. Stay dry!
What Causes Condensation on Floor Vents
Condensation on floor vents can be a frustrating and potentially damaging issue in your home. But don’t worry, we’ve got you covered with some insights into what causes this pesky problem and how you can tackle it.
Humidity: Friend or Foe
Humidity plays a significant role in the formation of condensation on floor vents. When warm, moist air comes in contact with the cooler surface of the vent, it cools down rapidly and releases tiny droplets of water. Think of it as your vents throwing a surprise pool party!
Improper Ventilation: Let it Breathe!
Improper ventilation can contribute to condensation problems. If your ventilation system is not functioning optimally, it can trap moisture-laden air inside your home. As a result, this excessive moisture can settle on your vents and say, “Hey, let’s start a mini-rainforest right here!”
Location, Location, Location!
The location of your floor vents can also impact condensation. Vents located in areas with high moisture levels, such as bathrooms, kitchens, or laundry rooms, are more prone to condensation. So, if you’ve got a vent near your shower, it might just be getting misty-eyed from all that moisture!
Insulation Matters: Blanket your Vents!
Insufficient insulation around your floor vents can exacerbate condensation issues. Poor insulation allows cold air to creep in, leaving your vents feeling chilly. And we all know what happens when warm and cold air meet – a dew-filled spectacle that’ll make your vents wish they had brought a towel!
Battling the Drip: What Can You Do
To combat condensation on your floor vents, here are a few tips:
-
Monitor Humidity: Invest in a hygrometer to keep an eye on your home’s humidity levels. Ideally, you want to aim for a relative humidity of around 40-50%. Anything higher might have your vents feeling like they’re stuck in a tropical rainforest!
-
Ventilate Smartly: Ensure proper ventilation throughout your home. Open windows and use exhaust fans in moisture-prone areas to allow excess humidity to escape. Let that moisture dance its way out of your home!
-
Inspect and Insulate: Check your vents for any signs of damage or gaps. Seal any openings and ensure proper insulation around the vents to prevent cold air from causing condensation. Give your vents a cozy blanket!
So, there you have it – the ins and outs of what causes condensation on your floor vents. By understanding the underlying factors and taking necessary precautions, you can keep those vents dry and happy. No more surprise pool parties or mini-rainforests in your home!
How to Repair Air Ducts in Slab Foundation
Signs Your Air Ducts in Slab Foundation Need Repair
If you’ve been noticing unusual occurrences in your home, such as hot or cold spots, increased energy bills, or even water in floor vents, it might be time to check your air ducts. Air ducts are an essential part of your HVAC system, responsible for distributing warm or cool air throughout your home. However, when they are damaged or compromised, it can lead to various issues. Here are some signs that your air ducts in slab foundation need repair:
1. Uneven Temperature Distribution
Have you experienced certain areas of your home feeling colder or hotter than others? This inconsistency in temperature could indicate a problem with your air ducts. If there are leaks or blockages in the ductwork, it can restrict the airflow, resulting in uneven temperature distribution.
2. Increased Energy Bills
If you’ve been cringing every time you open your energy bill, your air ducts might be to blame. When there are leaks or gaps in the ducts, the heated or cooled air can escape, causing your HVAC system to work harder to maintain the desired temperature. As a result, your energy bills can skyrocket.
3. Unpleasant Odors or Dust
Have you noticed strange odors or excessive dust in your home lately? Damaged air ducts can become a breeding ground for mold, bacteria, and other contaminants, which can circulate through your living spaces. This can lead to unpleasant odors and increased dust levels.
DIY Air Duct Repair Tips
Before you call in the professionals, there are a few simple steps you can take to repair minor issues in your air ducts yourself. Here are some helpful tips for DIY air duct repair:
1. Locate the Damaged Area
Inspect your air ducts and locate the areas that need repair. Look for visible signs of damage, such as holes, leaks, or disconnected sections.
2. Seal Small Leaks
For small leaks or gaps, you can use foil tape or duct sealant to seal them. Ensure that the area is clean and dry before applying the tape or sealant for better adhesion.
3. Patch Larger Holes
If you come across larger holes or significant damage, you can use duct mastic or metal patches to patch them up. Make sure to secure the patch firmly in place and seal the edges to prevent any leaks.
4. Reconnect Disconnected Sections
In case you find disconnected sections in your air ducts, use metal screws or metal foil tape to reconnect them. Ensure a secure connection to avoid any air leakage.
When to Call a Professional
While DIY repairs can solve some minor issues, there are instances when it’s best to leave the air duct repairs to the professionals. Here are situations where it’s advisable to call a professional HVAC technician:
1. Extensive Damage
If you discover extensive damage to your air ducts, such as collapsed sections or severely corroded areas, it’s best to let the experts handle the repairs. They have the necessary tools and expertise to handle complex jobs effectively.
2. Inaccessible Ductwork
If your ductwork is difficult to access due to its location or complexity, it’s safer to hire a professional. They will have the knowledge and equipment to navigate challenging spaces without causing any further damage.
3. Regular Maintenance
Even if you don’t see any apparent signs of damage, regular maintenance and inspections by a professional can help prevent any potential issues before they worsen. A trained technician can detect early warning signs and make necessary repairs or replacements to keep your HVAC system running efficiently.
By following these DIY tips and knowing when to call in the professionals, you can ensure that your air ducts in a slab foundation remain in top shape, providing optimal comfort and energy efficiency for your home. Don’t neglect these crucial components of your HVAC system, as they play a significant role in maintaining a comfortable living environment.
What Happens When Water Goes Down a Floor Vent
Introduction
Have you ever wondered what happens when water goes down a floor vent? Well, prepare to be amazed as we dive into this captivating topic! From unexpected surprises to potential damage, there’s a lot to explore when it comes to water in floor vents.
Water Invasion: Unfortunate Encounters
When water takes a wrong turn and finds its way down a floor vent, it’s akin to a surprise guest crashing a party. You weren’t expecting them, but here they are, causing chaos. Similarly, water in floor vents can quickly become an unwanted guest, making its presence known through unpleasant odors and a damp environment.
Bye-Bye to Dryness: Dampness Takes Over
Once water infiltrates your floor vent, it sets off a chain reaction that can turn your previously dry environment into a moisture-laden space. The dampness caused by the water can lead to the growth of mold and mildew, creating an altogether unpleasant and potentially unhealthy situation.
Mold Mayhem: An Unwelcome Party Guest
When water goes down a floor vent, it provides the perfect breeding ground for mold and mildew to throw their own raucous party. Mold spores thrive in moist environments, and if left unchecked, they can spread throughout your home, causing a range of health issues and requiring costly removal processes.
Flooding Fallout: Potential Damage
In cases of severe flooding or plumbing mishaps, water in floor vents can lead to more significant concerns. Excess water can seep into the subfloor, weaken it over time, and even compromise the structural integrity of your floors. If left unaddressed, costly repairs may be necessary to fix the damage.
Say Goodbye to Serenity: Noise, Odors, and Unpleasant Surprises
Water going down a floor vent doesn’t just bring dampness and damage; it can also introduce a cacophony of unpleasant sounds, odors, and surprises. From gurgling noises to musty smells, your floor vents might become the epicenter of an unexpected and unwelcome symphony.
While water going down a floor vent may initially seem like a mere inconvenience, the consequences can quickly escalate into a much bigger nuisance. From mold growth and structural damage to unwanted sounds and odors, it’s clear that water and floor vents don’t mix. So, be diligent in preventing water from finding its way into your vents, and avoid the unpleasant outcomes that can ensue.