Are you planning to install hardwood floors in your home and wondering what tools you’ll need? One essential tool that every DIYer should consider is a hardwood floor nailer. But with different sizes and options available, it’s crucial to choose the right one for your project. In this blog post, we’ll explore the ins and outs of hardwood floor nailers to help you make an informed decision.
From the size of nails to the type of nailer, we’ll cover everything you need to know. Whether you’re working with 3/4-inch hardwood flooring or considering laminate options, we’ll discuss the suitability of different nailers. We’ll also dive into the costs associated with DIY hardwood floor installation, including the expense of renting or purchasing a floor nailer. So, let’s get started and find out the perfect size hardwood floor nailer for your DIY project!
What Size Hardwood Floor Nailer Do I Need for DIY
Are you ready to tackle your own hardwood floor installation project? Well, before you dive in, it’s important to make sure you have the right tools for the job. One essential tool you’ll need is a hardwood floor nailer. But what size nailer should you choose? Don’t worry, I’ve got you covered.
Understanding the Different Sizes
When it comes to hardwood floor nailers, there are generally two sizes to choose from: 15-gauge and 18-gauge. But what do these numbers mean? Think of them as the superheroes of nail sizes. The 15-gauge nailer is like the Hulk, strong and sturdy, while the 18-gauge nailer is more like Spider-Man, nimble and versatile.
The Hulk: 15-Gauge Nailer
If you’ve got a big project on your hands, such as nailing down solid hardwood flooring, the 15-gauge nailer is your best bet. It’s heavy-duty and can handle thicker and harder floorboards. This beast of a nailer can drive nails into hardwood like the Hulk smashes through walls. However, keep in mind that the size and weight of the 15-gauge nailer can make it a bit challenging to maneuver, especially in tight or hard-to-reach areas.
Spider-Man: 18-Gauge Nailer
If you’re dealing with engineered hardwood flooring or working in a smaller space, the 18-gauge nailer is a friendly neighborhood choice. It’s lighter and more agile than its 15-gauge counterpart, making it easier to work with in tight spots. The 18-gauge nailer is like Spider-Man swinging through the city, effortlessly maneuvering between obstacles.
Choosing the Right Size for DIY
Now that you know the strengths of each nailer, how do you decide which size is right for your DIY flooring project? Well, it depends on a few factors. If you’re a seasoned DIYer with experience in hardwood floor installation, the 15-gauge nailer might be the way to go. Its power and durability will help you breeze through your project with ease.
On the other hand, if this is your first time taking on a flooring project or you’re working with engineered hardwood, the 18-gauge nailer is a fantastic choice. Its lightweight design and versatility will make the process less intimidating and more enjoyable.
Wrapping It Up
So, which size hardwood floor nailer is right for you? Ultimately, the decision depends on the size of your project, your level of experience, and the type of flooring you’re working with. Remember, the 15-gauge nailer is like the Hulk, perfect for heavy-duty work, while the 18-gauge nailer is like Spider-Man, great for smaller, more agile tasks.
Whichever size you choose, just remember to approach your DIY project with confidence and a sense of humor. And if all else fails, call in the superheroes for backup—Hulk and Spider-Man will be waiting in the comic book store! Happy nailing, DIYer!
*Disclaimer: The references to Hulk and Spider-Man are for entertainment purposes only and do not imply any endorsement or affiliation with Marvel Comics.
FAQ: What Size Hardwood Floor Nailer Do I Need For DIY
If you’re planning on installing hardwood floors on your own, you may be wondering about the right size hardwood floor nailer to use. Choosing the correct nailer can make a significant difference in the quality and durability of your flooring. In this FAQ-style guide, we’ll address some common questions about the size of nails, the types of nailers, and other related concerns. So, let’s dive right in!
What size nails should be used for 3/4-inch hardwood flooring
When it comes to 3/4-inch hardwood flooring, it’s recommended to use 2-inch nails. These nails provide sufficient depth to securely fasten the flooring to the subfloor. Using shorter nails may not properly penetrate the hardwood, leading to loose or squeaky boards. So, remember, longer is better when it comes to your nails!
What is the difference between a brad nailer and a finish nailer
Ah, the age-old question of brad nailer versus finish nailer. Well, my DIY enthusiast, the main difference lies in the size of the nail they use and the purpose they serve. A brad nailer typically uses 18-gauge nails, which are thinner and leave smaller holes than the ones used by a finish nailer. If you’re working on delicate trim or need to hide those nail holes, a brad nailer is your best friend. On the other hand, a finish nailer packs more punch with 15 or 16-gauge nails, making it ideal for heavier trim and tasks that require extra holding power. So, choose wisely, Grasshopper!
How much does it cost to install hardwood floors yourself
Ah, the age-old “cost” question. Well, my frugal friend, the cost of installing hardwood floors yourself depends on a few factors. Firstly, the price of hardwood flooring may vary depending on the type and quality you choose. Secondly, you’ll need to factor in the cost of renting or purchasing the necessary tools, such as a floor nailer, a saw, and other essentials. Lastly, don’t forget the little things like underlayment and finishing materials. As a rough estimate, the cost could range anywhere from $4 to $12 per square foot. But remember, with DIY, you’re not just saving money – you’re also gaining a healthy sense of accomplishment!
Can you use a brad nailer on laminate flooring
Ah, laminate flooring. It’s budget-friendly, durable, and an excellent alternative to hardwood. But can you use a brad nailer to install it? Well, my eager beaver, the short answer is no. Laminate flooring is typically installed using a floating method, which means it’s not nailed down. Instead, the pieces interlock and sit on top of an underlayment. So leave your brad nailer aside for this task and enjoy a hassle-free installation.
Are cleats or staples better for 3/4-inch hardwood
Ah, the eternal debate – cleats or staples for 3/4-inch hardwood? Well, my friend, both have their pros and cons. Cleats provide excellent holding power, as they have ridges that grip into the wood, ensuring a secure installation. On the other hand, staples are faster to install, but they rely on the compression of the wood to hold them in place. Ultimately, the choice depends on your personal preference and the recommendations of your flooring manufacturer. So take a deep breath, make your decision, and nail it!
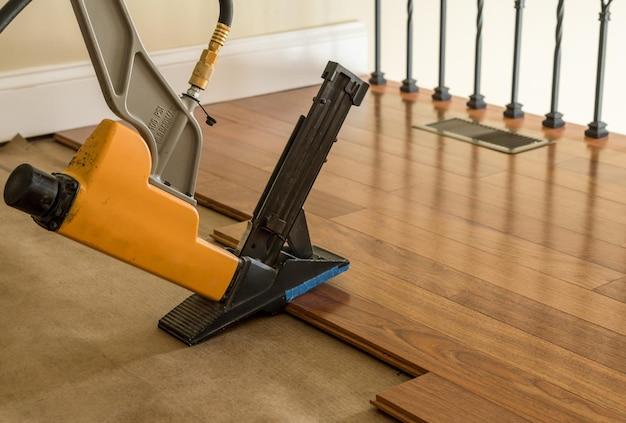
What is a flooring nailer
Ah, the majestic flooring nailer, the unsung hero of hardwood floor installations. A flooring nailer is a specialized tool designed to make your DIY flooring project a breeze. It typically uses pneumatic power to drive the nails at the perfect angle and depth into the hardwood and subfloor. With a trusty flooring nailer by your side, you’ll be floating, or should I say nailing, on a cloud of DIY success!
Can I face nail hardwood flooring
Ah, the urge to go old-school and face nail your hardwood flooring. While it may seem tempting, my eager beaver, it’s generally not the best approach. Face nailing involves visible nails on the surface of the wood, which can detract from the overall aesthetics. It’s always better to use a flooring nailer or cleats to ensure a tight and secure installation. So resist the temptation, my friend, and let your floors shine without those unsightly nail heads!
How much does it cost to install 1000 square feet of hardwood floors
Ah, the mighty 1000 square feet of hardwood floors, a project to be reckoned with. Now, my budget-conscious friend, the cost of installing hardwood floors in this expanse will depend on various factors. These include the type and quality of the hardwood, any additional prep work required, the region you’re in, and the labor costs if you choose to hire professionals. As a rough estimate, you can expect to spend anywhere from $5000 to $12000, but remember, the pride and joy of walking on your own handiwork are truly priceless!
What type of nailer is used for flooring
When it comes to nailing down those beautiful hardwood floors, my friend, it’s the flooring nailer that reigns supreme. This specialized tool is specifically designed for the purpose, with features like adjustable base plates and angled magazine designs to make your job easier. So get yourself a trusty flooring nailer and let the nailing commence!
How do I choose a floor nailer
Ah, the quest for the perfect floor nailer, my eager DIY enthusiast. When choosing your trusty sidekick, there are a few factors to consider. Firstly, determine the type of flooring you’ll be installing – solid hardwood, engineered wood, or something else. Secondly, consider the compatibility of the nailer with the flooring thickness and nail size required. Lastly, think about the ease of use, durability, and the reputation of the brand. So put on your DIY detective hat, do your research, and march forward with a nailer that suits your needs!
What kind of nail gun do I need for hardwood flooring
Ah, the essential tool for any DIYer – the nail gun. When it comes to hardwood flooring, my trusty companion, a flooring nailer is your best bet. The flooring nailer is specifically designed to handle the thickness and hardness of hardwood, ensuring precise and efficient nail placement. So, leave those other nail guns aside, my friend, and let the flooring nailer do its magic!
Can you use 18-gauge nails on hardwood floors
Ah, the delicate touch of 18-gauge nails on hardwood floors. While 18-gauge nails are often used with brad nailers for trim work, they may not be the best choice for securing hardwood flooring. Due to their thin nature, they may not provide sufficient holding power in the long run. So let’s save those 18-gauge nails for more delicate tasks and keep our hardwood floors firmly in place with stronger alternatives!
What size screws for 3/4-inch plywood subfloor
Ah, the humble screws that hold everything together, including your 3/4-inch plywood subfloor. For this mighty task, my friend, it’s recommended to use 1 5/8-inch to 2-inch screws. These sturdy screws will ensure a secure and stable subfloor, ready to support the weight of your beautiful hardwood floors. So grab your drill, pick the right screws, and get ready to create a solid foundation for your DIY masterpiece!
Can you use 15-gauge nails for hardwood floors
Ah, the allure of 15-gauge nails for hardwood floors. While they may seem sturdy, powerful, and capable of holding your floors in place, my cautious friend, they are not the recommended choice. 15-gauge nails are thicker than the standard flooring nails, which can lead to difficulties with installation and potential damage to your precious flooring. So let’s reserve those 15-gauge nails for other tasks and use nails specifically designed for hardwood flooring – your floors will thank you!
What is a brad nailer good for
Ah, the versatile brad nailer, the unsung hero of trim work and delicate woodworking projects. A brad nailer excels at tasks where you need precision and a smaller, less noticeable hole. Whether it’s attaching delicate trim, molding, or other decorative elements, the brad nailer is your trusty companion. It’s like a gentle artist, leaving behind only whispers of its presence. So embrace the subtlety of the brad nailer and let your woodworking finesse shine!
What is the nail spacing for hardwood flooring
Ah, nail spacing for hardwood flooring, the rhythm and flow of a beautifully installed floor. The general rule of thumb is to space your nails approximately 6 to 8 inches apart for 3/4-inch solid hardwood flooring. This ensures a secure attachment while allowing for natural expansion and contraction of the wood. Remember, my friend, nails that are too close can cause the wood to split, while nails that are too far apart may result in unsightly gaps. So measure twice, nail once, and find that perfect balance!
What gauge floor nailer do I need
When it comes to the gauge of your floor nailer, my dear DIY enthusiast, the magic numbers are 15 or 16. A floor nailer with a 15 or 16-gauge capacity is the recommended choice for most solid hardwood flooring installations. These gauges strike the right balance between holding power and minimizing potential damage to the wood. So trust in the wisdom of those numbers, my friend, and let your floor nailer guide you to DIY success!
Can a brad nailer be used for baseboards
Ah, the versatile brad nailer strikes again! Can it be used for baseboards? Well, my enthusiastic friend, it depends on the size of your baseboards and personal preference. For smaller and lighter baseboards, a brad nailer can work its magic and securely fasten them to the wall. However, for larger and more substantial baseboards, you may want to consider a finish nailer for extra holding power. Choose wisely, my friend, as your baseboards are key players in the aesthetics of your space!
Can I use brad nails in a finish nail gun
Ah, the tempting idea of swapping nails in your finish nail gun. While it may sound convenient, my curious friend, it’s generally not recommended. Brad nails, which are thinner, may not feed properly through a finish nail gun. This can lead to jamming, misfires, and possibly damage to the tool. It’s always best to use the nail type recommended for your nail gun to ensure smooth sailing and a successful finish!
And there you have it, my fellow DIYers, a comprehensive FAQ-style guide to help you navigate the nailer world for your hardwood flooring project. From the size of nails to the types of nailers, we’ve covered the essentials to set you on the path to DIY success. So go forth, armed with knowledge and a trusty nailer, and nail those floors like a pro! Happy DIYing!
Disclaimer: This blog post is intended for informational purposes only. Always refer to manufacturer recommendations and seek professional advice when necessary. The author and publisher disclaim any liability for any damages or injuries incurred by following the information in this article.