Have you noticed a drip coming from your outdoor spigot? It may seem like a small issue, but that constant drip can waste a surprising amount of water and lead to higher water bills. Not to mention, it can cause damage to your wall and even leak into your home. In this blog post, we will discuss the common causes of a leaking outdoor spigot in the wall, how to fix it, and provide answers to questions you may have about this irritating problem. So, grab your toolbox and let’s get started on tackling that drip!
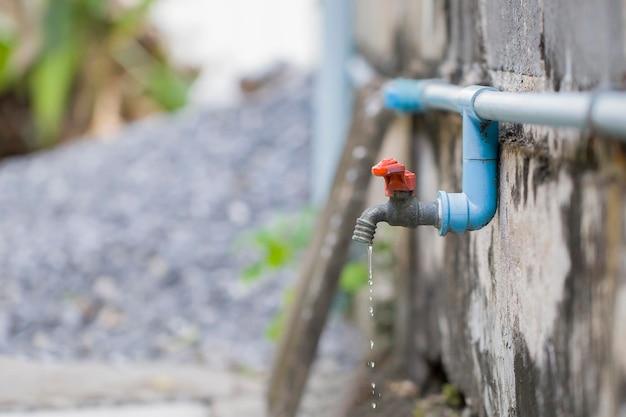
Outdoor Spigot Leaking in Wall
The Drip Dilemma: Outdoor Spigot Leaking in Wall
Are you tired of dealing with a leaky outdoor spigot that drips more than a broken faucet? Well, you’re in for a treat because we’re going to tackle the dreaded “outdoor spigot leaking in wall” situation head-on. Prepare yourself for some witty advice and a sprinkling of humor as we dive into the world of leaky outdoor spigots!
The Perils of a Misbehaving Outdoor Spigot
Picture this: you’re peacefully enjoying your time in the backyard, when suddenly you notice an ominous puddle forming near the wall. Before you know it, your outdoor spigot has become a rogue fountain, turning your water bill into a nightmare. Fear not, dear reader! We’ve got your back, and we’re here to offer some guidance on how to tackle this soggy situation.
Calling All DIY Heroes: Fixing the Leaky Outdoor Spigot
Now, it’s time to put on your superhero cape and channel your inner plumber. First things first, you need to locate the source of the leak. Inspect the spigot and surrounding areas for any visible cracks or gaps, paying particular attention to the connection points. If you spot any loose fittings, tighten them with a wrench. Remember, a leaky spigot is no match for your DIY skills!
Turning Off the Water: A Leaking Spigot’s Kryptonite
Before we can conquer the leak, we must first turn off the water supply. Locate the shutoff valve, which is usually located near the spigot or inside your home. Don’t worry if you have trouble finding it; sometimes, these valves like to play hide-and-seek. Once you’ve found it, give it a gentle turn to the right until the water flow stops. Congratulations, you’re one step closer to fixing that pesky leak!
Sealing the Deal: Fixing the Leak Like a Pro
Now comes the fun part – fixing the leak. If the problem lies in a cracked or worn-out pipe, you’ll need to replace the damaged section with a new one. Remember to measure twice and cut once to ensure a snug fit. For smaller leaks, you can try using plumber’s tape or pipe sealant. Just wrap the tape carefully around the affected area or apply the sealant as directed. Kiss that leak goodbye!
Preventing Future Leaks: Be a Leak-Stopping Legend
You’ve successfully vanquished the leaky spigot beast, but how can you ensure it never returns? Regular maintenance is key. Inspect your outdoor spigot for any signs of wear and tear, such as rust or corrosion. Additionally, consider investing in a frost-proof spigot to prevent winter-related leaks. Remember, a little prevention goes a long way when it comes to keeping pesky leaks at bay!
And there you have it, my friend – a comprehensive guide to tackling the outdoor spigot leaking in wall phenomenon. Armed with a little bit of know-how and a whole lot of determination, you can conquer any leak that comes your way. So, go forth, fellow leak warrior, and may you never face a dripping spigot again! Happy fixing!
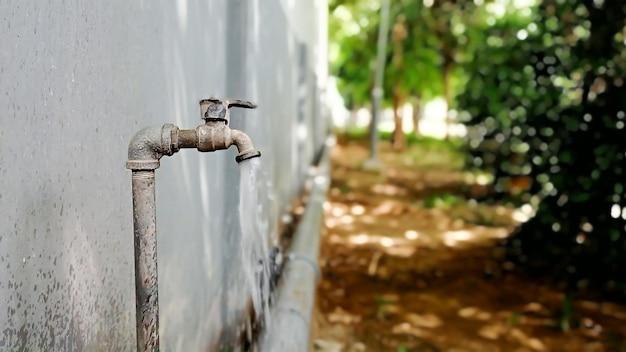
Outside Water Spigot Leaking
So, your outdoor spigot has decided to spring a leak? Oh boy, isn’t that just fantastic? Well, fear not, my friend! We’re here to dive into the wonderful world of a leaking outside water spigot and provide you with some helpful tips on how to deal with this riveting issue.
The Soaking Surprise
Is Your Outdoor Spigot Leaking? No Biggie!
You step outside to enjoy a relaxing afternoon in your backyard oasis, only to find a lovely surprise – a leaking outside water spigot. Well, well, well, Mother Nature really has a sense of humor, doesn’t she? But hey, don’t panic just yet! Let’s tackle this watery mess one drip at a time.
The Hunt Begins: Finding the Culprit
First things first, you need to identify where the leak is coming from. Is it the handle? The spout? Or perhaps a mysterious hidden leak within the wall? It’s like solving a plumbing mystery! Grab your magnifying glass (or flashlight) and thoroughly inspect the area. Remember, you’re the Sherlock Holmes of leak detection now!
Diving into the Depths: Fixing the Leak
Don’t Get Your Drip in a Twist!
Now that you’ve unveiled the leak’s secret hiding spot, it’s time to put on your DIY superhero cape and fix that sucker! But hold your horses, my friend, there’s a smart way to go about it.
Shut it Down: Turning off the Water
Before you begin your epic battle against the drip, make sure you turn off the water supply to the outside spigot. We don’t need any accidental waterworks while you’re trying to save the day. Locate the shutoff valve and give it a good twist. Click! Ah, sweet silence. Now you can proceed without getting soaked or causing a mini flood. You’re on a roll!
The Toolbox of Heroes: Necessary Tools
To successfully complete your mission, you’ll need a few trusty tools by your side. Make sure you have a wrench, Teflon tape, and maybe even an old toothbrush (we won’t judge). Oh, and don’t forget your superhero cape! It adds that extra touch of flair to your DIY endeavors.
Patching It Up: The Heroic Fix
The Wrench Whiz: Tightening the Nuts and Bolts
Sometimes, a loose connection might be the root of all your dripping evils. Grab your wrench and give those nuts and bolts a satisfying turn. Not too tight, though! We don’t want any superhero-induced pipe casualties. Just a gentle twist to secure everything in place. Super strength not required, just a determined hand will do!
Taming the Leaking Beast: Replacing the O-Ring
If the leak persists, it’s time to call in reinforcement – the O-ring. Turn off the water supply again (because, well, precautions), unscrew the spigot handle, and expose that pesky little O-ring. Give it a good inspection, and if it looks damaged or worn out, go ahead and replace it. Just like a superhero’s costume upgrade, a fresh O-ring can work wonders.
A Victory Dance: Celebrate Your Plumbing Prowess
You did it! Your outdoor spigot is no longer leaking and you’ve emerged as the hero of your own plumbing adventure. Grab yourself a victory cup of coffee (or a nice cold beverage if you’re feeling fancy), kick back, and soak in your triumph. The leak may have been a nuisance, but you tackled it like a boss!
Share the Wisdom: Preventing Future Leaks
Now that you’ve saved the day, it’s time to pass on your hard-earned wisdom. Keep an eye on your outdoor spigot, and if you notice any minor leaks, fix them promptly. Regular maintenance and occasional inspections can go a long way in preventing future waterworks. Give yourself a pat on the back, my DIY champ!
So, there you have it! The thrilling tale of your outdoor spigot leaking adventure. Remember, no leak stands a chance against your DIY skills. Keep calm, fix it up, and revel in your newfound plumbing prowess. Cheers to leak-free days and happy outdoor adventures!
Dripping Outside Faucet Freeze
If you live in a place where winter brings freezing temperatures and a magical wonderland of snow, you’re probably no stranger to the joys and woes of dealing with frozen outdoor faucets. And nothing screams “fun” like waking up to a dripping outside faucet that’s frozen solid!
Why Does It Happen
Well, my friend, it’s all about science – or rather, the lack of it. When the temperatures drop, the water trapped inside your outdoor spigot can freeze, causing it to expand and potentially crack. And when that ice thaws, you’re left with a dripping faucet that’s as stubborn as a mule.
The Symphony of Drips
Ah, the sound of a dripping faucet in winter – nature’s own orchestra serenading you day and night! But fear not, for there are ways to tackle this annoyance and silence the drip-drip-drip.
1. Preventive Measures
Take proactive steps to prevent frozen faucets in the first place. First off, make sure to disconnect any hoses and drain the water from them. Next, consider insulating your outdoor spigot by wrapping it with a cozy blanket of foam insulation. You might even want to invest in a nifty faucet cover, providing your spigot with an extra layer of warmth and protection.
2. Heat It Up, Baby
If preventive measures fail you, fear not – there’s still hope! Now, I’m not suggesting you serenade your faucet with a torch, but applying gentle heat can work wonders. Use a hairdryer (preferably not the one you use for your luscious locks) to thaw the icy grip on your faucet. Be patient, my friend, and let the warm air work its magic.
3. Insulation is the Key
Once you’ve silenced the dripping faucet and nurtured it back to health, make sure it stays that way. Insulate your outdoor spigot with pipe insulation or even a good ol’ sleeve of old socks. Yes, you heard me right – give those lonely socks a purpose and save your faucet from potential future freeze-ups!
Dealing with a dripping outside faucet freeze is no fun, but with a touch of humor and a dash of resourcefulness, you can triumph over the winter’s icy grip. Remember, prevention is key, but if all else fails, gentle heat and a little insulation can work wonders. So go forth, my brave homeowner, and conquer those dripping faucets like the superhero of household inconveniences that you are!
Now, go grab a cup of hot cocoa and revel in the triumph of saving your outdoor spigot from the chilly clutches of winter. Cheers to a drip-free, hassle-free season ahead!
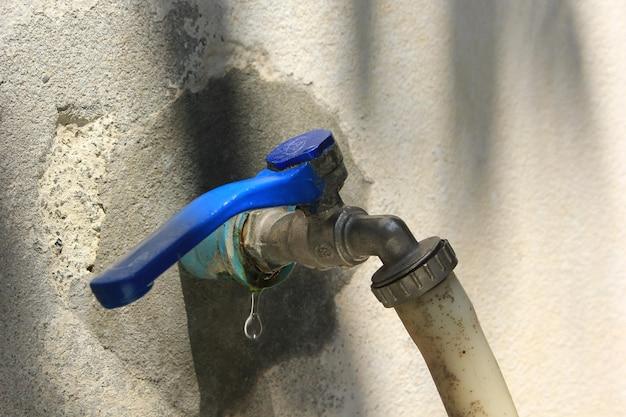
Why Does My Outside Spigot Leak
Have you ever experienced the frustration of a leaking outdoor spigot? It’s enough to drive anyone crazy! But fear not, because in this section, we’re going to dive into the reasons why your outside spigot might be leaking. So grab a seat (preferably a dry one) and let’s get to the bottom of this dripping dilemma.
The Dreaded Freeze and Thaw
One common culprit behind a leaking outdoor spigot is the ever-changing weather. If you live in an area with freezing temperatures, your spigot may have fallen victim to the freeze and thaw cycle. When water freezes in the pipes, it expands and can cause cracks or even burst the spigot. So, if you’re experiencing a leak, it’s possible that the freezing winter temperatures have played a not-so-hilarious joke on your outdoor plumbing.
Faulty Washer Woes
Another prime suspect for spigot leaks is a faulty washer. You might be thinking, “What does a washer have to do with my spigot?” Well, my friend, that little seal inside the spigot is crucial for preventing leaks. Over time, the washer can deteriorate or wear out, leading to pesky drips. So the next time you’re wondering why your spigot is leaking, don’t forget to give the washer a proper inspection.
Beware of Backflow
Have you ever noticed water flowing back up your spigot and wondered why? That’s a case of backflow, my friend, and it can also cause leaks. When there’s a sudden drop in pressure, water can reverse its flow, causing your spigot to leak. This can occur due to issues with your plumbing system or even a malfunctioning valve. So, if you’re dealing with a leaky spigot, make sure to keep an eye out for any signs of backflow.
The Call of Aging Pipes
Time spares no one, and unfortunately, that includes your outdoor spigot. Over the years, pipes can become corroded or damaged, which can result in leaks. So, if you’ve had your spigot for what feels like a lifetime, it might be time to consider an upgrade. Just think of it as giving your garden a fashionable and leak-free makeover!
Now that we’ve uncovered the mystery behind your leaking outdoor spigot, you can take the necessary steps to address the problem. Whether it’s dealing with freezing temperatures, checking the washer, watching out for backflow, or considering the age of your pipes, you’re armed with the knowledge to fix that drip. So bid farewell to the days of soggy shoes and water wastage – it’s time to conquer that leaking spigot once and for all!
Why is My Outdoor Spigot Leaking
Is Your Outdoor Spigot Giving You a Damp Surprise? Here’s What Could Be Going On!
Let’s face it: discovering a leaking outdoor spigot can be a real buzzkill. But fear not! We’re here to shed some light on why this pesky problem might be happening and, of course, entertain you along the way.
1. Old Age Strikes Again!
Is Your Spigot Showing Signs of Wear and Tear?
Like onions and fine wine, outdoor spigots can also show signs of aging. Over time, the constant exposure to the elements and years of faithfully serving your watering needs can take a toll on your poor spigot. So, if you’re dealing with a leak, it might just be that your spigot is past its prime.
2. Loosey-Goosey Connections? Oh, Snap!
Did Someone Forget to Give Those Connections a Good Tightening?
Remember that time you assembled that Swedish bookshelf but forgot to tighten all the screws properly? Yeah, well, turns out that can also happen with your outdoor spigot. Over time, those connections can become loose and start leaking faster than a sieve. So, grab your trusty wrench and give those connections a good old twist to see if that solves the mystery.
3. Jack Frost Nipping at Your Spigot
Could Jack Frost Be Behind the Leaky Shenanigans?
Winter can be a magical time filled with snowflakes and hot cocoa. But it can also wreak havoc on your outdoor spigot. If you live in an area with freezing temperatures, it’s possible that the water trapped inside your spigot froze at some point and caused damage. So, next time you’re caught in a winter wonderland, remember to disconnect and drain your spigot to prevent leaks from happening.
4. Faulty Plumbing or Mischievous Gnomes
Is There a Plumbing Gremlin Having a Laugh?
Now, we’re not saying gnomes are responsible for your leaky spigot, but hey, stranger things have happened, right? Jokes aside, sometimes the culprit behind the leak is deeper in the pipes. You might be dealing with faulty plumbing, loose fittings, or perhaps even a mischievous gnome who loves to mess with your outdoor water supply. Time to call a plumber or an exterminator, your choice!
Wrapping Up the Leaky Tale
Now that you’ve chuckled your way through this nifty guide, you’re armed with a better understanding of why your outdoor spigot might be leaking. Remember, it could be old age, loose connections, Jack Frost’s mischief, or even a pesky gnome causing trouble. Take action, tighten those connections, and if all else fails, don’t be afraid to call in the professionals. Happy spigot adventures!
How to Fix a Leaky Outdoor Spigot
Identify the Drip, Drip
So, you’ve got this sneaky little outdoor spigot leaking in the wall, huh? Don’t worry, we’ve got your back! The first step in fixing it is to play detective and identify where exactly the drip, drip is coming from. It could be the handle, the spout, or some mysterious underworld pipe network. Use your keen observation skills and find that pesky source of the leak.
Shut off the Water (No, Not the Whole City!)
Before we dive into the marvelous world of fixing, we must first ensure we’re not creating a real-life water park in our backyard. Locate the shutoff valve for the outdoor spigot and gently give it a little twist to stop the water flow. Taking a refreshing shower in your own backyard sounds fun, but save it for another day, okay?
Get the Right Tools (Not a Sledgehammer!)
Now that we’ve prevented any unexpected waterworks, let’s gather our tools of the trade. You’ll need an adjustable wrench, some Teflon tape, and a sprinkle of determination. Leave your trusty sledgehammer leaning against the wall – it’s not going to be useful unless you want to redecorate your entire yard.
Tighten Those Nuts and Bolts
Loose nuts and bolts are the stuff of mechanical nightmares. Take your adjustable wrench (leave the hammer alone, please) and give the connections a gentle tighten. Sometimes, all it takes is a little muscle to fix that leak. Don’t tighten too much, though, or you might end up with a whole new set of leaks to deal with.
Tame the Dripping Beast with Teflon Tape
If the leak still persists, don’t lose hope – we have our secret weapon: Teflon tape! Wrap a few layers around the threads of the spigot to create a watertight seal. This sneaky little tape will charm the drip, drip into submission. Just make sure not to use the whole roll, or you might confuse your future self when you’re trying to fix something else.
Test, Test, Test!
Now that we’ve done the dirty work, it’s time to put our fix to the test. Carefully turn on the water, and keep a sharp eye out for any signs of leakage. If all goes well and there are no surprise parties for your feet, congratulations! You’ve successfully fixed that leaky outdoor spigot, and you can bask in the glory of your handyman skills!
Remember, my friend, a leaky outdoor spigot is no match for your determination and a few trusty tools. Just do what needs to be done, and soon enough, that drip, drip will be a distant memory. Happy fixing!
Outside Faucet Leaking Behind Brick: A Waterworks of Woes
When the Waterworks Turn into a Teary Tragedy
We’ve all experienced those unexpected mishaps that turn a simple task into a grand spectacle. Picture this: you’ve set out to water your prized garden, but as soon as you twist that trusty outside faucet handle, you’re met with a less-than-impressive dance of water droplets. Oh, the tragedy! Fear not, dear reader, for this subsection is here to shed light on that perplexing predicament of an outside faucet leaking behind brick.
Behind the Curtain: The Cause of the Drama
Before we dive into the grand performance of tackling this problem, let’s explore the underlying reasons that may plunge your waterworks into disarray. Most often, an outside faucet starts leaking behind a brick wall due to worn-out or damaged plumbing fixtures. Over time, those pesky gaps in the brickwork can allow water to seep into the delicate hidden realm behind the scenes.
Don’t Stage a Melodrama: Fixing the Leaky Situation
Now that we know the villain of our tale, it’s time to unleash our hero—you! With a little bit of wit and a dash of determination, you can tackle this task head-on. Here are some steps to guide you on your quest for a dry and functioning outside faucet:
1. Detect the Source of the Drama
Before grabbing your toolbelt, let’s play detective and find the precise location of the leak. This can be done by carefully examining the surrounding area for any visible signs of water damage or dampness lurking unseen.
2. Brass Tacks: Repairing the Leak
Once you’ve unmasked the source of the leak, it’s time to gather your tools and get to work. Begin by shutting off the water supply to the outside faucet, then carefully remove the faucet handle, exposing the inner workings. Replace any worn-out or damaged parts, making sure to choose materials that can withstand the dramatic world of outdoor plumbing. Secure everything back in place and turn the water supply back on—voila! Cue the applause.
3. A Lesson in Waterproofing
To ensure a happily-ever-after ending to this tale, it’s essential to address the root cause of the problem. Apply a waterproof sealant to the gaps in the brickwork, banishing pesky water infiltration once and for all. This simple step will keep any future leaks from stealing the spotlight.
A Grand Finale: A Tale of Triumph and Taps Restored
Dear reader, with these steps in your repertoire, you are now armed to confront the boisterous beasts of outside faucet leaking behind brick. Embrace the dramatic flair of your waterworks adventures, but remember, the real victory lies in restoring order and harmony to your outdoor spigot. So gather your tools, don your cape of determination, and conquer those leaky demons once and for all. Your garden—and your sanity—will thank you.
Now, let’s get ready for an encore where water flows freely and smoothly, untainted by the woes of leaks and drips behind brick walls.
Can an Outdoor Faucet Leak into the House
A Watery Invasion
So, you’ve ventured into the world of outdoor faucets only to find out there might be a leaky situation. But wait, could it possibly escalate into a full-blown house invasion? Let’s dive into what this leaky business is all about!
A Comedy of Errors
Picture this: you’re innocently watering your garden, basking in the sun, when suddenly you notice a little drip-drip on the outside faucet. You might think, “No biggie, it’s just a tiny leak,” but let me tell you, my friend, appearances can be deceiving!
The Slippery Slope of Water
Water has a sneaky way of finding its path of least resistance. That means if your outdoor faucet is experiencing a little leak, it might just decide to take a detour through the walls and into your house. Yes, you heard it right – that innocent drip-drip could turn into an indoor waterfall!
The Wrath of the Waterworks
If you’re wondering how on earth this could happen, let me break it down for you. If there’s a crack or a hole in your outdoor faucet, water can seep into your walls. Over time, this can lead to serious damage, like mold growth, rotting wood, or electrical problems. Trust me, your house doesn’t want to go swimming either!
Prevention is Worth a Thousand Buckets
Now that we’ve established that a leaky outdoor faucet can indeed cause mayhem indoors, let’s talk prevention. The key to keeping your house dry and your wallet happy is regular maintenance. Inspect your faucets for any signs of leakage and fix them promptly. And remember, a little maintenance now could save you from a watery disaster later!
Wrap it Up, No More Leaks
In conclusion, a leaky outdoor faucet can certainly turn your home into an impromptu waterpark, complete with moldy slides. So, keep an eye out for those drips, fix any issues immediately, and save yourself from the not-so-fun adventure of leak-induced home renovations. Stay dry, my friends!
How to Fix a Leaky Outdoor Wall Faucet
So, you’ve got yourself a leaky outdoor wall faucet, huh? Well, fear not! I’m here to save the day with some handy-dandy tips on how to fix that pesky little problem. Grab your tool belt and let’s get to work!
Assess the Situation
Before you start swinging that wrench around, take a moment to assess the situation. Is the leak coming from the handle or the actual spout? Is it a tiny trickle or a gushing waterfall? Understanding the source and severity of the leak will help you tackle the issue like a pro.
Turn Off the Water
First things first, turn off the water supply to the outdoor spigot. You don’t want to create a mini swimming pool in your backyard while attempting to fix the leak. Locate the valve and give it a nice, firm twist. Ah, silence. Now we’re ready to dive into the fix!
Tighten Those Loose Ends
One common culprit for a leaky faucet is a loose packing nut. Grab your trusty wrench and give it a gentle tightening. Be careful not to overtighten, though. We don’t want any broken pipes or snapped bolts here. Just a snug little twist to stop that pesky leak.
Replace the Washer
If the leak persists, it’s time to get up close and personal with your faucet. Remove the handle and peek inside. Ah, there it is – the washer. This little guy is often the source of all your leaking woes. Replace it with a shiny new washer and voila! Goodbye, leaks!
Call in the Reinforcements
If all else fails and the leak refuses to budge, it might be time to call in the reinforcements – a.k.a. a professional plumber. They have superpowers when it comes to fixing leaks, and they’ll have your outdoor spigot back to its normal leak-free glory in no time. Plus, you can sit back and relax while someone else does the dirty work. Win-win!
So, my friend, now you have the know-how to fix that leaky outdoor wall faucet. Remember, a little DIY magic and a dash of humor can go a long way. Happy fixing!
How Much Does It Cost to Fix a Leaking Spigot
So, you’ve got a leaking spigot and you’re wondering how much it’s going to cost you to fix this pesky problem. Well, fear not! We’re here to shed some light on the costs involved, and maybe even make you crack a smile or two along the way (because let’s face it, plumbing issues are no laughing matter…unless you add a touch of humor).
The Price Tag of a Drippy Dilemma
When it comes to fixing a leaking spigot, the cost can vary depending on a few factors. First off, you’ll need to consider whether you’re tackling the job yourself or calling in the pros. If you’re a DIY champ, you might be able to get away with just the cost of replacement parts. On the other hand, if you prefer to leave it to the experts, you’ll need to factor in labor costs too.
DIY: Dollars in Your Own Hands
If you’re feeling handy and have the necessary tools, fixing a leaking spigot can be a relatively inexpensive endeavor. Most hardware stores carry replacement parts, such as washers and O-rings, that can solve your dripping dilemma. These parts usually cost anywhere from a few cents to a couple of dollars, so you won’t be breaking the bank.
However, if you find yourself caught in a web of confusion or lack the proper tools, calling in reinforcements might be the way to go.
Calling in the Cavalry: Plumbers to the Rescue
If you opt to enlist the help of a professional plumber, you can expect the cost to be a bit higher. Plumbers typically charge an hourly rate, which can range anywhere from $75 to $150 per hour, depending on your location and the level of expertise required. Additionally, there may be a service fee just for showing up at your door. So, while it may cost you a bit more, the peace of mind knowing the job is in capable hands can be worth every penny.
Prevention: A Penny Saved is a Spigot Fixed
Now that we’ve covered the cost of fixing a leaking spigot, let’s take a quick detour to the land of prevention. We all know that an ounce of prevention is worth a pound of cure, or in this case, a few dollars saved. Regularly inspecting your spigots for leaks, and promptly addressing any issues, can help prevent larger problems down the line. Trust us, a proactive approach can save you from dealing with a flood of trouble.
Take It from a Leaking Spigot Survivor
In conclusion, the cost to fix a leaking spigot can range from a few pennies to a few hundred dollars, depending on whether you go the DIY route or call in the experts. So, if you’re feeling handy, roll up those sleeves and give it a shot yourself. But if you’d rather let someone else handle the drips and drops, be prepared to shell out a bit more. Either way, remember that prevention is the key to keeping your spigots in tip-top shape and your bank account from taking a hit. Happy fixing!
Outdoor Faucet Leaking Behind Siding When Turned On
Identifying the Pesky Culprit
So, you’ve turned on your outdoor faucet, ready to tackle that never-ending list of gardening tasks, only to be greeted by an unexpected surprise – water cascading down your siding. Talk about a splashy situation! But fear not, we’re here to help you troubleshoot this dripping dilemma.
Don’t Blame the Faucet, Blame the Pipes
Before you start pointing fingers at the innocent faucet, it’s important to note that when water leaks behind your siding, the real culprit lies within the pipes. Over time, those pesky pipes can develop cracks or even burst, causing water to find its way into places it shouldn’t.
The Sweet Melody of Dripping Pipes
Now, let’s follow the enchanting symphony of your leaking outdoor faucet as it makes its way behind the siding. Drip, drip, drip! This tantalizing melody is your cue to investigate further.
Get Your Sherlock Holmes Hat On
To uncover the truth behind the leak, it’s time to channel your inner detective. Start by checking for any visible cracks, loose connections, or obvious signs of wear and tear in your outdoor faucet. If you spot anything, kudos to you, Sherlock!
Contacting the Plumbing Maestros
If your pipe prowess fails you, it may be time to call in the experts. Yes, those marvelous plumbing maestros who can effortlessly conquer any leaky predicament. They’ll be armed with all the knowledge and gear necessary to fix your sneaky piping problem.
Prevention is the Best Cure
While we can’t turn back time and magically unleak your pipes, we can certainly help prevent future mishaps. Regularly inspect your outdoor faucet for signs of wear and tear, and make sure you promptly address any emerging issues. Trust us, a patch job can save you from a waterworks spectacle down the line!
Wrapping it Up in Waterproof Style
So, dear reader, we hope this jaunt through the twists and turns of your leaking outdoor faucet behind the siding has left you with newfound knowledge and, perhaps, a touch of amusement. Remember, when it comes to plumbing predicaments, a dash of humor can go a long way!
Stay tuned for more plumbing escapades!
Now it’s your turn to share your leaky faucet stories. Any DIY solutions you swear by? Let us know in the comments below!