When it comes to plumbing issues, a leaking drain pipe can be a major headache. If you’re faced with a ceramic drain pipe that needs repair, you might be wondering where to start and how to solve the problem. In this blog post, we will provide you with step-by-step instructions on how to repair a ceramic drain pipe, along with answers to common questions about sewer line repair.
From connecting an existing soil pipe to sealing a leaking drain pipe, we will cover all the necessary information you need to know. We’ll also delve into the world of trenchless pipe repair, discussing its benefits, cost, and how it works. So whether you’re dealing with a crack in a soil pipe or considering replacing a clay sewer pipe, this article will provide you with the guidance you need.
As we explore the history of plumbing materials such as clay pipes and PVC, you’ll gain valuable insights into the longevity of clay drain pipes and when they were commonly used. We’ll even address homeowners’ concerns about insurance coverage for broken sewer lines. So let’s dive in and learn how to successfully repair a ceramic drain pipe without breaking the bank!
Keywords: How do I connect an existing soil pipe?, How do you seal a leaking drain pipe?, What is trenchless pipe repair?, Does homeowners insurance pay for broken sewer line?, How much does trenchless pipe repair cost?, How does trenchless piping work?, Can you repair a clay sewer pipe?, Can you line a broken sewer pipe?, What type of plumbing was used in 1970?, When did they stop using clay sewer pipes?, How do you fix a crack in a soil pipe?, Should I replace clay sewer pipe?, Are clay pipes bad?, How long do clay drain pipes last?, What year did they start using PVC for sewer lines?, Can soil pipes crack?, Can you patch clay pipe?, How much does it cost to replace sewer pipe clay?, When were clay pipes used?, Is trenchless sewer repair better?, Can clay pipes be relined?
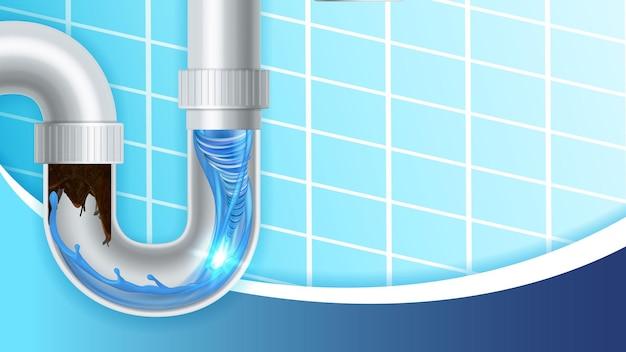
How to Repair Your Ceramic Drain Pipe like a Pro
Welcome to our comprehensive guide on repairing ceramic drain pipes! We know that dealing with a cracked or damaged drain pipe can be a draining experience (pun intended), but fear not! In this subsection, we will walk you through step-by-step on how to repair your ceramic drain pipe like a pro. So put on your DIY hat and let’s get started!
Assessing the Damage
Before you jump into fixing your ceramic drain pipe, it’s essential to assess the extent of the damage. Grab your flashlight and take a close look at the pipe. Look out for cracks, chips, or any other signs of wear and tear. The last thing we want is to patch up a tiny crack only to be faced with a bigger issue down the line! So be thorough in your examination and take note of the areas that require attention.
Gathering the Essential Tools
To repair your ceramic drain pipe successfully, you’ll need to gather a few tools. Don’t worry; we’re not sending you on a mission to Mars! Just a quick trip to your local hardware store should do the trick. Be sure to get your hands on the following items:
-
Ceramic Epoxy: This superhero of adhesives is specially formulated for ceramic materials. It’ll be your trusty sidekick in this repair adventure.
-
Sandpaper: To smoothen the surface and ensure a seamless repair, grab some fine-grit sandpaper. A little elbow grease will go a long way!
-
Rubbing Alcohol: This is not for sipping; it’s for cleaning! Make sure to clean the damaged area thoroughly with rubbing alcohol before applying the epoxy.
-
Protective Gloves: Safety first, folks! Shield your hands from any potential mishaps by wearing protective gloves.
Patching Up the Pipe
Now that you have your tools at the ready, it’s time to get down to business and patch up that ceramic drain pipe. Here’s a handy step-by-step guide to walk you through the process:
Step 1: Clean the Damage
Using a clean cloth soaked in rubbing alcohol, wipe down the damaged area of the drain pipe. This will remove any dirt, grime, or residue that could hinder the adhesive’s effectiveness. Remember, a clean surface is key!
Step 2: Mix the Epoxy
Refer to the manufacturer’s instructions on your ceramic epoxy to determine the correct mixing ratio. Carefully measure and mix the epoxy components in a disposable container. Stir well until you achieve a consistent color and texture.
Step 3: Apply the Epoxy
Using a small brush or spatula, apply an even layer of epoxy to the damaged area of the ceramic drain pipe. Be generous, but not excessive. You want enough epoxy to ensure a secure bond without creating a messy situation.
Step 4: Smooth it Out
Once the epoxy is applied, take your sandpaper and gently smooth out the patched area. This will help blend the repair seamlessly with the rest of the pipe. Take your time and aim for a flawless finish.
Congratulations, you’ve successfully repaired your ceramic drain pipe! Give yourself a pat on the back for a job well done. Remember, tackling home repairs can be a bit daunting, but with the right tools and a sprinkle of DIY spirit, you can be your own hero. So go forth and conquer those plumbing challenges, one repair at a time!
FAQ: How To Repair Ceramic Drain Pipe
Welcome to our comprehensive FAQ-style guide on repairing ceramic drain pipes. In this article, we will address the most common questions and concerns homeowners have about fixing their ceramic drain pipes. Whether you’re dealing with a leak, crack, or other damage, we’ve got you covered. So, let’s dive in and get your drain pipes back in tip-top shape!
How do I connect an existing soil pipe
Connecting an existing soil pipe to a ceramic drain pipe requires a few steps, but it’s definitely doable. First, you’ll need to measure the diameter of both the soil pipe and the ceramic drain pipe. Once you have the measurements, you can purchase a rubber coupling with metal hose clamps. Slide the coupling over the ceramic drain pipe and tighten the clamps to secure it in place. Then, insert the soil pipe into the other end of the coupling and tighten the clamps again. Voila! Your soil pipe is connected to the ceramic drain pipe.
How do you seal a leaking drain pipe
To seal a leaking drain pipe, you’ll need to gather a few supplies. Start by turning off the water supply, if applicable. Clean the area around the leak with a mild detergent to remove any dirt or debris. Once the area is clean and dry, you can use an epoxy putty or a pipe repair clamp to seal the leak. Apply the putty or wrap the clamp tightly around the leaking area, following the manufacturer’s instructions. Allow the sealant to dry or cure completely before turning the water back on. Your leaky drain pipe will be as good as new!
What is trenchless pipe repair
Trenchless pipe repair is a modern and innovative technique used to repair damaged drain pipes without the need for extensive digging and excavation. It involves inserting a new pipe liner into the existing ceramic drain pipe, creating a smooth, durable, and seamless interior. This process eliminates the need for traditional pipe replacement, saving homeowners time, money, and the headache of disruptive construction. Trenchless pipe repair is an effective solution that brings your drain pipes back to life with minimal disruption to your daily routine.
Does homeowners insurance pay for broken sewer line
In most cases, homeowners insurance policies do not cover the cost of repairing or replacing a broken sewer line. However, it’s essential to review your specific policy and consult with your insurance provider to confirm the details. Some insurance companies offer additional coverage options specifically for sewer line repairs, so it’s worth exploring those possibilities. Remember, prevention is key! Regular maintenance and inspections can help identify potential issues before they become major problems, potentially saving you from costly repairs.
How much does trenchless pipe repair cost
The cost of trenchless pipe repair can vary depending on various factors such as the extent of the damage, the length of the pipe, and your location. On average, homeowners can expect to pay between $80 and $250 per linear foot for trenchless pipe repair. While this may seem higher than traditional methods initially, it’s important to consider the long-term benefits. Trenchless pipe repair is typically more cost-effective in the grand scheme of things, as it eliminates the need for excavation and additional restoration work.
How does trenchless piping work
Trenchless piping uses advanced technology to rehabilitate damaged drain pipes without the need for extensive digging. The process involves inserting a new pipe liner into the existing ceramic drain pipe. The liner, usually made of a durable material such as epoxy resin or cured-in-place pipe (CIPP), is then either inflated or pulled into place. Once in position, the liner adheres to the inner walls of the existing pipe, creating a smooth and seamless interior. Trenchless piping provides a long-lasting solution that restores the functionality of your drain pipes without the disruptions of traditional repair methods.
Can you repair a clay sewer pipe
Yes, clay sewer pipes can be repaired. If you notice cracks or other forms of damage in your clay sewer pipe, it’s essential to address the issue promptly. Options for repair include clay pipe lining or trenchless pipe repair techniques, both of which are effective in restoring the integrity of the pipe. Clay sewer pipes are known for their durability, but they can still succumb to wear and tear over time. By addressing any issues early on, you can extend the lifespan of your clay sewer pipe and prevent more significant problems down the road.
Can you line a broken sewer pipe
Yes, broken sewer pipes can be lined using trenchless pipe lining techniques. The process involves inserting a flexible liner coated with an epoxy resin into the damaged sewer pipe. The liner is then expanded and pressed against the inside walls of the existing pipe. Once the resin cures, it creates a strong and seamless new pipe within the old broken sewer pipe. This method eliminates the need for extensive excavation and replacement, providing a cost-effective and minimally disruptive solution for homeowners.
What type of plumbing was used in 1970
In the 1970s, various types of plumbing materials were commonly used, including galvanized steel, copper, and polybutylene. Galvanized steel was frequently used for water supply lines, while copper pipes were popular for both water supply and drainage systems. Polybutylene gained popularity later in the decade due to its flexibility and relatively low cost. However, it was later discovered that polybutylene pipes were prone to failure, leading to widespread replacement efforts in the 1980s and 1990s.
When did they stop using clay sewer pipes
Clay sewer pipes were commonly used until the mid-20th century when more modern materials, such as cast iron and PVC, started gaining popularity. The use of clay pipes began declining in the 1960s and 1970s as these newer materials offered improved durability and performance. That being said, some areas may still have clay sewer pipes in use today, particularly in older neighborhoods or regions where the infrastructure has not been updated.
How do you fix a crack in a soil pipe
Fixing a crack in a soil pipe requires careful attention and the right tools. Start by cleaning the cracked area with a mild detergent to remove any debris or grease. Once the area is clean and dry, you can apply a specialized sealant, such as epoxy putty or pipe repair tape, directly onto the crack. Ensure that the sealant covers the entire crack and extends slightly beyond its edges. Give the sealant enough time to cure or dry completely before testing the repaired soil pipe. If the crack is severe or extensive, it’s advisable to consult a professional plumber for proper repair.
Should I replace clay sewer pipe
Deciding whether to replace a clay sewer pipe depends on its overall condition and the extent of any damage. While clay pipes are known for their durability, they can deteriorate over time due to age, root intrusion, or ground shifting. If you notice frequent backups, leaks, or other signs of significant damage, it may be time to consider replacing your clay sewer pipe. Investing in a more modern and resilient material, such as PVC or cast iron, can provide long-term peace of mind and prevent future costly repairs.
Are clay pipes bad
Clay pipes, while once a common choice for sewer systems, have certain drawbacks compared to newer materials. Clay pipes can be prone to cracking, especially as they age and the ground shifts. They are also susceptible to root intrusion, which can lead to blockages and system backups. However, with proper maintenance and proactive measures, such as regular inspections and root barrier installations, these issues can be mitigated. Overall, while clay pipes have their limitations, they can still be a reliable and functional choice when well-maintained.
How long do clay drain pipes last
Clay drain pipes, when properly installed and maintained, can last for several decades. With their inherent durability and resistance to corrosion, clay pipes have a lifespan ranging from 50 to 100 years. However, it’s important to note that factors such as soil conditions, root intrusion, and shifting ground can affect the longevity of clay drain pipes. Regular inspections and prompt repairs can help prolong the lifespan of clay pipes, ensuring they continue to function optimally for many years.
What year did they start using PVC for sewer lines
PVC (polyvinyl chloride) pipes began being used for sewer lines in the 1970s. This synthetic plastic material gained popularity due to its excellent durability, chemical resistance, and ease of installation. PVC pipes offer superior longevity compared to traditional materials like clay or cast iron. They quickly became the go-to choice for sewer lines and are still widely used today in both residential and commercial applications. PVC pipes have proven to be a reliable and cost-effective solution for modern sewer systems.
Can soil pipes crack
Yes, soil pipes can crack for various reasons, including age, ground movement, or physical damage. Cracks in soil pipes can lead to leaks, blockages, and potential system failures if left unaddressed. It’s important to regularly inspect your soil pipes for any signs of cracks or damage and promptly repair them to maintain the integrity and functionality of your drainage system. By taking proactive measures, you can prevent costly repairs and potential health hazards associated with cracked soil pipes.
Can you patch clay pipe
Yes, clay pipes can be patched using specialized sealants designed for sealing cracks and other minor damages. Start by preparing the damaged area, ensuring it is clean and free from any loose debris or obstructions. Then, apply the sealant directly onto the damaged spot, extending it slightly beyond the edges of the patch. Allow the sealant to cure or dry completely as per the manufacturer’s instructions. While patching can temporarily repair minor issues, it’s important to monitor the condition of the clay pipe and consult a professional if more extensive repairs are needed.
How much does it cost to replace sewer pipe clay
The cost of replacing a clay sewer pipe can vary depending on several factors, including the length of the pipe, the extent of excavation required, and your location. On average, homeowners can expect to spend between $3,000 and $8,000 for a full replacement. The cost includes labor, materials, permits, and any necessary restoration work. It’s important to obtain detailed quotes from reputable plumbing professionals to get an accurate estimate tailored to your specific project. Remember, investing in a long-lasting and resilient sewer pipe material can save you from future headaches and expenditures.
When were clay pipes used
Clay pipes have a long history of being used in sewer systems worldwide. They were commonly used from ancient times up until the mid-20th century when more modern and durable materials, such as cast iron and PVC, gained popularity. Clay pipes have been an essential part of our plumbing infrastructure, demonstrating the longevity and reliability of this ancient material. While their use has diminished in recent years, clay pipes still exist in some older sewer systems, serving as a testament to their enduring qualities.
Is trenchless sewer repair better
Trenchless sewer repair undoubtedly offers several advantages over traditional excavation methods. The minimally invasive nature of trenchless repair means less disruption to your property, reduced labor costs, and a faster overall repair process. With trenchless repair, there is minimal to no digging required, preserving your landscape and minimizing the need for extensive restoration work. Trenchless methods also provide a long-lasting solution, reinforcing or replacing your sewer pipes with durable materials that can withstand the test of time. So, if you’re looking for a more efficient and less intrusive way to repair your sewer, trenchless is definitely the way to go!
Can clay pipes be relined
Yes, clay pipes can be relined using trenchless sewer repair techniques. Relining clay pipes involves inserting a new pipe liner into the existing clay pipe, creating a durable and seamless interior. The liner, typically made of materials like epoxy resin or CIPP, adheres to the inside walls of the clay pipe, providing structural reinforcement and preventing leaks and blockages. Relining is an effective and cost-efficient method to extend the lifespan of clay pipes, avoiding the need for extensive excavation and replacement. So, if your clay pipes are showing signs of wear and tear, relining could be an ideal solution.
We hope this comprehensive FAQ-style guide has answered your burning questions about repairing ceramic drain pipes. Whether you’re connecting an existing soil pipe, sealing a leaking drain pipe, or considering trenchless pipe repair, you now have the knowledge to tackle the job with confidence. Remember, regular maintenance and prompt repairs are key to preserving the integrity of your drain pipes and ensuring a smoothly functioning plumbing system. If you’re facing more complex issues or prefer professional assistance, don’t hesitate to reach out to a qualified plumber. Happy repairing!