Are you looking to add the finishing touch to your door trim? Quarter round is the perfect solution! This small, curved molding can add a subtle yet stylish edge to your door frames. In this blog post, we will guide you through the process of installing quarter round around door trim.
From cutting quarter round ceiling corners to determining the ideal angle for a 45-degree cut, we’ve got you covered. We will also address commonly asked questions such as whether you can use a hammer for finishing nails, the purpose of quarter round, and whether it’s necessary to use quarter round with vinyl plank flooring.
So, grab your tools and let’s get started on transforming your door trim with quarter round!
How to Master the Art of Putting Quarter Round Around Door Trim
The Nitty-Gritty of Quarter Round Placement
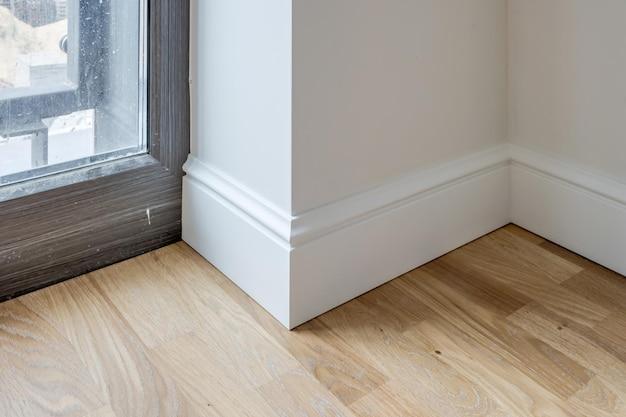
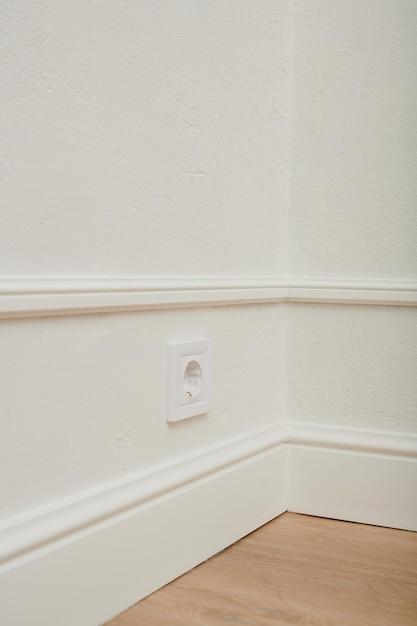
When it comes to sprucing up your door trim, quarter round is the secret sauce that adds that finishing touch. Not only does it conceal any unsightly gaps between your trim and flooring, but it also gives your space an elegant and polished look. So, get ready to channel your inner DIY master and learn how to put quarter round around door trim like a pro.
Gather Your Tools and Prepare for Trim Time
Before you dive in, make sure you have all your tools and materials ready. You’ll need a miter saw, tape measure, adhesive, hammer, nail set, pencil, safety goggles (because who doesn’t want to look cool while working?), and, of course, the star of the show—quarter round molding. Head over to your local hardware store or, if you’re feeling fancy, order it online.
Measure Once, Cut Twice (Or Maybe Just Once)
Measure twice, cut once—that’s the cardinal rule of trim work. Grab your tape measure and carefully measure the length of each section of your door trim where the quarter round will be installed. Keep in mind that miters at the corners will require extra length, so add a few extra inches to those measurements. Now it’s time to fire up that miter saw, put on your safety goggles, and make those precise cuts. Remember, it’s better to start with longer pieces and trim them down if needed.
Get Sticky With It—Adhere the Quarter Round to the Trim
Once your quarter round pieces are cut to perfection, it’s time to attach them to the door trim. Apply a thin bead of adhesive along the backside of the molding, ensuring consistent coverage. Then, gently press the quarter round against the trim, starting from one end and working your way to the other. Be careful not to smudge the adhesive, unless you’re going for a modern art look, of course.
Nail It to Win It—Securing the Quarter Round
While adhesive is great for holding the quarter round in place, it’s the nails that provide extra strength and stability. Grab your trusty hammer and nail set, and give each piece of quarter round a good ol’ one-two tap into the trim. Be precise and aim for the thickest part of the molding to avoid splitting it. After all, we’re here to add beauty, not destruction.
Fill Those Holes—And We’re Not Talking About Life’s Existential Void
Now that your quarter round is securely fastened, chances are you have some small nail holes to deal with. Grab some wood putty that matches your quarter round color, and sparingly fill in those holes. Smooth it out with a putty knife, wipe away any excess, and voilà! Your trim is looking fresh and hole-free.
Give It a Test Drive—Admire Your Handiwork
With everything in place and your craftsmanship skills on full display, take a step back and admire your newly adorned door trim. Marvel at the seamless transition between the trim and the flooring. Bask in the glory of your DIY triumph. And don’t forget to give yourself a pat on the back—you’ve officially mastered the art of putting quarter round around door trim!
So next time you want to spruce up your door trim, fear not! With our trusty step-by-step guide, you’ll be nailing those quarter round installations like a pro.
FAQ: How to Put Quarter Round Around Door Trim
Welcome to our comprehensive FAQ-style guide on how to put quarter round around door trim. If you’re looking to add that finishing touch to your door frames, quarter round molding is the way to go. In this article, we’ll answer all your burning questions, provide helpful tips, and guide you through the process step-by-step. So, let’s dive in!
How do you cut quarter round ceiling corners
When it comes to cutting quarter round for ceiling corners, it’s all about precision. Start by cutting a 45-degree angle on one end of the molding. Then measure the length needed and make a second 45-degree cut in the opposite direction. This will allow the pieces to fit together snugly and create a seamless corner.
Can you use a hammer for finishing nails
Absolutely! While a finishing nail gun can make the process faster and more efficient, you can definitely use a trusty hammer. Just make sure to hold the nail firmly in place and tap it in gently to avoid damaging the molding. A little extra effort with a hammer can go a long way in achieving a professional finish.
What is the point of quarter round
Quarter round serves both aesthetic and functional purposes. Its main function is to cover the gaps between the baseboard and flooring or door trim, providing a clean and polished look. Additionally, quarter round helps protect the edges of the flooring and trim from everyday wear and tear. Think of it as the icing on the cake – it adds that final touch of elegance to your interior design.
Can you cut trim with a hand saw
Definitely! While power tools can make the job easier, a hand saw can be just as effective. Just make sure to choose a saw with fine teeth and take your time to make precise cuts. It’s always a good idea to mark the measurements beforehand and use a miter box to guide your sawing. With a steady hand and a little patience, you can achieve professional-looking results.
What angle do you stop shoe molding
When it comes to stopping shoe molding, a 45-degree angle is your go-to. By cutting the end of the molding at a 45-degree angle, you ensure a seamless transition and a professional finish. This angle allows the molding to meet neatly at the corners and create a clean, polished appearance.
Is it better to glue or nail quarter round
Well, it depends on your preferences and the specific situation. While nailing quarter round provides a more secure and resilient hold, gluing can be a suitable alternative. If you opt for gluing, make sure to use a strong adhesive specifically designed for molding. However, if durability is a key factor, nailing the quarter round is generally recommended.
How do you measure for a 45-degree cut
Measuring for a 45-degree cut may seem tricky, but fear not! You can easily achieve this by using a miter square or a protractor. Place the square or protractor against the molding, aligning one side with the edge and the other with a 45-degree angle. Once aligned, mark the measurement and proceed with the cut. With a little angle magic, you’ll be on your way to perfectly cut quarter round.
How do you install casing kickers
Installing casing kickers is a breeze. First, measure the length of the kicker needed and mark it on the casing. Then use a saw to make a 45-degree cut at each end. Align the kicker with the bottom of the door casing and secure it in place using finishing nails or an adhesive. Casing kickers not only provide extra support but also enhance the overall aesthetics of your door trim.
What is the difference between a door sill and threshold
Ah, the classic door sill vs. threshold confusion! Allow us to clarify. A door sill refers to the horizontal piece of wood or metal at the bottom of the door frame, while a threshold is the strip that bridges the gap between the interior and exterior flooring. In simpler terms, the door sill is part of the door frame itself, while the threshold sits on the floor, creating a smooth transition. Now you know!
How do you put down quarter round without a nail gun
No nail gun? No problem! You can still put down quarter round without one. Try using adhesive instead. Apply a strong adhesive to the back of the quarter round molding and press it firmly against the baseboard or trim. Be sure to hold it in place for a few seconds to allow the adhesive to bond securely. Voila! You’ve successfully installed quarter round without a nail gun.
What is shoe molding for cabinets
Shoe molding for cabinets serves a similar purpose to that for floors or trim. It provides a decorative and functional finish to the bottom edges of your cabinets. Shoe molding can help cover gaps, protect the cabinet edges from damage, and add a touch of elegance to your overall kitchen or bathroom design. So, don’t forget to dress up those cabinets with some stylish shoe molding!
Does quarter round go over door trim
In most cases, quarter round does not go over door trim. Rather, it is installed along the floor or at the bottom edges of baseboards, providing a seamless transition between these elements. However, you may choose to use quarter round around a door frame if you prefer a specific aesthetic or if the design calls for it. Ultimately, the choice is yours, but the traditional approach is to install quarter round at the baseboard level.
How do you cut a perfect miter for beading
Cutting a perfect miter for beading can be a bit tricky, but fear not! Start by measuring the length needed and cut the molding at a 45-degree angle using a miter saw or a miter box. To ensure a seamless fit, cut the adjacent piece at the opposite 45-degree angle. Remember, practice makes perfect, so take your time and make adjustments as needed until you achieve that flawless miter for your beading project.
Does an exterior door need a threshold
Absolutely! An exterior door definitely needs a threshold. The threshold provides an essential barrier against the elements, preventing water, air, and pests from seeping indoors. It also creates a smooth transition between indoor and outdoor flooring. So, if you want to keep the great outdoors outside, don’t forget to install a sturdy and weather-resistant threshold beneath your exterior door.
Can you glue quarter round to concrete
Yes, you can glue quarter round to concrete. Start by cleaning the concrete surface thoroughly and ensuring it is dry. Apply a strong adhesive suitable for both wood and concrete surfaces, then press the quarter round molding firmly against the concrete. Be sure to hold it in place for a while to allow the adhesive to bond effectively. Once dry, you will have a securely attached quarter round with excellent adherence to the concrete.
How do you cut molding without a miter saw
When a miter saw is unavailable, fear not, for there are alternatives! Use a miter box and a hand saw to achieve accurate cuts. Simply secure the molding into the appropriate slot of the miter box, aligning the desired cutting angle, and carefully saw through the marked area. The miter box acts as a guide, ensuring consistent and precise cuts while keeping your fingers safely away from the saw.
How do you install shoe molding without a nail gun
No nail gun? No worries! Installing shoe molding without one is still within your grasp. Start by predrilling pilot holes into the shoe molding, spacing them evenly along its length. Next, attach the molding to the baseboard or trim using finishing nails and a trusty hammer. With a little patience and some good old-fashioned elbow grease, you’ll have that shoe molding securely in place.
What angle do you cut the end of quarter round
To achieve a neat and seamless corner, cut the end of your quarter round at a 45-degree angle. This angle allows the pieces to fit together smoothly when joining two sections. Remember to measure and mark accurately before making the cut to ensure a proper fit. With a precise 45-degree angle, your quarter round will add a touch of elegance to your door trim.
How do you make a 45-degree angle without a protractor or compass
No protractor or compass? No problem! You can still achieve a 45-degree angle with simple tools. Use a regular square or right angle tool as a guide, aligning one side along the edge of the material and the other side pointing towards the opposite direction of the desired angle. By aligning the tool accordingly, you’ll have yourself a makeshift 45-degree angle guide without the need for fancy measuring instruments.
Is shoe molding the same as quarter round
Ah, the eternal shoe molding vs. quarter round debate! While they share similarities in purpose and appearance, they are not exactly the same. Shoe molding is typically thinner and shorter than quarter round, making it ideal for covering gaps between flooring and the baseboard. Quarter round, on the other hand, is slightly larger and often used for transitions between horizontal surfaces. So, while they may be close cousins in the molding family, they do have their subtle differences.
Do you have to use quarter round with vinyl plank flooring
Using quarter round with vinyl plank flooring is not an absolute necessity, but it can certainly enhance the overall look and feel of your installation. Quarter round can provide a finished and polished appearance by covering any gaps between the flooring and the baseboard. It also protects the edges of the vinyl plank from potential damage. Ultimately, the choice is yours, but adding quarter round can elevate your vinyl plank flooring to the next level.
Congratulations! You’re now equipped with all the knowledge you need to put quarter round around door trim like a pro. From cutting angles to installation techniques, we’ve covered it all. Remember to take your time, measure accurately, and be patient as you add that final touch of elegance to your door frames. Happy molding!