Are you planning a bathroom renovation or remodeling project? One of the key aspects to consider is how to transition the ceramic tile to the drywall in your shower. A seamless transition between these two materials not only enhances the overall aesthetic appeal but also ensures durability and water resistance. In this comprehensive guide, we will dive into the step-by-step process of achieving a professional and watertight transition.
Throughout this blog post, we will address various common questions and concerns related to the transition between tile and drywall. From grouting and caulking techniques to hiding the edges of the tile and managing gaps between the floor and walls, we will cover it all. So, whether you’re a DIY enthusiast or a professional contractor, this guide will help you navigate the complexities of the tile-to-drywall transition with ease.
Stay tuned for valuable insights, expert tips, and practical solutions to achieve a seamless and visually appealing transition between ceramic tile and drywall in your shower. Let’s get started on creating a beautiful and functional space that will stand the test of time.
How to Seamlessly Transition Ceramic Tile to Drywall in a Shower
Selecting the Perfect Transition
When it comes to transitioning ceramic tile to drywall in a shower, there’s no doubt that finding the perfect transition is crucial. Don’t worry though, with a little bit of know-how and a touch of creativity, you’ll be able to achieve a flawless transition that not only looks great but also stands the test of time.
Step 1: Measure Twice, Transition Once
Before diving into any project, it’s always a good idea to start with accurate measurements. In this case, measure the length and width of the area where the transition will take place. You don’t want to head to the hardware store and end up purchasing a transition piece that’s either too long or too short. Remember, as the saying goes, “measure twice, transition once!”
Step 2: Choose Your Transition Style
Just like fashion trends, transition styles also come and go. However, when it comes to transitioning tile to drywall, there are a few tried-and-true styles that have stood the test of time. The most common styles include bullnose, metal edging, and wood molding. Consider the overall aesthetics of your shower and choose a style that complements it seamlessly.
Step 3: Prep That Surface!
Now that you have your transition style selected, it’s time to prep the surface. Start by removing any existing grout or adhesive from the edges of the ceramic tiles. Use a putty knife or utility knife for this task. Ensure that the transition area is clean, dry, and free from any debris. A smooth surface will provide the perfect foundation for a flawless transition.
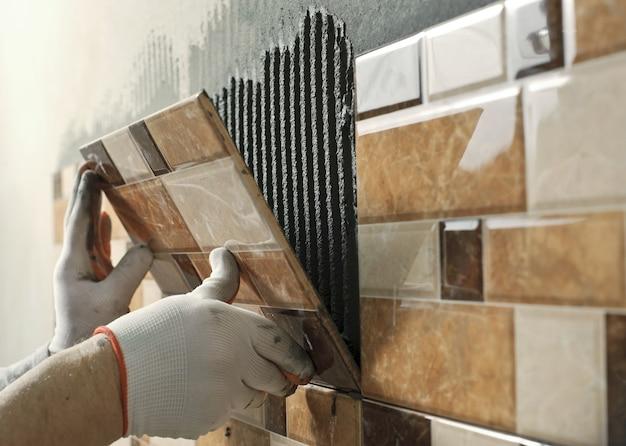
Step 4: Installation Time!
Here comes the fun part – installation! If you’re opting for a bullnose transition, simply apply a generous amount of adhesive on the back of the transition piece and press it firmly against the ceramic tile. For metal edging or wood molding, follow the manufacturer’s instructions to ensure a secure installation. Keep in mind that precision is key. Take your time to align the transition piece perfectly to achieve that polished look.
Step 5: Seal the Deal
To ensure longevity and prevent water damage, don’t forget to seal the transition area. Invest in a high-quality silicone caulk that matches the color of your grout. Apply a thin, consistent bead along the edge where the transition meets the drywall and the ceramic tile. Smooth it out carefully with your finger or a caulk tool for a professional finish. Let the caulk dry according to the manufacturer’s instructions.
Enjoy the Seamless Transition!
Congratulations! You’ve successfully transitioned ceramic tile to drywall in your shower like a pro. Stand back, admire your handiwork, and revel in the satisfaction of a job well done. The seamless transition not only adds a touch of elegance to your shower but also ensures durability that will withstand the test of time.
So whether you’re a seasoned DIY enthusiast or a novice looking to flex your home improvement muscles, following these steps will guide you through the process with ease. With the right transition style, preparation, and installation, your shower will be the envy of the neighborhood. Happy transitioning in 2023!
FAQ: How to Transition Ceramic Tile to Drywall in a Shower
So, you’re looking to transition from ceramic tile to drywall in your shower? We’ve got you covered! We know you might have a few questions on this topic, and we’re here to answer them. Check out our FAQ-style guide below for all the answers you need.
Do You Grout Between Tile and Wall in the Shower
Absolutely! When it comes to transitioning from ceramic tile to drywall in a shower, you should definitely grout between the tile and the wall. Grout helps to seal the gaps and prevent any moisture from seeping in. Plus, it gives a finished and polished look to your shower. So grab your trusty grout and get to work!
How Do You Caulk Between Drywall and Tile
Caulking between drywall and tile is a crucial step in achieving a seamless transition. To get started, make sure the gap is clean and dry. Then, apply the caulk evenly along the joint using a caulk gun. Smooth it out with a caulking tool or your finger and wipe away any excess. Viola! You’ve got a beautifully caulked transition.
How Big of a Gap Can You Fill with Caulk
When it comes to filling gaps between tile and drywall with caulk, smaller is better. Ideally, you want to tackle gaps that are around 1/8 inch wide. If the gap exceeds this size, it’s best to use a backer rod to fill the void partially before applying caulk. Remember, proper caulking ensures a watertight and visually appealing finish.
How Do You Hide the Edges of Tile
Hiding the edges of tile is a breeze. You can use a tile trim, also known as edge trim or bullnose trim. This trim is specifically designed to give your tile installation a polished and professional look. Simply place the trim along the exposed edges of the tile and secure it with tile adhesive or thinset. It’s like a cherry on top of your tile cake!
Why is There a Gap Between Basement Wall and Floor
Ah, the infamous gap between the basement wall and floor. This gap is usually present due to the natural settling of a building’s foundation. While it may seem concerning, this gap serves a crucial purpose by allowing for movement and preventing cracks. If you’re looking to fill the gap, a flexible and moisture-resistant caulk will do the trick.
Can You Use Silicone Instead of Grout
In some cases, you can use silicone instead of grout. Silicone is a flexible and waterproof material, making it a suitable alternative for areas that are prone to movement, such as corners or transitions. However, keep in mind that silicone is not as aesthetically pleasing as grout and might not be the best choice for visible areas.
Why is My Floor Separating From the Wall
If you’re noticing your floor separating from the wall, it could be due to a few factors. One common culprit is improper installation. If the subfloor wasn’t secured properly, it can cause the floor to shift and create a gap. Additionally, changes in temperature and humidity levels can also lead to floor separation. Consider consulting a professional to address this issue.
How Do I Fill a Large Gap Between the Floor and Baseboard
When faced with a larger gap between the floor and baseboard, you’ll need to use a more substantial filler material. Wood filler or caulk mixed with finely powdered grout can be an effective solution. Apply the filler evenly into the gap, smooth it out, and remove any excess. Once it’s dry, you can paint or stain the filler to match your baseboard. Problem solved!
Do You Use Corner Bead on Durock Corners
Yes, it’s recommended to use corner bead on Durock corners. Corner beads provide extra reinforcement and protection to the vulnerable corners of your Durock installation. It ensures a clean and sturdy finish that can withstand the test of time. So don’t forget to slap on that corner bead to keep those corners looking sharp.
Can You Use Silicone Instead of Thinset
While silicone is a versatile material, it’s not a suitable replacement for thinset. Thinset, also known as mortar, is specifically designed to bond tile to surfaces like drywall or cement board. Silicone doesn’t possess the same bonding properties as thinset and may not provide the necessary strength and durability for tile installation.
How Do You Finish Where Tile Meets the Ceiling
Ah, the tricky part—where tile meets the ceiling. To achieve a clean and polished finish, you can opt for a tile trim or bullnose tile specifically designed for ceiling transitions. Alternatively, you can use crown molding or decorative trim to create a seamless and elegant transition. Let your creativity shine and crown your tile masterpiece!
How Do You Fill a Large Gap Between Tile and Wall
When faced with a large gap between tile and the wall, don’t panic! A great option is to use sanded caulk that matches the color of your grout. Apply the caulk evenly into the gap and smooth it out with a caulk tool or your finger. The sanded caulk will blend seamlessly with your grout and bridge that pesky gap.
How Do You Fill Gaps Between Floor and Wall
To fill gaps between the floor and the wall, grab your trusty caulk gun and a flexible caulk suitable for your flooring material. Apply the caulk evenly into the gaps, making sure to fill them completely. Smooth it out with a caulking tool or your finger, removing any excess. Now those gaps are history!
Can You Tile Over Drywall
Yes, you can tile over drywall, but it’s essential to prepare the surface properly. Make sure the drywall is clean, free from any loose or crumbling sections, and has a smooth finish. Applying a coat of primer or a bonding agent is also recommended to ensure proper adhesion between the drywall and the tile. Now let the tiling adventure begin!
Do You Use Corner Bead Under Tile
No, corner bead is not typically used under tile. Corner bead is primarily used to reinforce and protect external corners, such as those in drywall installations. However, if you’re working with unconventional or specific tiling situations, consulting a professional can provide you with the best advice on using corner beads.
Can You Put Joint Compound Over Thinset
It’s not recommended to put joint compound directly over thinset. Joint compound is primarily used for smoothing and finishing drywall surfaces, while thinset is a bonding agent for tile. It’s best to keep these two substances separate to ensure the integrity and longevity of your tile installation.
Do You Grout Between Tile and Drywall
Yes, you should grout between tile and drywall. Grouting helps to fill in the gaps and provide a water-resistant barrier. It also enhances the look of the tile installation, giving it a clean and finished appearance. So, don’t forget this crucial step to achieve a stunning and functional shower!
Should I Grout or Caulk Shower Corners
For shower corners, it’s best to caulk rather than grout. Caulk is flexible and can accommodate any movement that might occur in corners, preventing cracks or water infiltration. Grout, on the other hand, is more rigid and prone to cracking in areas of frequent movement. So remember, when it comes to shower corners, caulk is your best friend!
Now that you have all the answers to your burning questions about transitioning ceramic tile to drywall in a shower, you’re ready to tackle your project with confidence. Say goodbye to gaps, uneven transitions, and unsightly finishes. Happy tiling!