Granite countertops are a popular choice for kitchens and bathrooms due to their durability and timeless beauty. However, when it comes to faucet holes in granite, there can sometimes be extra holes that are no longer needed or unsightly. So, what can you do with these unused faucet holes? How can you fix a chipped countertop or pitted granite? Is it normal for granite to have pits? These are just some of the questions we’ll be answering in this comprehensive guide.
In this blog post, we’ll walk you through the steps to effectively cover and plug faucet holes in granite. We’ll also explore different options for filling extra sink holes, as well as techniques to repair and restore damaged granite countertops. Whether you’re a DIY enthusiast or simply looking for ways to maintain and enhance your granite surfaces, this guide will provide you with the knowledge and tips you need. Keep reading to discover how to transform your granite countertops into pristine, seamless works of art.
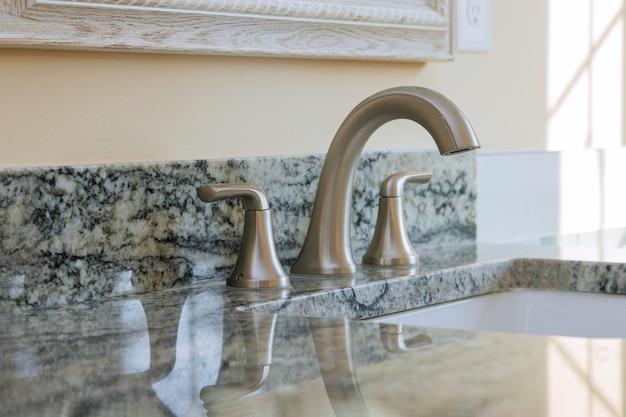
How to Fill Those Tricky Faucet Holes in Granite
So, you’ve got yourself a beautiful granite countertop. It’s like a work of art, and you’re proud to have it in your kitchen. But there’s one small problem: those faucet holes. They’re just sitting there, unsightly and reminding you of the plumbing work you had to do. Fear not, my friend, because I’m here to teach you the fine art of plugging those pesky granite faucet holes. Let’s dive in!
Assess the Situation
Before we start plugging away, take a moment to assess the situation. Look at the size and depth of the holes. Are they big or small? Shallow or deep? This information will help you determine the best approach for plugging them up. It’s like solving a puzzle, but without the frustration of missing pieces.
Step 1: Gather Your Materials
Now that you know what you’re dealing with, it’s time to gather your materials. You’ll need some epoxy adhesive, a putty knife, and a rag. Oh, and don’t forget the most important ingredient: your unwavering determination. With this arsenal at your disposal, you’re ready to tackle those faucet holes like a pro.
Step 2: Prepare the Epoxy Adhesive
Ah, epoxy adhesive. The superhero of hole-plugging materials. Mix equal parts of the epoxy resin and hardener on a clean, disposable surface. Like a match made in DIY heaven, these two components will create a strong bond that can withstand the tests of time. It’s like the granite countertop equivalent of a power couple.
Step 3: Apply the Magic Potion
With your epoxy adhesive mixed and ready for action, it’s time to apply it to the faucet holes. Use your trusty putty knife to carefully spread the adhesive over the holes, making sure to fill them completely. Don’t hold back here; the more adhesive, the better. It’s like giving those holes a spa treatment, filling them up until they’re content and whole.
Step 4: Smooth Things Over
After you’ve filled the holes with adhesive, take a moment to smooth things over. Use the flat side of your putty knife to level the adhesive with the surrounding granite surface. This step is crucial for achieving that seamless look. You want those faucet holes to disappear so seamlessly that they become the Houdini of your kitchen.
Step 5: Wipe Away the Evidence
Once you’ve achieved the perfect level surface, it’s time to wipe away the evidence. Grab your trusty rag and lightly dampen it with water. Gently wipe away any excess adhesive from the granite surface, leaving behind a clean and polished finish. It’s like giving your countertop a spa day, complete with a rejuvenating facial that leaves it looking radiant.
And there you have it! A step-by-step guide to plugging faucet holes in granite. Now you can enjoy your beautiful countertop without those unsightly reminders of the plumbing work. Give yourself a pat on the back for a job well done. You’ve successfully tackled the world of DIY with style, grace, and a touch of humor. Bravo, my friend, bravo!

FAQ: How To Plug Faucet Holes In Granite
In our never-ending quest for the perfect kitchen and bathroom aesthetics, sometimes we end up with unused faucet holes in our beautiful granite countertops. Fear not! In this FAQ-style guide, we will answer all your burning questions about plugging faucet holes in granite.
What can I do with unused faucet holes
Ah, the possibilities are endless! If you’re feeling artsy, you can turn those unused faucet holes into mini herb gardens. Just place some lovely pots, fill them with soil, and voilà! You have a stylish addition to your countertop. Alternatively, you can use the holes to mount soap dispensers or even go for the classic stainless steel plug to keep things sleek and shiny.
Why is there an extra hole in the sink
Ah, the mystery of the extra hole! Sometimes, it seems like sinks have a sense of humor, playing games with us homeowners. The truth is, that extra hole is meant for a variety of purposes. It could be for a soap dispenser, a side sprayer, a separate filtered water faucet, or even a fancy air gap for your dishwasher. So, next time you spot that extra hole, embrace the mystery and get creative!
Is it normal for granite to have pits
Yes, it is normal for granite to have pits. Think of them as tiny character marks that give your countertop a unique personality. Just like the quirks that make us human, granite can also have its imperfections. These natural pits occur during the formation process and are usually filled with a resinous substance during fabrication. However, if the pits bother you, there are ways to minimize their appearance and keep your countertop looking smooth and flawless.
Should my granite countertop be smooth
Absolutely! A smooth countertop not only looks stunning, but it also makes cleanup a breeze. If you find any rough spots or areas with pits, don’t fret. You can easily polish your granite countertop using a specialized granite polish and a little bit of elbow grease. In no time, you’ll have a smooth surface that rivals a baby’s bottom!
How do I cover a hole in a bathroom sink
Ah, the elusive hole cover. Don’t worry, we’re here to save the day! To cover a hole in a bathroom sink, you can use a decorative escutcheon plate or a sleek chrome cover plate. Simply place it over the hole, tighten it snugly, and watch that hole disappear like magic! It’s a small fix with a big impact on your bathroom’s aesthetics.
How can you tell the quality of granite
When it comes to granite, quality is key. To determine its quality, you need to look out for a few things. First, check for consistency in color and pattern throughout the slab. A high-quality piece of granite will also have a smooth and glossy surface. Another important factor is the thickness of the slab; thicker granite tends to be of better quality. So, run your hand over the surface, inspect it closely, and remember, trust your instincts, because granite never lies!
How do you fix a chipped countertop
Oh, no! A chipped countertop can be a real buzzkill. But fear not, brave homeowner! You can rescue your granite using some epoxy resin. Clean the chip and surrounding area with a mild detergent, apply the epoxy resin, and let it cure. Then, sand the area smooth and polish it until it’s seamlessly integrated into the rest of the countertop. And just like that, your countertop will be picture-perfect once again.
How do you stop a plug hole from leaking
Ah, the elusive leaking plug hole! To stop it from wreaking havoc on your kitchen or bathroom, try using plumber’s putty. Take a small amount, roll it into a snake-like shape, and place it around the underside of the plug hole’s flange. Then, carefully push the plug hole back into place and tighten it up. And viola! Your plug hole will be watertight, making leaks a problem of the past.
How do you seal a granite countertop faucet
Sealing a granite countertop faucet is as easy as pie! Begin by completely removing the faucet fixture. Then, clean the area thoroughly using a mild granite cleaner and a soft cloth. Once the surface is dry, apply a thin layer of clear silicone sealant around the hole. Now, carefully place the faucet fixture back into position and tighten it according to the manufacturer’s instructions. Remember, a sealed faucet hole is a happy faucet hole!
How do you seal a countertop faucet
Sealing a countertop faucet is a simple process. Start by turning off the water supply to the faucet. Then, clean the area around the faucet with a gentle cleanser and dry it thoroughly. Once the area is clean and dry, apply a small bead of silicone sealant around the base of the faucet. Gently press the faucet down onto the countertop and wipe away any excess sealant. Let it dry according to the sealant manufacturer’s instructions, and there you have it – a perfectly sealed countertop faucet!
Where do you put silicone sealant on a faucet
Ah, the magical powers of silicone sealant! To achieve a watertight seal for your faucet, apply the silicone sealant around the base of the faucet where it meets the countertop. Ensure you create a complete circle around the base to prevent any pesky leaks. Just remember, a little sealant goes a long way, so don’t go overboard!
How do I cover an extra faucet hole
Covering an extra faucet hole is easier than you think! You can find decorative faucet hole plugs in various finishes, such as stainless steel or chrome, to seamlessly blend with your existing fixtures. Simply insert the plug into the extra hole and tighten it until it sits flush with the countertop. It’s like giving your countertop a quick makeover without the need for expensive renovations!
What do I put in an extra sink hole
The possibilities for the extra sink hole are endless! You can unleash your creative side and turn it into a stylish accessory. Consider adding a liquid soap dispenser for a touch of luxury, a built-in lotion dispenser for extra pampering, or even a filtered water dispenser for a healthier hydration option. So, bid farewell to the empty sink hole and say hello to customization!
How do you repair a damaged granite countertop
Whoops! Accidents happen, but luckily, granite is a forgiving material. If you find a damaged spot on your countertop, such as a scratch or a stain, you can remedy the situation. Begin by cleaning the damaged area with mild soap and warm water. For scratches, you can gently buff the area with a fine steel wool pad. For stains, create a paste using baking soda and water, apply it to the stain, and let it sit for a few hours before rinsing it off. With a little TLC, your granite countertop will be back to its glorious self!
Should I silicone around a kitchen faucet
Absolutely! Adding a thin bead of silicone caulk around your kitchen faucet will provide an extra layer of protection against water damage and leaks. It’s a small step that can make a big difference in the longevity of your kitchen faucet. So go ahead, grab that silicone caulk, and give your faucet the love and support it deserves.
How much does it cost to repair a chip in granite
Ah, the cost of chip repair – the million-dollar question! While it’s difficult to pinpoint an exact cost without knowing the specifics of your granite and the extent of the damage, you can expect to spend anywhere from $100 to $500 for chip repair. However, keep in mind that this cost is a small investment to restore the beauty and functionality of your granite countertop. So, let the repair wizards work their magic and bid farewell to that pesky chip!
Do all kitchen sinks have three holes
Ah, the mystical world of kitchen sinks and their hole count. While the majority of kitchen sinks feature three holes, each with its own purpose, it’s essential to note that sink design has evolved over time. Nowadays, you can find a wide range of kitchen sinks with different hole configurations to accommodate varying faucet styles and accessories. So, be prepared to explore the vast realm beyond the traditional three holes!
How do you fill a granite countertop with chips
Ah, the quest to fill the chipped abyss! To fill a chip in your granite countertop, start by cleaning the damaged area with mild soap and warm water. Once the area is dry, apply a granite epoxy resin filler that matches the color of your countertop. Smooth it out using a putty knife, ensuring it fills the chip completely. Allow the filler to cure, then gently sand the surface until it’s flush with the surrounding granite. Finally, polish the area to a glossy finish, and presto! Your chipped countertop will be practically good as new.
How do you fix pitted granite
Pitted granite got you down? Fear not, for there is a solution! Begin by cleaning the pitted area with mild soap and water. Once dry, apply a granite epoxy resin filler to the pits using a putty knife. Smooth it out and ensure the pits are completely filled. Allow the filler to cure before gently sanding the area until it’s smooth. Finish off by applying a granite polish to restore the shine and protect the surface. Goodbye, pitted granite – hello, smooth and flawless perfection!
Enjoy Your Granite Paradise
With this comprehensive FAQ guide on how to plug faucet holes in granite, you are now armed with all the knowledge to transform your kitchen and bathroom into granite paradises. Whether you’re covering holes, sealing faucets, or repairing chips, your granite countertops will shine brighter than ever before. So go forth, brave homeowner, and embrace the beauty of granite with confidence!