Are you tired of your old landscape edging and looking to give your garden a fresh new look? Removing landscape edging can be a daunting task, especially if you’ve never done it before. But fear not! In this blog post, we will guide you through the process of removing landscape edging step by step, ensuring that you don’t damage your garden or surrounding areas in the process.
From plastic border edging to bender boards and aluminum trim, we’ll cover various types of landscape edging and provide you with practical tips and tricks to make the removal process a breeze. Whether you’re dealing with adhesive-backed wallpaper or an old wallpaper border that has been there for decades, we’ve got you covered with effective removal methods.
So, if you’re ready to transform your garden and remove that outdated landscape edging, grab your tools and let’s get started!
How To Remove Landscape Edging
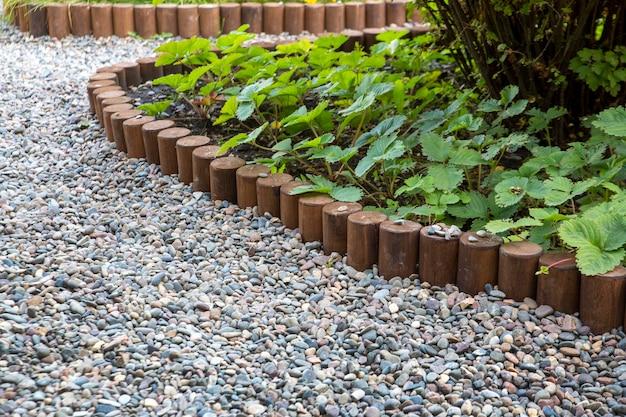
When it comes to sprucing up your garden, landscape edging can be a great addition. It helps define and separate different areas, adding aesthetics to your outdoor space. But what do you do when you decide it’s time for a change? Fear not, my fellow garden enthusiasts! I’m here to guide you through the process of removing landscape edging with ease and a sprinkle of humor.
Assess the Situation
Before you grab your tools and dive into the edging removal process, take a moment to assess the situation. Evaluate the type of edging you have and its condition. Is it made of plastic, metal, or some other material? Is it worn out, damaged, or simply not serving its purpose anymore? Understanding these factors will help you determine the best approach for removal, saving you time and potential frustration.
Gather Your Arsenal
Now that you’ve acquainted yourself with the edging, it’s time to gather your arsenal of tools. You’ll want to arm yourself with a sturdy pair of gloves, a trusty shovel, a rubber mallet, and a spade or pry bar. Oh, and let’s not forget patience – that’s an essential tool too.
Loosen and Lift
With your tools at the ready, it’s time to get down and dirty. Start by using the spade or pry bar to loosen the edging. Gently insert it under the edging, applying gentle pressure to lift it upwards. If you’re dealing with plastic edging, a rubber mallet can come in handy. Give it a few taps to loosen the ground and make lifting easier. Just remember, you’re not auditioning for a percussion band, so go easy on those drumming skills!
Work Your Way Around
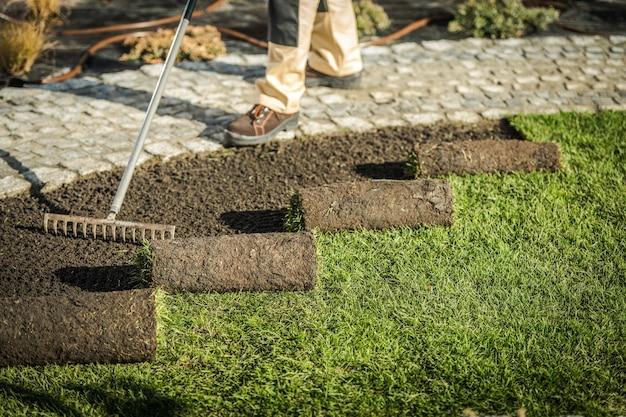
Remove landscape edging one section at a time, working your way around the garden. Take your trusty shovel and dig around the edging, creating space to lift it out. This process may be a bit demanding, but hey, who said gardening was all rainbows and butterflies? Remember, the end result will be worth the effort, and you’ll have arms like a seasoned landscaper by the time you’re done!
Handle with Care
As you lift each section of the edging, handle it with care – like a fragile flower in your garden. Depending on the material, you might be able to reuse it elsewhere or recycle it responsibly. If it’s in good condition, give yourself a pat on the back for being environmentally conscious. And let’s face it, who doesn’t love a good pat on the back?
Fill the Void
Congratulations! You’ve successfully removed the landscape edging. Now, it’s time to fill in the void left behind. Use your shovel to level the ground, removing any debris or remnants of the edging. Consider adding some fresh soil or mulch to give your garden a rejuvenated look and feel. It’s like giving your green space a little makeover – your plants will love you for it!
The Joy of a Blank Canvas
With the landscape edging removed and the ground leveled, you now have a blank canvas to work with. Let your creative juices flow and reimagine your garden design. Whether you choose to leave the space open or introduce a new type of edging, the choice is yours. Embrace the freedom to transform your garden into a masterpiece that’s totally edging on perfection!
FAQ: How To Remove Landscape Edging
Can you paint over border
Yes, you can paint over a landscape border to give it a fresh new look. Before painting, it’s important to clean the surface and ensure it is free from dirt, grime, and loose debris. Sand any rough areas to create a smooth surface for the paint to adhere to. Use a high-quality exterior paint that is suitable for the material of your landscape border. Apply multiple thin coats for a professional finish, allowing each coat to dry completely before applying the next.
How many stakes should a bender board have
The number of stakes required for a bender board will depend on its length and the type of soil it is being installed in. As a general guideline, it is recommended to use one stake for every 4 to 6 feet of bender board. This helps to keep the board securely in place and prevent shifting or movement over time. However, in softer or looser soil, you may need to use additional stakes for added stability.
Are bender boards recyclable
Yes, most bender boards are recyclable. Bender boards are commonly made from recycled plastic or composite materials, which can be recycled after their useful life is over. When disposing of old or damaged bender boards, check with your local recycling facility to ensure they accept this type of material. Proper recycling helps reduce waste and contributes to a more sustainable environment.
How do you remove adhesive-backed wallpaper
Removing adhesive-backed wallpaper can be a sticky situation, but don’t worry, we have a solution! Follow these steps for a smooth removal process:
-
Start by scoring the wallpaper surface using a scoring tool or utility knife. This will create small perforations that will allow the removal solution to penetrate and loosen the adhesive.
-
Prepare a wallpaper removal solution by mixing warm water with a wallpaper removal concentrate or fabric softener. Follow the product instructions for the proper dilution ratio.
-
Apply the removal solution generously to the wallpaper surface using a sponge or sprayer. Allow it to soak in and soften the adhesive for the recommended amount of time, usually around 15 minutes.
-
Once the adhesive is sufficiently softened, use a wallpaper scraper or putty knife to gently lift and peel off the wallpaper. Work slowly and carefully to avoid damaging the underlying surface.
-
If any stubborn patches of adhesive remain, reapply the removal solution and let it soak for a bit longer. Then, scrape off the remaining adhesive.
-
Finally, clean the wall with warm water and mild detergent to remove any residue. Rinse thoroughly and allow the wall to dry completely before applying new wallpaper or paint.
How do you install plastic border edging
Installing plastic border edging is a straightforward process that can enhance the aesthetics and functionality of your landscape. Follow these steps to get the job done right:
-
Start by laying out the desired path or border line. Use stakes or markers to define the edges and guide the installation process.
-
Dig a trench along the marked line, making sure it is deep enough to accommodate the height of the plastic border edging.
-
Place the plastic border edging in the trench, pushing it firmly into the soil. Ensure the top edge is level with the desired ground level.
-
If the edging comes in sections, overlap the ends by a few inches to create a seamless connection. Secure the sections together using the provided connectors or clips.
-
Use a rubber mallet or hammer to tap the top edge of the edging to ensure it is secure and level.
-
Backfill the trench with soil, packing it firmly around the edging to provide stability. Smooth out the surface with a rake or shovel.
-
Finally, water the area to settle the soil and help the edging blend naturally into the landscape.
How do you get wall border off
Removing a wall border doesn’t have to be a tedious task. Here’s a simple method to get that border off your wall:
-
Start by wetting the wall border using a sponge or spray bottle filled with warm water. This will help to loosen the adhesive and make the removal process easier.
-
Once the border is moistened, use a putty knife or scraper to gently lift and peel away a corner or edge of the border. Be careful not to damage the underlying wall surface.
-
Slowly continue peeling the border off, working your way along the length of the wall. Apply more water if needed to keep the border moist and pliable.
-
If the adhesive is stubborn and difficult to remove, you can use a wallpaper removal solution or fabric softener diluted with warm water. Apply it to the border and let it soak for a few minutes before attempting to peel it off again.
-
After removing the entire border, clean the wall with warm water and mild detergent to remove any residue or adhesive that may have been left behind.
-
Let the wall dry completely before applying new paint or wallpaper.
How do you remove a plastic border
Removing a plastic border can be a breeze with the right approach. Follow these steps to remove a plastic border efficiently:
-
Start by locating the starting point of the border. Look for a corner or an edge where you can easily get a grip.
-
Use your fingers or a pair of pliers to grip the edge of the plastic border firmly. Slowly and steadily, start peeling the border away from the wall surface.
-
If the border is securely attached or the adhesive is resistant, you can use a hairdryer to apply heat to the border. The heat will soften the adhesive, making it easier to remove. Hold the hairdryer a few inches away from the border and move it along the length of the border as you peel it off.
-
Be patient and take your time when peeling off the border. Rushing the process may cause the border to break or leave adhesive residue on the wall.
-
Once the border is completely removed, clean the wall with warm water and mild detergent to remove any remaining adhesive or residue.
-
Allow the wall to dry thoroughly before applying new paint, wallpaper, or any other decorative finish.
How do you remove a 20-year-old wallpaper border
Removing a wallpaper border that has been in place for 20 years might be a bit trickier, but don’t worry, it’s not impossible! Just follow these steps:
-
Start by scoring the surface of the wallpaper border using a scoring tool or utility knife. This will create small punctures that allow the removal solution to penetrate and loosen the adhesive.
-
Mix warm water with a wallpaper removal concentrate or fabric softener according to the product instructions.
-
Apply the removal solution generously to the wallpaper border using a sponge or sprayer. Allow it to soak in for a longer period than usual, around 30 minutes or more, to thoroughly soften the adhesive.
-
Once the adhesive is sufficiently softened, use a wallpaper scraper or putty knife to carefully lift and peel off the wallpaper border. Take your time and work in small sections to avoid damaging the wall.
-
If any stubborn patches of adhesive remain, reapply the removal solution and let it soak for an extended period. Then, scrape off the remaining adhesive.
-
After removing the border, clean the wall with warm water and mild detergent to remove any residue. Rinse thoroughly and allow the wall to dry completely before applying new wallpaper, paint, or other wall finishes.
How do you remove aluminum trim
Removing aluminum trim can be a delicate process to avoid damaging the surrounding surfaces. Follow these steps for a safe and effective removal:
-
Start by protecting the adjacent surfaces that you don’t want to damage. Use painter’s tape or any other protective covering to create a barrier between the trim and the surrounding areas.
-
Locate the screws or fasteners that are holding the aluminum trim in place. These are usually situated at regular intervals along the length of the trim.
-
Using a screwdriver or a suitable tool, carefully remove the screws or fasteners. Take your time and ensure you have a good grip on the screw head to prevent stripping or damaging it.
-
Once all the screws or fasteners have been removed, gently pry the aluminum trim away from the surface using a putty knife or a similar flat tool. Work slowly and gradually to avoid causing any damage.
-
If the trim is firmly stuck or sealed, use a heat gun or a hairdryer to apply heat to the trim. The heat will help soften any adhesive or sealant, making it easier to remove the trim. Apply heat while simultaneously loosening the trim with a putty knife or a similar tool.
-
After removing the aluminum trim, clean the surface with warm water and mild detergent to remove any remaining adhesive or residue.
How do you repair lawn edging
If your lawn edging has seen better days, here’s how you can repair it and bring it back to its former glory:
-
Start by assessing the damage to determine the extent of the repair needed. Common issues include cracks, breaks, or sections that have come loose from the ground.
-
For cracks or breaks, clean the affected area with a brush or hose to remove any dirt or debris. Apply an adhesive specifically designed for the material of your lawn edging to bond the broken pieces back together. Follow the product instructions for the recommended application method and drying time.
-
If a section of the edging has come loose from the ground, dig a trench along the edge of the section to expose the roots or stakes that hold the edging in place.
-
Reattach the section by pushing it firmly back into the ground or reattaching it to the stakes. Use additional stakes if necessary for added stability.
-
Fill any gaps or holes around the repaired area with soil and pack it firmly to ensure the edging is secure.
-
Water the repaired area to settle the soil and help the edging blend seamlessly with the rest of your lawn.
How do you remove a wallpaper border with vinegar
Vinegar can be a handy household ingredient for removing a wallpaper border. Here’s how you can use it for an effective removal process:
-
Mix equal parts of white vinegar and warm water in a spray bottle. This mixture will act as a natural wallpaper removal solution.
-
Spray the vinegar-water solution generously onto the wallpaper border. Let it soak for a few minutes to allow the vinegar to penetrate and loosen the adhesive.
-
Once the adhesive is sufficiently softened, use a putty knife or scraper to gently lift and peel off the wallpaper border. Work slowly and carefully to avoid damaging the wall surface.
-
If the adhesive is stubborn, you can spray more of the vinegar-water solution onto the border and let it sit for a longer period.
-
After removing the wallpaper border, clean the wall with warm water and mild detergent to remove any vinegar residue or adhesive that may have been left behind.
-
Allow the wall to dry completely before applying new paint or wallpaper.
How do you install metal garden edging
Installing metal garden edging can add a sleek and modern touch to your outdoor space. Here’s how you can install it with ease:
-
Start by laying out the desired path or border line. Use stakes or markers to define the edges and guide the installation process.
-
Use a garden spade or shovel to dig a trench along the marked line. The depth of the trench should accommodate the height of the metal garden edging plus a few inches for stability.
-
Place the metal garden edging in the trench, ensuring the top edge is level with the desired ground level. Cut the edging to size if necessary, using tin snips or a metal saw.
-
If the edging comes in sections, overlap the ends by a few inches to create a seamless connection. Secure the sections together using metal connectors or screws designed for the purpose.
-
Use a rubber mallet or hammer to tap the top edge of the edging to ensure it is secure and level.
-
Backfill the trench with soil, packing it firmly around the edging to provide stability and prevent shifting. Smooth out the surface with a rake or shovel.
-
Finally, water the area to settle the soil and give your metal garden edging a finished and polished look.
How do you install landscape fabric edging
Landscape fabric edging can help suppress weed growth and maintain a neat and tidy appearance for your garden beds. Here’s how to install it:
-
Start by preparing the area where you want to install the landscape fabric edging. Remove any existing vegetation, rocks, or debris to create a clean surface.
-
Lay out the landscape fabric along the edge of the garden bed, ensuring it overlaps the desired width of the edging. Cut the fabric to size if needed.
-
Use landscape fabric pins or stakes to secure the fabric to the ground. Place the pins at regular intervals along the length of the edging, ensuring they penetrate the fabric and anchor it securely.
-
As you install the landscape fabric, fold it along curves or corners to create a smooth and continuous edge. Use additional pins or staples to hold the fabric in place.
-
Once the landscape fabric is installed, cover it with a layer of mulch or decorative gravel. This will help anchor the fabric, provide additional weed suppression, and give your garden bed a clean and polished look.
How do I remove the border from a text box
Removing a border from a text box is a straightforward process. Follow these steps to get rid of that unwanted border:
-
Select the text box by clicking on it. You should see small squares or handles around the borders of the text box, indicating that it is selected.
-
Look for the formatting options in your word processing or design software. This is usually located in the toolbar or under the “Format” menu.
-
Find the “Border” or “Outline” options. Click on it to open the border settings for the text box.
-
In the border settings, look for an option to remove or disable the border. It might be called “No Border,” “None,” or simply a checkbox to turn off the border.
-
Click on the option to remove the border. The border should disappear from the text box, leaving it without any visible outlines.
-
If the border doesn’t disappear immediately, try deselecting and reselecting the text box to update the changes.
How do you remove a wallpaper border with a hairdryer
Using a hairdryer can be an effective method to remove a wallpaper border. Here’s how you can do it:
- Start by warming up the wallpaper border