Are you looking for a way to update your home’s flooring without the hassle of removing ceramic tiles? Well, you’re in luck! In this blog post, we will explore the process of leveling ceramic tile for vinyl flooring, allowing you to achieve a smooth and even surface for your new flooring.
Whether you want to install luxury vinyl or another type of flooring over existing ceramic tiles, leveling the subfloor is crucial for a successful and long-lasting result. We’ll guide you through the steps of leveling a subfloor and answer common questions like whether you need underlay with vinyl flooring and what other types of flooring can be installed over ceramic tiles.
So, if you’re ready to give your floors a fresh new look, let’s dive in and discover how to level ceramic tile for vinyl flooring to create a beautiful and functional space in your home.
How to Level Ceramic Tile for Vinyl Flooring
Why Leveling Your Ceramic Tile Matters
When it comes to installing vinyl flooring over ceramic tile, having a level surface is crucial. Not only does it ensure a smooth and professional-looking finish, but it also extends the lifespan of your vinyl flooring. So, let’s dive into the nitty-gritty of leveling ceramic tile for vinyl flooring and make this process as easy as pie!
Assessing the Tile Situation
Before we jump into action, take a moment to evaluate the condition of your ceramic tile. Are there any loose or cracked tiles? Are they uneven across the surface? Addressing these issues beforehand will save you headaches down the line. Plus, you’ll avoid that awkward moment when your guests trip over a lumpy tile and pretend it was nothing.
Grab Your Superhero Gear: Tools and Materials
Alright, it’s time to gear up like a DIY superhero! Here’s what you’ll need:
1. A Floor Leveling Compound
Think of it as the magic potion that will transform your bumpy tile surface into a smooth and level wonderland. Look for a self-leveling compound that can withstand the weight and traffic of daily life—because, let’s face it, your home is your kingdom.
2. A Drill with Mixing Attachments
To prepare the leveling compound, you’ll need a trusty drill with mixing attachments. Imagine the drill as your sidekick—a reliable companion to help you achieve the perfect consistency.
3. A Trowel or Notched Trowel
Get ready to channel your inner artist with a trowel or notched trowel. You’ll use these tools to apply and spread the leveling compound—consider it your chance to show off your secret superhero talents.
4. A Bubble Level
No, not the kind you blow and watch float away—this one stays firmly on the ground. Your bubble level will be the judge, jury, and executioner of whether your tile is level or not. Warning: It’s known for giving harsh but fair judgments.
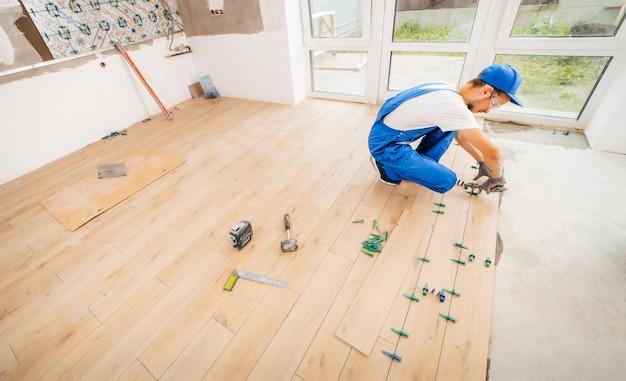
Step-by-Step Leveling Process
Now that we’ve assembled our superhero gear, it’s time to put on our DIY capes and get to work. Follow these steps for a flawless leveling experience:
1. Clean and Prepare the Tile Surface
Like any good superhero, cleanliness and preparation are key. Start by cleaning the tile surface, removing any debris or remnants of your previous battles. Trust us, a clean canvas makes for a smooth and even outcome.
2. Mix the Leveling Compound
Get your trusty drill and mixing attachment ready. Follow the instructions on your leveling compound packaging to achieve the perfect consistency. Be warned: over-mixing can lead to a sticky situation, so tread lightly, my DIY apprentice.
3. Apply the Leveling Compound
Time to unleash your inner artist! Gently pour the leveling compound onto the ceramic tile surface and use your trowel or notched trowel to spread it evenly. Remember, this is your chance to show off your superhero skills—make it smooth and level like a true pro.
4. Use the Bubble Level to Ensure Evenness
Bring out the bubble level and let the judgment begin. Place it on different areas of the surface and let it determine the fate of each tile. Adjust the leveling compound as needed to achieve a picture-perfect levelness. Spoiler alert: the bubble should be right in the middle—not too high, not too low—just like Goldilocks’ porridge.
Finishing Touches for a Heroic Finish
You’ve mastered the art of leveling ceramic tile for vinyl flooring, but there are a few last steps before you can declare victory. Follow these finishing touches to complete your heroic mission:
1. Allow the Leveling Compound to Dry
Patience is a virtue even for DIY superheroes. Allow the leveling compound to dry according to the manufacturer’s instructions. It may take some time, but remember—Rome wasn’t built in a day, and neither was your perfectly leveled floor.
2. Smooth Out Imperfections
Inspect the surface for any remaining imperfections once the leveling compound is dry. If you find any uneven areas, use sandpaper or a floor scraper to smooth them out. Remember, you’re aiming for a flawless finish worthy of a superhero’s sanctuary.
With these steps, you’re now armed with the knowledge and tools to level ceramic tile for vinyl flooring like a true DIY superhero. So go forth and conquer that bumpy tile, leaving behind a beautifully leveled surface that’s sure to impress both friends and foes. Good luck, and may the leveling force be with you!
FAQ: How To Level Ceramic Tile For Vinyl Flooring
Are you considering installing vinyl flooring over your existing ceramic tiles? If so, you probably have a few questions about how to ensure a level surface and achieve a successful installation. Fear not! We’ve compiled a list of frequently asked questions to guide you through the process. So, let’s dive in and address your concerns head-on!
Can I cover my floor tiles without removing them
Yes, you can! If your ceramic tiles are in good condition and firmly adhered to the subfloor, you have the option to install vinyl flooring right over them. It’s a convenient and cost-effective solution that saves you the hassle of tile removal.
How do you level a subfloor
Leveling a subfloor is essential for a flawless vinyl flooring installation. Here are some steps to achieve a leveled surface:
- Inspect the subfloor: Check for any loose tiles or damaged areas. Repair or replace them if necessary.
- Clean the surface: Remove any dirt, debris, or adhesive remnants from the subfloor.
- Fill low spots: Use a leveling compound to fill in any depressions or uneven areas. Follow the manufacturer’s instructions for application and drying time.
- Sand down high spots: If you encounter high points on the subfloor, carefully sand them down until the surface is smooth and level.
- Ensure stability: Confirm that the subfloor is stable and free from movement or flexing, as it could cause future problems with your vinyl flooring.
Can luxury vinyl be installed over tile
Absolutely! Luxury vinyl is a versatile flooring option that can be installed over existing ceramic tile. Its durability and flexibility make it an excellent choice for covering up outdated or damaged tiles, giving your space a fresh new look without the need for extensive renovations.
What flooring can I put over ceramic tiles
Besides luxury vinyl, there are other flooring options that can be installed over ceramic tiles:
- Laminate Flooring: Laminate is a popular choice as it provides a similar wood or stone look without the high cost or maintenance.
- Engineered Wood Flooring: Engineered wood is made of layers, making it more stable than solid wood. It can be installed over tiles with the proper preparation.
- Carpet Tiles: If you prefer a softer underfoot feel, carpet tiles can be laid directly over ceramic tiles, providing comfort and insulation.
Do you need underlay with vinyl flooring
In most cases, underlay is not necessary when installing vinyl flooring over ceramic tiles. However, it’s essential to assess the condition of the existing tiles and subfloor. If there are significant imperfections or concerns about moisture, using an underlayment can provide additional stability and protection for your vinyl flooring.
How flat does a concrete floor need to be for laminate
For laminate flooring installation, it’s recommended that your concrete floor be reasonably flat with no more than a 3/16-inch deviation over a 10-foot span. However, always refer to the manufacturer’s guidelines for specific requirements, as different laminate flooring products may have varying tolerances.
Can you cover a tiled floor
Definitely! If you want to change the appearance of your tiled floor, you have several options. You can cover it with new vinyl flooring, laminate flooring, engineered wood flooring, or even carpet tiles. These alternatives provide a convenient way to update your space without the need for extensive tile removal.
Can laminate flooring go over tile
Yes, laminate flooring is suitable for installation over tile. However, it’s crucial to prepare the tile surface properly. Make sure the tiles are clean, free of cracks or loose sections, and level. Follow the manufacturer’s recommendations for underlayment or vapor barrier if necessary, and ensure that the laminate planks are properly acclimated to the room’s humidity level before installation.
What type of flooring is best for uneven floors
When dealing with uneven floors, luxury vinyl, carpet tiles, or engineered wood flooring are excellent choices. These options can adapt to minor irregularities in the subfloor, providing a more stable and visually appealing surface.
Can you lay vinyl flooring on an uneven floor
While vinyl flooring can handle some unevenness, it’s essential to ensure the subfloor is reasonably level. If there are major issues with your floor’s stability and unevenness, it’s recommended to address those concerns before installing vinyl flooring. Correcting the subfloor will help prevent future problems and ensure a long-lasting vinyl installation.
Should I remove tile before installing vinyl plank flooring
Removing ceramic tiles before installing vinyl plank flooring is not always necessary. If the tiles are in good condition, level, and well-adhered to the subfloor, you can install vinyl planks directly over them. Just remember to clean the tiles thoroughly and fill any grout lines or surface imperfections to create a smooth substrate.
How level does a concrete floor need to be for vinyl plank flooring
Ideally, the concrete floor should be reasonably level for a successful vinyl plank flooring installation. It’s generally recommended to have no more than a 3/16-inch deviation over a 10-foot span. However, always refer to the manufacturer’s instructions for their specific requirements, as different vinyl plank products may have varying tolerances.
What can you do with uneven floors
If you have uneven floors, there are several options available:
- Self-leveling compound: Use a self-leveler to create a smooth and even surface before installing new flooring.
- Floor grinding: Hire a professional to grind down high spots and level out the flooring.
- Floor shims: Place shims under the subfloor to eliminate unevenness and create a more level surface.
- Underlayment: Install an underlayment designed to compensate for minor irregularities and create a level base for your new flooring.
Does the floor need to be level for vinyl flooring
While vinyl flooring can tolerate minor unevenness, it’s generally recommended to have a reasonably level floor to ensure a successful installation. Leveling the floor helps prevent issues such as premature wear, shifting, or gaps between planks. Take the time to prepare the subfloor properly for optimal results.
Can you lay hardwood on uneven floors
Laying hardwood flooring on an uneven surface is not recommended. Hardwood requires a stable and level subfloor for proper installation. If your floor is uneven, consider leveling the surface before proceeding with hardwood installation or choose a more forgiving flooring option, such as engineered wood flooring.
How do you level a floor before installing vinyl
To level a floor before installing vinyl flooring, follow these steps:
- Inspect the subfloor: Check for any loose or damaged areas. Repair or replace them as needed.
- Clean the surface: Remove any debris or adhesive residue from the subfloor.
- Fill low spots: Use a self-leveling compound to fill in any depressions or uneven areas according to the manufacturer’s instructions.
- Sand down high spots: Carefully sand down any high points until the floor is smooth and even.
- Check stability: Confirm that the subfloor is stable and secure, without any movement or flexing.
- Ensure dryness: Make sure the subfloor is dry before proceeding with vinyl flooring installation.
Can you put other flooring over tile
Certainly! You can put other flooring options over tile, including vinyl, laminate, engineered wood, or carpet tiles. These alternatives allow you to update your space without the need for tile removal. Just ensure that the underlying tile is in good condition, level, and well-prepared for the new flooring material.
Now that we’ve answered your burning questions about leveling ceramic tile for vinyl flooring, you’re ready to embark on your home improvement journey. Remember to assess your specific situation, follow the manufacturer’s instructions, and take the necessary steps to create a smooth, level surface. Soon, you’ll be enjoying your new vinyl flooring with confidence and style!