Are you considering installing 12×24 ceramic tiles in your bathroom but not quite sure where to start? Look no further! In this comprehensive guide, we will walk you through the step-by-step process of installing 12×24 ceramic tiles in your bathroom, ensuring a beautiful and professional finish.
Whether you’re a seasoned DIY enthusiast or a beginner, this blog post will provide you with all the information you need. We’ll answer common questions such as whether large tiles are harder to install, the best adhesive for wall tile, the ideal grout line size for 12×24 porcelain tiles, and much more. So, let’s roll up our sleeves and get ready to transform your bathroom into a stunning space!
Dive into the world of tile installation as we guide you through each stage, so you can confidently tackle this project and give your bathroom a fresh, stylish upgrade.
The Step-By-Step Guide to Installing 12X24 Ceramic Tiles in Your Bathroom
Getting Started: Preparing Your Workspace
Before you dive into the exciting world of ceramic tile installation, it’s essential to make sure you’re ready to tackle this project like a pro. Here are the steps to get your workspace primed and prepped:
Clear the Path, Tile Crusader!
First things first, give your bathroom a good clearing. Remove all obstacles in your path, making sure you have ample space to move around with all the grace of a ballerina – or at least close to it!
Tools of the Tile Trade: Gather Your Arsenal
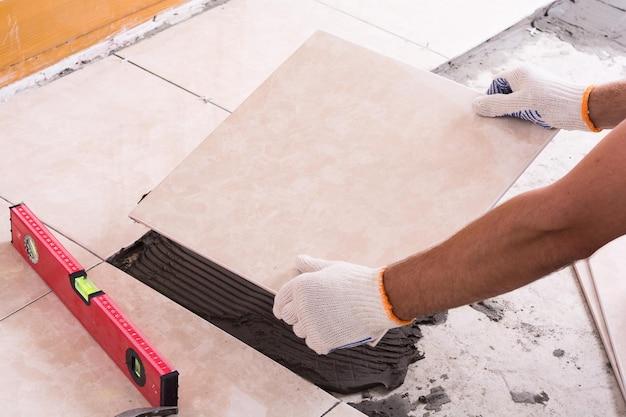
To conquer the challenge of installing 12X24 ceramic tiles, equip yourself with the right tools. You’re going to need a trowel, a notched trowel, a tile cutter, a tape measure, a level, a bucket, a sponge, and some good old-fashioned gloves to protect those precious hands of yours.
Laying Down the Law: Installing the Ceramic Tiles
Now that you’ve set the stage let’s dive into the main event – installing those magnificent ceramic tiles! Take a deep breath, and let’s jump in step-by-step.
Step 1: Creating a Solid Foundation
No, we’re not talking about building a monument here, but a solid foundation is crucial for your tile installation success. Start by cleaning and priming your bathroom floor. Smooth out any lumpy areas and make sure it’s squeaky clean. You don’t want any dirt showing through and raining on your parade.
Step 2: Planning Your Tile Layout
No need to hire a legendary architect for this job, but you will need to plan your tile layout carefully. Sketch out your masterpiece on paper before you go all Picasso on your bathroom floor. This way, you can avoid any unwanted surprises and ensure the end result is aesthetically pleasing.
Step 3: The Magical Mix – Preparing Your Adhesive
Time to summon your inner wizard and concoct the perfect adhesive mixture. Follow the manufacturer’s instructions carefully, as the perfect brew often involves a harmonious blend of water and adhesive powder. Stir it up until it’s velvety smooth, just like a chocolate milkshake.
Step 4: Unleash the Mortar Madness
Now comes the fun part – spreading the adhesive mortar on your clean, primed floor. Embrace your inner Michelangelo and use your notched trowel to create grooves in the mortar. This will make sure your tiles stick like glue… well, actually, more like mortar.
Step 5: Laying the Tiles with Finesse
It’s time to bring those stylish 12X24 ceramic tiles to the party and lay them down gently but firmly on your freshly spread mortar. Align them with care, ensuring uniform spacing and perfect symmetry. Use spacers to keep things looking oh-so-pretty and professional.
Step 6: Grout Like You Mean It
Now that your tiles are in place, it’s time to fill in the gaps like a pro with some grout. Mix up a batch according to the manufacturer’s instructions – just like following a secret recipe. Using a rubber float, spread the grout diagonally, embracing the zen of the tile installation process.
Step 7: A Wipe Here, A Wipe There – Cleaning up the Act
Once your grout has settled in and had a little siesta, it’s time to give it a gentle wake-up call. Grab a damp sponge and delicately wipe away the excess grout from the surface, revealing the shining glory of your tiled floor. It’s like watching a beautiful sunrise on a beach vacation – pure joy.
Step 8: The Waiting Game
Patience is a virtue, or so they say. Allow your tile installation masterpiece to dry completely before returning to normal bathroom activities and bringing in your army of rubber duckies for marching orders. This is crucial for the longevity of your tiles and the avoidance of footprints resembling Sasquatch’s.
Voila! You’re Now a Certified Tile Whisperer
Congratulations, you magnificent tile whisperer! You’ve successfully embarked on a journey of ceramic tile installation and emerged victoriously. Now sit back, relax, and bask in the glory of your newly transformed bathroom. You deserve it!
FAQ: How To Install 12X24 Ceramic Tile In A Bathroom
Are larger tiles harder to install
Installing larger tiles, such as 12×24 ceramic tiles, may seem daunting at first. However, with the right approach and tools, it can be a manageable task. While larger tiles may require more precise cutting and leveling, they also cover more surface area, resulting in fewer grout lines and potentially less installation time. So, while there might be a slight learning curve, it’s certainly not an impossible feat.
Which direction should 12×24 tile be laid
When it comes to laying 12×24 tiles, you have a couple of options. If you want to create a sense of length in a narrow bathroom, lay the tiles parallel to the longest wall. This technique can visually elongate the space and make it appear more spacious. On the other hand, if you prefer a traditional look, laying the tiles perpendicular to the wall or in a traditional grid pattern is a great choice. Ultimately, the decision depends on your personal preference and the aesthetic you’re aiming for.
What is the best adhesive for wall tile
For installing 12×24 ceramic tiles on a bathroom wall, it’s crucial to choose the right adhesive. Opt for a high-quality thinset mortar specifically designed for wall tiles. Thinset mortar offers excellent bond strength, ensuring your tiles stay securely in place. Be sure to follow the manufacturer’s instructions for mixing and application to achieve the best results.
How wide should grout lines be for 12×24 porcelain tile
Grout lines play an essential role in both the appearance and stability of your tile installation. For 12×24 porcelain tiles, a grout line width of 1/8 to 1/4 inch is commonly recommended. However, it’s worth noting that wider grout lines can help mask slight irregularities in the tile’s size or installation. Ultimately, the decision depends on your personal preference and the overall aesthetic you wish to achieve.
Where do you start when tiling a wall
When starting a wall tile installation, begin at the bottom and work your way up. This way, you can ensure that any cut tiles or uneven edges end up in less noticeable areas near the ceiling rather than at eye level. Starting from a level baseline and using a level or tile spacer is crucial to maintaining a straight and even installation.
What size spacers should I use for 12×24 tiles
To achieve consistent and evenly spaced grout lines for your 12×24 tiles, it’s recommended to use tile spacers. Suggested spacer sizes for this tile dimension range from 1/8 to 3/16 inch. These spacers will help maintain a uniform gap between the tiles and allow for the proper application of grout.
Should I lay floor tiles horizontally or vertically
The orientation of your floor tiles can have a significant impact on the overall look and feel of your bathroom. If you’re aiming to make the room appear wider, consider laying the tiles horizontally along the longest wall. This technique can create the illusion of expanded space. Alternatively, if you prefer a more traditional or elongated look, laying the tiles vertically might be the better option. Ultimately, the decision comes down to personal preference and the desired visual effect.
Which tile spacer size should I use
Choosing the right tile spacer size is crucial for a successful installation. For 12×24 tiles, it’s advisable to use tile spacers in the range of 1/8 to 3/16 inch. These spacers will help maintain consistent grout lines and ensure an even layout. Remember that the size of the spacers will also impact the overall look of your finished tile installation.
How big of a tile can you put on a wall
While there is no strict limit on the size of the tiles you can install on a wall, it’s important to consider the weight and dimensions of the tiles. Larger and heavier tiles, such as 12×24 ceramic tiles, require extra care during installation. Ensure that your wall is structurally capable of supporting the weight of the tiles, and use a suitable adhesive and installation method to ensure a secure bond.
Can you use 1mm tile spacers
While 1mm tile spacers are available, they are generally not recommended for use with 12×24 ceramic tiles. The thinness of 1mm spacers may not provide enough room for the grout, resulting in a compromised and potentially unstable grout line. It’s safer to opt for slightly larger spacers in the 1/8 to 3/16 inch range to ensure sufficient grout space and overall stability.
What size notched trowel do I need
Selecting the right notched trowel size is crucial for proper adhesive application and tile installation. For 12×24 ceramic tiles, it’s recommended to use a 1/2-inch notched trowel. This trowel size allows for adequate adhesive coverage on both the tile and the wall, ensuring a strong bond and proper tile positioning.
How wide should floor tile grout lines be
The width of floor tile grout lines depends on personal preference and the overall look you want to achieve. For 12×24 tiles, a grout line width of 1/8 to 3/16 inch is commonly used. However, wider grout lines can offer a more pronounced and distinct look, while narrower lines provide a more seamless and contemporary appearance. Consider your design aesthetic and practicality when determining the width of your floor tile grout lines.
Where do you start when tiling a shower wall
When tiling a shower wall, it’s best to start at the second row from the bottom. This allows you to create a level starting point without needing to cut tiles for the first row. Make sure to use a level or tile spacer to ensure your tiles are straight and properly aligned. From there, work your way up row by row, checking for levelness and making any necessary adjustments as you go.
Can I use 2mm spacers for floor tiles
While 2mm spacers are available, they are generally not recommended for floor tile installations, especially for larger tiles like 12×24. Using larger spacers (around 1/8 to 3/16 inch) is generally advised for floor tiles to allow for proper alignment, creating stronger grout lines, and accommodating any slight variations in tile size.
Which way do you lay tile to make a room look bigger
To make a room appear larger, consider laying your tiles diagonally. This technique creates diagonal lines that visually expand the space and give the illusion of a larger area. Additionally, using lighter-colored tiles can help enhance the effect and make the room feel spacious and airy.
What direction should I lay floor tiles
The direction you choose to lay your floor tiles depends on the overall aesthetic you want to achieve. For a standard look, lay the tiles in a traditional parallel or perpendicular pattern to the walls. However, if you’re aiming for a visually interesting or unique design, you can consider laying the tiles at an angle or in a herringbone pattern. Ultimately, it comes down to personal preference and the style you want to showcase in your bathroom.
What size notched trowel for 12×12 wall tile
For 12×12 wall tiles, a 1/4-inch notched trowel is commonly recommended. This trowel size will provide sufficient adhesive coverage on both the tile and the wall, ensuring a secure bond and proper tile placement. Using the right notched trowel size is crucial for a successful and long-lasting tile installation.
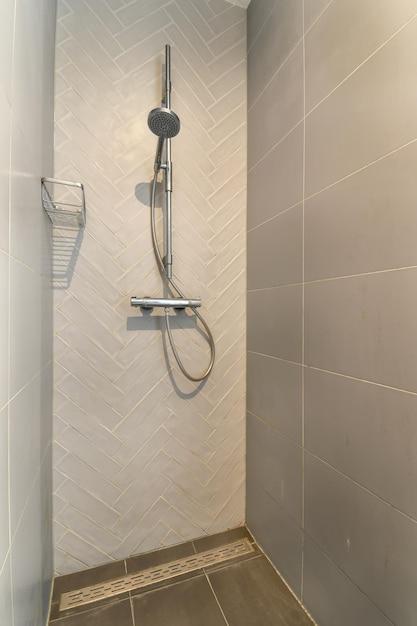
Can you put 12×24 tile on the wall
Absolutely! 12×24 tiles can be a fantastic choice for wall installations, especially in bathrooms. These larger tiles can add a modern and luxurious touch to your space, creating a sleek and seamless look. Just make sure your wall is properly prepared and structurally sound to support the weight of the tiles. Additionally, using an appropriate adhesive and following proper installation techniques will help ensure a successful and durable wall tile installation.
How much space should be between tiles
When setting tiles, it’s crucial to leave a small and consistent space between them, known as a grout line. For 12×24 ceramic tiles, a grout line width of 1/8 to 3/16 inch is commonly recommended. This spacing allows room for grout, which strengthens the installation, improves visual aesthetics, and accommodates slight size variations in the tiles.
What size grout joints should I use
Choosing the right size for your grout joints can significantly impact the overall aesthetic of your tile installation. For 12×24 porcelain tiles, grout joints should ideally be a minimum of 1/8 inch wide. However, if you prefer a bolder, more pronounced look, you can opt for wider grout joints up to 3/16 inch or more. Remember to choose a grout color that complements your tiles, enhancing the final appearance of your bathroom.
How big should grout joints be
Grout joints are important not only for aesthetics but also for the stability and durability of your tile installation. For 12×24 tiles, grout joints should typically be between 1/8 and 3/16 inch wide. These dimensions provide enough space for grout to fill while ensuring a clean and visually appealing finish. However, the final decision depends on your personal preference and the overall design of your bathroom.
How do I know what size tile spacer to use
Selecting the right tile spacer size is crucial for achieving proper spacing and alignment during tile installation. For 12×24 ceramic tiles, it’s recommended to use spacers in the range of 1/8 to 3/16 inch. However, the precise size depends on factors such as the desired grout line width and the specific tile dimensions. Consider your preferences, consult with tile experts, and conduct a test layout to determine the best spacer size for your project.
These FAQs provide valuable insights into the challenges and considerations when installing 12×24 ceramic tiles in a bathroom. From grout line width to tile spacer size, understanding the best approaches will help you achieve a successful and visually stunning tile installation. Remember to always follow manufacturer guidelines, use high-quality materials, and, most importantly, have fun throughout the process of transforming your bathroom!