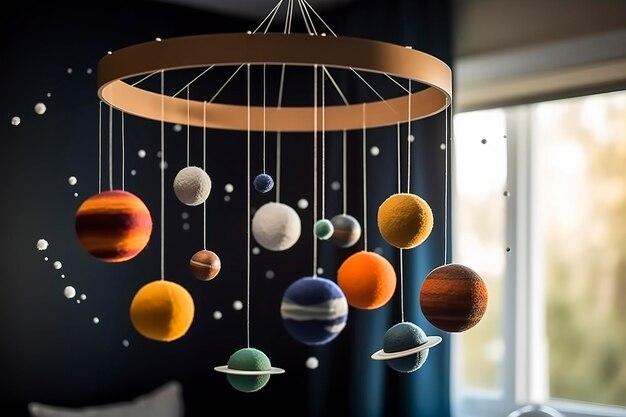
Have you ever wanted to bring the wonders of the solar system into your home? Hanging planets from the ceiling is a fantastic way to add a touch of celestial beauty to any room. Whether you’re creating a space-themed nursery or decorating your classroom, this blog post will provide you with step-by-step instructions on how to bring the planets to life and hang them securely.
In this guide, we’ll cover various topics related to hanging planets from the ceiling. You’ll learn how to make solar panels out of household items, hang foam planets, attach a hanger to a styrofoam ball, and even create a solar system mobile. We’ll also explore different materials for making a solar system model and painting styrofoam balls to resemble vibrant planets.
So get ready to bring the universe indoors and create a captivating display with our comprehensive guide on hanging planets from the ceiling in 2023. Let’s dive in!
How to Hang Planets From the Ceiling
Create a Cosmic Oasis in Your Room
Have you ever dreamed of having your very own solar system right above your head? With a little creativity and some stellar DIY skills, you can make that dream a reality! In this guide, we’ll show you step-by-step how to hang planets from your ceiling and transform your room into a cosmic oasis. Get ready to reach for the stars, folks!
Gather Supplies from Earth and Beyond
Before blasting off into space decorating, let’s gather all the supplies you’ll need for this celestial project. Here’s a list of what you’ll need to hang planets from your ceiling:
-
Planets (or foam balls): Choose various sizes and colors to create a realistic-looking solar system. Pro tip: Paint them with a glow-in-the-dark paint for some extra celestial flair.
-
Fishing line or clear thread: This will be the invisible force that suspends your planets in mid-air, giving them that weightless galactic vibe.
-
Adhesive hooks or ceiling clips: These handy tools will ensure your planets stay securely attached to the ceiling without leaving a trace when you decide to redecorate.
-
A ladder (or a jetpack, if you have one handy): Unless you’re an astronaut, a ladder is essential for reaching those high, ethereal heights of your ceiling.
Hang Like an Astronaut
Now that you have everything ready, it’s time to step into your astronaut shoes and start hanging those planets! Follow these simple steps:
Step 1: Choose the Perfect Placement
Before you start suspending planets left and right, take a moment to envision the perfect arrangement. Are you going for a straight line formation, or will you recreate the chaos of an asteroid belt? Once you’ve decided, mark the spots on your ceiling where you want each planet to hang.
Step 2: Attach the Hooks or Clips
Now that you’ve established the planet locations, it’s time to put those adhesive hooks or ceiling clips to good use. Carefully attach them to the ceiling, making sure they are placed at the exact spots you marked earlier. Double-check for alignment, because you wouldn’t want Venus to be mistaken for Mars!
Step 3: String ‘Em Up!
Here comes the fun part—watching your little planets take flight! Take a piece of fishing line or clear thread and cut it to your desired length. Tie one end to the hook or clip and the other end to the planet, making sure it’s secure. Repeat this step for each planet, adjusting the lengths to create depth and dimension.
Step 4: Admire Your Cosmic Creation
Stand back and marvel at your intergalactic masterpiece! Adjust the lengths of the strings as needed to achieve the perfect arrangement. Take a moment to bask in the wonder of the universe you’ve created within the confines of your own room. Remember, you’re not just hanging planets; you’re bringing the cosmos home!
Beyond the Stars
Now that you know how to hang planets from your ceiling, the cosmic possibilities are endless! Consider adding comets, shooting stars, or even a mini replica of the Hubble Space Telescope to enhance the galactic ambiance. And if the mood strikes, throw on some astronaut-themed bedding and transform your room into Mission Control. So go forth, intrepid space decorator, and make your room truly out of this world!
FAQ: How to Hang Planets from the Ceiling
How do you make a solar panel out of household items?
Making a solar panel out of household items might sound like science fiction, but it’s actually quite doable! Here’s a simple step-by-step guide to get you started:
- Gather your materials: You’ll need a piece of cardboard, aluminum foil, glue, a small fan motor, and some wires.
- Cut the cardboard: Start by cutting the cardboard into a square shape. This will serve as the base for your solar panel.
- Cover with foil: Take the aluminum foil and cover one side of the cardboard. Make sure it’s smooth and tightly secured.
- Attach the motor: Glue the small fan motor onto the foil-covered side of the cardboard. This will be the heart of your solar panel.
- Connect the wires: Connect one wire to the positive terminal of the motor and another wire to the negative terminal. Leave the other ends of the wires loose.
- Test it out: Place your homemade solar panel under direct sunlight and watch as the motor starts spinning. Congratulations, you’ve just harnessed the power of the sun!
How do you hang foam planets?
Hanging foam planets can add a touch of celestial wonder to any room. Here’s a simple guide to help you hang them flawlessly:
- Create a plan: Decide on the arrangement you want for your foam planets. Consider spacing, size, and the overall aesthetic you’re aiming for.
- Choose the right adhesive: Foam planets are lightweight, so using adhesive putty or double-sided adhesive tape is often the best option. They provide a strong hold without damaging the ceiling.
- Measure and mark: Use a measuring tape to mark the positions where you want to hang the planets. Make sure they are evenly spaced.
- Prepare the adhesive: Take a small piece of adhesive putty or cut a strip of double-sided adhesive tape for each planet. Roll it into a ball or shape it to fit the back of the foam planet.
- Stick the adhesive: Place the adhesive onto the back of the foam planet and press firmly against the ceiling at the desired spot. Hold it in place for a few seconds to ensure a secure bond.
- Repeat and adjust: Repeat the process for each foam planet, adjusting their positions as needed to achieve the desired arrangement. Step back and admire your cosmic masterpiece!
How do you hang a Styrofoam ball from the ceiling?
Hanging a Styrofoam ball from the ceiling is easier than launching it into space! Just follow these simple steps:
- Choose your method: You have a few options when it comes to hanging a Styrofoam ball. You can use adhesive putty, double-sided adhesive tape, or even create a string loop attached to a hook.
- Measure and mark: Use a measuring tape to mark the exact spot where you want to hang the Styrofoam ball. Make sure it’s centered and at the desired height.
- Prepare the hanging mechanism: If using adhesive putty or tape, cut a small piece and shape it into a ball or strip. If using a string loop, tie one end securely to the Styrofoam ball.
- Attach the hanging mechanism: For adhesive putty or tape, press the prepared piece onto the back of the Styrofoam ball. For a string loop, insert a hook into the ceiling and hang the loop securely on it.
- Check for stability: Gently tug on the Styrofoam ball to ensure it’s securely attached. Make any necessary adjustments to the hanging mechanism if needed.
- Enjoy the floating look: Step back and revel in the illusion of a Styrofoam ball defying gravity as it hangs from your ceiling. It’s a small step for decorating, but a giant leap for your space-themed aesthetic!
Why do people put tennis balls in the garage?
Ah, the mystery of the tennis balls in the garage! While it may seem puzzling, there’s actually a simple and practical reason behind this phenomenon. People often hang tennis balls in their garages to serve as a visual guide for parking their vehicles.
Here’s how it works:
- Park perfectly every time: By hanging a tennis ball from a string at just the right height, you can position it to touch your windshield or the roof of your car when you park in the optimal spot.
- Avoid dings and dents: When the tennis ball touches your car, it acts as a gentle reminder to stop before you hit a wall, shelving unit, or any other potential obstacle in your garage.
- Quick and easy installation: All you need is a length of string, a tennis ball, and something sturdy to attach it to, like a ceiling beam or a garage door opener rail.
- Say goodbye to parking woes: With the trusty tennis ball as your guide, parking in your garage becomes a breeze. No more worrying about scraping your car or awkwardly inching forward to get it just right.
So, the next time you see tennis balls hanging in someone’s garage, remember that they’re not there for a spontaneous game – they’re helping ensure hassle-free parking!
How can we make a solar hanging mobile?
Creating a solar hanging mobile is a fun and eco-friendly project that adds a touch of celestial charm to any space. Here’s how you can make one:
- Gather your materials: You’ll need several lightweight materials like foam balls or wooden shapes, craft wire, solar-powered mini LED lights, and a sturdy stick or dowel.
- Create your celestial shapes: Cut out or shape your foam balls or wooden shapes into various celestial bodies like planets, stars, and moons. Paint or decorate them as desired.
- Attach the shapes to wire: Cut a length of craft wire for each shape and create a small loop at one end. Thread the wire through the center of the shape and secure it with a knot or glue.
- Assemble the mobile: Tie or attach the other end of the craft wires to your sturdy stick or dowel, spacing out the shapes evenly. Ensure the mobile is balanced and hangs smoothly.
- Add the solar-powered lights: Attach the solar-powered mini LED lights to the craft wires, placing them strategically to illuminate the shapes and create a captivating effect.
- Hang and enjoy: Find a sunny spot where you can hang your solar mobile, whether it’s near a window or outside. Sit back and watch as the sunlight charges the lights, bringing your mobile to life with a mesmerizing glow.
Not only is a solar hanging mobile a visually stunning addition to any space, but it also serves as a reminder of the limitless power of the sun.
What does polystyrene look like?
Polystyrene is a versatile material used in various applications, and it comes in different forms. Here’s a breakdown of the two common variations:
- Expanded polystyrene (EPS): Also known as foam or Styrofoam, EPS is a lightweight and rigid cellular plastic. It often appears as white or off-white foam with a smooth surface. EPS is commonly used in packaging, insulation, and crafting due to its excellent insulating and cushioning properties.
- Extruded polystyrene (XPS): XPS is denser and more rigid than EPS. It has a closed-cell structure and is typically sold in the form of rigid boards. XPS insulation boards are usually light blue or pink, and they have a smooth, plastic-like surface. XPS is commonly used for construction insulation and architectural models.
Whether it’s the familiar sight of white foam cups or the sturdy boards used in construction, polystyrene is a versatile material with countless possibilities.
How do you hang a ball from the ceiling?
Hanging a ball from the ceiling can be a delightful addition to any space, whether you’re creating a playful atmosphere or aiming for a more artistic touch. Here’s how you can do it:
- Choose your ball: Select the type of ball you want to hang. It could be a decorative globe, a colorful beach ball, or even a disco ball for that extra sparkle!
- Decide on the hanging method: Depending on the weight and size of the ball, you can use a combination of materials like string, wire, or adhesive hooks.
- Secure a hanging point: Find a secure point on the ceiling where you’ll attach the ball. It could be a hook, a ceiling beam, or any other sturdy feature.
- Prepare the hanging mechanism: If using string or wire, cut an appropriate length and tie it securely to the ball. For adhesive hooks, follow the manufacturer’s instructions for attaching them to the ball.
- Attach the hanging mechanism: If using string or wire, tie the other end to the secure point on the ceiling. If using adhesive hooks, press them firmly onto the desired spot.
- Check for stability: Gently give the ball a gentle tug to ensure it’s securely attached. Make any necessary adjustments to the hanging mechanism if needed.
- Sit back and admire: Step back and enjoy the visual impact of a floating ball suspended from your ceiling. It’s sure to be a conversation starter!
So go ahead, let your creative spirit soar, and hang that ball in style for a touch of whimsy or a dash of elegance.
How do you attach a hanger to a Styrofoam ball?
Attaching a hanger to a Styrofoam ball is a breeze. Follow these simple steps to ensure it stays securely in place:
- Choose the right hanger: Pick a hanger suitable for the size and weight of your Styrofoam ball. Small metal hooks or adhesive hooks work well.
- Identify the hanging point: Determine the spot on the Styrofoam ball where you want to attach the hanger. It’s often easiest to choose the top center point.
- Prepare the Styrofoam ball: If using a metal hook, gently insert the pointed end into the chosen spot. For adhesive hooks, remove the backing to expose the sticky surface.
- Secure the hanger: For metal hooks, push it into the Styrofoam ball until it feels sturdy. For adhesive hooks, press the sticky side firmly against the chosen spot and hold it in place for a few seconds to ensure adhesion.
- Check for stability: Give the hanger a gentle tug to ensure it’s securely attached. If it feels loose, remove it and try a different spot or a different type of hanger.
Now you can hang your Styrofoam ball confidently, knowing that the hanger will keep it in place and ready to add a touch of whimsy to any space.
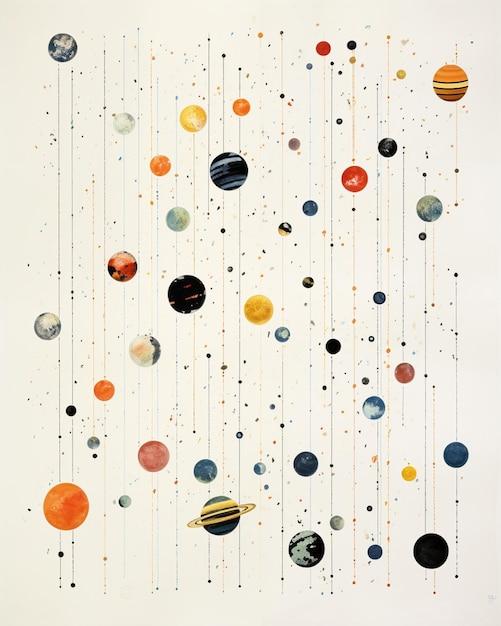
What materials do you need to make a solar system model?
Creating a solar system model is an out-of-this-world project that can be both educational and visually stunning. Gather the following materials to embark on your celestial journey:
- Styrofoam or craft balls: Choose various sizes of Styrofoam or craft balls to represent the planets. Opt for colors that closely match each planet or paint the balls accordingly.
- Paints or markers: Use paints or markers to add the distinct colors and patterns seen on each planet. Reference images or diagrams to ensure accuracy.
- Craft wire or string: You’ll need something to suspend the planets and create the model’s structure. Craft wire or string works well for this purpose.
- Cardboard or foam board: Use cardboard or foam board as the base for your solar system model. Cut it into a circular shape for a planetarium-like effect.
- Miscellaneous materials: Depending on your artistic vision, you might want to gather additional materials such as glitter, sequins, and craft foam to add extra sparkle and texture to your model.
- Reference materials: Have books or online resources about the solar system on hand to guide you in creating an accurate representation of the planets’ sizes and distances from the sun.
So, grab your materials and embark on an artistic and educational journey through our very own cosmic neighborhood!
How do you paint Styrofoam balls to look like planets?
Turning Styrofoam balls into realistic-looking planets is a creative process that will make your solar system model shine. Follow these steps to paint Styrofoam balls with planetary flair:
- Choose your colors: Select paint colors that closely resemble each planet in our solar system. Reference images or diagrams to ensure accuracy.
- Prep your workspace: Lay down a protective covering and gather all necessary painting supplies, such as brushes, paint palettes, and water cups.
- Prime the Styrofoam: Before painting, apply a coat of primer to the Styrofoam balls. This helps the paint adhere better and creates a smooth surface. Let the primer dry completely.
- Base coat: Apply the base color for each planet using a paintbrush. Make sure to cover the entire surface of the Styrofoam ball evenly. Allow each base coat to dry before moving on to the next planet.
- Add details: Use smaller brushes or sponges to add details like swirls, bands, or spots to mimic each planet’s unique features. Reference images or diagrams to capture the planets’ distinct characteristics.
- Dry and varnish: Allow the painted Styrofoam balls to dry thoroughly. To protect the paint and give the planets a polished look, apply a coat of clear varnish or sealer. Let it dry according to the product instructions.
Once your painted Styrofoam balls are dry and sealed, you’ll have a set of stunning planetary models ready to take center stage in your solar system display.
How do you make a planet with old CDs?
Transforming old CDs into dazzling planets is a fantastic way to repurpose and add some cosmic pizzazz to your space-themed décor. Follow these steps to make your own planet with old CDs:
- Gather your materials: You’ll need an old CD, acrylic paints, paintbrushes, a foam brush, a circular template (such as a jar lid or compass), and clear varnish or sealer.
- Prepare your workspace: Lay down a protective covering and gather all your painting supplies. Ensure you have good ventilation or work in an outdoor area.
- Prime the CD: Apply a thin,