Are you looking to give your plywood furniture or countertops a sleek and durable finish? Gluing Formica to plywood is the perfect solution! Formica, a popular brand of laminate, offers a wide range of colors and designs, making it an ideal choice for both decorative and functional purposes. However, knowing the right adhesive and technique to bond Formica with plywood is crucial for achieving a flawless result.
In this comprehensive guide, we will walk you through the process of gluing Formica to plywood step by step. From selecting the right adhesive to preparing the surfaces and applying the glue, we’ve got you covered. We’ll also address common questions like the best glue for laminate, using wood glue on laminate, and even removal methods for adhesives such as Gorilla Glue and Liquid Nails. So, let’s dive in and transform your plywood into a stunning and long-lasting masterpiece!
====================
How to Glue Formica to Plywood
Materials Needed
Before diving into the exciting world of Formica gluing, let’s gather our supplies. Here’s what you’ll need:
- Plywood sheet(s)
- Formica laminate
- Contact cement or adhesive
- Fine-grit sandpaper
- Clean, lint-free cloth
Step 1: Prepare the Surface
To ensure a solid bond between Formica and plywood, the surface needs some TLC. Start by sanding the plywood with a fine-grit sandpaper, creating a smooth and even texture. This roughens up the surface, allowing the glue to grip better. Don’t worry, this is where the magic starts!
Step 2: Measure Twice, Cut Once
Now, let’s unleash our inner carpenter. Measure the plywood and cut the Formica laminate to match the dimensions perfectly. After all, nobody likes an ill-fitting outfit, right?
Step 3: Get Sticky with It
Here comes the most exciting part: gluing! Apply contact cement or adhesive to both the plywood and Formica surfaces. Allow them to dry for the recommended time, savoring the suspense before we bring them together.
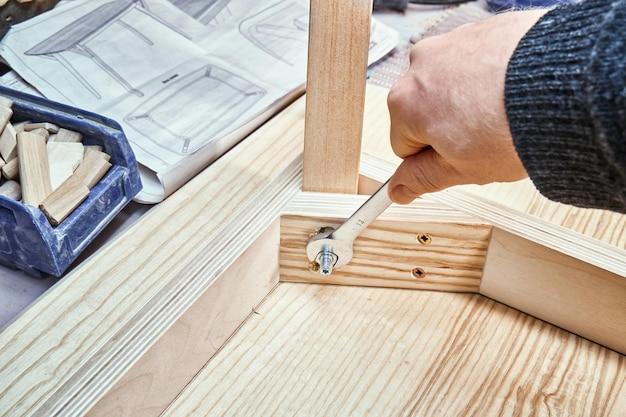
Step 4: Align and Bond
Align the edges of your Formica and plywood, and then apply pressure to bond them together thoroughly. A roller or heavy object can come in handy to ensure a tight embrace. Patience, my friend—strong relationships need time to develop, so press firmly!
Step 5: Trim the Edges
Who doesn’t love a good makeover? Use a router to trim the excess Formica from the edges of the plywood. This gives your project a polished, professional finish that’ll make heads turn!
Step 6: Cleaning Time
We’ve bonded two unlikely souls, and it’s time to clean up after the party. Carefully wipe away any excess glue with a clean, lint-free cloth. Ta-da! Your Formica is now beautifully adhered to the plywood, ready to conquer the world together.
Extra Tips and Tricks
- Always follow the manufacturer’s instructions for the specific adhesive you’re using. They’re like a trusted mentor guiding you through the jungle.
- Remember to work in a well-ventilated area because, let’s face it, nobody wants to get high on glue fumes.
- If you’re feeling adventurous, you can experiment with different types of adhesives suitable for Formica. Just be sure to test them out on a scrap piece first—because practice makes perfect!
Come forth, DIY enthusiasts, and fear not the art of gluing Formica to plywood. With the right materials, a touch of patience, and a sprinkle of humor, you’ll achieve a bond so strong that even separation anxiety won’t be an option. Happy crafting, my glue-loving amigos!

FAQ: How To Glue Formica To Plywood
Introduction: Gluing Formica to plywood is a common technique used in various woodworking projects, especially when it comes to creating durable and attractive countertops and tabletops. If you’re new to this process or have some burning questions about it, you’ve come to the right place! We’ve gathered the most frequently asked questions about gluing Formica to plywood and provided detailed answers to help you achieve the best results possible. So, let’s dive in!
How do you get Gorilla Super glue off countertops
Oh no, we’ve all been there! If you’ve accidentally spilled some Gorilla Super glue on your beautiful countertops, don’t panic. Here’s a simple solution: Grab a clean cloth or sponge and soak it in acetone or nail polish remover. Gently dab the affected area and allow the solvent to work its magic. Once the glue becomes soft, use a plastic scraper or a credit card to carefully scrape it off the countertop. Voila! Your countertops will be glue-free and back to their splendid self in no time.
Will Liquid Nails stick to melamine
Ah, the infamous Liquid Nails! While they are exceptional for various woodworking projects, they might not be the best choice for bonding melamine surfaces directly. Melamine tends to have a slippery and non-porous surface, which can make it challenging for Liquid Nails to create a strong bond. To ensure a successful connection, we recommend using a melamine-specific adhesive or roughening the melamine surface with sandpaper to enhance the adhesion process. Remember, a little preparation goes a long way!
Can you use Liquid Nails on countertops
Ah, countertops, where all the magic happens! While Liquid Nails is a fantastic adhesive for many applications, it may not be the ideal choice for securing countertops. Countertops often require a strong and durable bond, capable of withstanding moisture, heat, and everyday use. Instead, consider using a purpose-made adhesive, such as contact cement or construction adhesive, specifically designed for countertop installations. These specialized adhesives ensure a reliable and long-lasting bond that will keep your countertops firmly in place.
How do you glue Formica to plywood
Gluing Formica to plywood can be a straightforward process if you follow a few essential steps. Here’s a quick rundown:
-
Prepare the surfaces: Ensure both the Formica sheet and plywood are clean, dry, and free from any dirt or dust particles. This will help achieve a strong and smooth bond.
-
Apply adhesive: Using a brush or roller, evenly apply a high-quality contact cement adhesive to both the Formica and plywood surfaces. Make sure to cover the entire area intended for bonding.
-
Allow drying time: Let the adhesive dry until it feels tacky to the touch. This usually takes around 10-15 minutes, but refer to the specific instructions provided by the adhesive manufacturer.
-
Align and bond: Carefully align the Formica sheet with the plywood surface, making sure it’s positioned correctly. Once aligned, gently press the Formica onto the plywood, starting from one end and gradually working your way to the other.
-
Apply pressure: Use a laminate roller or a clean block of wood wrapped in a towel to apply even pressure across the entire Formica surface. This step helps ensure a strong and uniform bond.
-
Trim and finish: Trim any excess Formica with a router or a laminate trimmer, and use a file or sandpaper to smooth the edges. Now you’re ready to admire your newly bonded Formica and plywood masterpiece!
What is the best glue to stick laminate to wood
Ah, the million-dollar question! When it comes to gluing laminate to wood, the best adhesive to use is undoubtedly contact cement. Contact cement is specifically formulated to create a strong and permanent bond between laminate and wood surfaces. It offers excellent resistance to heat, moisture, and impact, making it ideal for enduring everyday use. So, remember to reach for contact cement when you’re embarking on your laminate and wood bonding adventures!
Can you glue down laminate
Certainly! Gluing down laminate is a popular method for installing and securing laminate flooring. By using the appropriate adhesive, such as PVA glue or a specialized laminate flooring adhesive, you can ensure a strong bond between the flooring and the subfloor. This approach helps prevent any shifting or movement in the laminate, resulting in a stable and long-lasting floor. So, go ahead and glue down that laminate for a floor that’s as steady as a rock!
How do you glue laminate to wood
Ah, the beautiful marriage of laminate and wood! To glue laminate to wood successfully, follow these simple steps:
-
Prepare the wood surface: Ensure the wood surface is clean, dry, and free from any dust or debris. Smooth out any imperfections to create an even and sturdy base.
-
Apply adhesive: Using a brush or roller, generously apply the chosen adhesive to the wood surface. Ensure the adhesive is spread evenly and covers the entire area intended for bonding.
-
Align and bond: Carefully place the laminate onto the wood, aligning it precisely to achieve the desired position. Once aligned, gently press down on the laminate, starting from one end and gradually working your way across the entire surface.
-
Remove air bubbles: To eliminate any trapped air bubbles, use a laminate roller or a clean block of wood wrapped in a towel. Applying even pressure will promote a secure and bubble-free bond.
-
Allow drying time: Be patient and allow the adhesive to dry fully. The specific drying time will depend on the adhesive chosen, so refer to the manufacturer’s instructions for guidance.
-
Trim and finish: Once the adhesive has dried, trim any excess laminate using a router, laminate trimmer, or a sharp utility knife. Sand the edges to achieve a smooth finish, and voila! Your laminate and wood fusion is complete.
Does Gorilla glue bond plastic to wood
Absolutely! Gorilla glue is known for its exceptional bonding capabilities, and it’s more than capable of bonding plastic to wood. Whether you’re working with a wooden frame and plastic sheeting or attaching a plastic component to your wooden project, Gorilla glue is a reliable choice. Just make sure to follow the instructions on the glue packaging, apply the adhesive evenly, and allow sufficient curing time for a robust and long-lasting bond.
What is lamination glue
Lamination glue, also known as laminate adhesive, is a specialized adhesive designed explicitly for bonding laminate materials to various surfaces. It typically comes in contact cement form and offers excellent bonding strength and durability. Lamination glue ensures a resistant and long-lasting bond between the laminate and the base surface, such as wood or particleboard. So, if you’re planning on laminating any surface, don’t forget to grab some quality lamination glue for the best results!
Does Gorilla Glue work on Formica
Absolutely! Gorilla Glue is a versatile adhesive that can be used for bonding Formica to various surfaces, including wood. Its strong bond and water-resistant properties make it a reliable choice for Formica installation projects. Just make sure to follow the manufacturer’s instructions when using Gorilla Glue and allow sufficient drying or curing time to achieve the best results. With Gorilla Glue in your toolkit, you’ll be able to tackle any Formica bonding challenge with confidence!
What is the best glue for laminate
When it comes to gluing laminate, nothing beats the reliability and strength of contact cement adhesive. Contact cement is specifically formulated to create a strong and permanent bond between laminate and various surfaces such as wood, particleboard, or MDF. Its exceptional resistance to heat, moisture, and impact ensures a long-lasting bond and reliable performance over time. So, if you’re looking for the best glue for laminate, reach for contact cement and enjoy a bond that stands the test of time!
How do you get liquid nails off a countertop
Uh-oh, a little mishap with Liquid Nails on your beautiful countertop? No worries! Follow these simple steps to remove it:
-
Softening the adhesive: Using a clean cloth or sponge, apply a small amount of mineral spirits or an adhesive remover onto the affected area. Gently rub the liquid nails, allowing the solvent to soften the adhesive.
-
Scraping off the adhesive: Once the adhesive becomes soft and pliable, use a plastic scraper or a credit card to carefully scrape it off the countertop. Apply gentle pressure and ensure not to scratch the surface.
-
Wipe off residue: After removing the adhesive, wipe the countertop with a clean cloth dampened with warm, soapy water to remove any remaining residue. Dry the surface thoroughly to restore its original beauty.
Remember, patience and a gentle touch are key when removing Liquid Nails from your cherished countertops!
Can you use Liquid Nails on Formica
While Liquid Nails is a reputable adhesive, it may not be the ideal choice for bonding Formica directly. Formica surfaces are usually slick and non-porous, which can make it difficult for Liquid Nails to form a strong bond. To ensure a successful connection, we recommend using a contact cement adhesive specifically designed for bonding Formica. This specialized adhesive will provide a secure and long-lasting bond, ensuring your Formica project stays intact for years to come.
What is the best glue for Formica
When it comes to bonding Formica, you want an adhesive that is up to the task. The best glue for Formica is undoubtedly a high-quality contact cement adhesive. Contact cement offers excellent adhesion to both the Formica surface and the base material, providing a strong and durable bond. Its heat and moisture resistance make it a perfect choice for Formica applications, ensuring your project stands strong against the test of time. So, stock up on contact cement and get ready to tackle your Formica projects with confidence!
How do you install Formica countertops
Formica countertops are a popular choice due to their durability, versatility, and aesthetic appeal. If you’re ready to install Formica countertops yourself, here’s a simplified guide to get you started:
-
Measure and prepare: Measure your countertop area carefully and order a Formica sheet with the appropriate dimensions. Ensure your existing countertop surface is clean, dry, and free from any debris or defects.
-
Apply adhesive: Using a high-quality contact cement adhesive, apply an even layer to both the countertop surface and the backside of the Formica sheet. Follow the adhesive manufacturer’s instructions for application and drying times.
-
Position and bond: Carefully align the Formica sheet over the countertop surface, starting from one end and gradually positioning it along the entire length. Once aligned, gently press down the Formica to secure it to the countertop, ensuring proper adhesion.
-
Apply pressure and trim: Use a laminate roller or a clean block of wood wrapped in a towel to apply even pressure across the entire Formica surface. This step aids in creating a strong and uniform bond. Trim any excess Formica using a router or a laminate trimmer, and smooth the edges using sandpaper.
-
Finish and enjoy: Clean the Formica surface, removing any adhesive residue or dirt. Install any necessary edging pieces or backsplash, and voila! Your stunning Formica countertops are ready to be admired and utilized to their fullest.
Do you put plywood under countertops
Absolutely! Plywood is a common and essential component when it comes to installing countertops. Plywood serves as a strong and stable base for countertops, ensuring proper support and preventing sagging or warping over time. It also provides a secure surface for attaching the countertop material, whether it’s Formica, granite, quartz, or any other material. So, when preparing for a countertop installation, don’t forget to include a sturdy plywood base!
How do you repair a Formica tabletop
Accidents happen, and sometimes our beloved Formica tabletops might suffer a few bumps and bruises. But fear not, because repairing them can be surprisingly straightforward. Here’s a step-by-step process to get your Formica tabletop looking good as new:
-
Assess the damage: Identify the extent of the damage to determine the appropriate repair method. For minor scratches or chips, you can proceed with a simple repair. However, for more severe damage, it may be necessary to replace the entire Formica sheet.
-
Clean the area: Thoroughly clean the damaged area with warm, soapy water and a soft cloth to remove any dirt or debris. Ensure the surface is completely dry before proceeding.
-
Fill and level: For minor scratches or chips, you can use a two-part epoxy resin or a specially formulated Formica repair kit. Follow the manufacturer’s instructions to mix the epoxy and carefully apply it to the damaged area, ensuring it is level with the surrounding Formica.
-
Cure and smooth: Allow the epoxy to cure as per the manufacturer’s instructions. Once fully cured, use fine-grit sandpaper or a sanding block to gently smooth the repaired area until it blends seamlessly with the rest of the tabletop.
-
Clean and finish: Wipe the tabletop with a clean, damp cloth to remove any sanding dust. Apply a suitable laminate or furniture polish following the manufacturer’s instructions to restore the tabletop’s original shine and protect the repaired area.
With a little patience and some TLC, your Formica tabletop will regain its splendor and become the centerpiece of your space once again!
How do you glue laminate to laminate
When it’s time for one layer of laminate to bond with another, there’s no room for second-rate adhesives. To achieve a seamless and sturdy laminate-to-laminate bond, follow these steps:
-
Preparation is key: Ensure both laminates are clean and free from any dirt or residue. Wipe them down with warm, soapy water and dry them thoroughly before proceeding.
-
Apply the glue: Using a high-quality contact cement adhesive, apply an even layer to both laminates. Make sure to cover the entire surface area intended for bonding. It’s crucial to adhere to the adhesive manufacturer’s instructions for application and drying times.
-
Carefully position and bond: Align the two laminates precisely, ensuring they are in the desired position. Once aligned, gently press the laminates together, starting from one end and gradually working across the entire surface. Apply firm and even pressure to create a strong and uniform bond.
-
Roll it out: Use a laminate roller or