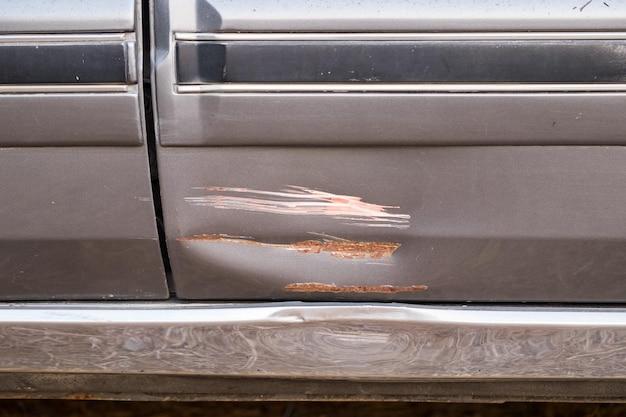
Plastic bumpers are a common feature in modern vehicles, offering lightweight and durable protection. However, over time, these bumpers can develop scuffs, scratches, or faded spots, diminishing the appearance of your vehicle. But fret not! With the right knowledge and tools, you can easily restore your plastic bumpers to their former glory.
In this comprehensive guide, we will delve into the world of plastic bumper repair and restoration. From understanding the types of sandpaper grit to effectively prepping the surface for painting, we will cover all the essential steps to bring back that flawless shine. Can a plastic bumper be sanded? How do you paint plastic fenders? What sandpaper should you use on plastic? All these questions (and more!) will be answered along the way.
So, if you’re ready to embark on a journey of reviving your plastic bumper’s aesthetics, grab your sandpaper and let’s dive into the exciting world of plastic bumper repair and restoration!
What Grit Sandpaper Should I Use for a Plastic Bumper
Have you ever been driving and accidentally grazed your plastic bumper against a wall or another car? We’ve all been there, and it’s not a great feeling. The good news is that you can fix those unsightly scratches and scuffs on your plastic bumper with a little elbow grease and some sandpaper. But what grit sandpaper should you use to get the job done right? Let’s dive in and find out!
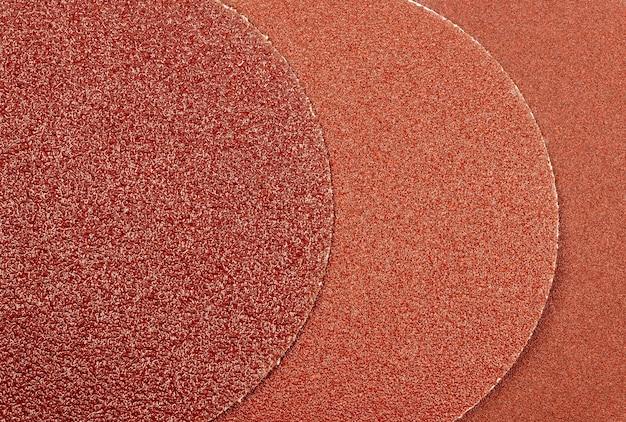
Understanding Grit Ratings: The Lowdown on Sandpaper
Before we jump into specific grit recommendations, let’s talk about grit ratings and what they actually mean. When it comes to sandpaper, the grit refers to the number of abrasive particles per square inch on the paper. The lower the grit number, the coarser the sandpaper, and vice versa. So, when it comes to plastic bumper repair, you want to choose a sandpaper that will effectively remove imperfections without causing further damage.
The Right Grit: Taking the Smoother Route
When it comes to sanding a plastic bumper, you don’t want to start too aggressive. Trust me; you don’t want to turn that minor scratch into a major disaster! So, put away that coarse sandpaper with grit ratings in the 40s or 60s. Instead, opt for something a bit smoother.
Start with a Gentle Touch: 320 to 400 Grit
For minor scratches or scuffs that haven’t gone too deep into the plastic surface, 320 to 400 grit sandpaper will work like a charm. This grit range gives you enough abrasiveness to remove the imperfections while being gentle enough to avoid further damage. It’s a win-win situation!
Leveling Up: 600 Grit for Deeper Dents
If you’re dealing with slightly deeper scratches or dents, it’s time to level up your sandpaper game. Enter 600 grit sandpaper, your trusty companion for fixing those more stubborn imperfections. This finer grit will help smooth out the surface and get you one step closer to a bumper that looks as good as new.
The Finishing Touch: 800 to 1000 Grit for Polished Perfection
Once you’ve sanded away the scratches, it’s time to give your plastic bumper that final touch of perfection. Grab your 800 to 1000 grit sandpaper and gently go over the sanded area to achieve a smooth, polished surface. This will ensure your bumper blends seamlessly with the rest of your car’s exterior.
Remember: Patience is Key
Repairing a plastic bumper may take some time, but it’s worth the effort to restore your car’s appearance. Just remember to be patient and take your time, especially when sanding. Rushing the process or using the wrong grit sandpaper can lead to more harm than good. So, put on your favorite tunes, grab your sandpaper, and get ready to give your plastic bumper the love it deserves!
The Final Verdict: Grit Selection Made Easy
In summary, when it comes to sanding a plastic bumper, start with something smoother like 320 to 400 grit sandpaper for minor imperfections. Gradually move to 600 grit for deeper scratches or dents, and finish off with 800 to 1000 grit for a polished look. Remember, the key is to take your time and be gentle with your sanding. With a little patience and the right sandpaper, you’ll have your plastic bumper looking brand new in no time!
So, there you have it! Armed with the knowledge of which grit sandpaper to use, you can confidently tackle those plastic bumper imperfections and enjoy your car’s renewed aesthetic. Stay tuned for more pro tips and tricks to keep your ride looking fresh.
FAQ: What Grit Sandpaper For Plastic Bumper
Can a plastic bumper be sanded
Yes, absolutely! While it may seem counterintuitive to sand a plastic bumper, it can be done. Sanding allows you to smooth out any imperfections, scuffs, or scratches on the surface, creating a clean canvas for painting or repair work.
How do you paint plastic fenders
Painting plastic fenders is a straightforward process that begins with proper preparation. Here’s a simple step-by-step guide:
Step 1: Clean the Surface
Use a mild detergent and warm water to clean the fenders thoroughly. Remove any dirt, grease, or wax residue. Rinse and dry the surface completely before proceeding.
Step 2: Sand the Fenders
Using sandpaper with a grit between 220 and 400, gently sand the fenders in a circular motion. This step helps create a rough texture on the plastic, allowing the paint to adhere better.
Step 3: Apply Primer
Apply a plastic adhesion promoter or a suitable plastic primer to ensure the paint bonds effectively with the surface. Follow the manufacturer’s instructions for the recommended drying time.
Step 4: Paint the Fenders
Using automotive spray paint designed for plastic surfaces, apply several thin and even coats to achieve the desired color. Allow each coat to dry according to the paint manufacturer’s instructions before applying the next.
Step 5: Seal the Paint
Finish off by applying a clear coat designed for automotive use. This protective layer will provide added durability and enhance the glossy finish of your fenders.
What are the different types of sandpaper grit
Sandpaper comes in a variety of grits, each serving a specific purpose. Here are some common types of sandpaper grit:
1. Coarse Grit
Coarse-grit sandpaper, such as 40 to 60 grit, has larger abrasive particles. It is primarily used for heavy sanding and shaping tasks, like removing paint or material quickly.
2. Medium Grit
Medium-grit sandpaper, such as 80 to 120 grit, strikes a balance between coarseness and smoothness. It is suitable for general sanding and preparing surfaces for painting, as it can remove imperfections without being too abrasive.
3. Fine Grit
Fine-grit sandpaper, ranging from 150 to 220 grit, is ideal for sanding between coats of paint or finish to achieve a smooth and even surface. It is also effective for light material removal and sanding delicate areas.
4. Extra Fine Grit
Extra fine-grit sandpaper, such as 320 to 400 grit, is used for final sanding before applying a finish or polish. It is perfect for achieving a super smooth and flawless surface.
How do you repair a scuff on a plastic bumper
Repairing a scuff on a plastic bumper can be done using the following steps:
Step 1: Clean the Area
Before attempting any repairs, ensure the scuffed area is clean. Use a mild detergent and warm water to remove dirt, grime, and any loose debris. Dry the area thoroughly.
Step 2: Sand the Scuff
With 320 to 400 grit sandpaper, gently sand the scuffed area to smooth out any rough edges or raised portions. Keep the sanding motion consistent and blend it with the surrounding bumper surface.
Step 3: Apply Plastic Adhesive
Using a plastic adhesive designed for automotive use, carefully apply it to the sanded area. Follow the manufacturer’s instructions for the proper application technique and drying time.
Step 4: Sand and Blend
Once the adhesive has dried, lightly sand the repaired area using fine-grit sandpaper. This step helps blend the repaired spot with the rest of the bumper surface, ensuring a seamless finish.
Step 5: Paint and Seal
Finally, follow the steps mentioned earlier on how to paint plastic fenders to apply a matching coat of paint and sealant to the repaired area, giving it a professional finish.
How do you sand a fiberglass bumper
Sanding a fiberglass bumper requires a gentle touch and the right tools. Here’s how you can do it effectively:
Step 1: Clean the Surface
Using a mild detergent and warm water, clean the fiberglass bumper to remove any dirt, grime, or wax residue. Rinse and dry the surface thoroughly.
Step 2: Protect Yourself
Fiberglass can cause skin and respiratory irritation, so be sure to wear protective gear, including gloves, a respirator, and safety glasses.
Step 3: Start with Coarse Grit
Begin sanding the bumper with a coarse-grit sandpaper, such as 80 to 120 grit. This will help remove any imperfections or rough patches on the surface. Sand in a circular motion, applying even pressure.
Step 4: Progress to Finer Grits
As you work your way through sanding, switch to finer-grit sandpaper, such as 220 to 400 grit, to smoothen the surface. This will help achieve a polished and even finish.
Step 5: Clean and Inspect
Once you’re satisfied with the smoothness of the bumper, clean the surface to remove any sanding residue. Inspect the area for any remaining imperfections and make necessary touch-ups.
Can you sand plastic smooth
Yes, you can sand plastic to achieve a smooth finish. However, it’s crucial to use the right sandpaper grit and employ proper sanding techniques. Start with a coarser grit to remove any prominent imperfections and gradually progress to finer grits for a polished result. Keep the surface moist during sanding to prevent excessive heat buildup and avoid using too much pressure, as it may damage the plastic.
What is 2000 grit sandpaper used for
2000 grit sandpaper is a very fine-grit sandpaper used mainly for finishing or refining surfaces. It is commonly used for automotive applications, such as sanding between layers of clear coat or buffing compound to remove minor imperfections and achieve a glossy, smooth finish.
What sandpaper should I use on plastic
For sanding plastic surfaces, it’s best to use sandpaper within the range of 220 to 400 grit. This allows you to remove imperfections, roughen the surface for better adhesion, and achieve a smooth finish without being too abrasive.
What is 50 grit sandpaper used for
50 grit sandpaper, also known as coarse-grit sandpaper, is used for heavy-duty sanding tasks. Its large abrasive particles make it suitable for tasks like stripping paint or material quickly and leveling rough surfaces.
What paint is best on plastic
When painting plastic, it’s crucial to use a paint specifically formulated for plastic surfaces. Look for automotive-grade spray paints designed for plastics, as they offer excellent adhesion, durability, and flexibility. These paints are typically labeled as “suitable for use on plastics” and come in a wide range of colors.
Can I sand and paint a plastic bumper
Absolutely! Sanding and painting a plastic bumper is a popular approach to refresh worn or damaged bumpers. By properly cleaning, sanding, and following the painting process outlined earlier, you can transform the appearance of your plastic bumper and make it look as good as new.
Should you sand after priming plastic
While it may be tempting to sand after priming plastic, it is generally not necessary. Priming helps create a strong bond between the plastic surface and the paint, and sanding after priming may compromise this bond. Instead, focus on ensuring a smooth and clean surface before priming to achieve the best possible final result.
How do you keep paint from peeling off a plastic bumper
To prevent paint from peeling off a plastic bumper, it’s essential to follow these steps:
-
Clean the bumper surface thoroughly before painting to remove any oils, dirt, or wax residues.
-
Use a plastic adhesion promoter or primer specifically designed for plastic surfaces to ensure optimal paint adhesion.
-
Apply multiple thin coats of paint, allowing sufficient drying time between each coat. Avoid applying thick, heavy layers that may lead to peeling.
-
Once the paint has dried completely, apply a clear coat designed for plastic surfaces as a protective layer. This clear coat will help guard against peeling, chipping, and UV damage.
-
Regularly clean and maintain your bumper to protect the paint. Avoid using abrasive cleaners or tools that could scratch or chip the paint.
How do you restore a faded plastic bumper
Restoring a faded plastic bumper can significantly improve the appearance of your vehicle. Here are some steps to help you in the restoration process:
Step 1: Clean the Bumper
Thoroughly clean the bumper using a mild detergent to remove dirt, grime, and wax residue. Rinse and dry the surface completely.
Step 2: Sand the Bumper
Using a fine-grit sandpaper (around 400 grit), gently sand the entire bumper surface. This process helps remove the faded layer and prepares the plastic for restoration.
Step 3: Apply a Plastic Restorer
Apply a quality plastic restorer product to the bumper, following the manufacturer’s instructions. These products often contain special agents that help restore the color and shine of the plastic.
Step 4: Buff the Surface
Use a soft cloth or buffing pad to buff the bumper in circular motions. This helps evenly distribute the plastic restorer and brings out the restored shine.
Step 5: Seal and Protect
To safeguard the restored bumper, apply a layer of automotive-grade plastic sealant or wax. This protective layer will help preserve the shine and protect against future fading.
Do plastic bumpers need primer
Yes, using a primer is recommended when painting plastic bumpers. Primers specifically formulated for plastics ensure better adhesion and promote an even paint application. They also help prevent the paint from peeling or chipping off the bumper surface.
How do you prep plastic for painting
Properly preparing plastic surfaces is key to achieving a successful paint job. Follow these steps to prep plastic for painting:
-
Clean the Surface: Thoroughly clean the plastic surface using a mild detergent and warm water to remove dirt, grease, and wax. Rinse and dry the surface completely.
-
Sand the Surface: Gently sand the plastic with a fine-grit sandpaper, such as 220 to 400 grit. This step helps create a rough texture and promotes paint adhesion. Wipe away any sanding residue with a clean cloth.
-
Apply Adhesion Promoter or Primer: Depending on the type of paint you’re using, apply a plastic adhesion promoter or primer designed for plastics. Follow the manufacturer’s instructions regarding application technique, drying time, and number of coats.
-
Paint the Plastic: Apply multiple thin coats of automotive-grade paint suitable for plastic surfaces. Allow each coat to dry properly before applying the next. Follow the paint manufacturer’s instructions for proper drying times.
-
Seal the Paint: For added protection and a glossy finish, apply a clear coat designed for plastic surfaces. This clear coat will help preserve the paint and provide durability.
Remember, proper preparation and using the right products are essential for achieving a long-lasting and professional-looking paint job on plastic surfaces.
I hope you find this FAQ section on sanding and painting plastic bumpers helpful! If you have any more questions, feel free to ask. Happy sanding and painting!