Are you looking to give your bathroom or kitchen a fresh new look? Gluing ceramic tiles to your wall can be a great way to add elegance and style to any space. But with so many adhesive options available, choosing the right one can be an overwhelming task.
In this comprehensive guide, we will address all your burning questions about adhesive for wall tiles. From understanding the differences between cement and tile adhesive to learning how to attach ceramic tiles to a wall, we’ve got you covered. We will also debunk common misconceptions, such as whether grout and tile adhesive are the same thing.
So, if you’re ready to tackle your tiling project head-on, let’s dive in and explore the world of ceramic tile adhesive!
How to Successfully Glue Ceramic Tiles to a Wall
Are you ready to give your bathroom or kitchen a fresh new look? Ceramic tiles are a fantastic choice for both durability and aesthetics. To ensure that your tiles stay put on the wall, it’s crucial to follow the correct gluing process. In this guide, we’ll walk you through the step-by-step process of how to glue ceramic tiles to a wall. So grab your tool belt and get ready to channel your inner Bob Vila!
Gathering Your Materials
Before diving into any project, it’s essential to gather all the necessary materials. For this tile gluing adventure, you’ll need:
1. Ceramic Tiles:
First and foremost, you’ll need the stars of the show: the ceramic tiles themselves. Measure the area you wish to cover and calculate how many tiles you need, accounting for any cuts or spares.
2. Tile Adhesive:
A strong and reliable tile adhesive is the secret ingredient to successful tile installation. Choose an adhesive specially formulated for ceramic tiles and suitable for your specific wall surface.
3. Trowel:
Think of the trowel as your trusty sidekick throughout this process. Select a size that complements your tile dimensions and ensures an even application of the adhesive.
4. Spirit Level:
A spirit level is a handy tool for maintaining straight and level tile alignment. This will help avoid any crooked results that might make your eyes twitch.
5. Tile Spacers:
These little marvels maintain consistent spacing between tiles, ensuring a professional finish. Invest in spacers that suit your desired grout line width.
Preparing Your Wall
Now that you have all your materials ready, it’s time to prepare the wall for tile gluing. Follow these steps:
1. Clean the Wall:
Prepare the wall surface by removing any debris, dirt, or remnants of the previous tile. A clean canvas ensures better adhesion and a more solid foundation.
2. Fill Any Cracks:
Inspect the wall for cracks or imperfections. Fill them in with a suitable filler and allow it to dry before proceeding. You wouldn’t want your tiles to accentuate any wall flaws!
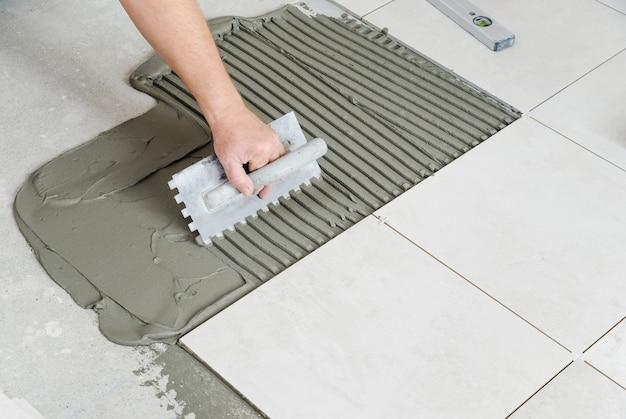
Applying the Adhesive
Hark, it’s time to get your hands dirty and start actually gluing those ceramic tiles to the wall! Follow these steps:
1. Mix the Adhesive:
Prepare the tile adhesive according to the manufacturer’s instructions. Mix it to a smooth, peanut butter-like consistency. Delicious, right?
2. Apply the Adhesive:
Using your trusty trowel, start spreading the adhesive on the wall. Begin at the bottom and work your way up in small sections. Create ridges on the adhesive with the trowel’s notched edge.
3. Get Sticky with It:
Press each tile firmly into the adhesive, twisting it slightly to ensure a strong bond. Use your spirit level to confirm that the tile is level and in line with neighboring tiles.
4. Mind the Spacers:
As you glue each tile, insert tile spacers to maintain consistent spacing. These spacers also make your life easier when it’s time to grout.
The Waiting Game
Congratulations! You’ve successfully glued your ceramic tiles to the wall. But before you start dancing the victory jig, you need to exercise a little patience. Allow the tiles to set and the adhesive to cure according to the manufacturer’s instructions. This waiting period ensures a secure bond and prevents any unexpected tile sliding incidents. Trust us, it’s worth the wait!
Wrapping It Up
And there you have it, an epic journey from a bare wall to a beautifully tiled masterpiece! By following these steps and using the right materials, you’ll be able to glue ceramic tiles to the wall like a pro. So grab your adhesive, don your tool belt, and unleash your inner DIY guru. You’re now equipped with the knowledge and know-how to transform any space into a stunning showcase of ceramic tile glory!
Now it’s time to sit back, admire your handiwork, and perhaps treat yourself to a congratulatory cookie or two. Happy tiling!
Disclaimer:
This blog post is intended for entertainment purposes only. Always refer to manufacturer guidelines and seek professional advice for your specific tiling project. We will not be held responsible for any tile-related mishaps, homemade cookie addictions, or unexpected dance-offs that may occur as a result of reading this article.
FAQ: How To Glue Ceramic Tile To Wall
Introduction: Welcome to our comprehensive FAQ guide on how to glue ceramic tile to the wall. Whether you’re a DIY enthusiast or a seasoned pro, we’ve got you covered with answers to all your burning questions. So grab your adhesive and let’s get tiling!
What is the best adhesive for wall tile
When it comes to the best adhesive for wall tile, you want something that provides strong and durable adhesion. Opt for a quality thin-set mortar or a ready-to-use adhesive specifically designed for ceramic tiles. These products offer excellent bonding properties and are easy to work with.
How do I choose tile adhesive
Choosing the right tile adhesive is crucial for a successful and long-lasting tile installation. Consider factors such as the type of surface you’re tiling, the size and weight of the tiles, and the location of the project (wet or dry area). Consult with a professional or refer to the manufacturer’s guidelines to ensure you make the right choice.
Is grout and tile adhesive the same thing
Nope, they’re not the same! While both grout and tile adhesive are used in the tiling process, they serve different purposes. Tile adhesive is applied to the back of the tiles to bond them to the wall, while grout is used to fill the gaps between tiles once they are set. So remember, don’t mix up your adhesive and your grout!
Is wall and floor tile adhesive the same
Although wall and floor tile adhesive share some similarities, they are formulated differently to meet the specific demands of each surface. Wall tile adhesive is typically designed to withstand vertical loads and prevent tile slippage, while floor tile adhesive is formulated to withstand greater horizontal pressure and foot traffic. So make sure to use the right adhesive for your project!
What adhesive is used for tiling
There are different adhesives used for tiling, depending on the type of tile and surface. Thin-set mortar and ready-to-use tile adhesive are commonly used for ceramic tiles. Epoxy adhesives are ideal for specialized tile applications, such as heavy-duty or outdoor projects. Always refer to the manufacturer’s recommendations for the best adhesive to use.
What is the difference between cement and tile adhesive
Cement and tile adhesive may seem similar, but they serve different purposes in tiling projects. Cement, such as Portland cement, is commonly used as a binding agent to create concrete. In contrast, tile adhesive is specifically formulated to bond tiles to surfaces. So, unless you’re planning to make a cement sculpture with your tiles, stick to using the appropriate adhesive!
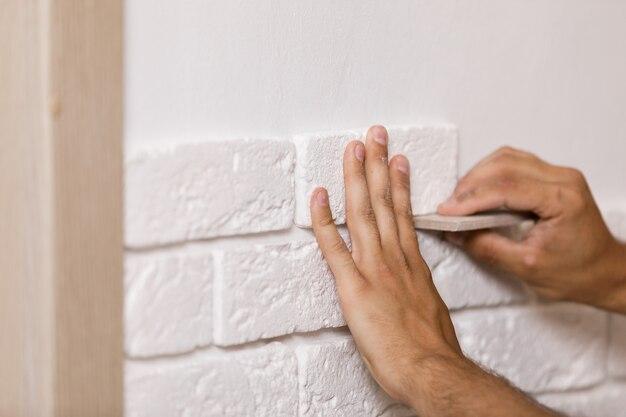
How do you attach ceramic tile to a wall
Attaching ceramic tile to a wall is a straightforward process, thanks to tile adhesive. Here’s how you can do it:
- Prepare the wall surface by cleaning and removing any debris.
- Apply the adhesive directly to the wall using a trowel, making sure to create evenly spaced ridges.
- Press the ceramic tiles into the adhesive, gently twisting and pushing them to ensure a secure bond.
- Use spacers to maintain consistent spacing between the tiles.
- Allow the adhesive to dry and cure as per the manufacturer’s instructions.
- Finally, grout the tiles and clean off any excess grout for a polished finish.
Can we use white cement for tiles
While white cement is primarily used for aesthetic purposes and offers a smooth finish, it is not recommended as a tile adhesive. White cement lacks the necessary bonding properties and adhesion strength required for securely attaching tiles to walls. Stick to using proper tile adhesives for the best results.
Do you put adhesive on tile or wall
When it comes to applying adhesive for wall tiling, the adhesive is typically applied directly to the wall surface. By spreading the adhesive onto the wall with a trowel, you create a secure and even bond between the tiles and the wall. So, leave the adhesive on the wall—your tiles will thank you!
Can I stick tiles with no nails
Absolutely! When using the appropriate tile adhesive, you can securely stick your tiles to the wall without any nails. The adhesive provides a strong bond between the tiles and the wall surface, eliminating the need for additional hardware. Say goodbye to nail holes and hello to a seamless tile installation!
What is C1 and C2 tile adhesive
C1 and C2 are classification codes for tile adhesives that indicate their performance and flexibility. C1 adhesives are suitable for interior walls with minimal movement, while C2 adhesives offer higher flexibility and are recommended for walls subject to slight movement or temperature fluctuations. Consider the specific requirements of your project when choosing between these classifications.
Can you glue ceramic tile to drywall
Yes, you can glue ceramic tile to drywall, but it’s important to ensure a proper and stable installation. Drywall is a relatively delicate surface, so it’s crucial to use an adhesive suitable for both drywall and ceramic tiles. Follow the manufacturer’s instructions, and consider using additional support, such as cement boards, for added stability.
Which cement is best for wall tiles
For wall tile installations, thin-set mortar or ready-to-use tile adhesive are the preferred options over cement. These adhesives offer superior bonding strength and flexibility, ensuring a durable and long-lasting tiled wall. Cement alone is not designed to provide the necessary adhesion properties required for attaching tiles to a wall.
Which is best: tile adhesive or cement
When it comes to attaching tiles to a wall, tile adhesive is your best bet. Tile adhesive is specifically formulated for the purpose of bonding tiles to various surfaces. It offers superior adhesion, flexibility, and long-term durability compared to cement alone. So, put that bag of cement aside and grab some quality tile adhesive for your tiling projects!
What is the glue used to stick tiles to a wall
The glue used to stick tiles to a wall is commonly known as tile adhesive or thin-set mortar. These adhesives come in various formulations, including powder form for mixing with water or pre-mixed ready-to-use solutions. Tile adhesives provide the necessary bonding strength to attach tiles securely to vertical surfaces, ensuring a sturdy and visually pleasing result.
Does it matter what color tile adhesive I use
The color of the tile adhesive itself doesn’t affect the overall installation, as it will typically be covered by the tiles and grout. However, white or light-colored adhesives are often recommended for translucent or light-colored tiles to prevent any potential discoloration or show-through. For general use with most tiles, the color of the adhesive is purely an aesthetic preference.
What type of cement is used for tiles
Cement alone is not typically used for attaching tiles to surfaces. Instead, specialized tile adhesives, such as thin-set mortar or ready-to-use tile adhesive, are the go-to options. These adhesives offer the necessary bonding properties, flexibility, and strength required for successful tile installations. So, skip the cement and opt for the right tile adhesive instead!
Will Liquid Nails hold tile
While Liquid Nails is a popular construction adhesive, it may not be the best choice for attaching ceramic tiles to walls. Liquid Nails is primarily designed for general bonding applications and lacks the specific formulation required for successful tile installations. It’s better to use adhesives specifically designed for tiling projects to ensure a strong and durable bond.
What does S1 mean on tile adhesive
The “S” in the adhesive classification system stands for “Slip resistance.” The “S1” rating indicates that the tile adhesive provides a higher slip resistance, making it suitable for both floor and wall applications. This rating ensures better adhesion of tiles to vertical surfaces, preventing slippage and ensuring a secure installation. Keep an eye out for that “S1” rating when choosing your tile adhesive!
Conclusion: With these frequently asked questions answered, you’re now equipped with the knowledge to tackle any ceramic tile wall installation with confidence. Remember to choose the right adhesive, follow proper application techniques, and let your creativity shine through. Happy tiling in 2023 and beyond!