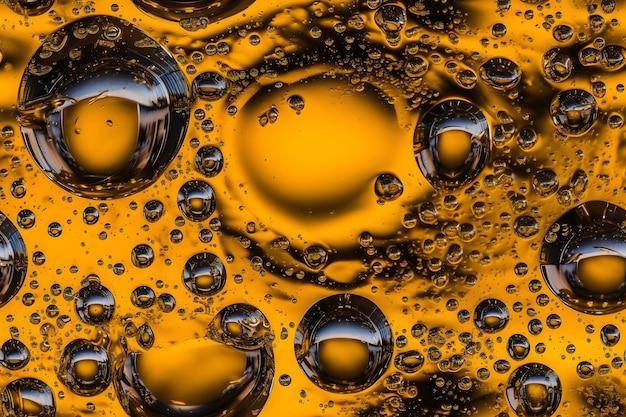
UV resin has become a popular choice among crafters and DIY enthusiasts for its quick curing time and glossy finish. However, one common challenge that many face when working with UV resin is the presence of air bubbles. These tiny pockets can mar the smooth finish and affect the overall quality of your resin creations. In this guide, we’ll explore various techniques and tips to help you effectively eliminate air bubbles and achieve flawless results.
Have you ever wondered why your UV resin turns out cloudy instead of crystal clear? Or why it may feel tacky even after curing it under a UV lamp? We’ll address these concerns as well as provide insights on the importance of using proper safety measures, such as wearing a mask to protect yourself from potential health risks associated with inhaling UV resin fumes.
Whether you’re a beginner or an experienced resin artist, this blog post will equip you with the knowledge and techniques needed to achieve bubble-free, smooth, and beautiful UV resin creations. So let’s dive in and discover the secrets to mastering the art of air bubble removal in UV resin!
How to Remove those Pesky Air Bubbles from UV Resin
Getting Started: The Battle Against Air Bubbles
So, you’ve embarked on your UV resin craft adventure, only to find out that those stubborn air bubbles have decided to crash the party. Fear not, my fellow resin enthusiast! In this guide, we’ll dive headfirst into the supernatural world of air bubble removal. Get ready to banish those pesky intruders once and for all!
Air Bubble Elimination Techniques from the Resin Masters
Stirring it Up: Let’s Mix Things Up!
Before pouring your UV resin, give it a good stir with a wooden stick or a toothpick. This will help release any trapped air bubbles that might be lurking within. A brisk stirring session is like a mini tornado in your resin, setting those sneaky air bubbles free.
The Torch of Justice: Slaying Air Bubbles in One Sweep
Grab your trusty heat gun or culinary torch (yes, you read that right) and let’s torch those air bubbles into oblivion. With a gentle and circular motion, pass the flame over the resin surface. As if by magic, the heat will coax the air bubbles to rise and pop, leaving your resin smooth and bubble-free.
The Spoonful of Bubbles: A Masterful Trick
Now, here’s a secret technique passed down from resin masters – the spoonful of bubbles! Take a spoonful of your freshly mixed UV resin and hold it about an inch above the resin surface. Slowly pour the resin, allowing it to cascade down and burst any lurking air bubbles. It’s like dodging tiny air bubble bombs!
The Magic of Heat: Basking the Air Bubbles Away
Warm, gentle heat is our ally once again! Grab a heat-resistant blanket or silicone mat, place your resin creation on it, and cover it snugly. Then, let your masterpiece bask in the warm glow of a desk lamp for a couple of hours. The heat will encourage the air bubbles to rise to the surface, like a bubbling spa for your resin.
Patience, Grasshopper: Give It Time to Settle
Sometimes, the best weapon against air bubbles is simple patience. Allow your freshly poured resin to sit undisturbed on a level surface. As time passes, the air bubbles will naturally rise and find their way to the surface. Remember, good things come to those who wait patiently!
Wrapping It Up: Mastering the Art of Air Bubble Removal
With these air bubble elimination techniques in your arsenal, you’re ready to conquer any resin project that comes your way. From stirring to torching, spoons to heat baths, and a sprinkle of patience, you’ll achieve resin perfection. So, go forth, brave crafter, and create your resin wonders without those pesky air bubbles!
Pro Tip of the Day
As you venture deeper into the realm of UV resin crafting, keep in mind that prevention is half the battle. Keeping your workspace free from dust and using a transparent silicone mold release agent can help minimize the appearance of air bubbles. Now, go forth and craft with confidence, my resin-loving friend!
FAQ: How Do You Get Air Bubbles Out Of UV Resin
So you’ve decided to try your hand at using UV resin for your creative projects. It’s a fantastic choice! UV resin offers a quick and convenient way to achieve beautiful and durable results. However, like any medium, it comes with its own set of challenges. One common issue many artists and crafters face is the presence of stubborn air bubbles in their cured resin. But worry not! In this FAQ-style guide, we’ll address some of the most frequently asked questions on how to get air bubbles out of UV resin, along with other common concerns. Let’s dive in!
How Do You Get Air Bubbles Out Of Dry Resin
Method 1: The Toothpick Trick
One of the simplest and most effective ways to tackle air bubbles in dry resin is by employing the trusty toothpick trick. Gently drag a toothpick through the resin, targeting the areas where you spot those pesky bubbles. This will release the trapped air and help smooth out the surface. Remember, patience is key!
Method 2: The Heat Gun Hero
If you’re dealing with a larger project or numerous bubbles, a heat gun can be your secret weapon. Simply apply gentle heat to the surface of the resin using a low setting on the heat gun. As the resin warms up, the air bubbles will rise and pop before your eyes. Keep the heat gun moving to avoid overheating or deforming your masterpiece.
How Can I Fix Cloudy Resin
Cloudy resin can put a damper on even the most exciting projects. Fear not, though, for we have a straightforward solution for you!
The Glossy Glory of Polishing
To restore the lustrous shine to your cloudy resin, you’ll need some good old-fashioned elbow grease and a polishing agent. Start by sanding the surface gently with fine-grit sandpaper. Then, apply a specialized resin polish and buff it in using a soft cloth. Voila! Your previously cloudy piece will now gleam with renewed brilliance.
Why is My Resin Cloudy
Ah, the eternal question of cloudy resin. Several factors can contribute to this frustrating phenomenon.
The Foundation of Measurements
One common culprit is incorrect measurements of the resin and hardener. It’s crucial to follow the instructions meticulously and ensure a perfect balance between the two components. Even a slight miscalculation can tip the scales and result in cloudy resin.
Moisture: The Sneaky Saboteur
Moisture is another sneaky saboteur of crystal-clear resin. Make sure your working environment is dry and free from humidity. You can also try heat-curing your resin to drive away any lurking moisture, but be careful not to overheat it.
Why is My UV Resin Tacky After Curing
Oh no, tacky resin is no fun! But fret not, as we have some tips to help you overcome this sticky situation.
The Cure Commandments
First and foremost, ensure that you’ve given your UV resin enough time to cure. Check the product instructions for the recommended curing time and use a UV lamp of adequate strength. If your resin remains tacky, try increasing the curing time or giving it a second round under the UV lamp for a complete cure.
What Happens If You Inhale UV Resin
While we advocate for safe crafting practices, we understand that accidents can happen. If you happen to inhale UV resin, it’s crucial to take appropriate measures.
Act Swiftly
If you accidentally breathe in UV resin fumes, immediately move to a well-ventilated area and seek fresh air. If you experience any discomfort or persistent symptoms, contact medical professionals for further assistance.
The “Mask”-ery of Protection
To prevent inhalation of resin fumes, it’s strongly advised to wear a mask specifically designed for resin work. These masks filter out harmful particles and ensure you can continue creating without worry.
How Do You Remove Air From Resin
Removing air from resin is a skill that artists continuously refine. Luckily, we have a few techniques up our sleeves!
The Stirring Strategy
One effective method is to stir the resin slowly and continuously for a few minutes after mixing the components. This helps to coax out the air bubbles, allowing them to rise to the surface. Keep a close eye on the resin as it settles to ensure no new bubbles form during the stirring process.
The Bubble Bursting Ballet
Another technique involves delicately bursting the visible bubbles by gently blowing air over the resin surface, using a straw or even your own breath. Take care not to overdo it, as excessive force could introduce new bubbles or cause ripples in the resin.
Can You Use a Heat Gun to Get Bubbles Out of Resin
Indeed, you can! A heat gun is a handy tool that many resin enthusiasts swear by for bubble removal.
The Heat Gun Hero Revisited
Gently heating the surface of your resin with a heat gun will encourage the trapped air to rise and pop, leaving you with a smooth, bubble-free finish. Remember, keep the heat gun moving to avoid any misadventures.
Can You Use Alcohol to Get Rid of Bubbles in Resin
Ah, alcohol, the master of versatility! While it may not cure all your life’s problems, alcohol can indeed help with resin bubbles.
The Artistry of Alcohol
Using a small spritz bottle filled with isopropyl alcohol, mist the surface of the resin after pouring. The alcohol helps to burst the bubbles and create a flawlessly smooth finish. It’s like a refreshing cocktail for your resin masterpiece!
Why is My UV Resin Not Shiny
Dull resin can be a real buzzkill, but fear not, for you can regain that coveted shine!
The Culprits of Dullness
Dull resin can result from improper curing, insufficien