Are you looking to cut a vent pipe but not sure where to begin? Whether it’s for adding a vent to existing ductwork or shortening a dryer vent hose, this comprehensive guide has got you covered. In this blog post, we will address frequently asked questions such as, “Can you cut a vent into ductwork?” and “How do you connect two pieces of duct?”
With step-by-step instructions and tips, we will walk you through the process of cutting vent pipes safely and efficiently. No matter if you’re a seasoned DIY enthusiast or just starting out, by the end of this guide, you’ll have the knowledge and confidence to tackle your vent pipe cutting project with ease.
So, let’s roll up our sleeves and get ready to dive into the world of vent pipe cutting!
How to Efficiently Cut Vent Pipe Like a Pro
Cutting vent pipe may seem like a daunting task, but fear not! With the right tools and techniques, you can master the art of vent pipe cutting in no time. Whether you’re a DIY enthusiast or a seasoned professional, this guide will provide you with all the information you need to cut vent pipe successfully.
Tools You’ll Need
Before diving into the nitty-gritty of pipe cutting, let’s start with the essential tools you’ll need for the job:
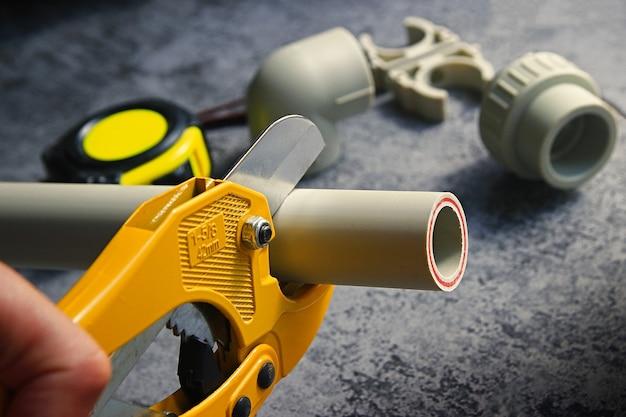
1. Tape Measure and Marker
“As the famous saying goes, measure twice, cut once!” Grab a tape measure and mark the desired length of the vent pipe before cutting. Accuracy is key to ensuring a perfect fit.
2. Hacksaw
Don’t let the name fool you – a hacksaw is your best friend when it comes to cutting vent pipe. Look for a model with a fine-toothed blade for smooth and precise cuts.
3. Safety Glasses and Gloves
Protect your eyes and hands from flying debris and sharp edges by wearing safety glasses and gloves. Safety first, right?
Step-by-Step Guide
Now that you have your tools ready, let’s walk through the step-by-step process of cutting vent pipe:
1. Measure Twice, Cut Once!
Grab your tape measure and accurately measure the length you need for your vent pipe. Remember, precision is vital here!
2. Mark the Spot
Once you have determined the desired length, use a marker to make a visible mark on the pipe. This mark will guide your cutting process.
3. Steady Does It
Secure the vent pipe firmly in a vise or clamp to prevent it from wobbling or rolling during the cutting process. This stability ensures a clean and accurate cut.
4. Time to Cut!
With your hacksaw in hand, position the blade against the marked spot on the pipe and apply gentle pressure. Start sawing back and forth in a steady motion. Let the blade do the work and avoid pushing too hard, as this may lead to uneven cuts.
5. Smooth It Out
After completing the cut, check for any rough or jagged edges. Use a file or sandpaper to smooth out these imperfections. A little extra effort goes a long way in achieving a professional finish.
6. Give It a Clean
Once you’re satisfied with the cut and the edges are smooth, remove any debris or metal shavings from the vent pipe. These particles can cause blockages and affect the efficiency of your ventilation system.
Congrats! You’ve successfully conquered the art of cutting vent pipe. Now go ahead and install the pipe with confidence, knowing that your cut is precise and up to par.
Remember, practice makes perfect. As you gain more experience, you’ll develop your unique cutting techniques, and who knows, you might even become the next vent pipe cutting maestro.
Now, in the words of plumbing philosophers, “Go forth and cut those pipes like a champ!”
FAQ: How To Cut Vent Pipe
How do you cut a metal flue pipe
Cutting a metal flue pipe may seem like a daunting task, but with the right tools and technique, it can be done smoothly. Here’s a simple step-by-step guide:
-
Measure and mark: Use a tape measure to determine the desired length of the metal flue pipe. Mark the measurement on the pipe using a pencil or marker.
-
Choose the right tool: To cut the metal flue pipe, you’ll need a reciprocating saw equipped with a metal-cutting blade. This powerful tool will make the job easier and more precise.
-
Safety first: Put on safety goggles and work gloves before you start cutting. The goggles will protect your eyes from sparks or debris, and the gloves will prevent any accidental cuts.
-
Cutting technique: Position the reciprocating saw at the marked spot on the metal flue pipe. Press the saw’s blade against the pipe and start cutting with a slow and steady motion. Apply light pressure to the saw; the sharp blade will do most of the work for you.
-
Smooth the edges: After cutting the metal flue pipe, you may notice rough edges. Smooth them out using a file or sandpaper to ensure a clean finish.
Can you cut dryer vent hose shorter
Absolutely! Cutting a dryer vent hose shorter is a common practice when the existing hose is too long or needs to fit into a tighter space. Here’s a quick rundown on how to do it:
-
Determine the right length: Measure the distance from the dryer exhaust port to the desired exit point for the vent hose. This will give you the length required for the shortened hose.
-
Mark and cut: Use a measuring tape and marker to mark the determined length on the dryer vent hose. Then, carefully cut the hose using a sharp utility knife or scissors.
-
Reconnect the hose: Once you have the shortened dryer vent hose, reconnect it to the dryer exhaust port and the vent outlet. Ensure a secure and snug fit, free from any gaps or leaks.
Remember, it’s important to keep the dryer vent hose as short and straight as possible for optimal performance and safety. Be sure to regularly inspect and clean the vent system to prevent lint buildup, which can be a potential fire hazard.
How much does it cost to add a vent to existing ductwork
The cost of adding a vent to existing ductwork can vary depending on several factors, including the complexity of the installation, the materials required, and the region you live in. On average, you can expect to spend between $200 and $500 for a professional to add a vent to your existing ductwork.
However, if you’re a DIY enthusiast with the necessary skills and tools, you can save on labor costs by doing it yourself. In that case, the cost will primarily be for the materials needed, such as a new vent, duct connectors, and any insulation or sealing materials. These expenses can range from $50 to $150, depending on the quality and type of materials chosen.
It’s always a good idea to consult with a professional HVAC technician to determine the specific requirements for your situation and get an accurate estimate of the cost involved.
Do dryer vent hoses come in different sizes
Yes, dryer vent hoses come in different sizes to accommodate various dryer models and installation configurations. The most common sizes for dryer vent hoses are 4 inches (10 cm) in diameter and 6 inches (15 cm) in diameter.
When purchasing a new dryer vent hose, ensure that it matches the size of your dryer’s exhaust outlet. It’s important to use the correct size to maintain proper ventilation and prevent lint buildup, which can pose a fire hazard.
Whether you need a shorter or longer vent hose, or if you have a specific venting configuration, there are options available in different sizes to suit your needs. Make sure to measure and select the appropriate size to ensure optimal functionality and safety.
Should I cut my dryer vent hose
Cutting your dryer vent hose may be necessary in certain situations, such as when it’s too long or needs to be rerouted to fit into a new space. However, it’s essential to handle this task with caution and follow the proper guidelines to avoid any issues. Here are a few points to consider:
-
Length requirements: Dryer vent hoses should be as short and straight as possible to maximize airflow efficiency and reduce the risk of lint buildup. If your current hose is excessively long, it’s advisable to cut it to the appropriate length.
-
Measure twice, cut once: Before proceeding, measure the distance required for the hose to fit properly. Double-check your measurements to ensure accuracy. It’s always better to be safe than sorry!
-
Use the right tools: To cut your dryer vent hose, you’ll need a sharp utility knife or scissors designed for cutting flexible materials. Avoid using dull tools, as they can cause fraying or create uneven edges.
-
Create a snug connection: After cutting the hose, make sure to securely attach it to the dryer’s exhaust port and the vent outlet. Utilize appropriate fasteners or clamps to create a tight, leak-proof connection.
By following these guidelines, you can confidently cut your dryer vent hose if needed. Remember, proper installation and regular maintenance are crucial for the efficient and safe operation of your dryer.
How do I add heat to my basement
Adding heat to your basement can significantly enhance its coziness and usability. Here are a few methods you can consider:
-
Extend your existing HVAC system: The most effective and hassle-free approach is extending your current heating, ventilation, and air conditioning (HVAC) system to include the basement. This involves hiring a professional HVAC technician who can connect and balance the ductwork and install additional vents or radiators.
-
Space heaters: Portable space heaters can be an affordable and convenient solution for heating specific areas of your basement. Look for energy-efficient options with adjustable thermostats and safety features like automatic shutoff.
-
Electric baseboard heaters: Electric baseboard heaters are another option to consider. These heaters are installed along the baseboard of each room and provide consistent and customizable heat. However, keep in mind that they may require professional installation and can be costlier to operate.
-
Radiant floor heating: For a luxurious heating option, consider installing radiant floor heating in your basement. This involves installing electric heating mats or water pipes beneath the floor surface, providing efficient and even heat distribution.
Always consult with a professional heating contractor to determine the most suitable heating solution for your basement. Each method has its pros and cons, so it’s important to consider factors such as energy efficiency, cost, and your specific needs and budget.
How do you cut into existing round ductwork
Cutting into existing round ductwork requires careful planning and precise execution. Here’s a step-by-step guide to help you through the process:
-
Identify the cutting area: Determine where you need to cut into the round ductwork to create an opening. Use a measuring tape and marker to mark the desired location. Make sure to choose a spot where the new opening won’t interfere with existing ducts or structural elements.
-
Choose the right tool: To cut into the round ductwork, you’ll need aviation snips or tin snips. These specialized cutting tools are designed to make clean and precise cuts in metal ductwork.
-
Safety precautions: Wear safety goggles and work gloves to protect your eyes and hands from any sharp edges or flying debris.
-
Cutting technique: Start by creating a small pilot hole at the marked location using a sharp utility knife or drill with a metal-cutting bit. Then, carefully insert the snips into the pilot hole and cut along the marked line. Take your time and make slow, steady cuts to ensure a clean and accurate result.
-
Smooth the edges: Once you’ve made the cut, use a file or sandpaper to smooth any rough edges around the new opening. This will prevent airflow disruptions and reduce the risk of injuries from sharp edges.
Remember, if you’re uncertain about cutting into existing ductwork or the project seems complex, it’s best to seek the assistance of a qualified HVAC professional who can ensure proper installation and minimize the risk of damaging the ductwork.
Does length of dryer vent matter
Yes, the length of a dryer vent does matter and can significantly impact the performance and safety of your dryer. Here’s why:
-
Airflow efficiency: Longer dryer vent runs create more resistance for the expelled air, leading to reduced airflow efficiency. This can result in longer drying times, increased energy consumption, and premature wear and tear on the dryer’s components.
-
Lint buildup: Dryer vents that are too long or have excessive bends are more prone to lint buildup. The longer the vent, the more opportunities for lint to accumulate, increasing the risk of clogs and potential fire hazards.
-
Condensation and moisture: Lengthy dryer vents are more susceptible to condensation and moisture retention. If the vent is not properly insulated or doesn’t allow the moist air to escape effectively, it can lead to mold and mildew growth, indoor air quality issues, and even damage to the surrounding walls.
It’s crucial to keep your dryer vent as short and straight as possible, following the manufacturer’s recommendations. Regularly inspect and clean the vent to prevent lint buildup, and ensure there are no obstructions or restrictions that could affect the dryer’s performance.
Can you cut a vent into ductwork
Yes, it is possible to cut a vent into existing ductwork to create an additional air supply or return register. Here’s a general outline of the process:
-
Identify the location: Determine where you want to add the vent in the existing ductwork. Consider factors such as the room layout and airflow requirements. Mark the desired location on the ductwork using a measuring tape and marker.
-
Prepare the area: Clear the surrounding area of any obstructions and ensure there’s sufficient space to make the necessary cuts. Turn off the HVAC system to prevent any airflow during the installation process.
-
Choose the right tool: To cut through the sheet metal of the ductwork, aviation snips or tin snips are usually the most suitable tools. These tools offer more control and precision compared to alternative cutting methods.
-
Cutting technique: Start by making a small pilot hole at the marked location using a sharp utility knife or drill with a metal-cutting bit. Insert the snips into the pilot hole, following the marked lines, and carefully cut through the ductwork. Take your time and make incremental cuts to ensure accuracy.
-
Install the vent: Once you have the opening in the ductwork, insert the vent collar or register into the hole. Use sheet metal screws or clamps to secure it in place. Ensure a proper seal to prevent air leaks.
It’s important to note that cutting into existing ductwork should be approached with caution. Improper installation or modifications can affect the overall system’s performance and efficiency. If you’re unsure about the process or its impact, consulting with a professional HVAC technician is always a wise decision.
How do you connect round duct to square duct
Connecting round duct to square duct can be achieved using a transition piece called a rectangular-to-round transition. Here’s a step-by-step guide to help you with the process:
-
Determine the sizes: Measure the diameter of the round duct and the dimensions of the square duct. This will help you find the appropriate rectangular-to-round transition piece that matches the two sizes.
-
Prepare the ducts: Ensure the ends of both the round and square ducts are clean and free from debris. Smooth any rough edges or bumps that could hinder the connection.
-
Install the transition piece: Insert one end of the rectangular-to-round transition into the square duct until it fits snugly. Secure the connection using self-tapping sheet metal screws or duct tape. Repeat the process for the other end of the transition, connecting it to the round duct.
-
Seal the connection: Apply foil tape or mastic sealant around the joints to ensure an airtight connection and prevent any air leaks.
Remember to follow the appropriate guidelines and local codes for your specific HVAC system. If you’re unsure about the process or lack the necessary skills, it’s recommended to consult with a professional HVAC technician to ensure proper installation and system efficiency.
How do you connect two pieces of duct
Connecting two pieces of duct requires a secure and airtight joint to maintain optimal airflow efficiency. Here’s a simple guide to help you with the connection:
-
Clean the ends: Ensure the ends of both duct pieces are clean and free from dust or debris. This will help create a better connection and prevent air leaks.
-
Choose the right connector: Depending on the type of duct you’re working with (e.g., round, rectangular), there are several connector options available, such as sleeve connectors, compression couplings, or duct clamps. Select the appropriate connector based on the duct type and size.
-
Insert and secure: Insert one end of the connector into the first duct piece, making sure it fits properly. Depending on the connector type, you may need to apply some force or use locking mechanisms to ensure a secure connection. Repeat the process for the second duct piece, inserting it into the opposite end of the connector. Again, ensure a tight fit.
-
Seal the joint: Apply foil tape or mastic sealant around the joint to create an airtight seal and prevent any air leaks. This step is crucial for maximizing airflow efficiency and preventing energy loss.
By following these steps, you can confidently connect two pieces of duct to maintain a proper ventilation system. If you’re unsure about the process or have complex ductwork, it’s best to consult with a professional HVAC technician to ensure a correct and efficient connection.
What is the diameter of a dryer vent
Dryer vents typically have a diameter of 4 inches (10 cm). This standard size allows for proper airflow and ventilation of the dryer exhaust. It’s essential to match the diameter of the dryer vent with the corresponding exhaust outlet on your dryer.
Using the correct diameter ensures optimal performance, allowing the hot, moist air to be efficiently expelled from the dryer and safely vented outside your home. By maintaining a proper dryer vent size, you help prevent lint buildup, reduce the risk of dryer fires, and enhance the overall efficiency of your dryer.
How do you cut a 4 inch dryer vent
Cut