Are you an HVAC technician or a DIY enthusiast looking to learn how to charge a multi zone mini split? Before diving into the process, it’s important to understand what a multi zone mini split is and how it works. In this blog post, we’ll cover the basics of multi zone mini splits, signs that indicate your mini split needs a recharge, and step-by-step instructions for charging it. We’ll also touch on topics like mini split recharge kits and how to charge a mini split in heat mode. So, grab your notepad, put on your learning cap, and let’s get started!
How to Charge a Multi-Zone Mini Split
So, you’ve just installed a multi-zone mini split, and now you need to charge it up before the summer kicks in. Fear not, dear reader, for we have compiled a comprehensive guide on how to charge your multi-zone mini split without breaking a sweat.
Tools Needed
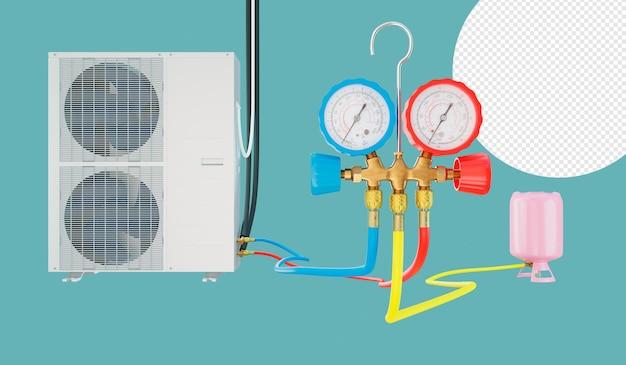
First off, let’s talk about the tools you’ll need. Make sure you have a refrigerant manifold gauge set, a vacuum pump, and a refrigerant cylinder on hand. These will ensure that you can accurately measure the refrigerant pressure, create a vacuum to remove any impurities, and replenish the refrigerant to the correct levels.
Precautions to Take

Before you begin, it’s essential to take some precautions to protect yourself. Make sure you wear safety glasses, gloves, and a face mask when handling the refrigerant. Also, ensure that you are working in a well-ventilated area to prevent inhaling any dangerous gases.
Steps to Follow
Now that we have covered the tools you’ll need and the precautions to take let’s dive into the steps you should follow when charging your multi-zone mini split.
Step 1: Turn off the Power
The first thing you want to do is turn off the power to the mini split system. This will prevent any electrical accidents from occurring while you’re working on the system.
Step 2: Determine the Refrigerant Type
The second step is to determine the type of refrigerant that is used in your mini split system. You can do this by checking the manufacturer’s manual or the label on the refrigerant cylinder.
Step 3: Install Refrigerant Manifold Gauge Set
Install the refrigerant manifold gauge set by screwing it onto the suction service valve. Make sure the gauge is in the ‘off’ position and that the refrigerant cylinder is closed.
Step 4: Connect Vacuum Pump and Run it
Connect the vacuum pump to the gauge set and turn it on. Let it run for at least 15 minutes to remove any impurities and moisture from the system.
Step 5: Start Refrigerant Flow
Close the low-pressure side valve on the gauge set and open the high-pressure side valve. Also, open the refrigerant cylinder valve slightly to allow refrigerant to flow into the system.
Step 6: Check Refrigerant Levels
Check the refrigerant level on the gauge set. Keep adding refrigerant until the pressure reading is within the recommended range.
Step 7: Close Valves and Turn on Power
Close the refrigerant cylinder valve, disconnect the manifold gauge set, and turn on the power to the mini split system.
And voila! You’ve successfully charged your multi-zone mini split system. Now sit back, relax, and enjoy the cool air blowing through your home.
Mini Split Recharge Kit
One of the most crucial aspects of maintaining your multi-zone mini-split system is charging it correctly. In this subsection, we’ll discuss the mini-split recharge kit and why it’s a useful tool for keeping your mini-split system in top condition.
What is a Mini Split Recharge Kit
A mini-split recharge kit is a set of tools that enables you to recharge your mini-split system’s refrigerant. This kit is typically sold separately and consists of a charging hose, a pressure gauge, and a canister of refrigerant. The kit is affordable and easy to use, making it an ideal solution for minor refrigerant leaks or low refrigerant levels.
Why Use a Mini Split Recharge Kit
The main advantage of using a mini-split recharge kit is cost-effectiveness. Instead of calling a professional to recharge your system, you can do it yourself with a recharge kit. The kit is straightforward to use, and the step-by-step instructions are easy to follow. Additionally, using a recharge kit is an excellent preventive measure that helps ensure your mini-split system operates at peak efficiency.
How to Use a Mini Split Recharge Kit
Before using a recharge kit, it’s essential to locate your system’s refrigerant lines and determine the type of refrigerant it uses. Once you’ve identified your system’s refrigerant, follow these steps to use the recharge kit correctly:
- Turn off the mini-split system and unplug it from the power source.
- Attach the charging hose to the canister of refrigerant.
- Connect the charging hose to the high-pressure port on your mini-split system.
- Turn on the mini-split system and set it to the fan-only mode.
- Slowly open the valve on the refrigerant canister to start the recharge.
- Monitor the pressure gauge on the charging hose until it reaches the recommended level for your system.
- Once the pressure gauge reaches the desired level, turn off the mini-split system, unplug it, and disconnect the charging hose.
A mini-split recharge kit is a must-have tool for mini-split system owners. It’s an affordable and easy-to-use solution for maintaining your system’s refrigerant levels. By using a recharge kit, you can save money on professional repairs, prolong the lifespan of your system, and ensure that it operates at peak efficiency.
Charging Mini Split by Pressure
If you’re wondering how to charge your multi-zone mini split, one way to do it is by pressure. This method is a bit more complex than the others, but it can be done with the right tools and knowledge. In this section, we’ll walk you through the process step by step.
Step 1: Prepare Your Tools
Before you start charging your mini split, you’ll need to make sure you have all the necessary tools. This includes a refrigerant pressure gauge, a refrigerant charging hose, and refrigerant (of the appropriate type for your mini split). Make sure you wear gloves and safety glasses to protect yourself from any potential harm.
Step 2: Connect the Gauge
Attach your refrigerant pressure gauge to the low side service valve of your mini split. Make sure you follow the manufacturer’s instructions for this step to avoid damaging your equipment.
Step 3: Attach the Hose
Attach the refrigerant charging hose to your refrigerant cylinder and connect it to your mini split. Make sure all connections are secure and tight to prevent any leaks.
Step 4: Charge the Mini Split
Now it’s time to charge your mini split. Turn on your air conditioning unit and allow it to run for a few minutes. Then, slowly open the refrigerant cylinder valve and let the refrigerant flow into your unit. Monitor the pressure gauge as you charge your mini split and make sure you don’t overcharge it.
Step 5: Monitor the Pressure
To avoid overcharging your mini split, you’ll need to monitor the pressure as you charge it. Check the manufacturer’s recommended pressure levels and adjust your charging accordingly. When you’ve reached the right pressure, close the refrigerant cylinder valve and disconnect the charging hose.
Congratulations, you’ve successfully charged your multi-zone mini split by pressure! With this method, you can ensure that your unit is charged to the right level and working efficiently.
What is a Multi Zone Mini Split
If you’re new to the HVAC world, you might be wondering what a multi zone mini split is. Well, in simple terms, it’s an air conditioning system that has multiple indoor units all connected to a single outdoor unit. Each indoor unit can be controlled independently of the others, allowing for maximum flexibility and comfort.
How Does It Work
Multi zone mini splits work by using a refrigerant to absorb heat from the inside of your home and transferring it outside. The outdoor unit houses the compressor and condenser, while the indoor units deal with the air handling.
Each indoor unit has its own thermostat, allowing you to set different temperatures for different parts of your home. This means you can have one room as cool as an iceberg, while having another room be as warm as a freshly baked cookie.
Why Choose a Multi Zone Mini Split over Other HVAC Systems
Multi zone mini splits are becoming increasingly popular for a variety of reasons. Firstly, they’re much more energy efficient than traditional HVAC systems, as they only cool or heat rooms that actually need it. This can result in significant cost savings on your monthly energy bill.
Secondly, they’re incredibly quiet in operation, with noise levels comparable to a whispering library. This means you can sleep soundly at night without any annoying humming or buzzing noises.
Finally, multi zone mini splits are great for homes with limited space. Unlike central air conditioning systems, they don’t require any ductwork, which can take up a lot of space and be expensive to install.
In conclusion, if you’re looking for a flexible, energy-efficient, and space-saving air conditioning system, then a multi zone mini split might just be the perfect solution for you.
How Do Multi Zone Mini Splits Work
Multi-zone mini splits are a great way to heat and cool different areas of your house without installing separate systems. You can easily control the temperature in each room via separate thermostats or a centralized control panel. But how do they work exactly?
Basic Principle of Multi Zone Mini Splits
Multi-zone mini split systems work on the same principle as conventional split systems. The indoor unit contains the evaporator coil, which cools or heats the air that circulates indoors. The outdoor unit contains the compressor, which pumps refrigerant between the indoor and outdoor units. A series of refrigerant lines and electrical connections connect the indoor and outdoor units.
Zone Control
The primary difference between single and multi-zone mini split systems is the ability to control different zones independently. A multi-zone system enables you to manage the temperature and humidity levels of different areas of your home through the use of multiple indoor units.
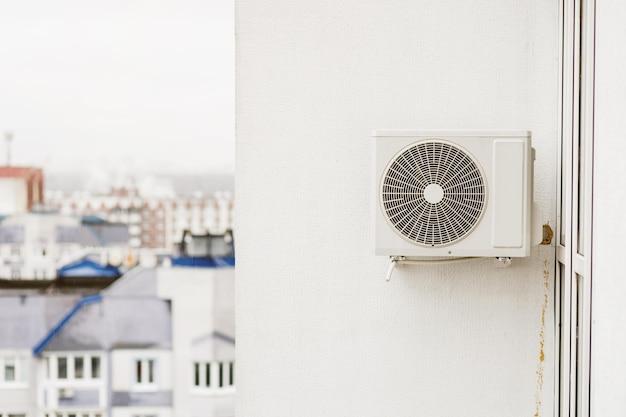
Outdoor Unit
The outdoor unit is the backbone of a multi-zone mini-split system. It is a heat pump that is responsible for extracting heat from the outside air during winter and transferring it inside the house. During summer, it works in reverse, extracting heat from the indoor air and transferring it outside.
Indoor Units
The indoor units are mounted on the walls or ceilings of the house and receive the conditioned air from the outdoor unit. They are available in various sizes and can range from basic units with one-to-one connections to advanced units with eight-to-one connections.
Control System
The control system is an essential part of multi-zone mini-split systems. You can manage the temperature of each indoor unit with separate thermostats or a centralized control panel. Depending on the size and complexity of your system, you can opt for a wired or wireless control system.
In conclusion, multi-zone mini-split systems work on the same principle as conventional split systems. The ability to control different zones independently and the use of multiple indoor units distinguish multi-zone systems from their single-zone counterparts. A well-designed and installed multi-zone mini-split system can provide you with a comfortable and energy-efficient way to heat and cool your home.
How to Add R410A to a Mini Split
Mini splits are not only economical but compact and energy-efficient, making them a popular choice for heating and cooling homes and commercial spaces. One of the essential tasks in maintaining your mini split is knowing how to charge it properly with R410A refrigerant.
Step 1: Locate the Refrigerant Ports
Before adding R410A refrigerant to your mini split, locate the refrigerant ports located on each unit. The high-pressure port is usually located on the condenser unit, while the low-pressure port is often on the air handler.
Step 2: Gather Tools and Supplies
Equip yourself with the necessary tools and supplies such as gauges, hoses, and a refrigerant tank. Ensure that your gauges are equipped with the proper connection for use with R410A refrigerant and double-check your hoses for leaks.
Step 3: Connect the Gauges and Hoses
Connect the gauges and hoses to the refrigerant ports, ensuring that you attach the correct hose to the right port. Mark the gauges with the correct refrigerant type to prevent confusion. Tighten all connections securely to prevent refrigerant leaks.
Step 4: Turn on the Mini Split
Turn on the mini split and wait for a few minutes to allow the system to stabilize. Once you have done this, turn off the mini split air handler on one of the zones where you want to add refrigerant.
Step 5: Add Refrigerant
Slowly add R410A refrigerant to the system, observing the gauges and system pressure as you do so. Be sure to add refrigerant in small increments and avoid overcharging the system, which can cause damage.
Step 6: Monitor the System
After adding the refrigerant, turn the mini split air handler back on and observe the system’s proper operation. Wait for a few minutes to ensure that the system pressure remains steady.
Charging your mini split with R410A refrigerant is easy, provided that you follow the proper steps. Remember to take safety measures, such as wearing proper protective gear, when handling refrigerant. And if you have any doubts or concerns, don’t hesitate to contact a professional to assist you.
How to Charge a Mini Split in Heat Mode
So, you’ve got a mini split and you need to charge it in heat mode. Fear not! With a little bit of knowledge and a lot of elbow grease, you can have your mini split up and running in no time. Here are a few tips to help get you started:
Understanding the Basics
Before getting started, it’s important to understand the basics of your mini split system. Heat pumps operate in two modes: heating mode and cooling mode. When your mini split is in heating mode, the refrigerant flow is reversed, and heat is absorbed from outside and transferred inside.
Checking the Charge
The first step in charging your mini split in heat mode is to check the charge. This can be done using a refrigerant scale and a thermometer. Ensure the unit is in heating mode, then use the thermometer to measure the temperature of the air entering the unit. If it’s not within the manufacturer’s specifications, you may need to add or remove refrigerant to get it to the correct temperature.
Adding Refrigerant
Once you’ve determined that your mini split needs more refrigerant, it’s time to add it. Keep in mind that this should be done slowly and carefully. Add a little bit of refrigerant at a time, then allow the system to run for a few minutes to stabilize before taking more measurements. Continue adding refrigerant until you reach the manufacturer’s recommended charge level.
Removing Refrigerant
If you’ve determined that your mini split has too much refrigerant, you’ll need to remove some. This can be done using a refrigerant reclaimer, which will safely recover the excess refrigerant for you. Be sure to follow all safety procedures when using a reclaimer.
Charging a mini split in heat mode may seem daunting at first, but with a little bit of patience and know-how, you can do it. Remember to always follow safety procedures, take measurements slowly and carefully, and allow the system to stabilize before making any changes. Good luck!
How Do I Know If My Mini Split Is Low on Refrigerant
If you own a mini split, you know it’s an excellent home cooling system. From keeping you cool during summer to warm in winter, mini-splits offer unparalleled comfort. But what happens when your mini split doesn’t seem to be working correctly? For instance, it’s not producing enough cold air, and your home isn’t as comfortable as it should be. What if it needs refrigerant recharge so that it works as it should? Here’s how to tell if your mini split is low on refrigerant.
Reduced Cooling Power
If you notice that your mini split isn’t cooling your home as it should be, then it’s most probably low on refrigerant. A reduction in cooling power is one of the most apparent signs that your mini split has a refrigerant leak. Don’t wait until you feel that your mini split isn’t producing enough cold air before you act. Instead, get in touch with a technician as soon as you suspect that your mini split is low on refrigerant.
Hot Air
Another obvious sign that your mini split is low on refrigerant is when it starts to blow hot air. A lack of refrigerant will diminish your mini split’s cooling power and reduce the overall temperature of the air getting into your home. This means your mini split system will struggle to pump out cold air from your home.
Ice Buildup

When the refrigerant level in your mini split is low, you may notice ice build-up on the coils of the indoor unit. Ice formation happens because the refrigerant can’t absorb enough heat, leading to the coils freezing up. If you notice ice buildup, turn off your mini split and call a technician to diagnose and repair the underlying issues.
Unusual Sounds
Mini splits typically operate quietly, without producing any unnecessary sound. But when your mini-split is low on refrigerant, it might start to produce unusual sounds like hissing or gurgling. These sounds may be due to the refrigerant leaking out of the air conditioning system. To avoid further damage, turn it off and call an expert who can narrow down the problem and fix it for you.
There you have it! If you notice any of these signs, don’t wait to call a qualified HVAC technician. Be sure not to use your mini split when you suspect it is low on refrigerant as it could cause further damage and require higher repair costs. A professional HVAC technician will diagnose the problem quickly and provide the best solution to get your mini split back in top shape.