Are you a homeowner or a contractor embarking on new construction? If yes, you need to understand the importance of AC rough in. An AC rough in is a pre-installation process of your air conditioner to ensure that all necessary ductwork, electrical, and plumbing components are in place before the installation is done. An AC rough in box is set up before the walls and ceilings are finished to speed up the installation process.
During your plumbing rough-in, the pipes are installed before any covering is done. Similarly, during the HVAC rough-in process, ductwork and components of heating and cooling systems are installed before insulation and drywall are put in place. A poorly done HVAC rough-in can lead to ineffective heating and cooling systems and increase the HVAC rough-in cost.
Do you know what an AC rough-in checklist entails? A checklist ensures that each component and system is installed correctly before the actual AC installation. It includes items such as verifying whether the furnace is compatible with the AC system, the size and location of the ducts, and proper electrical wiring. An efficient HVAC rough-in process guarantees you a comfortable and energy-efficient home.

Do you want to know how long it takes to rough in HVAC on a house? The duration of an HVAC rough-in depends on the size and complexity of the system. It can take a couple of days to a few weeks to complete. Finally, it’s essential to ensure that your AC is installed correctly to eliminate potential headaches down the line. Therefore, we will discuss how to know if your AC is installed correctly later in this guide.
Understanding the AC Rough-In Process
When it comes to installing or replacing your air conditioning unit, the first step is the AC rough-in. This is a critical process that ensures your AC unit is installed correctly, effectively, and efficiently. In this section, we’ll take a closer look at the AC rough-in process, what it entails, and what to expect.
What is AC Rough-In
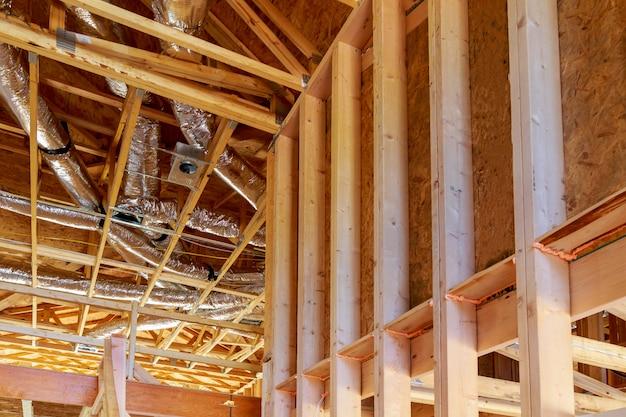
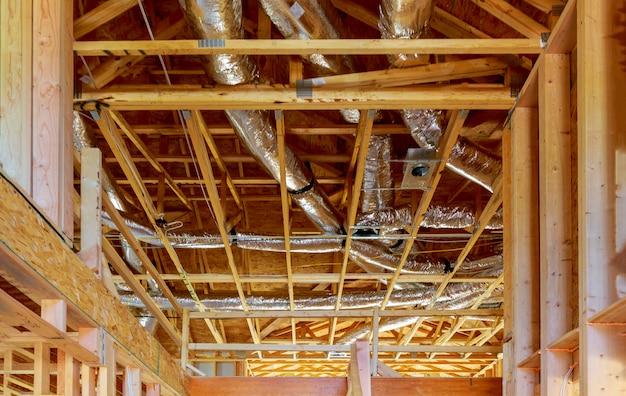
AC rough-in is the process of preparing your home for the installation of your AC unit. It involves several steps, including the installation of ductwork, electrical wiring, and refrigerant lines. The goal is to create a foundation for the AC unit, which will ensure that it operates effectively while providing maximum comfort and efficiency.
The Ductwork
The first step in the AC rough-in process is to install the ductwork. This is crucial since it’s right where the cool air will be circulating throughout your home. The ductwork consists of flexible, insulated pipes that are installed in walls, ceilings, or floors. The ductwork is responsible for distributing cooled air throughout your home while also removing hot air.
Electrical Wiring
The second step is to wire your air conditioning unit. This involves the installation of a circuit breaker, wiring from the breaker box to the AC unit, and the installation of a thermostat. The electrical wiring is critical as it ensures that your AC unit has the power it needs to operate efficiently.
Refrigerant Lines
The third and final step in the AC rough-in process is the installation of refrigerant lines. These lines carry the refrigerant from the outdoor unit to the indoor unit. They’re usually made of copper tubing and must be precisely measured and bent to fit in the space available.
The AC rough-in process is critical for the proper and effective installation of your AC unit. By following these steps, you can ensure that your AC unit operates efficiently and provides maximum comfort in your home. A professional HVAC contractor can help you with the AC rough-in process and ensure that your AC unit installation is up to code and meets your needs.
AC Rough-in Box
If you’re planning on installing a new AC unit, you’re probably wondering if you need an AC rough-in box. In short, the answer is yes! An AC rough-in box is an essential component of any AC installation. Here’s everything you need to know about AC rough-in boxes:
What is an AC Rough-in Box
An AC rough-in box is a metal enclosure that is installed in the wall during construction or renovation. It allows you to easily install and connect the AC unit’s wiring and drainage system. Essentially, the box serves as a conduit between the outside AC unit and the inside of your home.
What are the Benefits of Using an AC Rough-in Box
There are several benefits to using an AC rough-in box, such as:
– Ease of installation: By installing an AC rough-in box, you can easily connect the AC unit’s wiring without having to cut into your wall.
– Protection: The box provides a protective barrier around the AC unit’s wiring, preventing it from being damaged or tampered with.
– Cleanliness: An AC rough-in box ensures that the AC unit’s drainage system is properly installed and connected, preventing leaks and water damage.
How to Install an AC Rough-in Box
To install an AC rough-in box, here are the necessary steps:
1. Choose the location for the box, preferably close to where the AC unit will be installed on the exterior of your home.
2. Cut a hole in the drywall using a saw.
3. Install the box in the hole and secure it firmly.
4. Run the wiring and drainage pipes through the box.
5. Seal the box with caulk to prevent air leaks.
Installing an AC rough-in box might seem like an unnecessary expense, but it’s an investment that will pay off in the long run. It makes the installation process easier, protects your wiring, and ensures your AC unit is installed correctly. If you’re installing a new AC unit, make sure you don’t skip this important step.
Plumbing Rough-In
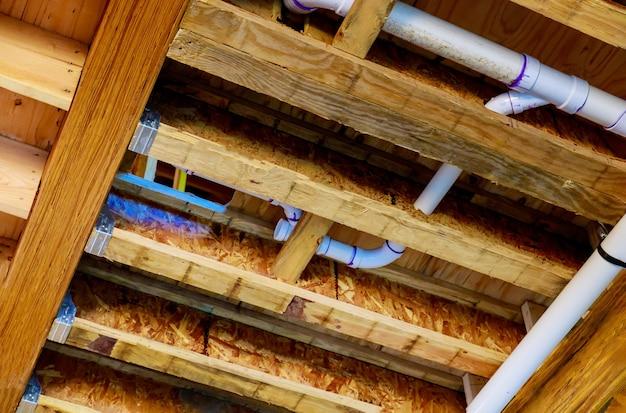
One crucial part of HVAC installation that homeowners often overlook is plumbing rough-in. This process involves installing the necessary pipes, valves, and fittings that connect to your HVAC unit, and it’s an essential step in ensuring that your cooling system functions correctly.
What is Plumbing Rough-In
Plumbing rough-in is the process of configuring the pipes and fittings that run from the HVAC unit to the rest of the home. It includes the installation of supply and return lines that connect the air handler to the ductwork, as well as the fitting of condensate drain lines that remove moisture from the HVAC system.
Why is Plumbing Rough-In important
Proper plumbing rough-in is essential to ensure your HVAC system runs smoothly and efficiently. The rough-in process ensures that all pipes are correctly placed, so there’s no risk of leaks or inefficient airflow. Additionally, a well-executed plumbing rough-in ensures that the condensate drain lines remove moisture from your HVAC system, which prevents mold and bacteria growth in your unit.
Common Plumbing Rough-In issues to watch out for
Homeowners should look out for some common issues when it comes to plumbing rough-ins, such as:
-
Improperly sized pipes: If the pipes connecting to your HVAC unit are too small or large, it can cause a decrease in airflow and lead to system inefficiencies.
-
Poorly placed pipes: If HVAC pipes are placed in a way that disrupts your home’s layout or design, it can be a cause for concern.
-
Leaky pipes or condensate lines: Leaks can cause water damage and lead to mold growth.
-
Improperly installed condensate pump: A faulty condensate pump can lead to an overflow of water and mold growth.
Ensuring that your HVAC system has the proper plumbing rough-in is essential for your unit’s safe, efficient functioning. By understanding the importance of this process and what to look out for, you’ll be able to make informed decisions when it comes to HVAC installation and maintenance.
“HVAC Rough In Cost”
When it comes to installing a new Air Conditioning (AC) system, the HVAC rough in cost can vary. The HVAC rough in cost refers to the installation of the necessary components for an air conditioning system before the actual installation of the unit can be completed. This includes copper piping, ductwork, vents, drain lines, and electrical wiring.
Factors Affecting HVAC Rough In Cost
Several factors affect the final cost of the HVAC rough in, including the size of the home or building, the type of AC unit being installed, and the level of complexity of the installation. Generally, the more complicated the installation, the higher the cost.
Range of HVAC Rough In Costs
The HVAC rough in cost can range from $2,000 to $7,000 or more, depending on the above factors. It is crucial to ask for a detailed quote from an HVAC contractor before starting the rough in work to avoid any unpleasant surprises later on.
Tips to Save Money on HVAC Rough In
If you’re looking to save money on HVAC rough in cost, there are a few things you can do. First, ensure that the installation area is clear, allowing the contractors to work efficiently. Second, get multiple quotes from different contractors and choose the one that offers the best value for your money. Finally, opt for energy-efficient components, which can save you money in the long run on utility bills.
Installing an AC system requires proper planning, and the rough in is an essential part of the process. By understanding the HVAC rough in cost and the factors that can affect it, you can make informed decisions and ensure the installation runs smoothly and without any hiccups. Remember, a detailed quote from an HVAC contractor is crucial to avoid any unexpected and hefty expenses that could derail your budget.
What is an AC Rough In
If you’re planning to install an air conditioning system in your home, the term “AC rough in” may pop up during your discussions with a contractor. This section will provide a comprehensive explanation of what an AC rough in is and why it’s crucial to your cooling system installation.
Understanding the Basics
To put it simply, an AC rough in is the installation process of several essential components required for your air conditioning system. These components include the refrigerant lines, the drain line, and the wiring. The installation process takes place before your walls close in, which is why it’s called the rough in stage. Essentially, it’s the installation of your system’s plumbing and electrical infrastructure.
Why is it Important for Your AC Installation
If you don’t understand the importance of AC rough in, you may opt-out of this process, thinking of it as an unnecessary step in the air conditioning installation process. Unfortunately, this could result in your system not functioning properly once it’s installed. Your system’s plumbing and electrical infrastructure need to be installed correctly and to code to ensure that your air conditioner runs efficiently. An improperly installed rough-in could lead to leaks, reduced efficiency, or complete system malfunction.
The Benefits of an AC Rough In
One of the main benefits of installing an AC rough in is that it ensures your system will run efficiently. A properly installed rough-in, along with regularly scheduled maintenance, can ensure your system will last for many years, ensuring comfort in your home.
The AC rough in is a crucial step in the air conditioning installation process that ensures your system runs efficiently for years to come. It may seem like an unnecessary step, but it’s best to have it installed correctly the first time to avoid potential issues in the future. Working with a knowledgeable contractor is essential to ensure that your system is installed correctly and to code.
In conclusion, the AC rough in is an essential step in the installation of an air conditioning system. It’s a necessary infrastructure installation that ensures efficient functioning of your system and helps you avoid potential issues in the future.
HVAC Rough-In Checklist
When it comes to installing an HVAC system, certain steps must be taken before the system can be fully installed. These steps include the rough-in stage, during which the HVAC system’s essential components are installed before the final finishing touches. Here is a checklist of things to do during the HVAC rough-in stage.
Plan Ahead
Before proceeding with the installation, it is vital to review the HVAC plans to ensure all components fit correctly. Check the materials to ensure they are of the right specifications and quality.
Install Ductwork
The first step in the rough-in stage is ductwork installation. The ductwork should be installed in the walls, ceilings or floors, depending on the design of the building. Ensure that the ductwork is airtight to minimize air leakage.
Install Equipment
After the ductwork installation, the HVAC equipment is then installed. This includes the furnace, air conditioner, and air handler. Before installation, check the equipment to ensure it is compatible with the building’s layout and meets the required specifications.
Install Registers and Grilles
After the installation of the HVAC equipment, it’s time to install the registers and grilles. Have them in the right size and location; this contributes to efficient and even cooling/heating throughout the building.
Power Supply and Wiring
Once the HVAC equipment and vents are installed, the next step is the wiring of the power supply. Ensure to follow the manufacturer’s specifications carefully and use the correct wiring.
Do a Test Run
After the installation, test the HVAC system to ensure it’s working correctly. Test it in all operational modes to see if there are any issues that need to be addressed.
In conclusion, the rough-in stage is just a part of the entire installation process. To have an efficient and functional HVAC system, the checklist above is essential. It ensures that every component is properly installed, and compatibility issues don’t arise during the final stages of installation.
Air Conditioner Rough In: What You Need to Know
If you’re installing a new air conditioning system, you’ll need to know about AC rough in. What does this mean? It’s the process of preparing a building’s infrastructure before installing air conditioning, also known as HVAC systems, to allow for ease of installation. In this subsection, we’ll discuss everything you need to know about air conditioner rough-in to ensure your installation is successful.
Choosing the Right Location
Choosing the right location is crucial for a successful air conditioner rough-in. The location should be central, away from high traffic areas, and secure from vandalism to ensure the system’s longevity. The location should also have sufficient clearance and free of obstructions for easy installation and maintenance.
The Role of a Professional Installer
Air conditioner rough-in requires expertise, specialized knowledge, and experience. It’s not a task for beginners or DIY enthusiasts. Professional installers understand the specifics required for the installation and maintenance of the HVAC system, including the necessary tools and equipment.
Ductwork
Ductwork is an essential aspect of air conditioner rough-in. It’s the pathway used to distribute cold air throughout the building and get rid of warmer air. The ideal design should be efficient, reliable, and with minimal leakage. A professional installer should do the necessary measurements to ensure that the ductwork is appropriately sized without compromising energy efficiency.
Electrical Wiring
Electrical wiring is another critical aspect of air conditioner rough-in. Typically, the system requires a dedicated electrical circuit. It’s crucial to ensure that the electrical contractor is licensed, certified, and insured. They should follow the local electrical codes to prevent any accidents or pose a fire hazard.
Drainage
During air conditioner rough-in, drainage is crucial. The system should be built with a condensation line and drainage to prevent clogging, mold growth, and moisture retention. An experienced installer will know the appropriate size to install based on the building’s design, local codes, and climate.
In conclusion, AC rough-in is an essential aspect of installing an air conditioning system. Hiring professional installers is recommended to ensure the necessary precautions are taken. With a secure location, proper ductwork, electrical wiring, and drainage, your HVAC system will last for long, providing optimal indoor comfort.
HVAC for New Construction Cost
When it comes to constructing a new home, the HVAC system is a crucial factor to consider. It’s essential to ensure that you install an efficient system that provides optimal comfort while keeping the overall construction cost within budget. In this subsection, we’ll look at the factors that affect the cost of the HVAC system for new construction.
System Type
The type of HVAC system you install is the most significant factor in determining the overall cost. The two most common types are the split system, which has an outdoor unit and an indoor unit, and the packaged system, which houses all the components in one outdoor unit. A split system is generally more expensive to install due to additional components and labor.
System Size
The size of the HVAC system required for your home is also essential. A larger system is more expensive to install, while a smaller one may be insufficient for your home’s needs. A professional HVAC contractor can help determine the right-sized system for your home based on the home’s size, climate, and insulation.
Ductwork
Another factor that affects the overall cost of the HVAC system is the ductwork. If your home already has ductwork in place, the contractor will inspect it to ensure it’s in good condition. Any necessary repairs or modifications may add to the overall cost. If your home doesn’t have ductwork installed, the contractor will have to install it, which will increase the overall cost.
Efficiency
The efficiency of the HVAC system is another factor to consider when determining the cost. A more efficient system may cost more upfront but will save you money in the long run on energy bills. A less efficient system may be cheaper initially but will end up costing you more in the long run.
In Conclusion
When determining the cost of the HVAC system in new construction, the type of system, size, ductwork, and efficiency are essential factors to consider. It’s crucial to work with a professional HVAC contractor who can help you determine the best system for your needs while staying within your budget. By considering these factors, you can ensure that your new home has an efficient HVAC system that provides optimal comfort and doesn’t break the bank.
How do I know if my AC is installed properly
You just got your AC installed, and you’re feeling good about it. But deep down, you’re wondering if the job was done correctly. Here are a few telltale signs that can help you determine if your AC is installed properly:
Airflow
The airflow from your vents is a crucial indicator of a well-installed AC. You should feel a constant and comfortable flow of air throughout your home. If the airflow is too weak or too strong, it could be an indication of a problem. Weak airflow might indicate ductwork issues, while too strong airflow might mean that the unit is overworking and could lead to higher energy bills.
Temperature
Your AC should maintain a consistent temperature throughout your home. If you’re experiencing temperature fluctuations, it could be an indication of an improperly installed system. An incorrectly sized unit or poorly placed ductwork can cause temperature fluctuations.
Noise level
A well-installed AC unit should run quietly. If you hear unusual noises like clanking, grinding or whistling, it could be an indication of a problem. An experienced technician can diagnose the issue and make the necessary repairs.
Energy bills
If you notice an increase in your energy bills after your AC installation, your unit may not be installed correctly. An improperly installed AC unit will have to work harder and longer to cool your home, leading to higher electricity bills.
Warranty
An AC unit that is correctly installed will have a manufacturer’s warranty. Make sure to read the warranty agreement before the installation and ensure that all installation requirements are met.
In conclusion, it’s crucial to hire a professional, experienced technician to install your AC correctly. If you notice any of the above-mentioned issues, call an HVAC technician to diagnose and repair the problem. A well-installed AC will ensure optimal cooling comfort and save you money in the long run.
How Long Does It Take To Rough In HVAC On A House
When it comes to installing an HVAC system, the rough in phase is the most crucial part of the entire process. The rough in is the initial installation of the HVAC system before it is connected to the electrical system or ductwork. This is a critical step, and it is essential to get it right.
Understanding the Rough In Process
The rough in process involves running the necessary electrical, gas, and refrigerant lines into the designated areas where the HVAC system will be installed. The process, of course, varies depending on the size and complexity of the HVAC system.
How Long Does It Take To Rough In HVAC On A House
On average, it takes between 2 and 4 days to rough in an HVAC system in a standard-sized family home. However, some factors can affect this timeline. For example, larger houses may take longer to rough in the system. Similarly, if the HVAC system requires more complex installations, then it may take longer to complete the rough in process.
Factors That Can Affect the Rough In Time
Several factors can affect the time it takes to rough in an HVAC system. Some of these factors include:
-
The Type of HVAC System. Different types of systems have varying installation times. For example, installing a ductless system may take less time compared to a centralized HVAC system.
-
The Complexity of the Installation. If the installation process is more complex, such as when installing a zoned system, then it may take longer to complete the rough in process.
-
The Size of the Home. Homes with more square footage require more HVAC equipment and may take longer to install.
-
The Availability of Parts. If the HVAC installer runs into unforeseen delays because of unavailable or delayed parts, it can affect the length of time it takes to complete the rough in process.
In conclusion, the rough in process is a crucial part of any HVAC installation, and it is essential to get it right. While the time it takes to rough in an HVAC system varies based on several factors, a professional installer can typically complete the process within 2-4 days.