Are you frustrated with the patchy appearance of your ceiling after painting? You’re not alone! Many homeowners face this issue, and it can be quite puzzling. After putting in the time and effort to give your ceiling a fresh coat of paint, you expect a smooth and even finish. But instead, you’re left with unsightly patches that ruin the entire look of the room.
In this blog post, we’ll delve into the reasons behind this common problem and explore some helpful tips and tricks to fix patchy ceiling paint. We’ll also answer frequently asked questions like whether three coats of paint are too much, the best roller to use for painting a ceiling, and whether it’s possible to touch up a freshly painted ceiling. So let’s dive in and discover how you can achieve a flawless ceiling paint job without the frustration of patchiness.
Why Does My Ceiling Look Patchy After Painting
Have you ever stood back after painting your ceiling, only to be disappointed by how patchy and uneven it looks? It’s frustrating, to say the least! But fear not, dear reader, because we’re here to shed some light on why your ceiling might be looking less than stellar after a fresh coat of paint.
Uneven Coverage: The Sneaky Culprit
One possible reason for patchy ceilings is uneven coverage. When you’re painting, it’s essential to apply the paint in a consistent and uniform manner. If you’re not careful, you might unknowingly miss spots or apply uneven amounts of paint, leading to the dreaded patchy appearance.
Poor Surface Preparation: A Recipe for Disaster
Another common culprit behind patchy ceilings is poor surface preparation. If you haven’t properly prepped your ceiling before painting, it can cause the paint to adhere unevenly and create those unsightly patches. Make sure to clean the surface thoroughly, remove any loose or flaky paint, and fill in any cracks or holes before you even think about picking up a paintbrush.
Low-Quality Paint: The Devil in Disguise
Ah, the pesky issue of using low-quality paint. While it might save you a few bucks initially, skimping on the quality of paint can lead to a patchy finish. Cheap paints often lack the necessary pigments and binders to provide good coverage, making it difficult to achieve a smooth and even result. So, invest in a high-quality paint that’s specifically formulated for ceilings, and you’ll thank yourself later.
Inadequate Priming: A Forgotten Hero
Priming might not be the most exciting part of a painting project, but it plays a vital role in achieving a flawless finish. Skipping or inadequately priming your ceiling can result in patchiness, especially if you’re painting over a different color or a stained surface. A good primer will create an even base for the paint and help it adhere better, ensuring a more uniform appearance.
Applying Paint in the Wrong Conditions: Mother Nature Strikes
Believe it or not, environmental factors can also contribute to patchy ceilings. Painting in high humidity or extreme temperatures can cause the paint to dry too quickly or not adhere properly, leading to an uneven finish. It’s important to choose the right conditions for painting and ensure proper ventilation to allow the paint to dry evenly without any interference from Mother Nature.
Overworking the Paint: Slow and Steady Wins the Race
When it comes to painting, impatience is not your friend. Overworking the paint by going over the same areas repeatedly can actually cause it to lift or thin out, resulting in a patchy appearance. Remember, slow and steady wins the race. Apply the paint in smooth, even strokes, and avoid going back over areas once the paint has started to dry.
Conclusion: A Patch-Free Future Awaits
Now that you’re armed with knowledge about the potential causes of patchy ceilings, you can take steps to avoid them. Ensure you have proper surface preparation, use high-quality paint, and prime when necessary. Painting in the right conditions and applying the paint with patience and care will also go a long way in achieving a flawless finish. So, bid farewell to those patchy ceilings and say hello to a beautifully painted space!
Happy painting, dear reader! May your ceilings always be smooth and free from the woes of patchiness.
Disclaimer: The information provided in this article is for general purposes only. It is always recommended to follow the manufacturer’s instructions and consult professionals if needed.
FAQ: Why Does My Ceiling Look Patchy After Painting
Welcome to the ultimate FAQ guide for all your patchy ceiling painting woes! If you’ve recently painted your ceiling only to find unsightly patches and streaks, you’re not alone. This perplexing issue can leave you scratching your head and questioning your DIY skills. But fear not! In this comprehensive FAQ-style guide, we’ll answer all your burning questions and provide you with expert tips to banish those patchy paint disasters for good. So, let’s dive right in!
Is 3 Coats of Paint Too Much
While it’s not a hard and fast rule, applying three coats of paint to your ceiling can indeed be excessive. In most cases, two coats should be sufficient to achieve a smooth and evenly painted surface. However, certain factors like insufficient priming or highly porous ceilings might necessitate an extra coat. Remember, the key is to strike a balance between optimal coverage and avoiding excess layers that can contribute to a patchy appearance.
What Is the Best Roller for Painting a Ceiling
Choosing the right roller for your ceiling can make a world of difference in achieving a flawless finish. Opt for a roller with a nap length of 3/8 to 1/2 inch, as this can hold a decent amount of paint without creating excessive texture. Additionally, consider using a roller with a higher quality synthetic or microfiber cover. These materials tend to distribute paint more evenly, minimizing the risk of patchiness.
Should I Paint the Walls or Ceiling First
Ah, the age-old debate! While there’s no concrete answer to this question, painting the ceiling first is generally recommended. By starting with the ceiling, you can avoid accidental drips or splatters onto freshly painted walls. Plus, it’s easier to cut in along the edges of the ceiling without worrying about precision. However, if you’re planning a complete room makeover, painting the walls before the ceiling might save you some frustration, especially if you’re using tape to separate the surfaces.
Can You Touch Up a Freshly Painted Ceiling
Certainly! If you discover small imperfections or missed spots on your freshly painted ceiling, fear not. Simply wait for the paint to fully dry, gather your materials, and touch up those areas with a small brush or roller. Be sure to feather the edges of the touch-up areas to blend them seamlessly with the surrounding paint. With a little patience and a steady hand, you’ll have your ceiling looking flawless in no time.
Will Streaks Go Away When Paint Dries
Hallelujah, they will! Streaks and uneven patches that appear during the painting process can often be a cause for concern. However, rest assured that most minor imperfections tend to level out and disappear as the paint dries. So, resist the urge to panic and give your freshly painted ceiling some time to work its magic. If after drying you still notice streaks, don’t worry – we’ll cover how to fix them shortly!
Where Do You Start When Painting a Ceiling
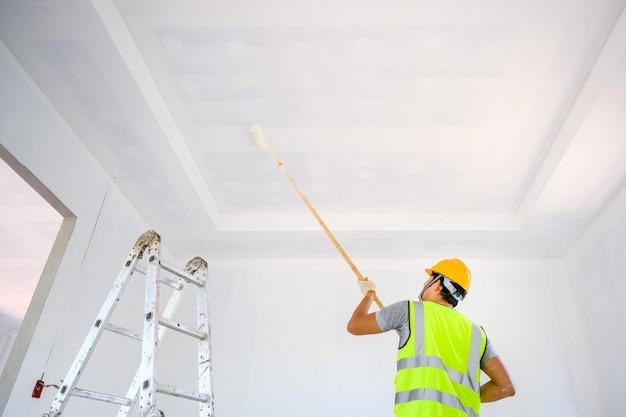
When it comes to painting a ceiling, starting in the right place can make your job much smoother. Begin by painting the edges or corners of the ceiling with a brush, creating a border about three inches wide. Then, move on to using a roller to cover the larger surface areas. Work in small sections, overlapping each stroke slightly to ensure even coverage. By following this methodical approach, you can avoid drastic variations in paint thickness and minimize the risk of patchiness.
How Do You Hide Imperfections on the Ceiling
Even with proper technique, pesky imperfections can sometimes rear their heads. But fear not, for a solution awaits! One effective way to hide ceiling imperfections is by using a textured paint or applying a textured plaster. These products add depth and dimension, camouflaging any flaws that may be lurking. Alternatively, you can also try using a drywall compound to fill in any divots or cracks before painting. Smooth the compound, sand it down, and voila – those imperfections will be mere memories!
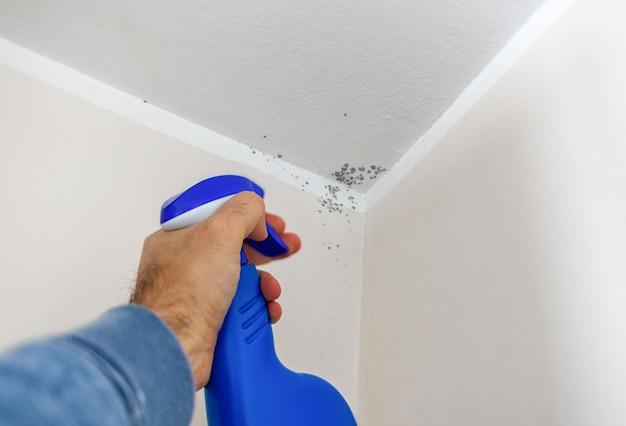
Why Is My Painted Wall Blotchy
Ah, those stubborn blotches! Blotchy walls can be caused by a variety of factors, from uneven application to poor quality paint. It could also be a case of inadequate surface preparation or using a roller with an irregular nap. To avoid a blotchy wall nightmare, ensure you properly clean and prime the surface before painting. Additionally, invest in high-quality paint and use a roller with a consistent nap length. With these precautions, your walls will be looking smooth and flawless in no time.
How Do You Fix Patchy Ceiling Paint
The dreaded patchy ceiling strikes again! But don’t lose hope – you can fix it. Start by identifying the cause of the patchiness. If it’s due to uneven application, consider applying an additional coat of paint, ensuring full coverage. In the case of inadequate surface preparation, you might need to sand down the affected areas, prime them, and then repaint. For those stubborn patches that refuse to budge, a technique called “feathering” can work wonders. Feathering involves blending the edges of the patchy areas with the surrounding paint, creating a seamless transition.
Can You Spot Paint a Second Coat
Absolutely! Spot painting a second coat is a great strategy for tackling those lingering patchy areas. Identify the problem spots and use a brush or roller to apply a second coat of paint to those specific areas. Make sure to feather the edges to maintain a smooth transition between the spot-painted areas and the rest of the ceiling. This method allows you to target the patches directly without having to repaint the entire ceiling.
How Do You Fix Patchy Emulsion
Patchy emulsion can be a real headache, but fear not – a fix is at hand! Start by determining the cause of the patchiness. If it’s due to uneven application, apply an additional coat of emulsion paint, ensuring you cover the patchy areas thoroughly. In cases where the patchiness is caused by an unevenly prepared surface, you might need to sand the affected areas, reprime them, and then repaint. Remember to feather the edges of the patchy areas to achieve a seamless finish. Before you know it, your emulsion will be looking flawless!
How Can I Paint My Ceiling Without Patches
Dreaming of a patch-free ceiling? Let’s make it a reality! Start by ensuring your ceiling is clean and properly primed. Remove any dirt or grease and apply a suitable primer to create a smooth surface for paint adhesion. Choosing high-quality paint is also key to achieving a flawless finish. When applying the paint, use a consistent technique and work in small, manageable sections. Avoid overloading your roller with paint, as this can cause drips and uneven coverage. With these tips in mind, you’ll be flaunting a patch-free ceiling fit for envy!
Is It OK If Primer Is Patchy
While a patchy primer coat doesn’t necessarily spell disaster, it’s best to strive for even coverage. Patchiness in the primer can sometimes lead to poor paint adhesion, resulting in an uneven final coat. To avoid this, ensure you apply primer evenly, using a brush or roller suitable for the primer’s consistency. Take your time and be thorough, paying attention to corners and edges. Remember, a solid foundation ensures a flawless finish!
What Does a Bad Paint Job Look Like
Oh, the horrors of a bad paint job – let’s spare you the embarrassment! A bad paint job can manifest in numerous ways. It may include visible brush or roller marks, uneven coverage, splotches, or streaks of varying colors. Blistering, cracking, or peeling paint are also telltale signs of a less-than-perfect job. To avoid these unsightly mishaps, follow proper painting techniques, invest in quality materials, and exercise patience. With a little practice and guidance, you can transform that bad paint job into a sight for sore eyes!
How Do I Keep My Painted Walls from Being Patchy
Nobody wants patchy painted walls, so let’s nip that problem in the bud! Start by preparing the surface properly. Clean the walls of any dirt or grease and repair any cracks or holes. Priming the walls before painting can also help achieve an even, smooth finish. When it comes to painting, use consistent strokes and avoid overloading your roller or brush. Working in small sections allows for better control and minimizes the risk of a patchy appearance. With these tips, your walls will be looking flawlessly painted in no time!
Why Is My Matte Paint Patchy
Ah, the allure of matte paint – and the frustration when it turns patchy! Patchiness in matte paint can occur due to a variety of factors. One common culprit is uneven application, where areas receive inadequate coverage. Insufficient surface preparation, such as failing to prime or properly clean the walls, can also contribute to patchiness. To avoid this issue, ensure you prepare and prime the surface meticulously. Apply the matte paint evenly, using consistent strokes, and consider a second coat if necessary. Soon enough, your matte walls will exude a smooth, velvety elegance!
How Do You Fix Patchy Paint
Patchy paint can be a real eyesore, but fret not – it’s fixable! The first step is identifying the cause of the patchiness. If it’s due to an uneven application, applying an additional coat of paint can often solve the problem. Be sure to cover the patchy areas thoroughly and feather the edges to blend seamlessly. In cases where inadequate surface preparation is to blame, sanding down the affected areas, priming, and repainting may be necessary. Ultimately, attention to detail and a touch of finesse will triumph over those patchy paint woes!
Does a Ceiling Need Two Coats of Paint
In most instances, giving your ceiling two coats of paint is sufficient for a smooth, flawless finish. However, certain factors like the original color of the ceiling or using a lighter shade might require an additional coat for optimal coverage. Be sure to apply each coat evenly, allowing ample drying time between them. Remember, it’s better to invest a bit more time to achieve a picture-perfect ceiling than to be haunted by patchy remnants of the past!
How Do You Touch Up Paint on a Textured Ceiling
Ah, the challenge of touching up paint on a textured ceiling – we’ve got you covered! Start by preparing the touch-up area. Use a brush or roller to apply a coat of paint to the affected spots, being careful to feather the edges for a seamless blend. However, texturing poses a unique challenge, as it can prove difficult to match the existing texture precisely. One technique to mitigate this is to replicate the texture on a piece of cardboard using a small amount of joint compound. Once dry, match the paint color to the card and apply it to the touch-up area. With some effort and creativity, your textured ceiling will soon regain its flawless appeal!
Congratulations! You’ve made it through our comprehensive FAQ guide on banishing patchiness from your ceiling painting endeavors. Armed with expert tips and a bit of humor, you’re now equipped to tackle those unsightly patches and achieve the flawless finish you desire. Whether you’re embarking on a DIY project or seeking professional advice, remember that patience and attention to detail are key. So go forth, grab that roller, and paint your ceiling with confidence. Patchiness, be gone!