If you’re planning to give your bathroom a makeover or replace your old bathtub, installing a sterling tub can be a great choice. Sterling tubs, made with durable materials like Vikrell, offer both beauty and functionality. But how exactly are bathtubs installed? In this comprehensive guide, we will walk you through the process of installing a sterling tub, including the installation of a sterling tub surround. We’ll also answer commonly asked questions about caulk, metal support clips, and offer tips on how to install a sterling shower unit. So let’s dive in and learn how to make your bathroom a relaxing oasis!
Sterling Tub Installation: A Step-by-Step Guide with a Twist!
So, You Want to Install a Sterling Tub
Are you ready to take your bathroom to the next level? Well, look no further because we’ve got you covered. In this section, we’ll walk you through the not-so-complicated process of installing a Sterling tub. Trust us, it’s easier than memorizing your uncle’s embarrassing stories at family gatherings.
Get Your Tools Ready, Handy(wo)man
Before you dive into this exciting project, it’s important to have the right tools in your arsenal. You’ll need a wrench (preferably not one you “borrowed” from your neighbor), a level (nope, not one for gossip), a screwdriver (not for meddling in other people’s business), and some good ol’ duct tape (because really, who doesn’t love duct tape?).
It’s All About Location, Location, Location
Now that you’ve gathered your tools, it’s time to find the perfect spot for your shiny new Sterling tub. Just make sure it’s level and in a location that allows you to fully enjoy the view from your bubble-filled oasis (think about those candlelit baths with a glass of wine — we won’t judge).
Prep Work: Unscrew, Unclog, Unleash the Handy(wo)man
In this next step, you’ll need to unleash your inner handy(wo)man by detaching the existing fixtures. Unscrew (carefully, please) the old showerhead, faucet, and handles. If you encounter a clog, don’t panic! We believe in you. Just remember, patience is key, so take your time, breathe, and feel the satisfaction when the water finally flows freely.
Tub Time: Insert Tub and Secure Like a Boss
You’ve made it to the fun part! It’s time to insert the Sterling tub into its designated spot. Remember to level it to perfection and use your trusty wrench to secure the tub firmly in place. Pro tip: don’t be afraid to ask for help if this step feels trickier than untangling headphone wires. Teamwork makes the dream work, folks!
Plumbing Party: Connect the Dots (or Pipes)
Congratulations, you’re almost there! It’s time to connect the dots, or rather, the pipes. Use your wrench to attach the showerhead and faucet, ensuring they’re snug like a bug in a rug. Double-check that everything is properly aligned and connected, and don’t be alarmed if you end up doing a celebratory victory dance around your bathroom. We won’t tell anyone!
The Final Touch: Test, Test, Test
Before you pop the champagne and start planning your first bath, it’s crucial to test your handy(wo)man skills. Turn on the water and marvel at your own brilliance as it cascades into your new Sterling tub. Listen for any unfamiliar sounds and fix any leaks or sputters (remember the duct tape?). Finally, take a moment to revel in your accomplishment—you’ve officially leveled up your bathroom game!
And that, my fellow DIY adventurers, concludes our light-hearted guide to installing a Sterling tub. We hope you’ve found it entertaining, informative, and, most importantly, helpful. Now go forth, embrace your inner handy(wo)man, and let the bubbles soothe your soul!
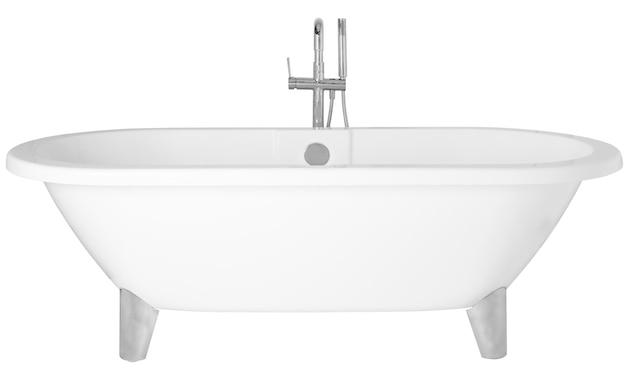
Sterling Bathtub: A Delightful Addition to Your Bathroom
Introducing the Sterling Bathtub
Imagine coming home after a long, tiring day and sinking into the warm, inviting embrace of a luxurious Sterling bathtub. This stylish and functional addition to your bathroom can instantly transform your bathing experience into something extraordinary. With its sleek design and exceptional quality, a Sterling bathtub is more than just a place to get clean – it’s a sanctuary of relaxation and indulgence.
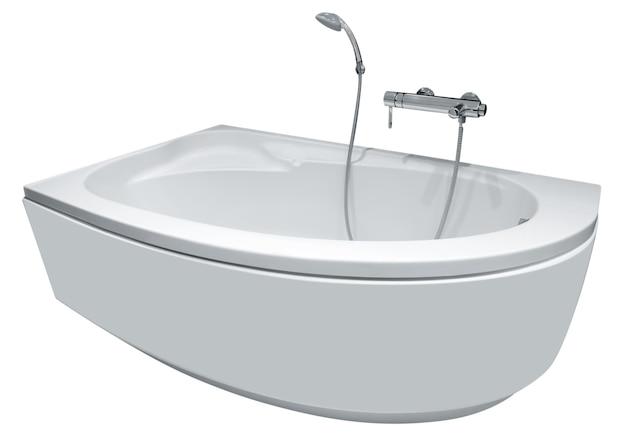
Unparalleled Comfort and Style
When it comes to comfort and style, Sterling bathtubs never disappoint. Crafted with precision and attention to detail, these tubs offer a perfect blend of form and functionality. The deep, ergonomic design ensures that you can recline comfortably, while the smooth acrylic surface feels heavenly against your skin. Plus, with a wide range of modern and timeless designs to choose from, you’re sure to find the perfect Sterling bathtub that complements your bathroom decor.

Easy Installation for a Stress-Free Experience
Installing a Sterling bathtub is a breeze, thanks to their user-friendly design. You don’t need to be a professional plumber to get the job done. With a few simple steps, a bit of patience, and perhaps a little help from a friend, you’ll have your Sterling bathtub up and running in no time. Say goodbye to the hassle of complex installations and hello to a stress-free experience that leaves you with more time to enjoy your new bathtub.
Maintaining Your Sterling Bathtub
To ensure your Sterling bathtub stays in pristine condition, a little bit of maintenance goes a long way. Regular cleaning with non-abrasive products will help keep the surface shiny and free from dirt or grime. It’s also essential to avoid using harsh chemicals or rough materials that could potentially damage the bathtub. With proper care and attention, your Sterling bathtub will continue to be a source of joy and relaxation for years to come.
The Final Verdict
If you’re looking to elevate your bathing experience while adding a touch of elegance to your bathroom, a Sterling bathtub is an excellent choice. From its comfort and style to its easy installation and maintenance, this bathtub is designed to delight. So go ahead, treat yourself to the luxury you deserve, and embrace the ultimate relaxation with a Sterling bathtub.
In conclusion, a Sterling bathtub is a fantastic addition to any bathroom, providing unparalleled comfort, style, and easy installation. With proper care, it will remain a centerpiece of relaxation and indulgence for years to come. So why wait? Upgrade your bathroom and transform your everyday bathing routine into a luxurious experience with a Sterling bathtub.
Vikrell Tub Installation
So you’ve made the wise decision to install a Vikrell tub in your bathroom, huh? Well, you’re in for a treat! Not only are Vikrell tubs sturdy and reliable, but they also come with a whole truckload of installation fun. Here’s everything you need to know about getting your Vikrell tub up and running.

Prepare for a Construction Adventure!
Before you start this epic journey of tub installation, make sure you’re equipped with all the necessary tools: a tape measure, a level, a drill, a wrench, and a healthy dose of optimism. Trust me, you’re going to need it!
Step 1: Clear the Area
First things first, clear out any rubble, grandma’s heirlooms, or pet dinosaurs that might be in the way. You want a clean slate for your Vikrell tub to shine. Plus, it’ll be easier to dance your victory moves once the tub is installed.
Step 2: Measure Twice, Drill Once
Measure the space where your Vikrell tub will reside and mark the spots for drilling. Remember, this is not a time for guessing games. Take your time, channel your inner mathematician, and measure twice. Drill once, champ!
Step 3: Embrace the Plumbing Dance
Now comes the fun part—plumbing! Connect your Vikrell tub to the existing pipes and make sure the connections are tight. You don’t want any surprise waterworks in the middle of your midnight bubble bath.
Pro tip: If you ever get confused, just pretend you’re performing in a water-themed ballet. Swan Lake has nothing on you!
Step 4: Lock It Down
Secure your Vikrell tub in place and level it. This step may require some acrobatic moves, as you’ll be working in tight spaces. But hey, who needs Pilates when you’ve got a Vikrell tub to flex your muscles?
Step 5: Celebrate Your Victory
Congrats, mighty tub installer! With your Vikrell tub installed, it’s time to revel in your accomplishment. Throw a party, pop some sparkling water, and invite your friends to witness the beauty of your newly installed masterpiece. Soak in the glory of a job well done!
Now that you’ve conquered the art of Vikrell tub installation, there’s nothing left to do but enjoy your new oasis of relaxation. So go ahead, grab your rubber duckie, and dive into blissful bathing bliss like never before. Cheers to new beginnings and a clean, perfectly installed Vikrell tub!
How Are Bathtubs Installed
Overview
So, you’re ready to install a sterling tub and wondering how it’s done? Well, grab a snack and get comfy because we’re about to embark on an epic journey into the land of bathtub installation. Alright, maybe not that epic, but still pretty interesting!
Preparing for Installation
Before you start hoisting that tub into your bathroom, there are a few things you need to do. First, measure your space to ensure the tub will fit. You don’t want to end up with a tub that sticks out like a sore thumb, do you? Next, make sure your plumbing is in order. Plumbing mishaps can turn a simple installation into a plumbing disaster. And trust me, nobody wants to deal with that mess.
Gather Your Tools
Now that you’re all prepped and ready to go, it’s time to gather your tools. You’ll need a saw, a pry bar, a level, a tape measure, a drill, and a rubber ducky (just kidding about the rubber ducky, but it couldn’t hurt to have one for moral support).
Removing the Old Tub
Let the demolition begin! To remove the old tub, start by shutting off the water supply. Then, take out any screws or nails holding the tub in place. You might need to do a little bit of prying and cutting, but remember to be gentle. No need to go all Hulk Smash on it. Once the old tub is out, give yourself a pat on the back. You’re one step closer to soaking in luxury.
Installing the New Tub
Now comes the fun part—installing the new tub. Start by placing the tub in its designated spot and using your level to make sure it’s nice and even. Nobody likes a wonky bathtub, trust me on that. Next, connect the tub’s plumbing fixtures. Double-check all the connections and make sure everything is watertight. You don’t want any unexpected leaks while you’re relaxing in your new tub.
Finishing Touches
Congratulations, you’ve successfully installed a sterling tub! Give yourself a round of applause, you deserve it. But wait, there’s more! Don’t forget about the finishing touches. Caulk around the edges of the tub to seal it and make it look all pretty. You can also add some decorative tiles or a cool shower curtain to really jazz things up.
Wrapping Up
And there you have it, folks—everything you need to know about installing a sterling tub. It may sound like a daunting task, but with a little bit of patience and the right tools, you’ll be enjoying bubble baths and singing in the shower in no time. Good luck and happy tub installing!
Kohler Sterling Tub Surround
Adding Style and Functionality to Your Bathroom
When it comes to upgrading your bathroom, the Kohler Sterling Tub Surround is a fantastic option to consider. Not only does it offer exceptional style, but it also provides additional functionality that will transform your bathing experience. Let’s take a closer look at why the Kohler Sterling Tub Surround is the perfect choice for your bathroom renovation.
Durability and Easy Maintenance
The Kohler Sterling Tub Surround is renowned for its durability. Made of high-quality materials, it can withstand daily use without showing signs of wear and tear. This makes it a long-lasting investment that will continue looking as good as new for years to come.
In addition to its durability, the Kohler Sterling Tub Surround is incredibly easy to maintain. With its smooth and non-porous surface, all it takes is a quick wipe with a damp cloth to keep it clean and shiny. Say goodbye to hours of scrubbing and hello to more time enjoying your beautifully upgraded bathroom.
Aesthetically Pleasing Design
One of the main reasons homeowners choose the Kohler Sterling Tub Surround is its visually appealing design. With a wide range of styles and finishes to choose from, you can easily find a tub surround that complements your bathroom decor. Whether you’re aiming for a modern and sleek look or a more traditional feel, Kohler Sterling has got you covered.
Installation Made Easy
Installing the Kohler Sterling Tub Surround can seem like a daunting task, but fear not! The installation process is straightforward, and you don’t need to be an expert DIY-er to get the job done. With the help of a few basic tools and a little patience, you can have your new tub surround up and ready in no time.
If you’re not confident in your DIY skills, don’t hesitate to hire a professional for installation. This way, you can sit back and relax, knowing that your Kohler Sterling Tub Surround will be installed flawlessly.
If you’re looking to elevate your bathroom to the next level, the Kohler Sterling Tub Surround is an excellent choice. With its durability, easy maintenance, stylish design, and straightforward installation process, it ticks all the boxes. Say goodbye to your outdated tub and hello to a bathroom oasis that you’ll love spending time in. Upgrade to a Kohler Sterling Tub Surround today and enjoy the perfect blend of style and functionality.
Sterling Tub Surround 60” x 32
Why Choose the Sterling Tub Surround 60” x 32
If you’re looking for a tub surround that not only adds functionality but also brings style to your bathroom, then look no further than the Sterling Tub Surround 60” x 32. This stunning piece will transform your ordinary tub into a luxurious oasis, making every bath time feel like a spa experience.
Easy Installation for a DIY Pro or a Novice
Installing a tub surround can be a daunting task, but fear not! The Sterling Tub Surround 60” x 32 is designed with ease of installation in mind. Whether you’re a DIY pro or a novice, this tub surround will make you feel like a master plumber.
Simply follow the step-by-step instructions provided, and you’ll have your new tub surround ready in no time. No need to hire a professional unless you want to show off your new bathroom addition and brag about your handy skills!
A Perfect Fit for Your Bathroom Dimensions
One of the greatest advantages of the Sterling Tub Surround 60” x 32 is its versatility. With its dimensions perfectly designed for a standard 60” x 32” tub, you can rest assured that it will fit seamlessly into your bathroom space. Say goodbye to unsightly gaps and uneven edges!
Durable Materials That Stand the Test of Time
When investing in a tub surround, durability is key. The Sterling Tub Surround 60” x 32 is constructed using high-quality materials that are built to last. Made from sturdy and crack-resistant acrylic, this tub surround will withstand years of use without losing its shine or functionality.
Choose from a Variety of Colors and Finishes
Who says your tub surround has to be boring? With the Sterling Tub Surround 60” x 32, you have the freedom to choose from a range of vibrant colors and finishes. Whether you prefer a classic white, a modern gray, or a bold black, there’s an option to match your unique style and complement your bathroom decor.
The Sterling Tub Surround 60” x 32 is more than just a tub surround. It’s a statement piece that adds both functionality and style to your bathroom. With its easy installation process, perfect fit dimensions, durable materials, and customizable options, this tub surround is a must-have for any homeowner looking to upgrade their bathroom. So why settle for an ordinary tub when you can have a luxurious oasis right in your home?
Sterling Tub Metal Support Clips
What Are Sterling Tub Metal Support Clips
If you’re considering installing a Sterling tub, you’ve probably heard of metal support clips. These little guys play a crucial role in ensuring your tub stays in place, preventing any embarrassing bathtub mishaps. Basically, they act as the unsung heroes of your bathroom, silently holding everything together while you relax in bubbly bliss.
The Importance of Metal Support Clips
Now, you might be wondering, why on earth do I need metal support clips for my tub? Well, dear reader, let me enlighten you. These clips provide extra support and stability to your tub, preventing it from shifting or moving around. Imagine taking a soothing bath, only to have your tub unexpectedly skid across the floor. Not the relaxing experience you had in mind, right?
How the Clips Work Their Magic
Metal support clips are like the Batman and Robin of your Sterling tub installation. They swoop in to save the day and keep your tub securely in place. These clips are typically installed underneath the tub, where they attach to a supporting framework. They work in perfect harmony with other components, forming a strong bond that can withstand all the bubbles, splashes, and enthusiastic bath time activities you can throw at it.
DIY or Call in the Pros
You might be thinking, “Can I install these clips myself, or should I let the professionals handle it?” Well, my friend, that depends on your DIY skills and comfort level. If you’re a handy person who loves a good challenge, go ahead and give it a try. However, if the thought of wrestling with metal clips leaves you feeling more stressed than relaxed, it might be wise to call in the experts. Remember, a successful installation ensures a secure and steady tub, so it’s worth considering professional help if you’re unsure.
As you embark on your Sterling tub installation journey, don’t overlook the importance of those mighty metal support clips. They may be small, but their role in keeping your tub where it belongs is huge. So, whether you take the DIY route or bring in the professionals, make sure these clips are given the attention and appreciation they deserve. Your bathtub and your sanity will thank you!
What is a Sterling Tub Surround Made of
If you’re in the market for a new bathtub, you’ve probably come across the term “sterling tub surround.” But what exactly is it made of? Let’s dive into the world of bathroom renovation materials and uncover the secrets of this intriguing tub surround!
A Symphony of Materials
When it comes to a sterling tub surround, it’s like a mixtape of different materials coming together to create the perfect harmony. The main ingredient in this musical ensemble is Vikrell, a composite material that combines fiberglass and resin. Think of it as the lead singer of the band – sturdy, durable, and ready to take on the bathroom stage!
A Dash of Style
But a sterling tub surround isn’t just about practicality. It knows how to strut its stuff in the style department too! With a smooth, glossy finish, it adds a touch of elegance to any bathroom. You can choose from a variety of colors and patterns to suit your personal taste and ensure your tub surround steals the show!
Easy to Install, Easy to Maintain
Now, here’s the best part: installing a sterling tub surround is a breeze! You don’t need to call in a team of construction experts or spend hours watching DIY videos on the internet. With its lightweight and modular design, it’s as simple as putting together a giant bathtub puzzle. And once it’s installed, maintenance is a piece of cake. Just wipe it down with a gentle cleaner, and you’re good to go!
The Sound of Silence
One of the unsung heroes of a sterling tub surround is its ability to keep the peace in your bathroom sanctuary. Thanks to its sound-deadening properties, you can soak away your troubles without the noise of running water echoing through the house. It’s like having your own private concert without disturbing the neighbors!
For the Environmentally Conscious
Last but not least, sterling tub surrounds are an eco-warrior’s dream. Made from recyclable materials, they help reduce waste and minimize your carbon footprint. So not only can you enjoy a luxurious bathing experience, but you can also save the planet one bubble bath at a time!
And there you have it, folks! The sterling tub surround, a bathroom superstar made of Vikrell, style, and eco-consciousness. So go ahead and embrace the tub surround revolution – your bathroom will thank you!
Do You Need to Caulk a Sterling Shower
If you’ve recently installed a beautiful Sterling tub in your bathroom, you might be wondering if caulking is necessary for the shower. Well, let’s dive into this slippery topic and find out!
The Caulk Conundrum
Caulking, that gooey substance that seals gaps and prevents water from sneaking into unwanted places, seems like an essential part of any bathroom installation. But when it comes to your Sterling shower, things might not be as straightforward.
To Caulk or Not to Caulk
Here’s the deal: Sterling showers are designed with a unique system that doesn’t necessarily require caulking. This system includes interlocking panels and a water containment bead that work together to keep water where it belongs – inside the shower. So, technically, you don’t need to caulk your Sterling shower.
Is Caulking a Waste
Now, before you start dancing in your tub, there are a few things to consider. While caulking might not be required, it can still provide some benefits. Caulk creates an extra barrier against water leakage and helps to keep your bathroom dry and mold-free. Plus, it adds a neat, finished look to your shower. So, while not crucial, caulking could be a wise choice.
Proceed with Care
If you decide to caulk your Sterling shower, there are a few things you need to keep in mind. First, make sure the shower is completely dry before applying any caulk. Moisture can interfere with the adhesion, and nobody wants a leaky shower situation. Secondly, choose the right type of caulk for the job. Look for one that is specifically designed for bathroom or shower use. And finally, follow the manufacturer’s instructions for application and drying time.
The Final Verdict
To caulk or not to caulk – that is the question. Ultimately, the decision is up to you. If you want that extra peace of mind and a polished finish, go ahead and grab the caulk gun. But remember, with a Sterling shower, it’s not an absolute necessity.
So, there you have it – the lowdown on caulking your Sterling shower. Whether you choose to caulk or not, may your bathroom adventures be splashingly awesome!
Sterling Store Installation Instructions
Planning Your Sterling Store Installation
Before you dive into the delightful world of installing your Sterling store, let’s take a moment to plan this out. Trust me, a bit of preparation now will save you from any installation-induced headaches later. Here are a few steps to ensure a smooth sailing installation:
Measure Twice, Install Once
First things first, measure your space accurately. We don’t want any surprises, do we? Grab your trusty measuring tape and jot down the dimensions. And here’s a pro-tip: measure twice, install once. Double-checking never hurt anyone, except maybe the unfortunate soul who brings half-baked cupcakes to a potluck.
Gather Your Tools, AKA Your Squad
Now, let’s gather your tools, or as I like to call them, your entourage. You’ll need a screwdriver (or drill if you’re feeling fancy), a level to keep things steady, and some plumber’s putty. Oh, and don’t forget your playlist of motivational tunes to keep you going. Installing a Sterling store is practically an Olympic event, after all.
Installing Your Sterling Store
Now that you’ve planned your installation like a true professional, it’s time to roll up your sleeves and get to work. Remember, you’ve got this!
Step 1: Pre-Installation Dance Party
Before we get into the nitty-gritty, let’s warm up those installation muscles with a little dance party. Crank up your favorite tunes and shake it like there’s no tomorrow. Trust me, this step is essential to maintain the optimal installation vibes.
Step 2: Assemble Your Sterling Store
Now, let’s put those puzzle-solving skills to the test. Follow the detailed instructions provided by our friends at Sterling to assemble your store like a pro. And remember, the key to success here is patience. If all else fails, take a deep breath, channel your inner Zen master, and try again. You’ve got this.
Step 3: Plumbing Magic
Ah, the glamorous world of plumbing. Apply a thin layer of plumber’s putty to the drain before attaching it to your Sterling store. This will ensure a watertight seal and prevent any unwanted surprises down the line. Don’t worry, you’ll be a master plumber in no time.
Final Touches and Celebrations
Congratulations, you’ve made it to the finish line! Now it’s time to add those final touches and bask in the glory of your beautifully installed Sterling store. Admire your handiwork, share it with your friends (who will undoubtedly be filled with envy), and give yourself a pat on the back. You’ve just earned yourself a well-deserved break.
Now go forth, my fellow Sterling store installer, and conquer the world, one fabulous installation at a time!
How to Install a Sterling Shower Unit
So, you’ve decided to take on the task of installing a Sterling shower unit? Well, my friend, you’re in for a treat! Installing a shower unit may seem like a daunting task, but fear not, because I’m here to walk you through it step by step, with a dash of humor to keep things interesting.
Tools You’ll Need
Before we dive into the nitty-gritty of installation, let’s gather our tools like a team of superheroes preparing for battle. Grab your trusty measuring tape, a drill (preferably one that doesn’t take coffee breaks), a wrench (or two, if you’re feeling extra fancy), and a sponge for any tears shed during the process. You’ll also need a healthy dose of patience and a can-do attitude.
Step 1: Location, Location, Location
Finding the perfect spot for your Sterling shower unit is crucial. Look for a space that offers privacy, convenience, and preferably some sort of magical portal that leads to a spa in the Bahamas. Measure the area to ensure a snug fit, because no one likes a shower unit that wiggles like grandma’s dentures.
Step 2: H2-Oh, Here We Go!
Now that you’ve found the ideal location, it’s time to get down and dirty with the plumbing. Connect the water supply lines like a puzzle made for the gods of DIY. Secure those connections tightly, unless you want to reenact scenes from Titanic in your bathroom.
Step 3: Installing the Shower Walls
Think of this step as creating a fortress around your shower dreams. Position the shower walls with care and attach them to the studs using screws. This will ensure a sturdy and delightful shower experience, devoid of any unexpected wall-collapsing surprises.
Step 4: The Shower Base Shuffle
The shower base is the foundation of your shower sanctuary, so treat it with respect and admiration. Place it lovingly in its designated spot, making sure it’s level and secure. Think of it as a dance partner, but one that won’t judge your moves.
Step 5: Doors for Days
No shower unit is complete without its fortress gates, also known as shower doors. Inscribe ancient symbols of DIY wisdom onto the doors, then carefully hang them in place. Just remember not to trap yourself inside and have to resort to Morse code to ask for help.
Step 6: Fine-Tuning and Celebrating
Once everything is in its proper place, turn on the water and marvel at your handiwork. Adjust any loose screws or wonky parts, then bask in the glory of a job well done. Pour yourself a well-deserved beverage of choice and congratulate yourself with a victory dance. You’ve officially conquered the world of Sterling shower unit installation!
So there you have it, my friend! With the right tools, a little patience, and a sprinkle of humor, you can conquer the art of installing a Sterling shower unit. Remember, DIY is an adventure, so embrace the challenges and celebrate the victories. Happy showering!