If you’ve ever wondered what makes up the layers of siding on your home, you’ve come to the right place. Understanding the different components and materials that go into creating a durable and visually appealing exterior is essential for any homeowner. From vinyl siding to types of trim, we’ll delve into everything you need to know about siding layers and answer some common questions along the way. So let’s dive in and uncover the secrets behind your home’s outer skin!
Siding Layers: Understanding the Different Levels of Protection
Introduction
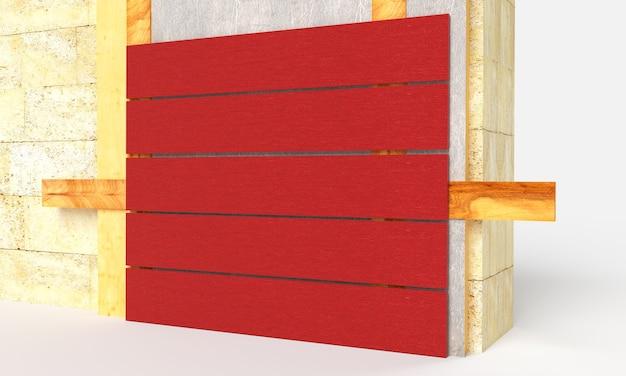
When it comes to siding, there is more to it than just a pretty facade. Different layers of protection work together to ensure your home stays safe, dry, and beautiful for years to come. In this article, we will delve into the world of siding layers and explore what each one does to keep your home in tip-top shape.
The Mighty Outer Layer: The Face of Your Home
The first layer, commonly known as the ‘outer layer,’ is what people see from the outside. It’s like the skin of your house. This layer is designed to withstand the harshest weather conditions, protect against moisture, and resist damage from UV rays. Think of it as your home’s very own superhero suit.
The Hidden Hero: Insulation to the Rescue
Beneath the outer layer lies the second layer, which is the unsung hero of siding. Known as ‘insulation,’ it provides added protection against energy loss and noise infiltration. Just like a cozy blanket, insulation helps regulate the temperature inside your home, keeping it warm in winter and cool in summer. It also helps reduce outside noise, creating a peaceful haven inside.
The Backbone of Your Home: Structural Support
Moving deeper, we find the third layer, the ‘structural support’ layer. This layer is made up of a sturdy material like plywood or oriented strand board (OSB) and acts as the foundation for your siding. It provides stability and strength to your walls, ensuring that everything stays intact, even during strong winds or earthquakes. It’s like the backbone of your home, providing the necessary support to keep everything standing tall.
Protection from the Elements: Weather Barrier
Next up, we have the ‘weather barrier.’ This layer is crucial for keeping water out and preventing damage caused by moisture. It acts as a shield, protecting your home from rain, snow, and other elements. Think of it as a raincoat for your house, ensuring that water stays on the outside where it belongs.
Adding the Finishing Touches: Trim and Accents
And finally, we have the icing on the cake, the ‘trim and accents’ layer. This layer adds the finishing touches to your siding, giving it a polished and cohesive look. Trim and accents come in various styles and materials, allowing you to customize the appearance of your home to match your personal taste. From sleek and modern to timeless and classic, this layer adds that extra bit of flair to make your home stand out from the rest.
Now that you understand the different layers of protection in siding, you can make an informed decision when it comes to choosing the right option for your home. Remember, each layer plays a vital role in keeping your home safe, comfortable, and visually appealing. So, whether you’re considering a siding upgrade or simply want to learn more, knowledge about these layers will help you appreciate and value the importance of a well-protected home.
Vinyl Siding
Vinyl siding is a popular choice for homeowners looking to enhance the beauty and durability of their homes. With its wide range of colors, styles, and textures, vinyl siding can transform the look of any house. In this section, we’ll explore the benefits of vinyl siding, its installation process, and how to maintain it for long-lasting beauty.
The Advantages of Vinyl Siding
When it comes to siding layers, vinyl certainly stands out for its numerous advantages. First and foremost, vinyl siding is incredibly low-maintenance. Unlike other materials that may need to be repainted or repaired regularly, vinyl siding simply requires a good rinse with a garden hose to keep it looking pristine. This is a huge time and money saver for homeowners!
Additionally, vinyl siding is known for its durability. It can withstand extreme weather conditions, such as strong winds, hail, and heavy rain. So, you won’t have to worry about constant repairs or replacements. Plus, vinyl siding is resistant to fading, making it a long-lasting investment.
Installing Vinyl Siding
Installing vinyl siding might seem like a daunting task, but fear not! It’s actually quite straightforward. You’ll need a few basic tools, like a tape measure, utility knife, and a snap-lock punch tool. Start by measuring your walls and calculating the amount of siding needed. Then, prep the walls by adding a moisture barrier and insulation.
Next comes the fun part – installing the vinyl siding! Start from the bottom, working your way up, and be mindful of positioning and alignment. Use the snap-lock punch tool to create the interlocking tabs and secure the panels. It’s like putting together a giant puzzle, but with more power tools!
Maintaining Vinyl Siding
The great thing about vinyl siding is that it doesn’t require much maintenance. However, it’s still important to keep it looking its best. Simple regular cleaning can help prevent dirt buildup, mildew, and mold. Just grab a bucket of soapy water, a soft-bristle brush, and give your siding a gentle scrub. Remember to rinse thoroughly and never use abrasive cleaners, as they can damage the surface.
Inspect your siding for any cracks or loose panels. If you spot any damage, it’s best to address it promptly to avoid further issues. Some minor repairs can be done yourself, but for major repairs, it’s best to call in a professional.
So, if you’re looking to upgrade your home’s exterior, vinyl siding could be just the solution you need. It’s easy to install, low-maintenance, and provides long-lasting beauty. Plus, with the wide variety of colors and styles available, you can find the perfect vinyl siding to suit your personal taste. Don’t wait any longer – give your home a fresh new look with vinyl siding!
Types of Siding Trim
When it comes to the various layers of siding, understanding the different types of siding trim is crucial. Not only does trim enhance the overall look of your home’s exterior, but it also provides important functionality and protection. Let’s dive into the world of siding trim and discover the options available to you.
Corner Trim
One of the first types of trim to consider is corner trim. As the name suggests, corner trim is used to neatly cover and protect the corners of your home. It adds a finishing touch, making your siding look polished and complete. Corner trim comes in various materials, such as vinyl, wood, or fiber cement, allowing you to choose the one that best suits your taste and needs.
Window and Door Trim
Window and door trim is another essential aspect of siding. This type of trim not only frames your windows and doors but also functions as a barrier against moisture and drafts. It plays a significant role in maintaining the integrity of your home’s exterior. From elegant to modern designs, window and door trim can be customized to match your personal style and complement the overall aesthetic of your home.
Fascia Trim
The fascia trim is located at the edge of your roofline and connects the roof to the outer walls of your house. It serves as a protective barrier, preventing water damage and pests from infiltrating your home. Fascia trim is available in a variety of materials, including aluminum and PVC, offering durability and low maintenance. It not only contributes to the overall curb appeal but also ensures that your roof and attic remain in excellent condition.
Soffit Trim
In conjunction with the fascia trim, the soffit trim helps to protect your home from external elements. Soffit trim is installed underneath the roof’s overhang, providing ventilation to your attic while keeping out unwanted pests. It also shields your home from water intrusion and helps regulate temperature and moisture levels. Various materials, such as vinyl and aluminum, are commonly used for soffit trim, offering durability and ensuring your home stays protected for years to come.
J-Channel
J-channel is a versatile type of trim that is often used around windows, doors, and other areas where siding edges need to be finished. It provides a clean edge and helps to redirect water away from vulnerable areas. J-channel typically comes in vinyl and aluminum, making it easy to match with your chosen siding material.
Understanding the different types of siding trim is essential to ensure your home’s exterior not only looks great but also remains protected. From corner trim to soffit trim, each type serves a specific purpose in maintaining the integrity of your home’s siding. So, whether you’re looking for added curb appeal or enhanced functionality, explore the various options available and find the perfect siding trim that meets your preferences and needs.
No Plywood Under Siding
When it comes to installing siding layers, one question that often pops up is whether or not plywood should be used as an underlayment. In this section, we’ll explore the concept of “no plywood under siding” and discuss its benefits and considerations.
What is “No Plywood Under Siding”
Traditionally, plywood has been used as an underlayment for siding installation. However, the practice of omitting plywood as an underlayer has gained popularity in recent years. Instead, alternative materials such as foam insulation boards or specialized house wraps are being used.
Benefits of “No Plywood Under Siding”
1. Cost Savings
One of the main advantages of eliminating plywood from the siding installation process is the potential cost savings. Plywood can be expensive, and by removing it from the equation, homeowners can reduce the overall material costs. This can be particularly beneficial for those on a tight budget.
2. Improved Insulation
Another advantage of using alternative materials instead of plywood is improved insulation. Foam insulation boards, for example, can provide an additional layer of thermal resistance, helping to keep your home warmer in the winter and cooler in the summer. This is especially significant for homeowners looking to enhance energy efficiency.
Considerations for “No Plywood Under Siding”
1. Structural Integrity
While eliminating plywood may bring cost savings and improved insulation, it’s crucial to consider the structural integrity of your home. Plywood can help provide stability and support to your siding, especially when dealing with uneven surfaces. Before deciding to forgo plywood, it’s important to assess your specific situation and consult with a professional contractor if necessary.
2. Moisture Management
Moisture is a perennial concern for any homeowner, and siding is no exception. Without plywood, it’s vital to ensure proper moisture management. Specialized house wraps and other moisture barrier systems may need to be used to prevent water infiltration and potential damage to the underlying structure. Be sure to research and follow the manufacturer’s guidelines to maintain a secure and water-resistant barrier.
In conclusion, the decision of whether or not to use plywood under siding is a personal one that should be based on various factors such as budget, insulation needs, structural integrity, and moisture management. By understanding the benefits and considerations of “no plywood under siding,” homeowners can make an informed choice that suits their specific circumstances. Remember to consult with professionals and adhere to industry best practices for a successful siding installation.
House Wrap: An Essential Layer of Protection for Your Siding
What is House Wrap
When it comes to siding layers, one crucial component that shouldn’t be overlooked is house wrap. This thin, water-resistant material is installed beneath your home’s siding, acting as a barrier against moisture and airflow from the outside. Think of it as a superhero cape for your house, protecting it from the elements and ensuring its longevity.
The Benefits of House Wrap
1. Moisture Management
House wrap plays a vital role in keeping moisture at bay. It prevents water from seeping into your walls, which can lead to mold, mildew, and costly repairs. So, you can bid farewell to damp and musty odors inside your home.
2. Energy Efficiency
By creating an airtight seal, house wrap helps to minimize drafts and heat loss, making your home more energy-efficient. This means lower utility bills and a cozier living environment, especially during those chilly winter months.
3. Structural Integrity
Our friendly house wrap superhero also provides an extra layer of protection for your home’s structure. It shields against wind-driven rain, preventing rot and damage to the wooden components of your siding. So, you won’t have to worry about unexpected repair expenses caused by water infiltration.
4. Breathability
While house wrap keeps moisture out, it still allows your home to breathe. This is crucial for letting any accumulated moisture escape, preventing the buildup of condensation. This breathability contributes to a healthier living environment by reducing the likelihood of trapped moisture causing mold issues.
House Wrap Tips
1. Installation Process
When it’s time to install house wrap, make sure to follow the manufacturer’s instructions carefully. This ensures proper coverage and maximum effectiveness. Remember, it’s all about creating that superhero-worthy shield for your home!
2. Seam Seal
Don’t forget to seal the seams of your house wrap. This prevents water from finding its way through any tiny gaps or overlaps. A simple application of specially designed tape or sealant will do the trick.
3. Professional Assistance
If you’re unsure about tackling the house wrap installation yourself, it’s always a good idea to consult with a professional. They will have the knowledge and experience to ensure your house wrap is installed correctly, providing you with peace of mind and optimal protection.
So, there you have it! House wrap is a key player in the world of siding layers, shielding your home from moisture, improving energy efficiency, and preserving its structural integrity. Don’t forget to include this superhero cape in your siding project and reap the benefits for years to come!
Underlayment for Siding
When it comes to siding layers, one crucial component that often gets overlooked is the underlayment. While it may sound like a fancy word, the underlayment plays a vital role in protecting your home’s exterior from moisture, heat, and other elements. Let’s dive in and explore what underlayment for siding is all about!
What is Underlayment
Underlayment is like the unsung hero of the siding world. It’s the layer that sits between the exterior walls of your home and the actual siding material. Think of it as the security blanket that provides an extra layer of protection and support to ensure your siding stays put and lasts for years to come.
Types of Underlayment
There are different types of underlayment available, each with its unique properties. The most common ones include:
1. Felt Underlayment
This type of underlayment is made from a combination of synthetic fibers and bitumen, which acts as a protective barrier against moisture. It’s typically applied in rolls and provides an excellent cost-effective option for most siding projects.
2. Foam Underlayment
If you’re someone who likes a little extra insulation, foam underlayment might be the way to go. It not only provides added protection from moisture but also helps to improve energy efficiency by acting as an insulator, keeping your home warm in winters and cool in summers.
3. House Wrap
House wrap is a popular choice when it comes to underlayment. It’s a thin, breathable material that prevents water from infiltrating your home while allowing any trapped moisture to escape. House wrap also improves the overall energy efficiency of your home and helps to prevent drafts.
Benefits of Underlayment
Now that we know what underlayment is and the different types available, let’s explore the benefits it brings to your siding project:
1. Enhanced Durability
By adding a layer of underlayment, you’re giving your siding extra protection against the elements. This means it can withstand extreme weather conditions better, preventing any potential damage to your home.
2. Moisture Protection
Moisture is the number one enemy when it comes to your home’s exterior. Underlayment acts as a moisture barrier, preventing water from seeping into your walls and causing rot, mold, or mildew.
3. Energy Efficiency
Certain types of underlayment, like foam and house wrap, provide insulation properties that help to improve the energy efficiency of your home. This can lead to lower heating and cooling costs and a more comfortable living environment.
Now that you have a better understanding of the importance of underlayment for siding, you can make an informed decision when it comes to protecting your home. Remember, investing in quality underlayment is a small price to pay for the long-term benefits it provides to your siding and overall home maintenance.
Exterior Wall Siding Panels
When it comes to adding both functionality and style to your home’s exterior, exterior wall siding panels are the perfect solution. These versatile panels come in a variety of materials, including vinyl, fiber cement, wood, and metal, and can completely transform the look of your home. Let’s dive into the different types of exterior wall siding panels and explore their benefits.
Vinyl Siding Panels: Affordable and Low-Maintenance
Vinyl siding panels are a popular choice for many homeowners due to their affordability and low maintenance requirements. These panels are made from durable PVC material, which makes them resistant to the elements and pests. With a wide range of colors and styles available, vinyl siding panels offer a versatile and cost-effective option for enhancing your home’s curb appeal.
Fiber Cement Siding Panels: Durability and Fire-Resistance
If you’re looking for a siding material that combines both durability and fire-resistance, fiber cement siding panels are an excellent choice. Made from a blend of cement, sand, and cellulose fibers, these panels are highly resistant to rot, warping, and termites. Additionally, fiber cement siding panels can mimic the appearance of wood, stone, or brick, providing a natural and timeless look to your home.
Wood Siding Panels: Classic Charm and Warmth
For homeowners who appreciate the classic charm and warmth of natural materials, wood siding panels are a great option. Wood siding provides a unique aesthetic that complements both traditional and modern architectural styles. However, it’s important to note that wood requires regular maintenance to prevent rot and insect damage. With proper care, wood siding panels can last for decades and continue to enhance the beauty of your home.
Metal Siding Panels: Sleek and Modern
Metal siding panels are known for their sleek, modern appearance, making them a popular choice for contemporary homes or commercial buildings. Typically made from steel or aluminum, these panels offer exceptional durability and resistance to extreme weather conditions. Metal siding is also available in various colors and finishes, allowing you to create a personalized look for your home’s exterior.
Choosing the right exterior wall siding panels for your home is a crucial decision, as it significantly impacts both the aesthetics and protection of your property. Whether you opt for vinyl, fiber cement, wood, or metal, each type has its distinct advantages. Consider your budget, desired style, and maintenance requirements before making a final decision. With the right exterior wall siding panels, you can enhance your home’s curb appeal, increase its value, and enjoy a beautiful, well-protected exterior for years to come.
What Are the Layers of Siding
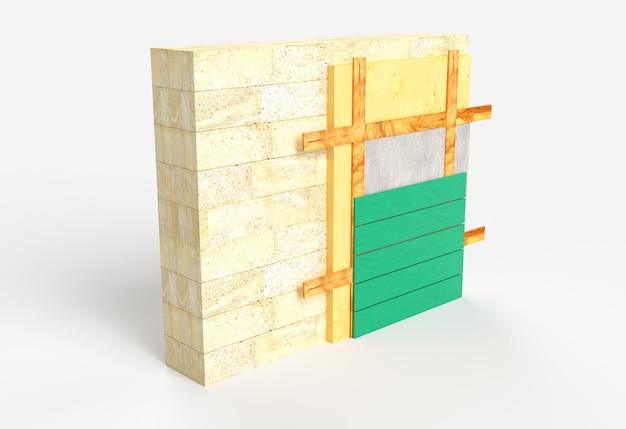
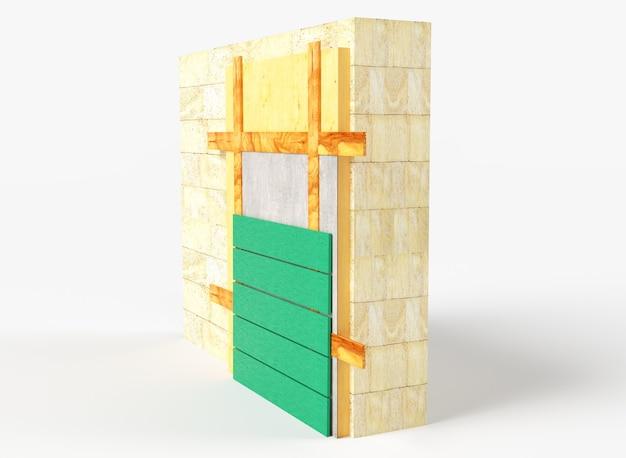
Siding is not just a single layer slapped onto the exterior of a house. It’s a multi-layered system designed to protect your home and enhance its curb appeal. Let’s peel back the layers and take a closer look at what makes up a typical siding system.
The Backbone: Sheathing
At the core of the siding system is the sheathing. Typically made of plywood or oriented strand board (OSB), the sheathing provides a sturdy and flat base for the siding installation. It also helps to increase the structural integrity of the house and acts as an extra layer of insulation.
Insulation: House Wrap or Vapor Barrier
To keep your home cozy and energy-efficient, a layer of insulation is added. This layer, often referred to as house wrap or vapor barrier, helps to prevent air infiltration, as well as protect against moisture accumulation. It acts as a shield and enhances the energy efficiency of your home.
Outer Layer: Siding Panels or Cladding
Here comes the star of the show – the siding panels or cladding. They are the visible layer that defines the aesthetics of your home’s exterior. Siding panels are available in a wide range of materials, including vinyl, fiber cement, metal, and wood. Each material has its own unique characteristics, offering different levels of durability, maintenance requirements, and style options.
Protective Shield: Water-Resistant Barrier
To ensure that your home stays dry and moisture-free, a water-resistant barrier is applied between the siding panels and the sheathing. This barrier helps to deflect water away from the underlying layers and prevents it from seeping into the walls. It acts as a safeguard against water damage, mold, and rot.
Finishing Touches: Trim and J-channel
No siding installation is complete without the finishing touches. Trim and J-channel play vital roles in the overall appearance and functionality of the siding system. Trim is used to frame windows, doors, and corners, adding a polished and cohesive look. J-channel, on the other hand, acts as a receiver for the siding panels, allowing them to fit securely in place.
Now that you’re familiar with the layers of a siding system, you can better understand the importance of each component in protecting and beautifying your home. From the sturdy sheathing to the stylish siding panels, every layer plays a role in creating a resilient and visually appealing exterior. So the next time you admire a house with stunning siding, remember the layers that make it possible!
Is There Brick Under My Siding
If you’re a homeowner, you may have wondered at some point, “Is there brick under my siding?” While it may seem like a strange question, it’s actually quite common. Many older homes were built with brick as the primary exterior material, and over the years, owners have chosen to cover it up with siding for various reasons. In this subsection, we’ll explore whether or not your siding could be hiding a beautiful brick facade.
Signs to Look For
Before we dive into the possibilities, it’s important to know what signs to look for that may indicate the presence of brick under your siding. One of the most obvious signs is the presence of mortar lines or brick patterns visible through the siding. If you notice any irregularities or inconsistencies in the texture or appearance of your siding, it could be a clue that there’s brick underneath.
Another telltale sign is the presence of brick chimneys or exposed brick on other parts of your home. If these areas are still visible and have not been covered with siding, there’s a good chance that the rest of the facade could be brick as well. Take a close look at these areas and compare them to the rest of your exterior.
Historical Research
If you’re still unsure about whether or not there’s brick under your siding, it may be helpful to do some historical research on your home. Check with your local historical society or town archives to see if they have any records or photos of your property from when it was first built. This information can often provide valuable insights into the original construction materials used.
Professional Inspection
When in doubt, it’s always a good idea to consult with a professional. Hiring a contractor or home inspector experienced in older home construction can help you determine if there’s brick under your siding. They have the knowledge and expertise to identify hidden brickwork and can provide you with an accurate assessment.
Remember, removing or altering siding can be a complex and potentially costly process, so it’s important to gather as much information as possible before making any decisions.
So, is there brick under your siding? While we can’t say for certain without further investigation, keeping an eye out for telltale signs, conducting historical research, and consulting with a professional are all steps that can lead you to the answer. Whether you decide to uncover and restore the original brick or simply enjoy the benefits of your current siding, understanding the history and construction of your home is an exciting part of being a homeowner.
What is a row of siding called
When it comes to home exteriors, siding plays a crucial role in protecting our houses from the elements. But have you ever wondered what each individual piece of siding is called? Well, wonder no more! In this section, we’ll explore the curious world of siding terminology and uncover what a row of siding is actually called.
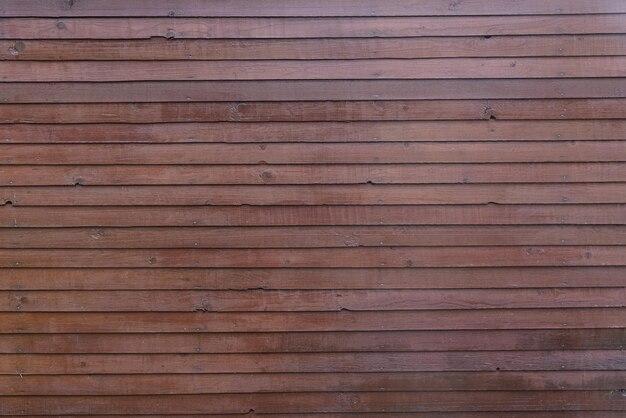
Enter the Clapboard
In the world of siding, a row of overlapping, horizontal boards is commonly referred to as a “clapboard.” This traditional style of siding has been around for centuries and continues to be a popular choice for homeowners across the globe. With its distinct rustic charm and ability to withstand the test of time, the clapboard is truly a classic in the siding world.
Beveling into the Lap
Another term you may come across when discussing siding is the “lap.” This refers to the horizontal overlap between two adjacent rows of clapboards. By overlapping the boards, the lap helps to create a more weatherproof barrier, preventing water from seeping in and causing damage to your home. So, the next time you’re admiring the exterior of a house, take a closer look at the neat rows of siding and appreciate the clever craftsmanship that goes into creating these laps.
Course after Course
Just like a delicious meal, a row of siding is composed of multiple “courses.” Each course refers to a horizontal row of clapboards that extends across the side of a house. When installing siding, starting from the bottom and working your way up, each course is carefully placed on top of the previous one, creating a visually appealing and structurally sound exterior. So, think of each course as a layer of perfectly seasoned siding, adding both protection and character to your home.
Wrapping It Up
So, there you have it! The answer to the age-old question of what a row of siding is called is a clapboard. You now know that the horizontal overlap between rows is called a lap, and that multiple rows of clapboards make up a course. Armed with this newfound knowledge, you’ll be able to impress your friends and family with your siding expertise. And who knows, maybe you’ll even start a fascinating conversation about home exteriors at your next dinner party. Happy cladding!
Keywords: siding layers, row of siding, clapboard, lap, course, overlapping, horizontal boards, home exteriors, weatherproof, protection, craftsmanship, installation, structurally sound, exterior
Can You Put Tyvek Over Old Siding
The Benefits of Adding a Tyvek Layer
If you’re considering a home exterior renovation, you may have wondered if it’s possible to put Tyvek over old siding. Well, you’re in luck! In this section, we’ll explore the advantages of adding a Tyvek layer to your existing siding. So, let’s dive right in!
Improved Energy Efficiency
One of the key benefits of installing Tyvek over old siding is the improved energy efficiency it provides. Tyvek acts as a barrier against air infiltration, preventing drafts and keeping your home better insulated. This can result in reduced heating and cooling costs, making it a smart investment for any homeowner.
Enhanced Moisture Protection
Another fantastic reason to consider adding a Tyvek layer is the enhanced moisture protection it offers. By acting as a breathable barrier, Tyvek prevents water from seeping into your walls while allowing any trapped moisture to escape. This helps to prevent mold and mildew growth, keeping your home healthier and more comfortable.
Additional Comfort and Noise Reduction
Tyvek also provides an extra layer of comfort by reducing outside noise transmission. Whether it’s traffic, neighbors, or construction, having a Tyvek layer can help significantly dampen unwanted sounds, creating a quieter living environment for you and your family.
The Process of Installing Tyvek Over Old Siding
Now that we’ve discussed the benefits, let’s explore the process of installing Tyvek over old siding. It’s essential to follow proper procedures to ensure the best results. Here’s a step-by-step breakdown:
Step 1: Clean and Prepare
Before installing Tyvek, clean your existing siding thoroughly. Remove any dirt, mold, or loose paint that might interfere with the adhesion of the Tyvek layer. Ensuring a clean surface is crucial for optimal performance.
Step 2: Measure and Cut
Measure the height and width of your walls, allowing for some overlap. Cut the Tyvek material into sections that will cover the entire surface, leaving a few extra inches for overlap on each side.
Step 3: Secure the Tyvek
Using nails or staples, secure the Tyvek to the wall, starting from the bottom and working your way up. Make sure the material is taut and smooth to avoid any wrinkles or gaps that might compromise its effectiveness.
Step 4: Seal the Seams
To ensure a watertight barrier, seal the seams of the Tyvek using Tyvek tape or a compatible adhesive. This extra step will provide added protection against moisture infiltration.
In this section, we’ve explored the benefits and installation process of adding a Tyvek layer over old siding. By improving energy efficiency, enhancing moisture protection, and providing additional comfort and noise reduction, Tyvek can be an excellent investment for your home. As always, consult with a professional to assess your specific situation and ensure the best results. Happy renovating!
How Much Overlap for Hardie Siding
When it comes to installing Hardie siding, one important aspect to consider is how much overlap is needed. Getting this right is crucial for the longevity and overall performance of your siding. Let’s dive into the nitty-gritty details and find out how much overlap you should aim for!
Understanding the Purpose of Overlap
Before we delve into the specifics, let’s briefly touch upon why overlap is necessary in the first place. The primary purpose of overlap is to provide a watertight seal that protects your home from the elements. By overlapping the siding layers, you prevent water, drafts, and pests from finding their way into the nooks and crannies. So, it’s not something to overlook!
Considerations for Hardie Siding Overlap
When it comes to Hardie siding, the recommended overlap may vary depending on the specific product you’re working with. However, a general guideline is to aim for a 1.25-inch overlap. This will ensure sufficient coverage and protection for your home.
The 1.25-inch Rule: Keep It in Mind
Remember, it’s always good to have a rule of thumb! The 1.25-inch overlap rule works like a charm for most Hardie siding installations. By following this guideline, you’ll strike the right balance between ensuring a secure fit and allowing for natural expansion and contraction of the siding material. It’s a win-win situation!
Handling Corners and Edges
Now that we have covered the basics, let’s talk about corners and edges. When dealing with corners, you’ll want to provide an overlap of at least 2 inches. This additional overlap guarantees better protection, as corners are typically more vulnerable to weather elements.
On the other hand, when it comes to edges, a minimum overlap of 1 inch is generally sufficient. This ensures a tight seal while considering the overall appearance of your siding.
The Golden Rule: Read the Instructions
While the guidelines mentioned above are a great starting point, don’t forget to consult the manufacturer’s instructions for the specific Hardie siding product you’re using. Always thoroughly read and follow the installation guidelines provided by the manufacturer. This will help you ensure you’re adhering to any specific requirements they may have and guarantee the best performance for your siding.
There you have it! When it comes to Hardie siding, aiming for a 1.25-inch overlap is a safe bet. Don’t forget to increase the overlap to 2 inches for corners and keep it at 1 inch for edges. And as always, make sure to consult the manufacturer’s instructions for any additional recommendations specific to your siding product. With the right overlap, your Hardie siding will not only look great but also provide the protection your home deserves. Happy siding installation!
What is the Overlap on Hardie Siding
Understanding the Importance of Overlap
When it comes to Hardie siding, one term that often comes up is “overlap.” So, what exactly is overlap? Well, in simple terms, it refers to the way the individual siding panels are installed and positioned on your home’s exterior. This overlap is crucial because it helps ensure proper protection against the elements, seals out moisture, and maintains the overall integrity of your siding.
The Purpose of the Lap Joint
The lap joint, or overlap, is essentially where one piece of siding overlaps another. Hardie siding typically has a horizontal lap joint, meaning that each panel overlaps the one below it. This overlap creates a barrier that prevents water from seeping in and causing damage. It’s like a protective shield for your home, shielding it from rain, snow, and other environmental factors.
The Ideal Overlap Measurement
When it comes to Hardie siding, the ideal overlap measurement is usually around 1 inch. Now, don’t worry; this doesn’t mean you need to whip out a ruler and measure each individual panel. Hardie siding panels are designed with pre-marked lines, making it easy for you or your contractor to achieve the correct overlap measurement during installation.
Achieving a Proper Overlap
To ensure a proper overlap on your Hardie siding, start by installing the first panel at the bottom of your exterior wall. The next panel will then overlap the lower panel, and so on. The key is to secure each panel tightly and to align them properly during installation. This way, you’ll have a seamless and visually appealing finish.
Avoiding Common Mistakes
While overlapping Hardie siding may seem straightforward, there are a few common mistakes to watch out for. One such mistake is improper alignment, which can lead to uneven spacing and a less professional look. Another mistake is not securing the panels tightly enough, which can result in gaps and potential water damage. So, take your time, follow the manufacturer’s guidelines, and don’t be afraid to ask for help if needed.
Wrap-Up
Now that you know about the importance of overlap on Hardie siding, you can appreciate the role it plays in protecting your home. From keeping water out to maintaining the overall durability of your siding, a proper overlap ensures your home looks great while withstanding the test of time. So, when it’s time to install or replace your siding, remember to pay attention to the overlap – your home will thank you for it!
How Many Layers of Siding Can You Have
Installing new siding can greatly enhance the appearance and durability of your home. When it comes to siding layers, you might wonder how many layers you can have. In this section, we will explore the possibilities and guidelines for siding layers.
The Standard: Single Layer Siding
The most common practice for siding installation is to have a single layer. A single layer of siding provides effective protection and insulation for your home. It is the standard and typically meets the needs of most homeowners.
Going Beyond: Double Layer Siding
In some cases, homeowners may opt for double layer siding. This can be a viable option if your existing siding is damaged or worn out. Adding a second layer on top of the original can give your home extra protection and improve its overall appearance. Double layer siding is commonly used when the original siding is still structurally sound but needs an aesthetic makeover.
The Maximum: Triple Layer Siding
While double layer siding is accepted and practiced, triple layer siding is less common. There are some instances, however, where it may be necessary or desired. For homes in regions with extreme weather conditions, such as high wind areas or regions prone to hurricanes, triple layer siding can provide an additional safeguard against the elements. It’s important to note that adding more layers may require adjustments to windows, doors, and other exterior features.
Considerations and Recommendations
When deciding how many layers of siding to have, there are a few things to keep in mind. First, check local building codes and regulations to ensure compliance with any restrictions on the number of layers allowed. Additionally, consider the overall weight of the layers, as too much weight can strain the structure of your home.
It’s always advisable to consult with a professional siding contractor who can assess the condition of your current siding and provide expert advice on the number of layers needed for your specific circumstances. They can also help you choose the right materials and ensure proper installation.
Remember, the primary goal is to provide a long-lasting, visually appealing, and protective exterior for your home. Whether you choose single, double, or triple layer siding, make a decision that aligns with your budget, climate demands, and personal preferences.
In conclusion, the number of siding layers you can have depends on various factors, including local regulations, the condition of your existing siding, and your specific requirements. Consult with professionals, understand your options, and make an informed decision to enhance the beauty and durability of your home.