So, you’ve just finished the arduous task of replacing your sewer line. Congratulations! But now you’re left with a less-than-ideal lawn that’s showing the aftermath of the construction work. Maybe you have patches of grass that refuse to grow, or perhaps there’s a sinking spot over the new sewer line. Don’t worry, though – in this blog post, we will explore various tips and tricks to help you repair your lawn after a sewer line replacement. From settling dirt in trenches to promoting healthy grass growth, we’ve got you covered. Let’s dive in and get your lawn looking lush and vibrant once again!
Keywords: sand under sewer pipe, repair or replace sewer line, ground sinking over sewer line, how to settle dirt in a trench, new seeded lawn growing patchy, mound of dirt after sewer repair, patches in lawn where grass won’t grow, Can sewer pipes be repaired without digging?, How do I fix my lawn ruts after construction?, How long does it take for a trench to settle?, how long to let dirt settle before planting grass
Lawn Repair After Sewer Line Replacement
So, you just had your sewer line replaced, and now you’re left with a sad-looking lawn that resembles a warzone. Don’t worry, because lawn repair after a sewer line replacement is totally doable. With a little bit of patience, some hard work, and a sprinkle of magic (okay, maybe not magic), you can bring your lawn back to life in no time. Here’s what you need to know:
1. Assess the Damage
Before you dive headfirst into lawn repair mode, take a moment to assess the extent of the damage. Is your grass completely torn up or just a bit compacted? Are there any depressions or areas that have sunk in? Understanding the state of your lawn will help you determine the appropriate course of action for repair.
2. Loosen the Soil
If your lawn got a beating during the sewer line replacement, chances are the soil is now compacted and in desperate need of some love. Grab a garden fork or a core aerator and get to work. Loosen up the soil by poking holes all over the affected areas. This will allow air, water, and nutrients to reach the grass roots and promote healthy growth.
3. Amend the Soil
Once you’ve loosened up the soil, it’s time to give it some nutrients. Mix in some compost or organic matter to improve its structure and fertility. This will provide a good foundation for your new grass to thrive. Spread a layer of compost over the damaged areas and gently rake it into the soil.
4. Reseed or Sod
Now comes the fun part – reseeding or sodding. If your grass is beyond repair, you’ll want to reseed the damaged areas. Choose a grass seed that is suitable for your climate and follow the instructions on the packet for the best results. If you’re in a hurry to get your lawn back in shape, sodding is the way to go. Roll out some fresh sod over the affected areas and water it regularly to help it establish.
5. Water, Water, Water
In the world of lawn repair, water is your best friend. Newly seeded or sodded areas need to be kept moist to aid in germination and root establishment. Water the repaired sections frequently, making sure not to let them dry out. Over time, gradually reduce the frequency of watering, but increase the amount to encourage deep root growth.
6. Patience is a Virtue
Lastly, be patient. Your lawn won’t magically transform overnight. It takes time for grass to grow and fill in the damaged areas. Keep up with regular maintenance such as mowing, watering, and fertilizing, and before you know it, your lawn will be back to its lush, green self.
Remember, lawn repair after a sewer line replacement might seem like a daunting task, but with the right approach and a little TLC, you can restore your yard to its former glory. So roll up your sleeves, put on your gardening gloves, and get ready to give your lawn the pampering it deserves.
Sand: The Secret Ingredient for a Successful Sewer Line Replacement
Protecting Your Lawn
During a sewer line replacement, your once pristine lawn may bear the brunt of all that digging and trenching. Fear not, for there is a secret ingredient that can help repair the damage and restore your lawn to its former glory: sand! Yes, that humble granular substance can be the key to a successful post-sewer pipe project and a beautifully rejuvenated lawn.
The Benefits of Sand
Sand has a multitude of benefits when it comes to repairing your lawn after a sewer line replacement.
1. Leveling the Ground
With all the excavation involved in sewer pipe replacement, your lawn can end up looking like a battlefield. But fear not! Sand can come to the rescue as the ultimate leveling agent. By spreading a thin layer of sand over the disturbed area, you can easily smooth out the bumps, lumps, and trenches, restoring a flat surface ready for reseeding.
2. Improving Drainage
One of the main aims of a sewer line replacement is to ensure proper drainage, and sand can help achieve just that. Its granular nature allows water to pass through easily, preventing waterlogging and keeping your lawn healthy. By mixing sand into the soil, you create a well-draining environment for new grass to flourish.
3. Supporting Root Growth
A vital aspect of lawn repair is encouraging healthy root growth. Sand helps in this regard by providing a loose and aerated soil structure. This allows the roots to penetrate easily and access nutrients, water, and oxygen, promoting healthy growth and a flourishing lawn.
How to Use Sand for Lawn Repair
Now that you know the benefits of sand, let’s dive into some practical tips on using it for your lawn repair project after a sewer line replacement.
1. Assess the Damage
Before starting any lawn repair, take a good look at the damage caused by the sewer line replacement. Identify areas that need leveling, areas with poor drainage, and spots where grass needs a little extra boost.
2. Level the Ground
For uneven surfaces, spread a thin layer of sand over the disturbed area. Use a rake or a shovel to spread it evenly, filling in any gaps or low spots. Be sure not to apply too much sand, as this can suffocate the grass.
3. Enhance Drainage
If you notice areas with poor drainage, mix sand into the soil at a ratio of 1:1 or as recommended by a lawn care professional. This will improve soil structure, allowing excess water to drain away effectively.
4. Prepare for Seeding
Once the ground is level and the drainage is improved, you’re ready to prepare for seeding. Mix sand and soil in a 1:2 ratio to create a nutrient-rich bed for your grass seeds.
5. Reseed and Water
Spread grass seeds evenly over the prepared area and lightly rake to ensure good seed-to-soil contact. Water the newly seeded area regularly, keeping the top inch of soil moist until the grass begins to establish itself.
The Secret is Out
Now that you’re armed with the secret ingredient for repairing your lawn after a sewer line replacement – sand – you can confidently tackle any lawn repair project. Remember to assess the damage, level the ground, improve drainage, prepare for seeding, and watch your lawn flourish. With a little help from sand, your lawn will bounce back better than ever!
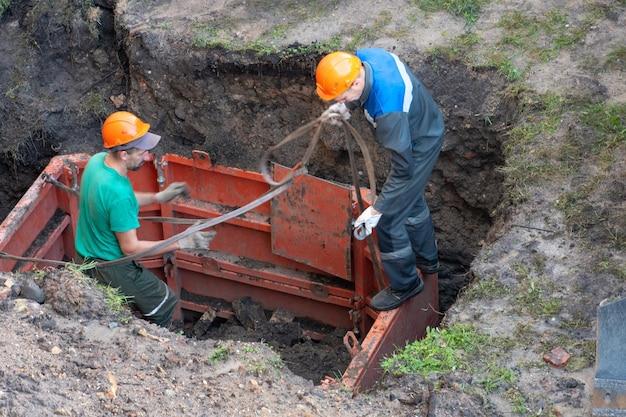
Repair or Replace Sewer Line
It’s a question many homeowners face after a sewer line replacement – should you repair or replace your sewer line? Let’s dive into the pros and cons of each option to help you make an informed decision.
Repairing Your Sewer Line
If your sewer line has suffered minor damage during the replacement process, repairing it may be a viable option. Repairing a damaged sewer line can be less expensive and less disruptive than a full replacement. It involves fixing the specific issue without completely replacing the entire line.
There are different repair techniques available, such as pipe lining or spot repairs, depending on the extent of the damage. These methods can successfully address issues like leaks, cracks, or minor blockages. Hiring a professional plumber to assess the damage and guide you through the repair process is essential. This way, you can determine if repair is a viable option for your specific situation.
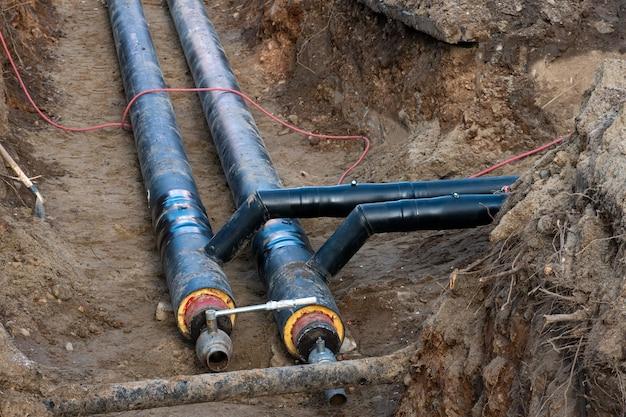
When to Replace Your Sewer Line
Sometimes, a sewer line replacement is the best course of action. If your sewer line has multiple issues, is old and deteriorating, or has a history of recurring problems, it might be time to consider a full replacement. While replacing your sewer line can be a larger upfront investment, it can provide long-term peace of mind.
Replacing your sewer line involves removing the existing line and installing a new one. This option allows for a fresh start with a new sewer line that is unlikely to encounter problems in the near future. Additionally, modern materials and techniques used in replacement provide better durability and longevity.
Factors to Consider
When deciding whether to repair or replace your sewer line, several factors come into play. First, consider the overall condition of the existing line. If it’s severely damaged or close to the end of its lifespan, replacement may be the best option. Additionally, think about the cost and potential disruption associated with repair versus replacement.
Another crucial consideration is the future. Will repair solve the issue permanently, or are you likely to face frequent repairs in the coming years? Understanding the long-term implications and costs can assist in making the right decision. Consulting with a professional plumber who specializes in sewer line repairs and replacements can provide valuable insight.
When it comes to choosing between repairing or replacing your sewer line after replacement work, there is no one-size-fits-all answer. It depends on the extent of the damage, the overall condition of the existing line, and your budget.
While repair may be a cost-effective choice in some scenarios, a full replacement offers a fresh start and peace of mind. Evaluate the best option based on careful consideration of all factors involved and consult with a professional plumber to make an informed decision.
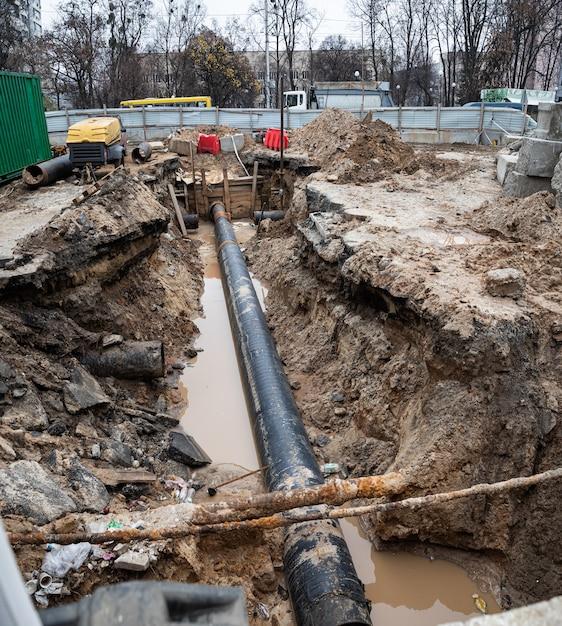
Ground Sinking over Sewer Line
Understanding the Phenomenon
If you’ve recently undergone a sewer line replacement and noticed the ground sinking in certain areas of your lawn, don’t panic! It’s a common occurrence after such a major plumbing project. The weight of the machinery used during the replacement process can sometimes cause the soil to compact and settle unevenly. This can result in depressions or areas of sinking in your yard, which may require some attention and repair.
Detecting Ground Sinking
To determine whether your lawn is experiencing ground sinking over the sewer line, here are a few telltale signs to look out for:
- Uneven Surface: Keep an eye out for any noticeable depressions or dips in your yard, particularly around the areas where the sewer line was replaced.
- Pooling Water: If you notice water accumulating in specific spots after rainfall or irrigation, it could be an indication that the ground has settled unevenly.
- Cracks and Gaps: Look for cracks or gaps forming in your driveway, sidewalk, or any nearby concrete structures. Ground sinking can sometimes cause these structures to shift and break apart.
Addressing the Sinking Issue
Now that you’ve identified the ground sinking issue, it’s time to take action. Fortunately, there are a few effective methods to address this problem:
1. Topsoil Leveling
Begin by adding additional topsoil to fill in the depressions and level the sinking areas. Make sure to use a quality topsoil that matches the composition of your existing soil. Spread the topsoil evenly and use a rake to smooth it out.
2. Soil Compaction
In some cases, the ground sinking may be due to inadequate soil compaction during the sewer line replacement. Renting a compaction plate or hiring a professional compaction specialist can help correct this issue. They will use specialized equipment to compact the soil properly, ensuring a stable and level surface.
3. Reestablishing Lawn
After leveling the ground, it’s time to restore your beautiful lawn. Depending on the extent of damage caused by the ground sinking, you may need to reseed or lay new grass. Follow standard lawn care practices, including watering, fertilizing, and regular maintenance, to support healthy growth.
Preventive Measures for the Future
To minimize the likelihood of ground sinking over your sewer line in the future, consider implementing these preventive measures:
– Proper Backfilling
Ensure that the soil used for backfilling during the sewer line replacement is properly compacted at the time of installation. This will help prevent future sinking issues.
– Regular Inspections
Schedule routine inspections of your sewer line to identify any issues early on. Catching and resolving problems promptly can prevent further damage to your lawn and save you money in the long run.
– Seek Professional Help
If you’re uncertain about how to address the ground sinking issue or if it persists despite your efforts, don’t hesitate to consult a professional landscaping or plumbing service. They have the expertise and equipment to assess the situation accurately and provide necessary solutions.
Remember, a sinking lawn doesn’t have to be a headache. By understanding the causes and taking appropriate measures, you can restore your yard to its former glory after a sewer line replacement.
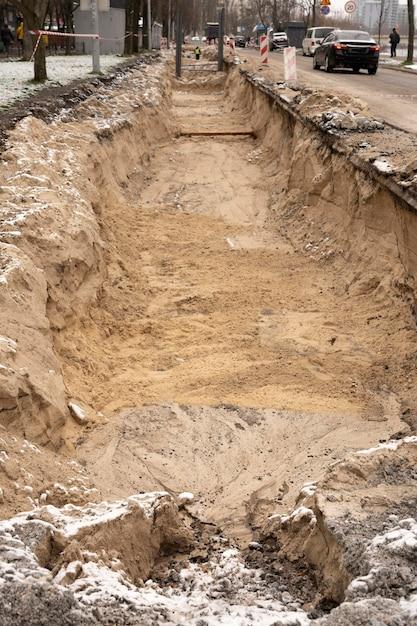
How to Settle Dirt in a Trench
So, you’ve just had your sewer line replaced, and now you’re left with a big trench in your lawn. Don’t worry, though! With a little effort, you can settle the dirt in the trench and get your lawn looking as good as new. Here are some tips to help you with the process.
Checking the Soil Quality
Before settling the dirt in the trench, it’s essential to check the quality of the soil. Make sure it’s free from any debris, rocks, or large clumps. You want the dirt to be loose and well-draining, so water doesn’t pool in the trench. If you notice any low spots, fill them in with extra soil to ensure a level surface.
Step-by-Step Process
- Water the Trench
Sprinkle the trench with water to moisten the soil. This will help the dirt settle and prevent any air gaps. Avoid overwatering, as you don’t want the trench to turn into a mud pit!
- Gently Compact the Dirt
Use a hand tamper or the back of a shovel to gently press down on the soil. Start at one end of the trench and work your way across. Be careful not to apply too much pressure, as you don’t want to create a hard, compacted surface.
- Add More Dirt if Needed
If the trench settles significantly after compacting, you may need to add more dirt. Fill any depressions with soil and repeat the compaction process. Keep in mind that settling may occur over time, so it’s helpful to have some extra soil on standby.
- Level the Surface
Use a rake to even out the soil surface. This will create a smooth and seamless transition from the trench to the rest of your lawn. If necessary, add more soil and repeat the leveling process until you achieve the desired result.
- Water and Monitor
Give the settled dirt a good watering to help it bond together. Monitor the area for any signs of settling or erosion. If needed, repeat the process to ensure the trench remains intact and blends in with the surrounding lawn.
Celebrate Your Trench Transformation
With these simple steps, you can settle the dirt in your trench and restore your lawn to its former glory. So put on your gardening gloves, grab your tools, and get ready to show off your beautiful, well-settled trench. Your lawn will thank you for it!
And that’s it! You’re now equipped with the knowledge to settle the dirt in your trench. Remember, a little patience and effort go a long way when it comes to lawn repair after a sewer line replacement.
New Seeded Lawn: Growing Patchy
So you’ve recently replaced your sewer line and decided to seed a new lawn. It’s a great way to rejuvenate your outdoor space, but now you’re noticing that your new lawn is growing patchy. Don’t fret, because we’re here to help you troubleshoot this common problem!
Understanding the Basics
Seeding a lawn involves spreading grass seeds over the soil and providing them with the right conditions to grow into a lush carpet of green. However, there are several factors that can contribute to a patchy lawn, especially in the early stages.
Insufficient Watering
Water is essential for seed germination and the sustained growth of your new lawn. If you’re not providing enough water, the seeds might struggle to establish themselves properly, leading to patchy growth. Your lawn needs consistent moisture, so make sure to water it regularly and thoroughly, keeping the topsoil damp but not waterlogged.
Improper Seed Coverage
A common mistake during seeding is insufficient seed coverage. If you didn’t spread enough seeds, bare patches can occur as the grass struggles to fill in the gaps. It’s important to ensure even distribution of the seeds to promote uniform growth. Consider using a lawn spreader or, for smaller areas, sow the seeds by hand, being careful to cover all parts of the lawn evenly.
Soil Compaction
Compacted soil can hinder the growth of your new lawn. After the sewer line replacement, the soil may have become compacted due to heavy equipment or construction activities. Compaction prevents the grass roots from penetrating the soil, resulting in uneven growth. To address this, you can aerate the soil by using a garden fork, rake, or renting a mechanical aerator.
Soil Quality and Nutrient Imbalance
The quality of your soil plays a crucial role in determining how well your lawn will grow. If the soil lacks essential nutrients, your grass may struggle to establish and grow uniformly. Conducting a soil test can help identify any deficiencies, allowing you to amend the soil accordingly with appropriate fertilizers and organic matter.
Pest and Weed Pressure
Pests and weeds can also wreak havoc on your growing lawn. Pests, such as grubs or birds, may be feasting on the seeds, impairing germination. Similarly, aggressive weeds can compete with your grass for nutrients and sunlight. Consider using appropriate insecticides, herbicides, or organic pest control methods to address these issues.
Patience and Maintenance
Remember, establishing a new lawn takes time and effort. Patience is key as your newly seeded lawn goes through different growth stages. Regular maintenance, such as mowing at the proper height and removing weeds, will help ensure the uniform growth of your grass.
By understanding the potential causes of patchy growth in your new seeded lawn and implementing the necessary solutions, you can enjoy a vibrant and lush carpet of green in your outdoor oasis. So don’t lose heart; persevere, and soon you’ll have a beautiful lawn to be proud of!
Mound of Dirt After Sewer Repair
So you’ve recently had your sewer line replaced, and now you’re left with an unsightly mound of dirt sitting in your yard. Don’t worry, this is a common occurrence after sewer line repairs, and there are a few things you can do to address this issue. In this section, we’ll explore some tips and tricks to help you deal with that annoying mound of dirt.
Embrace the Mound
While it may not be the most visually appealing addition to your yard, it’s important to remember that this mound of dirt is a temporary inconvenience. Instead of stressing about its presence, try to embrace it as a sign of progress. Remember that the repair work was necessary, and soon your lawn will be back to its former glory.
Leveling the Mound
If the dirt mound is preventing you from fully enjoying your yard, you can consider leveling it out. Begin by gently spreading the dirt around the affected area to create a more even surface. Take care not to damage any surrounding plants or existing landscaping features in the process.
Seeding or Sodding
To restore the lush green look of your lawn in the quickest way possible, you can opt for seeding or sodding. If the mound is not too large, you can sprinkle grass seed evenly over the area and water it regularly. Within a few weeks, you should start to see new grass sprouting. Alternatively, you can lay down new sod, which provides immediate results but is a bit more expensive.
Temporary Decorations
If you have an upcoming event or gathering in your yard and can’t wait for the new grass to grow, you can get creative with some temporary decorations. Consider placing potted plants, lawn ornaments, or even a small garden bench on top of the mound to distract from its appearance. This can add a touch of charm to an otherwise unattractive spot.
Patience is Key
Remember, nature takes time to do its thing, and the mound of dirt will eventually settle and blend in with the rest of your yard. As you go about your regular lawn maintenance routine, keep an eye on the progress and make any necessary adjustments. With a little patience, your yard will be back to normal before you know it.
To recap
- Embrace the mound as a sign of progress.
- Level out the dirt if it bothers you.
- Consider seeding or sodding for quicker results.
- Get creative with temporary decorations to distract from the mound.
- Be patient and trust that nature will take its course.
By following these tips, you’ll be able to navigate the aftermath of a sewer line repair and restore your lawn to its former glory in no time.
Patches in Lawn Where Grass Won’t Grow
If you’ve recently had a sewer line replacement and find yourself dealing with patches in your lawn where grass just won’t grow, don’t fret! This common issue can be resolved with a few simple steps. Let’s take a closer look at what you can do to repair those stubborn bare spots and get your lawn looking lush and green again.
Assess the Soil
The first step in tackling those patchy areas is to assess the condition of the soil. Start by checking for any compacted or hard areas that may be preventing grass roots from taking hold. Dig into the soil with a gardening fork or spade and loosen it up, making sure to remove any debris or rocks that could hinder grass growth.
Choose the Right Grass Seed
Once the soil is prepped and ready, it’s time to choose the right grass seed for your lawn. Look for a seed mix that is specifically formulated for patch repair and contains a blend of hardy grass varieties. These varieties will be more resilient to different growing conditions and can help fill in those bare areas quickly.
Seed and Feed
After selecting the right grass seed, it’s time to get down to business. Begin by raking the patchy areas to create a smooth and level surface. Next, spread the grass seed evenly, making sure to follow the recommended seeding rate on the package. Lightly rake the seed into the soil, ensuring good seed-to-soil contact.
To give your new grass the best chance of success, apply a starter fertilizer to provide essential nutrients for growth. This will help your grass establish strong roots and flourish in the repaired areas.
Water and Monitor
Now that you’ve done the hard work, it’s time to let nature take its course. Water the newly seeded areas regularly to keep the soil moist but not overly saturated. Avoid watering too heavily, as this can lead to poor germination or even wash away the grass seed altogether.
Keep a close eye on the repaired areas, monitoring for any signs of growth. With proper care and maintenance, you should start to see new grass sprouting up in no time. Be patient; it may take a few weeks for the seed to fully establish and fill in those bare spots.
Prevent Future Patchy Areas
To prevent future patchy areas in your lawn, it’s important to address any underlying issues. If the damaged sewer line caused soil contamination or compaction, consult with a professional to ensure proper remediation. Additionally, consider implementing regular lawn care practices, such as proper mowing height, adequate watering, and regular fertilization, to keep your lawn healthy and minimize the risk of future problems.
By following these simple steps, you can say goodbye to those stubborn patches in your lawn and hello to a lush and vibrant yard. So, grab your gardening tools and get ready to transform your lawn into a green oasis once again!
Can Sewer Pipes be Repaired Without Digging
The Modern Solution to Sewer Pipe Problems
If you’re facing issues with your sewer pipes, the thought of having to dig up your beautiful lawn can be daunting. But fear not! With advancements in technology, there is now a modern solution that allows sewer pipes to be repaired without all the digging. Yes, you read that right!
The Trenchless Technique
Say goodbye to the days of trenches and heavy machinery tearing up your lawn. Thanks to the innovative trenchless technique, sewer pipes can now be repaired or replaced with minimal disruption to your landscape. This method has become increasingly popular for its efficiency, cost-effectiveness, and environmental friendliness.
How Does it Work
Using the trenchless technique, a flexible liner is inserted into the damaged pipe. This liner is then expanded, creating a new, seamless pipe within the old one. The old pipe is essentially used as a host or guide for the new one. This process eliminates the need for extensive digging, preserving the integrity of your lawn while still resolving your sewer line issues.
The Benefits of Trenchless Repair
-
Minimal disruption: No more trenches or heavy machinery destroying your lawn. Trenchless repair keeps your landscape intact, saving you time and money on costly restoration.
-
Faster completion: Traditional pipe repairs can often take days or even weeks to complete. Trenchless repair, on the other hand, can be done much more quickly, as it doesn’t require extensive digging.
-
Less cost: Digging up your entire lawn for pipe replacement can incur significant expenses for labor, equipment, and landscaping repairs. With trenchless repair, you’ll save on all these costs, making it a more affordable option.
-
Environmentally friendly: The trenchless technique reduces the impact on the environment by minimizing the disruption to the surrounding landscape. It also eliminates the need for extensive excavation, reducing the use of heavy machinery and fuel consumption.
Is Trenchless Repair Right for You
Before opting for trenchless repair, it’s essential to consult with a professional plumber who specializes in this technique. They will assess the condition of your sewer pipes and determine whether trenchless repair is a viable option for your specific situation.
So, the next time you’re faced with sewer pipe problems, don’t dread the digging. Consider the trenchless technique and keep your lawn looking pristine while still resolving your sewer line issues. It’s the modern, hassle-free solution you’ve been waiting for!
How to Fix Lawn Ruts After Construction
So, you’ve recently had your sewer line replaced, and now your lawn resembles a mini-minefield. Those unsightly ruts and trenches left behind by the construction have got you scratching your head and wondering how to restore your once-pristine lawn. Well, fear not, dear homeowner, for we have some simple solutions that will have your yard looking fabulous again in no time!
Fill ‘Em Up: Soil and Sand to the Rescue!
First things first, you’ll need to fill those pesky ruts. Grab a shovel and start by leveling the areas with a light layer of topsoil. Smooth it out with a rake, ensuring it’s evenly distributed. Next, sprinkle some coarse sand on top to further promote evenness and stability. This combination of soil and sand will help alleviate those unsightly dips and bumps.
Give It Time: Patience is Key
Now, it’s crucial to remember that Rome wasn’t built in a day, and neither will your lawn be repaired overnight. Patience is key in this process. Allow the soil and sand mixture to settle naturally, and with time and regular watering, it will compress and level itself out. Be sure to water consistently, but avoid overwatering, as this can create further damage.
Reseed the Area: Green is Good!
Once the ruts have settled, it’s time to add some green back into your lawn. Reseeding the affected areas will help speed up the recovery process. Choose a grass seed that matches the rest of your lawn and spread it evenly over the repaired spots. Lightly rake the seed into the soil and water gently, ensuring the seeds remain moist until they germinate. A lush, green carpet will soon emerge, erasing all signs of construction chaos.
Spread Some Love: Fertilize for Growth
To give your newly repaired lawn a little TLC, it’s a good idea to apply some fertilizer. Choose a slow-release or organic fertilizer and distribute it evenly over the whole lawn, paying extra attention to the repaired areas. This will provide the necessary nutrients for your grass to grow thick and healthy, further aiding in the recovery process.
Prevention is the Best Cure: Avoid Ruts in the Future
While we can’t predict when sewer lines will need replacing again, we can take some steps to prevent future lawn ruination. If the construction exists in a specific area of your yard, consider installing temporary fencing to keep heavy machinery away from your precious lawn. Additionally, you can talk to your contractor about implementing a temporary plywood path to minimize traffic impact.
Remember, fixing lawn ruts after construction requires a little patience, care, and a sprinkle of humor. With these simple steps, you’ll soon be enjoying a beautiful, luscious lawn once again. So, grab that shovel and get to work – your yard will thank you!
How Long Does It Take for a Trench to Settle
When it comes to lawn repair after sewer line replacement, one common question that homeowners have is – how long does it take for a trench to settle? Well, the answer may vary depending on a few factors. Let’s dive into the details and find out what you can expect.
Soil Composition Matters
The time it takes for a trench to settle can be influenced by the type of soil in your yard. If you have clay soil, which tends to retain moisture and compact easily, the settling process may take longer. On the other hand, if your soil is sandy, which allows for better drainage, the trench may settle more quickly.
Give It Time
On average, it can take anywhere between a few weeks to a couple of months for a trench to fully settle. However, it’s important to note that the process is gradual, and you may not see immediate results. Patience is key here – resist the temptation to rush the process or make any hasty decisions.
Weather Conditions Play a Role
Weather conditions also play a role in how long it takes for a trench to settle. Dry and hot weather may cause the soil to dry out faster, leading to a quicker settlement. Conversely, if it’s a particularly wet season, the excess moisture can slow down the process. Keep an eye on the weather forecast and adjust your expectations accordingly.
Minimize Foot Traffic
While waiting for the trench to settle, it’s crucial to minimize foot traffic in the affected area. Walking on the soil can disrupt the settlement process and potentially cause uneven ground. So, resist the urge to test its stability by taking a stroll – it’s better to be safe than sorry.
Leveling and Seeding
Once the trench has settled, it’s time to level the ground and sow grass seed to restore your lawn’s appearance. Make sure to follow the recommended seeding instructions for your specific type of grass and provide adequate water to help it grow.
In conclusion, the length of time it takes for a trench to settle after sewer line replacement can vary. Factors such as soil composition and weather conditions can influence the settling process. Remember to be patient, avoid unnecessary foot traffic, and take the necessary steps to restore your lawn once the trench has fully settled.
How Long to Let Dirt Settle Before Planting Grass
Introduction:
After having your sewer line replaced, it’s essential to repair your lawn to restore its beauty. One crucial aspect of lawn repair is knowing how long to let the dirt settle before planting new grass. This is important to ensure that the soil is ready to support healthy growth and prevent issues down the line. In this section, we’ll discuss the ideal timeframe for letting dirt settle and some tips to make the process more effective.
Letting the Dirt Settle:
Understanding the Process
Before we dive into the timeline, let’s understand why letting the dirt settle is necessary. When the sewer line is replaced, the soil is often disturbed, creating pockets and unevenness. These inconsistencies can affect the grass’s root system, leading to poor growth or even failure. Allowing the dirt to settle helps in evening it out, making it more receptive to new grass seeds or sod.
Optimal Timeframe
On average, it’s recommended to let the dirt settle for about 2 to 4 weeks after sewer line replacement before planting grass. However, the actual time may vary depending on various factors, such as soil type, weather conditions, and the extent of the repair. Patience is key here, as rushing to plant grass too soon can lead to disappointment. Giving the dirt ample time to settle ensures a stable foundation for healthy grass growth.
Tips for Effective Settling:
Watering
To expedite the settling process, lightly mist the soil with water once or twice a day. This helps compact the soil particles and reduces the chances of large air pockets. However, avoid overwatering as it may cause soil erosion or create an unfavorable environment for grass seed germination.
Filling Depressions
During the settling period, keep an eye out for any depressions that form on the soil surface. Fill these areas with additional soil to achieve an even landscape. Be gentle while filling to retain the compactness of the surrounding soil.
Leveling and Raking
After the dirt has settled, carefully level the soil surface using a rake. This will help smooth out any remaining rough spots and create a uniform terrain for planting grass. Be thorough but gentle to avoid disturbing the settled dirt.
Conclusion:
In summary, allowing the dirt to settle is a crucial step in lawn repair after a sewer line replacement. It ensures a stable foundation for healthy grass growth. Remember to be patient and wait for approximately 2 to 4 weeks before planting the new grass. During this period, lightly water the soil, fill any depressions, and level the surface. By following these tips, you’ll set the stage for a vibrant, lush lawn that will be the envy of the neighborhood.