Are you tired of dealing with messy cords and limited outlets in your kitchen? Installing an outlet under the sink could be the solution you’ve been searching for. Whether you need to power your dishwasher or garbage disposal, having a convenient outlet can make your kitchen tasks much easier. In this blog post, we’ll explore everything you need to know about installing an outlet under the sink. From the types of outlets to the wiring process, we’ve got you covered. So, let’s dive in and make your kitchen more functional!
Installing an Outlet Under Your Sink: A Convenient Solution
Why bother with an outlet under the sink
So, you’ve finally decided to make your life easier by installing an outlet under your sink. Smart move! Having an outlet in this peculiar location might sound like an outlandish idea, but let me tell you, it’s actually pretty handy. No one likes struggling with tangled cords or hopping around the kitchen while desperately trying to find a spot to plug in your blender. With an outlet conveniently placed under your sink, all your kitchen gadgets can now be easily powered without any hassle.
What you’ll need (apart from the usual tools!)
Before we embark on this endeavor, let’s make sure you have all the necessary supplies. In addition to your trusty toolkit, make sure you have a GFCI outlet (because safety first, folks!) and some electrical wire. And please, don’t forget the wire nuts – they’re nuts about safety (pun fully intended).
Is it time to get your hands dirty? Step-by-step guide
Now that we’re all set, grab your tools and let’s get down to business. Remember to turn off the power at the breaker box – you don’t want any hair-raising surprises during the installation (literally!). Better safe than charred, am I right?
1. Plan for success
First, find the perfect spot under your sink to mount the outlet. Ideally, it should be somewhere easily accessible but hidden away from water sources. You don’t want to be worried about sparks every time you wash your dishes. Safety and convenience – like peanut butter and jelly, they go together.
2. Wire the way to greatness
Now it’s time to connect your new outlet to the electrical supply. Remove the knockout on the bottom of your electrical box and fit the wire through it. Then, connect the black wires together with a wire nut, followed by the white wires, and finally, the ground wires. We’re not making a jungle out of wires here – keep it neat and tidy.
3. Ground zero
Make sure you properly ground your outlet. Connect the grounding wire to the green grounding screw on your outlet. Safety is our number one priority, after all.
4. Showtime!
With everything wired up, it’s now time to carefully insert the outlet into the electrical box. Screw it in place and make sure it sits snugly. We don’t want any unexpected detachments when you’re vigorously blending that delicious smoothie.
5. Power up and test it out!
Finally, it’s time for the moment of truth. Restore the power at the breaker box and marvel at your new addition – an outlet right under your sink! Test it out with your favorite kitchen gadget and revel in the convenience it brings to your culinary adventures.
Wrapping it up: Efficiency meets convenience
Congratulations, my friend! You made it through the installation process like a true DIY champion. Now you can enjoy the convenience of having an outlet under your sink, making your kitchen tasks not only more efficient but also a lot less frustrating. Say goodbye to tangled cords and hello to a seamlessly powered kitchen. So go forth, bring out your inner handyman or handywoman, and let the power flow!
Under Sink Outlet Box
So you’ve decided to take on the challenge of installing an outlet under your sink. Congratulations, you brave DIY-er! But before you dive headfirst into this electrifying endeavor, let’s talk about the one thing that’s going to keep everything organized and safe: the under sink outlet box.
What’s the Deal with an Under Sink Outlet Box
Ah, the under sink outlet box, the unsung hero of electrical installations. This little box acts as the middleman between your dazzling new outlet and the wild world of wires lurking beneath your sink. It’s like a teeny-tiny bodyguard, protecting your precious electrical connections from any potential water damage or accidental encounters with your super absorbent sponges.
Prepping your Sink for a Date with the Outlet Box
Before you can introduce your sink to its new outlet pal, you’ll need to prepare the area. First things first, turn off the power to the circuit you’ll be working on. Trust me, sparks flying around while you’re elbow-deep under the sink is not the recipe for a good time.
Next, grab a drill and create a small hole on the side of your sink cabinet. This is where your outlet box is going to make its grand entrance. Just think of it as giving your sink some much-needed piercings to spice up its life.
Choosing the Perfect Outlet Box
Now that you’re ready to choose the star of the show, the under sink outlet box, be sure to go for a waterproof and corrosion-resistant option. You want something that will stand strong against splashes and drips without a hint of rust. Remember, this box is going to be the place where your outlet and wires can kick back and relax in watery environments.
The Art of Box Installation
With your chosen outlet box in hand, it’s time to show your sink who’s boss. Position the box over the hole you drilled earlier and trace its outline with a marker. Take a deep breath and grab your jigsaw, then carefully cut along the outline. It’s like giving your sink a fancy new haircut!
Now that your sink has a stylish opening, it’s time to insert the outlet box. Gently push it into place and secure it with screws. Feel free to give it a congratulatory pat on the back while you’re at it.
Ready to Get Connect-ed
Once your outlet box is snugly in place, you can start connecting the wires. Remember to follow the manufacturer’s instructions closely to ensure a safe and successful installation. And don’t forget to cap off any unused wires with wire nuts. We don’t want any rogue wires causing trouble!
The Final Performance
With wires connected and everything properly sealed, it’s time to give your outlet and new box BFF the ultimate test. Flip that power switch back on and watch as your under sink outlet comes to life, ready to power your handy garbage disposal or sleek new dishwasher.
Now you’re all set! Sit back and revel in the satisfaction of a job well done. You’ve conquered the world of under sink outlet box installations with style, humor, and a sprinkling of electrical magic!
Happy DIY-ing!
Installing an Outlet for Your Dishwasher
So you’ve finally decided to install a new outlet for your dishwasher? Well, my friend, you’re about to embark on a journey that will make your kitchen the envy of all your neighbors. Buckle up, because I’m about to guide you through the magical world of outlet installation.
Preparing for the Task
Before you dive headfirst into this electrifying adventure, make sure you have all the necessary supplies. You’ll need wires, wire nuts, a junction box, and, of course, an outlet. Don’t forget your trusty electrical tape – it’s about to become your new best friend!
Finding the Perfect Location
Now that you’re armed with your electrical arsenal, it’s time to find the perfect spot to install your new outlet. Remember, we’re talking about a dishwasher outlet here, so make sure it’s conveniently located to power the beast. You don’t want to be stumbling over cords every time you unload those sparkling dishes!
The Art of Wiring
Ah, the art of wiring – it’s like doing a jigsaw puzzle, except the stakes are slightly higher. Before you get tangled up, make sure you turn off the power to avoid any shocking surprises. Safety first, my friend!
Start by connecting the wires to the junction box, being extra careful to match those colors like a pro. Then, attach the wires to the outlet using those beautiful wire nuts. You’re really nailing this, aren’t you?
Testing, Testing, 1, 2, 3!
Now comes the moment of truth – testing your handiwork. Go ahead and turn that power back on, and let there be light! Well, not actual light, but you know what I mean. Plug in your dishwasher and give it a whirl. If everything’s working like a charm, pat yourself on the back, because you, my friend, are an electrical genius!
A Word of Caution
Before I release you into the wild, let me remind you of a few things. One, electricity is no joke. If you’re not comfortable with any of the steps I’ve outlined, don’t hesitate to call a professional. Two, double-check your local building codes to make sure you’re following the rules. We don’t want any unexpected fines ruining your day!
Now, go forth and conquer that dishwasher outlet installation like the superhero you are. Your sparkling dishes await!
Can You Install an Outlet Under the Sink
If you’ve ever found yourself desperately needing an outlet near your kitchen sink, you’ve probably wondered if it’s possible to install an outlet under the sink. After all, who wants to trip over cords or stretch across the counter just to power your blender or charge your phone? Well, fear not, my friend, because I’m here to tell you that installing an outlet under the sink is indeed possible.
Safety First, Always!
Before we dive into the nitty-gritty of installing an outlet under the sink, let’s talk about safety. I mean, we’re dealing with electricity here, and as much as we love a little spark in our lives, safety should always come first. Remember to turn off the power, use proper tools, and if you’re not confident in your DIY skills, it’s best to call a professional electrician.
Gather Your Tools and Materials
To get started on this electrifying adventure, you’ll need a few tools and materials. Don’t worry, it’s nothing too complicated – just a circuit tester, wire strippers, electrical tape, a screwdriver, wire nuts, an electrical box, and, of course, a GFCI (Ground Fault Circuit Interrupter) outlet. Now that you’re all geared up, let’s get down to business.
Fish That Wire!
No, I don’t mean you should grab a fishing rod and try to catch an electric eel. I’m talking about fishing the wire through the depths of your kitchen cabinets. It’s a bit like the old saying, “There are plenty of fish in the sea,” except in this case, it’s more like, “There are plenty of wires in the cabinet.” So grab that fish tape or a coat hanger (if you’re feeling MacGyver-ish) and carefully guide the wire from the desired outlet location to under the sink.
Box It Up, Buddy!
Now that you’ve successfully fished the wire to its destination, it’s time to bring out the electrical box. Think of it as a cozy little home for your outlet. Install that baby under the sink, making sure it’s secure and level. We don’t want any wonky outlets ruining your kitchen’s feng shui now, do we?
Connect the Dots, or Wires… You Know What I Mean
You’re in the homestretch now. Take those wire strippers and strip about three-quarters of an inch of insulation off the end of each wire. Then, connect the black wire to the brass screw, the white wire to the silver screw, and the green or bare wire to the grounding screw. Make sure those connections are tight and snug, just like a group hug with your outlet, wires, and electrical box.
Test It, Baby!

You’re almost there! Before you do a victory dance, it’s essential to test your handiwork. Turn the power back on, and use that trusty circuit tester to check if everything is working as it should. Give your new outlet a whirl by plugging in your favorite kitchen gadget. Voilà! You’re officially a DIY electrician with an outlet under the sink.
Installing an outlet under the sink may seem like a daunting task, but with proper safety measures, the right tools, and a little bit of determination, you can do it. Just remember to take your time, follow the steps carefully, and if all else fails, don’t hesitate to call a professional. Happy outlet-ing!
How to Add an Outlet Under the Sink
Gather Your Tools
Before embarking on the electrifying journey of adding an outlet under your sink, let’s make sure you have all the necessary tools to get the job done. Besides your enthusiasm and a can-do attitude, here’s what you’ll need:
Materials:
- Outlet box and cover plate
- Romex electrical cable
- Wire connectors
- Electrical tape
Tools:
- Drill
- 1 ¼-inch drill bit
- Screwdriver
- Wire stripper
- Pliers
- Voltage tester
Step 1: Cut Off the Power Supply
First things first, we don’t want you to electro-fry yourself while trying to install an outlet under your sink. Go to your electrical panel and switch off the circuit that supplies power to your kitchen. Double-check that the power is indeed off by using a voltage tester. Safety first, folks!
Step 2: Choose a Spot for Your Outlet
Now that you’ve ensured your own well-being, it’s time to decide where you want to install the outlet. Pick a spot under the sink that is easily accessible and won’t interfere with any plumbing or other obstructions. Measure twice, drill once!
Step 3: Drill a Hole
Drilling is always fun, right? Use a 1 ¼-inch drill bit to create a hole in the cabinet wall where you want your outlet to reside. Keep in mind that the hole should be close to an existing electrical source, like a nearby outlet or junction box.
Step 4: Install the Outlet Box
Get your outlet box ready and secure it in the hole you just drilled. Make sure it’s level and secure it with screws. Be gentle, no need to over-tighten and cause unnecessary damage.
Step 5: Connect the Wires
Time for some electrical bonding! Strip the outer coating of your Romex cable to expose the black, white, and bare copper wires. Connect the black wire (also known as the “hot” wire) to the brass screw, the white wire (or the “neutral” wire) to the silver screw, and the bare copper wire (the “ground” wire) to the green screw. Use wire connectors and tighten them firmly.
Step 6: Neatly Tuck in the Wires

Nobody likes messy wires hanging around, so let’s clean things up a bit. Gently push the connected wires inside the outlet box and make sure they are neatly arranged. Smooth operator!

Step 7: Attach the Outlet Cover Plate
The finishing touch! Snap the outlet cover plate onto the outlet box to keep everything looking neat and protected. Admire your handiwork, even if it’s under the sink where no one else can see it.
Step 8: Celebrate!
Congratulations, you’ve successfully added an outlet under your sink! Now you can plug in that fancy garbage disposal, a mythical dishwasher that actually cleans dishes, or whatever other electrical appliance your heart desires. You’re officially a handy person!
Remember, electrical work should always be approached with caution. If you’re not confident in your abilities or have any concerns, it’s best to consult a professional electrician who can help you out. Safety is no joke, folks!
Does Outlet Under Sink Need to Be GFCI
What is GFCI
GFCI stands for Ground Fault Circuit Interrupter, but let’s just call it a safety superhero. It’s like Batman, but for electricity. It protects you from dangerous shocks by swiftly interrupting the power when it senses even a tiny bit of electrical leakage. How considerate!
Outlet Under Sink: The Danger Zone
While a sink may feel like a cozy spot for an outlet, it can also be a potential danger zone. Imagine a mishap involving water and electricity—yikes! So, does that mean you need a GFCI outlet specifically for this area? Well, hold onto your electrons, because here’s the deal.
Code Compliance Comes First
According to our trusty electrical code overlords, the National Electrical Code (NEC), any outlet within six feet of a sink in a kitchen, bathroom, or other wet locations must be GFCI protected. So, yes, if you want to stay on the right side of the electrical law, you’ll need a GFCI outlet under your sink.
The Water Ballet Scenario
Picture this: you’re doing the dishes (or basically, reenacting a synchronized swimming routine with dirty plates). Suddenly, water sprays all over, reaching the depths of your under-sink realm. Without a GFCI outlet, this aquatic extravaganza could turn into a shocking experience. But with a GFCI outlet in place, that potentially shocking situation will be swiftly neutralized, just like Aquaman taking control of a wild wave.
GFCI-Proofing your Sink Area
If you’ve discovered that your outlet under the sink is missing its GFCI superpowers, fear not! It’s a relatively simple fix. You can either replace the outlet with a GFCI one, or if your outlet is serving other outlets downstream, you can install a GFCI breaker in your electrical panel. Whichever route you choose, just make sure you have the GFCI protection in place to keep your underwater adventures safe (and shock-free).
To answer the burning question—yes, your outlet under the sink needs to be GFCI. It’s not just a legal requirement; it’s a wise safety measure. So, let your outlet be a superhero, protecting you from shocking surprises while you’re scrubbing dishes or singing in the shower. Stay safe, my electrically enlightened friends!
What Type of Outlet for Garbage Disposal
When it comes to installing an outlet for your garbage disposal, you might be wondering what type of outlet you should use. After all, you don’t want your disposal to blow a fuse or cause an electrical disaster in your kitchen. So let’s dive into the types of outlets that are suitable for your garbage disposal needs.
Standard Outlets: The Basic Option
The most common type of outlet found in kitchens is the standard 120-volt outlet. These outlets are a safe and reliable choice for powering your garbage disposal. Plus, they’re easily accessible, and you may already have one in your kitchen. Just make sure the outlet is grounded for added protection against electrical shocks.
GFCI Outlets: The Extra Safety Measure
If you want an extra layer of protection for your garbage disposal, consider installing a Ground Fault Circuit Interrupter (GFCI) outlet. These outlets are designed to prevent electrical shocks and are required by code in many areas near water sources. So, if you regularly splash water around while washing your dishes, this might be the best option for you. Just imagine, with a GFCI outlet, you can safely dance around your sink without worrying about getting zapped!
Switched Outlet: A Convenient Choice
Now, here’s where things get interesting. If you want to control your garbage disposal with a switch, you’ll need a switched outlet. This nifty contraption allows you to turn your disposal on and off without having to plug and unplug it all the time. It’s like having a magic button to summon the garbage disposal fairy. Just press the switch, and voila! No more leftover food scraps clogging up your pipes.
USB Outlet: For Tech-Savvy Kitchens
Okay, this one is not a necessity, but it’s definitely a cool addition. If you consider your kitchen a high-tech marvel, why not install a USB outlet along with your regular outlet for the garbage disposal? You can conveniently charge your phone or tablet while you’re busy cooking up a storm. It’s like multitasking at its finest – disposing of garbage and charging your devices all in one place. Talk about modern convenience!
So, there you have it – the different types of outlets for your garbage disposal. Whether you go with a standard outlet for simplicity, a GFCI outlet for added safety, a switched outlet for convenience, or even a USB outlet for the tech-savvy kitchen, there’s an option to suit your needs. Now, go forth and install that outlet with confidence, my friend! But remember, if you’re not confident in doing electrical work yourself, it’s always best to hire a professional to ensure everything is done safely and up to code. Happy disposing!
How to Wire a Garbage Disposal Switch and Outlet
So, you’ve finally decided to tackle the daunting task of wiring a garbage disposal switch and outlet? Don’t worry, we’ve got your back! In this section, we’ll walk you through the process in a way that’s both informative and entertaining. Let’s get started, shall we?
Step 1: Prepare for the Wiring Adventure
Before diving into the world of electrical wiring, it’s essential to take some necessary precautions. First, make sure you have all the proper tools at your disposal (pun intended). You’ll need wire cutters, wire strippers, a voltage tester, and, of course, a healthy dose of bravery.
Step 2: Turn Off the Power
Before you even think about touching a wire, locate your home’s circuit breaker panel and flip the switch for the area where you’ll be working. This step is crucial for avoiding unexpected jolts of electricity that can instantly transform you into a human lightning rod. Trust us, that’s a shocking experience you’d rather avoid.
Step 3: Connect the Wires
Now it’s time to get up close and personal with those wires. Start by removing the cover plate from the outlet box and pulling the wires out, being careful not to disturb any friendly neighborhood spiders that may have taken up residence there.
Note: Make sure to consult the manufacturer’s instructions for your specific garbage disposal switch, as wiring requirements may vary.
Step 4: Nutting It Together
Gather the black wires together (no, not for a secret society meeting) and attach them using a wire nut. Repeat this process with the white wires and the ground wires, making sure to connect like colors together. They say opposites attract, but when it comes to electrical wiring, keeping things together is the way to go.
Step 5: Testing, Testing, 1, 2, 3
Once you’ve completed all the connections, it’s time to unleash your inner mad scientist and test your creation. Use a voltage tester to make sure the power is off, and then turn it back on to check if everything is working as expected. If the light on the tester flickers, it’s alive! Sorry, we couldn’t resist a Frankenstein reference.
Step 6: Tidy It Up
Last but not least, take a moment to tidy up your masterpiece. Gently fold the wires back into the outlet box, fasten the cover plate securely, and admire your handiwork. Just like a fancy work of art, your newly wired garbage disposal switch and outlet should be both functional and aesthetically pleasing.
And there you have it! Wiring a garbage disposal switch and outlet doesn’t have to be a hair-raising experience. With our step-by-step guide, a little know-how, and a touch of humor, you’re now ready to impress your friends and family with your electrical prowess. Good luck, and remember to always prioritize safety and double-check your work. Happy wiring!
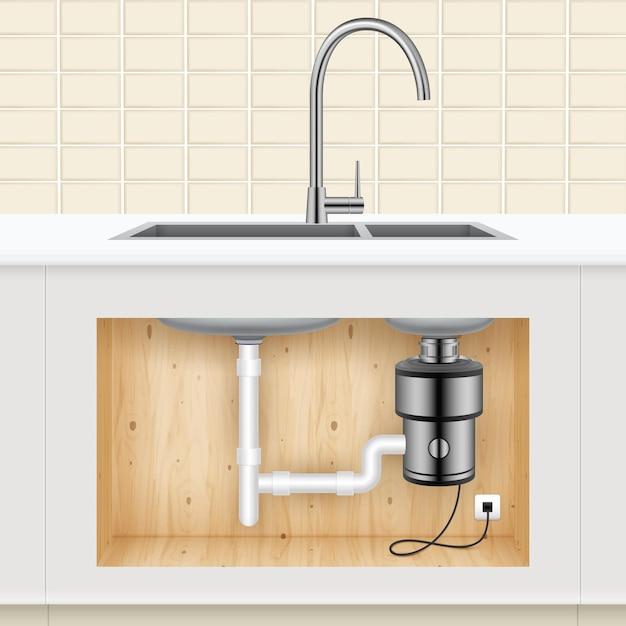
Outlet Under Sink for Garbage Disposal and Dishwasher
You’ve finally moved into your dream house, but there’s one problem – the lack of outlets under the sink for your garbage disposal and dishwasher. We all know that sinking feeling when we realize we need an outlet in that exact location. But fear not, for I have some tips and tricks to help you install a new outlet under your sink without losing your mind.
Why Do I Need an Outlet Under the Sink
Before we dive into the how-tos, let’s address the why. Having an outlet under the sink is essential for powering up your garbage disposal and dishwasher. It’s a convenient and space-saving solution that keeps those unsightly cords hidden away. Plus, it eliminates the need for those long, cumbersome extension cords that always seem to tangle themselves into knots.
Planning Your Outlet Under the Sink
Now that we know why we need that outlet, let’s get down to business. First things first, gather your tools. You’ll need a drill, a power cable, wire nuts, a screwdriver, and a healthy dose of patience. Trust me, this process is like solving a Rubik’s Cube – it may seem complicated at first, but with a little perseverance, you’ll have it mastered in no time.
Step 1: Turn Off the Power
Safety first, folks! Before you start drilling holes and making electrical connections, make sure to turn off the power to the area where you’ll be working. The last thing we want is a shocking experience, and not the good kind!
Step 2: Choose Your Location
Next, you need to decide where to install the outlet. Pick a spot that’s easily accessible, preferably near the appliances you’ll be powering. Remember, accessibility is key because you don’t want to start doing yoga poses just to reach that hidden outlet.
Step 3: Drill Baby, Drill
Now comes the fun part – drilling a hole for the cable. Choose a drill bit size that matches the diameter of your cable. Go slow and steady, just like that tortoise in your favorite childhood fable.
Step 4: Wiring Wonders
Once the hole is drilled, it’s time to connect the wires. Strip the cable and expose the individual wires. Match the colors – black to black, white to white, and green to green. Secure each connection with a wire nut, making sure there are no loose ends. Think of it as giving each wire a warm, fuzzy hug.
Step 5: Mount the Outlet
Almost there! Take your outlet and mount it in place, securing it with screws. It’s like putting the final piece in a puzzle – satisfying and oddly fulfilling.
Step 6: Power It Up
Now that everything is in place, it’s time to restore the power. Flip the circuit breaker back on and witness the glorious moment when your garbage disposal and dishwasher come to life!
Voila! You’ve successfully installed an outlet under the sink, and you didn’t even break a sweat. It’s a victory worth celebrating! So go ahead, propose a toast to your newfound outlet, and relish in the joy of never having to crawl under your sink ever again. Cheers!
How Much Does It Cost to Install an Outlet Under a Sink
So, you’ve decided to take the plunge and install an outlet under your sink. Maybe you want to plug in your fancy new garbage disposal or have a convenient spot to charge your electric toothbrush. Whatever the reason, you’re probably wondering how much this little project is going to cost you. Well, fear not, my curious friend, for I am here to reveal the secrets of outlet installation pricing.
Electrician Fees: The Shocking Truth
When it comes to electrical work, it’s always best to leave it to the professionals. Hiring an electrician to install an outlet under your sink is like hiring a superhero to save the day—except instead of capes, they wear tool belts. While the cost will vary depending on your location and the complexity of the job, you can expect to pay around $150 to $300 for this electrifying service. Keep in mind that this usually includes the cost of materials and labor, so you won’t need to worry about shocking additional expenses.
Material Costs: Finding the Outlet-timate Deal
Now, let’s talk about the materials you’ll need for this project. The main star of the show is, of course, the outlet itself. You can find a basic outlet for as little as $5, but if you’re feeling fancy and want some extra features like USB ports or weather resistance, you might be looking at spending $20 to $30. Don’t forget the electrical wire, which will set you back around $0.50 to $1 per foot. And of course, you’ll need some electrical tape and wire connectors, which won’t cost you more than a few bucks. All in all, you can expect to spend around $20 to $50 on materials, depending on your outlet preferences.
Hidden Costs: They’re Sinking to New Depths
Unfortunately, there are often some hidden costs associated with any home improvement project, and installing an outlet under your sink is no exception. You might need to hire a plumber if you’re not comfortable disconnecting and reconnecting any plumbing fixtures, which could add another $100 to $200 to the final bill. And let’s not forget about building permits, which can vary greatly depending on your location. These pesky permits can set you back anywhere from $50 to $500, so it’s best to check with your local authorities to make sure you’re up to code.
Time is Money: The Clock is Ticking
Now, let’s talk about everyone’s favorite currency: time. While I can’t put an exact price on how long it will take to install an outlet under your sink, I can tell you that it’s a relatively quick job for an experienced electrician. We’re talking a couple of hours, maybe less if they’re feeling extra zippy. Of course, if there are any unexpected hurdles like tricky wiring or stubborn plumbing, the clock might keep on ticking. But hey, at least you’ll have a shiny new outlet under your sink when it’s all said and done!
In conclusion, installing an outlet under a sink is a relatively affordable project, costing around $150 to $300 for the electrician fees and an additional $20 to $50 for materials. Don’t forget to factor in any hidden costs like plumber fees and building permits. And remember, my friend, when it comes to electrical work, it’s best to leave it to the professionals unless you fancy yourself a superhero with a tool belt.