Are you looking to give your painted table a durable and long-lasting finish? Waterproofing your painted table is essential to protect it from everyday wear and tear, spills, and moisture damage. Whether you want to seal a table for outdoor patio use or simply want added protection indoors, this comprehensive guide will walk you through the steps of waterproofing a painted table.
In this blog post, we will cover everything you need to know, from the best clear coats for painted wood to the difference between polyurethane and Polycrylic. We will also address common questions like whether you can apply water seal over painted wood and the importance of sanding between coats of Polycrylic. Whether you’re a beginner or a seasoned DIY enthusiast, this guide will help you achieve a smooth and beautiful finish that stands the test of time. So, let’s dive in and discover how you can make your painted table waterproof and preserve its beauty for years to come.
How to Protect Your Precious Painted Table from Water Damage
So, you’ve got yourself a beautifully painted table. It’s a work of art, a statement piece in your home. You love it, cherish it, and want to make sure it stays looking gorgeous for years to come. But, uh-oh, here comes a spill! Don’t panic just yet! In this handy guide, we’ll show you how you can waterproof your painted table and keep it safe from the dreaded water damage monster. Ready? Let’s dive in!
1. Choose the Right Waterproofing Product
Not all waterproofing products are created equal. When it comes to your beloved painted table, you want to pick a product that’s specially designed for wood surfaces. Look for a waterproofer that has a proven track record and good customer reviews. Don’t skimp on quality here, or you might end up with a table that looks like it’s been through a tropical storm!
2. Prepare Your Table for the Waterproofing Process
Before applying any waterproofing product, you need to make sure your painted table is clean and dry. Give it a gentle wipe down with a damp cloth to remove any dust or dirt. Then, let it air dry completely. Remember, water and waterproofer don’t mix well, so you want to start with a dry canvas for the best results.
3. Apply the Waterproofing Product
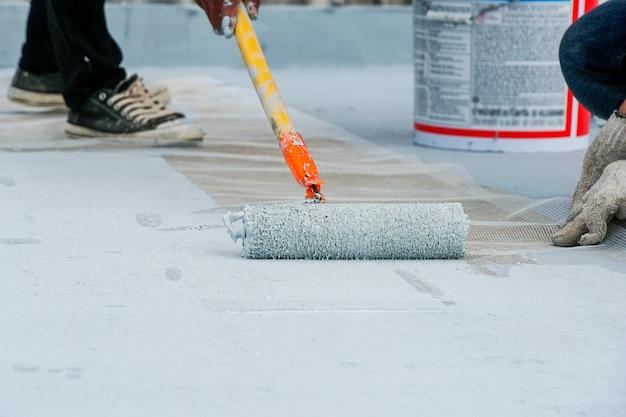
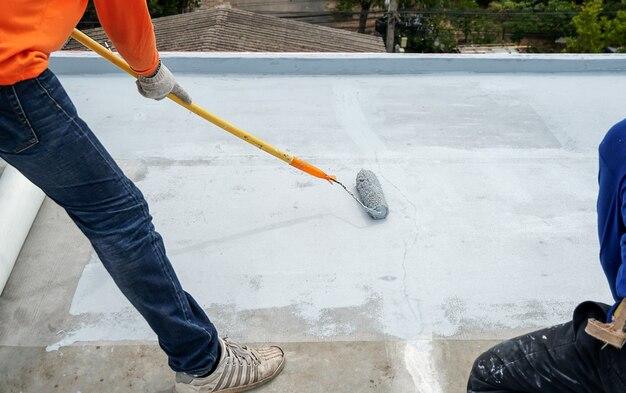
Now that your table is prepped and ready, it’s time to apply the magic waterproofing potion. Grab a brush or sponge and start coating your table with the waterproofing product. Make sure to cover the entire surface, including the legs and edges. Apply a thin and even layer, allowing the product to penetrate the wood. Don’t rush this step—you want to give your table the best protection possible.
4. Let It Dry and Repeat
Once you’ve expertly applied the waterproofing product, give it some time to dry. Follow the manufacturer’s instructions for drying time, as it can vary depending on the product. Once it’s fully dry, check for any missed spots or areas that could use an extra coat. Repeat the process if necessary, ensuring every inch of your table is well-sealed against water damage.
5. Enjoy with Confidence
Congratulations! You’ve successfully waterproofed your painted table. Now you can relax and enjoy it without worrying about accidental spills or water rings ruining the lovely finish. Just remember to clean up any spills promptly, as waterproofing will protect your table to a certain extent, but it’s not a license to be careless. So go ahead and showcase your table’s beauty to the world, fearlessly!
6. Bonus Tip: Add Coasters for Extra Protection
If you want to go the extra mile in protecting your painted table, consider adding some stylish coasters. These nifty little accessories will provide an extra layer of defense against water marks and heat damage. Plus, they can add a touch of personality to your table and make it even more Instagram-worthy. Who says practicality can’t be cute?
Now that you have the insider’s guide on how to waterproof your painted table, you can confidently tackle any spill or leak that comes its way. Remember, a little TLC goes a long way in preserving the beauty and longevity of your cherished furniture. So go forth, my friend, and let your painted table shine (without fear of water damage)!
That’s it for this subsection! Stay tuned for more fantastic household tips and tricks.
FAQ: How Do You Waterproof a Painted Table
How do you seal a painted table top
To seal a painted table top and protect it from moisture, you can follow these steps:
- Clean the surface: Begin by ensuring the table top is clean and free of any dust or debris. Give it a gentle wipe down with a damp cloth.
- Sand the painted surface: Lightly sand the painted surface using fine-grit sandpaper. This step helps the sealer adhere better and creates a smoother finish.
- Choose a sealant: Select a clear coat that is suitable for painted wood. You can consider options like polyurethane, Polycrylic, or epoxy resin, depending on the desired level of protection and the look you want to achieve.
- Apply the sealant: Using a brush or foam applicator, apply the sealant evenly over the painted surface, following the manufacturer’s instructions. Ensure full coverage and smooth strokes.
- Allow drying time: Let the sealant dry completely according to the recommended drying time mentioned on the product label.
- Apply additional coats (optional): If desired, you can apply additional coats of the sealant for added durability and protection. Remember to sand lightly between coats.
- Cure the sealant: Give the sealant ample time to cure and harden. This typically takes a few days, but refer to the product instructions for specific recommendations.
- Enjoy your waterproof table: Once the sealant is fully cured, your painted table top will be waterproofed and ready to withstand daily use.
What is a good clear coat for painted wood
When it comes to finding a good clear coat for painted wood, there are several options available. These include:
- Polyurethane: A popular choice, polyurethane provides a durable and protective finish. It comes in both oil-based and water-based formulas, offering different drying times and levels of sheen.
- Polycrylic: Similar to polyurethane but with a water-based formula, Polycrylic is known for its quick-drying properties and clear, non-yellowing finish. It is ideal for lighter-colored paints.
- Epoxy resin: Used primarily for creating a high-gloss and extremely durable finish, epoxy resin is a great option if you want to achieve a professional look. However, it can be more challenging to apply compared to polyurethane or Polycrylic.
- Varnish: Varnish is another traditional option for clear coating painted wood. It provides excellent protection against water and other liquids. However, varnish tends to have a slightly yellowish hue.
The choice of clear coat depends on your personal preferences, the type of wood, and the desired finish. Consider factors such as drying time, durability, ease of application, and the level of sheen you want to achieve.
What to put over acrylic paint to protect it
To protect acrylic paint and ensure its longevity, you can apply a clear sealant over it. Here are a few options to consider:
- Varnish: Applying a varnish over acrylic paint helps protect it from moisture, light, and general wear and tear. Choose a varnish specifically designed for use with acrylic paint.
- Acrylic sealer: Acrylic sealers come in spray form, making them convenient for applying an even coat without brush strokes. They provide a clear and protective layer that preserves the colors and finish of your acrylic artwork.
- Polycrylic: A water-based clear coat, Polycrylic is another suitable option for protecting acrylic paint. It dries quickly and doesn’t yellow over time, making it ideal for preserving the vibrancy of your artwork.
Always make sure to read and follow the manufacturer’s instructions for the specific sealant you choose to ensure proper application and effective protection.
What can I put over painted wood
To enhance the durability and longevity of painted wood surfaces, you can apply various protective coatings. Here are a few options to consider:
- Polyurethane: A clear coat of polyurethane works well to protect painted wood. It forms a hard and glossy finish, shielding the paint from moisture, stains, and scratches.
- Polycrylic: Similar to polyurethane but with a water-based formula, Polycrylic is an excellent choice for preserving the natural appearance of painted wood. It provides a clear, protective layer without yellowing over time.
- Varnish: Varnish is a traditional protective coating that provides a durable finish for painted wood. It adds a layer of protection against moisture, fading, and general wear and tear.
- Epoxy resin: If you’re looking for superior durability and a high-gloss finish, epoxy resin is a great option. It creates a hard and waterproof surface, perfect for tabletops or heavily used painted wood items.
Consider the specific requirements of your project and the aesthetic you desire when selecting the most suitable protective coating for your painted wood.
Can you put water seal over painted wood
Yes, you can apply a water seal over painted wood to provide additional protection. Water sealants, such as Thompson’s WaterSeal or other waterproofing products, are designed to repel moisture and help prevent damage to the wood.
When using a water seal over painted wood, keep the following tips in mind:
- Ensure the painted surface is clean and free of dust before applying the water seal.
- Test the water sealant on a small, inconspicuous area first to ensure it does not affect the paint color or cause any undesirable reactions.
- Follow the manufacturer’s instructions for application, including any recommended drying times and additional coats.
- Be aware that applying a water seal over painted wood may slightly alter the appearance of the paint, intensifying the sheen or making it slightly darker.
By applying a water seal over painted wood, you can provide an extra layer of protection against moisture and extend the life of your painted surfaces.
What happens if you don’t sand between coats of Polycrylic
Sanding between coats of Polycrylic is an important step that helps create a smooth and flawless finish. If you skip this step, you may encounter a few issues:
- Rough texture: Without sanding between coats, any imperfections or brushstrokes from the previous coat may remain visible on the surface. This can result in a rough and uneven texture.
- Poor adhesion: Sanding between coats helps to roughen up the surface slightly, allowing the next coat of Polycrylic to adhere better. Without this roughening, subsequent coats may not bond as effectively, leading to a weaker finish.
- Trapped debris: Sanding between coats helps remove any dust or other debris that may have settled on the previous coat. If you skip this step, the debris can become trapped under subsequent coats, leaving unsightly blemishes in your finish.
To achieve a professional and flawless result with Polycrylic, take the time to sand lightly between each coat. Use fine-grit sandpaper or a sanding block to create a smooth surface before applying the next coat.
What is the difference between polyurethane and Polycrylic
Polyurethane and Polycrylic are both clear coating options used to protect painted surfaces, but they differ in a few key ways:
- Formula: Polyurethane is available in both oil-based and water-based formulas, while Polycrylic is exclusively water-based. Oil-based polyurethane tends to have a slightly amber tone, which can impact the color of lighter paints, while Polycrylic dries clear, preserving the paint’s true color.
- Drying time: Polyurethane generally takes longer to dry and cure compared to Polycrylic. Oil-based polyurethane can take anywhere from 24 to 48 hours to dry, while Polycrylic typically dries within a few hours.
- Application: Polyurethane tends to be more challenging to apply evenly due to its viscosity, requiring careful brushwork to avoid brushstrokes. Polycrylic, on the other hand, has a thinner consistency, making it easier to achieve smooth and even coverage.
- Yellowing: Oil-based polyurethane has the potential to yellow over time, especially when applied to lighter-colored paints. Polycrylic, being water-based, does not yellow and maintains the true color of the paint.
Consider your specific project requirements, desired finish, and time constraints when deciding between polyurethane and Polycrylic as your clear coat.
Can you put a clear coat over paint
Absolutely! Applying a clear coat over paint is a fantastic way to protect the paint and enhance the overall appearance. Whether you’re working on furniture or other painted surfaces, a clear coat adds a protective layer that can withstand daily wear and tear.
Here’s a simple process to put a clear coat over paint:
- Prepare the surface: Ensure that the painted surface is clean and free of any dust or debris. Wipe it down with a damp cloth if necessary.
- Choose the appropriate clear coat: Consider factors such as the desired level of protection, the sheen you prefer, and the type of paint used. Options like polyurethane, Polycrylic, and acrylic sealers are great choices.
- Apply the clear coat: Use a brush or foam applicator to apply an even coat of clear coat over the painted surface. Work in smooth and consistent strokes to ensure proper coverage.
- Allow drying time: Follow the recommended drying time mentioned on the product label. Be patient and give the clear coat ample time to dry before applying any additional coats.
- Optional additional coats: If you desire extra durability or a higher sheen, you can apply additional coats of clear coat. Lightly sand between coats to create a smooth surface.
- Enjoy the protected surface: Once the clear coat is fully dry, your painted surface will have an added layer of protection and a beautiful finish.
Adding a clear coat over paint not only makes it more durable but also gives it a professional and polished look.
Should you use polyurethane over paint
Using polyurethane over paint is a popular choice for protecting and enhancing the appearance of painted surfaces. Polyurethane provides a strong and durable finish that can safeguard your paint from moisture, stains, and general wear and tear.
Consider the following factors when deciding whether to use polyurethane over paint:
- Desired sheen: Polyurethane is available in various sheens, including matte, satin, semi-gloss, and high-gloss. Determine the level of sheen that complements your painted surface.
- Level of protection: Polyurethane provides excellent protection against water, spills, and scratches, making it ideal for surfaces that will be used frequently or exposed to moisture.
- Ambering effect (oil-based): Keep in mind that oil-based polyurethane may add a slight amber tone to your paint job, which can be desirable for achieving an antique or aged look. However, it may alter the appearance of lighter-colored paints.
- Application method: Polyurethane can be applied with a brush, roller, or sprayer, depending on the surface and your personal preference.
Ultimately, using polyurethane over paint is a fantastic option for achieving a durable and protective finish. Consider the specific needs of your project and the desired aesthetic to determine if polyurethane is the right choice for you.
What do you seal painted wood with
Sealing painted wood helps protect the paint and enhances its longevity. Here are a few sealants commonly used for sealing painted wood:
- Polyurethane: A versatile sealant, polyurethane provides excellent protection against moisture, stains, and scratches. It comes in both oil-based and water-based formulas, offering different drying times and levels of sheen.
- Polycrylic: Particularly suitable for lighter-colored paints, Polycrylic is a water-based sealant that dries clear and doesn’t yellow over time. It is known for its quick-drying properties and ease of application.
- Varnish: Traditional varnish is another option for sealing painted wood. Its durable finish helps protect the paint from water damage and general wear and tear.
- Wax: Although not as protective as other sealants, applying a coat of wax over painted wood can add a subtle sheen and provide some additional moisture resistance. Wax is often used for decorative pieces or items that won’t have heavy use.
Consider the level of protection required, the desired sheen, and the specific characteristics of your painted wood when selecting the appropriate sealant.
How do you seal acrylic paint on a plastic table
When sealing acrylic paint on a plastic table, follow these steps to ensure a long-lasting finish:
- Prepare the surface: Clean the plastic table thoroughly, removing any dirt or debris. Use soap and water or a mild detergent. Rinse and let it dry completely.
- Apply a primer (optional): If the plastic is smooth or non-porous, consider applying a plastic primer before painting to improve adhesion and durability. Follow the instructions on the primer for application and drying times.
- Paint with acrylic paint: Use acrylic paint as your color choice for the plastic table. Apply multiple thin coats, allowing each coat to dry thoroughly before applying the next.
- Allow paint to cure: Once the final coat of paint is applied, let the table sit for several days to allow the paint to fully cure. Refer to the paint manufacturer’s instructions for the recommended curing time.
- Apply a clear sealer: To protect the painted surface and increase its longevity, apply a clear acrylic sealer. Opt for a spray-on sealer for convenient and even coverage. Follow the instructions on the sealer for application and drying times.
- Give ample drying time: After applying the clear sealer, allow sufficient drying time before using the table. Avoid placing any objects on the table until the sealant is fully dry and cured.
- Enjoy your sealed acrylic paint: Once dried and cured, your plastic table with sealed acrylic paint is ready to add a pop of color and style to your space while being protected from daily use.
How do I get a smooth finish with Polycrylic
To achieve a smooth finish with Polycrylic, follow these tips:
- Prepare the surface: Ensure the surface is clean, dry, and free from any dust or debris before applying Polycrylic.
- Use the right tools: Select a high-quality brush or foam applicator designed for applying water-based finishes. This helps minimize brush marks and creates an even application.
- Thin coats: Apply Polycrylic in thin coats rather than one heavy coat. Thick coats can result in uneven drying and an increased potential for visible brushstrokes.
- Work quickly and evenly: Apply the Polycrylic in smooth and even strokes, working in the same direction as the