Has the idea of adding wainscoting to your home crossed your mind? Or maybe you already have wainscoting in your hallway or living room but find yourself wondering how to seamlessly transition it to your door casing? Look no further! In this blog post, we’ll dive into the world of wainscoting and door casing, answering all your burning questions and providing step-by-step guidance on effortlessly integrating these two architectural elements.
Wainscoting, also known as wainscot paneling, is a decorative wall treatment that adds charm and character to any space. But should it be lighter or darker than your overall decor? And what about the width of the wainscoting panels? We’ll share our insights on these design considerations and more.
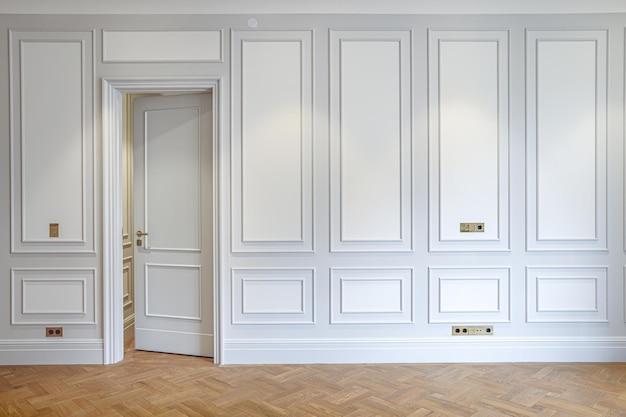
But what about door casing? If you’re not quite sure what it is, fear not! We’ll explain what door casing is and explore how it interacts with your wainscoting design. Learn how to stop wainscoting at door casing and understand if wainscoting has to match the trim.
So, whether you’re starting from scratch or looking to blend existing wainscoting with door casing, this guide has got you covered. Let’s jump right in and make your wainscoting-to-door-casing transition seamless and stunning.
How to Seamlessly Connect Wainscoting and Door Casing
Wainscoting adds a touch of elegance and charm to any room, but what happens when it meets the door casing? Transitioning wainscoting to door casing can be a challenging task, but fear not! We’ve got some expert tips and tricks to help you seamlessly connect these two architectural elements. So, let’s dive in and turn this potential design dilemma into a masterpiece!
Measure Twice, Cut Once
Before you start the transition process, precise measurements are essential. Grab your tape measure and jot down the measurements of both the wainscoting and the door casing. Remember, the key to a seamless transition lies in ensuring a perfect fit. So, measure not once, but twice to avoid any mishaps!
Level Up Your Skill Set
Now that you have the measurements locked down, it’s time to level up your skills. Grab your trusty level and a sharp pencil. Mark a straight line on the wall where the wainscoting will meet the top of the door casing. This line will serve as your guide, ensuring a flawless transition.
Make the Cut
Once your line is in place, it’s time to make the cut. Using a miter saw or a coping saw, carefully trim the edge of the wainscoting to meet the angle of the door casing. It might sound like a daunting task, but with a steady hand and a little bit of patience, you’ll have it looking perfect in no time. Remember, it’s always better to cut less than you think you need and make small adjustments if necessary.
File Away Imperfections
If you find any small imperfections or gaps after making the initial cut, don’t fret! Grab a fine file or sandpaper and gently smooth out any rough edges or discrepancies. This step will ensure that the transition is as seamless as possible and give your project that professional touch.
Bonding Time
Now that your wainscoting is perfectly aligned with the door casing, it’s time for a bonding moment. Apply a strong adhesive to the back of the wainscoting and carefully press it against the wall, ensuring it aligns with the marked line. Use clamps or painter’s tape to hold it in place until the adhesive dries completely.
Paint the Perfect Picture
The final touch to this seamless transition is a fresh coat of paint. Choose a color that complements both the wainscoting and the door casing to tie everything together. Take your time, apply multiple coats if necessary, and let your creativity shine!
There you have it! With these expert tips, transitioning wainscoting to door casing is no longer an uphill battle. Measure accurately, level up your skills, make precise cuts, file away imperfections, bond it all together, and paint your way to a flawless finish. Now, sit back, relax, and enjoy the fruits of your labor. Your wainscoting-to-door casing transition will have your guests asking for your DIY secrets. Happy renovating!
Let us know if you found these tips helpful and share your experiences in the comments below. We’d love to hear about your seamless transition triumphs!
FAQ: How To Transition Wainscoting To Door Casing
How do you finish beadboard edges?
When it comes to finishing beadboard edges, there are a few options you can consider. One popular method is to use edge trim or molding to create a clean and polished look. You can also use a router to create a decorative edge. Another option is to simply apply a coat of paint to the edges to match the rest of the beadboard. Whichever method you choose, make sure to sand and smooth the edges beforehand for a professional finish.
What is wainscot paneling?
Wainscot paneling refers to the decorative wooden panels that cover the lower portion of a wall. It is a popular architectural feature that adds charm and elegance to any space. Wainscot panels can be made from various materials, including wood, MDF, or PVC. They are installed vertically and often feature raised or recessed designs. Wainscoting not only adds visual interest to a room but also serves as a practical solution to protect walls from damage.
Should wainscoting be lighter or darker?
The choice of wainscoting color largely depends on your personal preference and the overall aesthetic you want to achieve. However, there are general guidelines you can consider. If you want to create a sense of openness and brightness, opting for lighter-colored wainscoting can help achieve that effect. On the other hand, darker-colored wainscoting can add drama and sophistication to a room. Ultimately, it’s important to choose a color that complements the overall color scheme and style of your space.
What is door casing?
Door casing, also known as door trim or door surround, refers to the decorative molding that surrounds a door frame. It serves both functional and aesthetic purposes. Functionally, door casing helps to conceal any gaps between the door frame and the wall, providing a finished look. Aesthetically, it adds a decorative touch and can enhance the architectural style of a room. Door casing is available in various styles and materials, allowing you to customize the look to suit your taste.
How wide should wainscoting panels be?
The width of wainscoting panels can vary depending on personal preference and the style you want to achieve. Generally, wainscoting panels range from 30 to 48 inches in width. However, it’s essential to consider the proportions of the room and the height of the walls to ensure a balanced and visually pleasing appearance. As a rule of thumb, aim for wainscoting panels that are approximately one-third the height of the wall.
Does wainscoting add value to your home?
Yes, wainscoting can indeed add value to your home. It is a classic architectural feature that adds charm and elegance, making your home more visually appealing to potential buyers. Additionally, wainscoting can also give the impression of higher-end craftsmanship and attention to detail. However, it’s essential to ensure that the style of wainscoting you choose complements the overall design and ambiance of your home to maximize its potential impact on resale value.
When should you not use wainscoting?
While wainscoting can enhance the aesthetic appeal of a space, there are some instances when it may not be the best choice. If you have very low ceilings, wainscoting can make the room feel even smaller and cramped. Additionally, if the walls are in poor condition or have significant imperfections, wainscoting may not be the best solution, as it will draw attention to these flaws. Ultimately, it’s important to assess the specific characteristics of your space and consult with a professional if you’re unsure about whether or not to use wainscoting.
How do you wainscot a hallway?
Wainscoting a hallway can add character and visual interest to this often overlooked area. To start, measure the height of your hallway walls and determine the desired height for the wainscoting panels. Next, choose your wainscoting material and style, such as raised panels or beadboard. Install the panels on the lower portion of the walls, leaving a small gap at the top for cap molding. Finally, finish off the wainscoting with baseboard molding at the bottom and cap molding at the top. Remember to paint or stain the wainscoting to match the overall color scheme of your hallway.
Does baseboard go on top of wainscoting?
No, baseboard does not go on top of wainscoting. Baseboard molding is installed at the bottom of the wall and serves to cover the joint between the wall and the floor. When installing wainscoting, the baseboard should be installed first and butt up against the bottom edge of the wainscoting panels. This creates a seamless and finished look, ensuring that the baseboard and wainscoting blend together seamlessly.
How do you stop wainscoting at door casing?
To stop wainscoting at the door casing, carefully measure the height of the wainscoting panels to align with the door casing. Use a miter saw to cut the panels at a 45-degree angle where they meet the door casing. This will create a clean and professional transition between the wainscoting and the door casing. Make sure to sand and touch up the cut edges for a polished finish.
Does wainscoting have to match trim?
Wainscoting does not necessarily have to match the trim, but it should complement it. Matching the wainscoting and trim color can create a cohesive and coordinated look. However, using contrasting colors can also create visual interest and highlight the architectural details. When choosing the colors for your wainscoting and trim, consider the overall style and color scheme of your space. Ultimately, the goal is to achieve a harmonious balance between the wainscoting and trim.
What is Backband casing?
Backband casing is a type of molding that is used to enhance the appearance of door casings and window trim. It is typically installed on top of the door or window casing to create a layered and more intricate look. Backband casing adds depth and dimension to the overall trim design and can make a significant impact on the visual appeal of a space. Its versatile design makes it compatible with various architectural styles, from traditional to contemporary.
Can you have too much wainscoting?
While wainscoting can add a touch of elegance and charm to a room, it’s important not to overdo it. Too much wainscoting can overwhelm the space and make it feel visually cluttered. It’s crucial to strike a balance between the wainscoting and other elements in the room. Consider the proportions of the space, the height of the walls, and the overall design aesthetic. If in doubt, start with a smaller area and gradually add more wainscoting if desired.
What do you put on top of wainscoting?
To finish off the top of wainscoting panels, you can use a cap molding or chair rail. A cap molding is a simple molding that runs horizontally along the top edge of the wainscoting, providing a clean and finished look. Alternatively, a chair rail can be used, which is a horizontal molding that serves both functional and decorative purposes. It helps to protect the walls from chair backs and can also create a visual division between the wainscoting and the upper portion of the wall.
What is band molding?
Band molding, also known as picture molding, is a decorative molding that is typically installed horizontally along the wall. Its primary purpose is to create a ledge for hanging artwork, mirrors, or other decorative items without the need for nails or screws. Band molding adds a touch of elegance and versatility to a space. It can also be used as a decorative border between different wall treatments or as a design feature itself.
How do you stop wainscoting in the middle of the wall?
If you need to stop wainscoting in the middle of the wall, you can create a clean and seamless transition. First, measure the desired height at which you want the wainscoting to stop. Using a level and pencil, mark this height on the wall. Use a saw to cut the wainscoting panels at a 45-degree angle along the marked line. Sand and touch up the cut edges as needed. This method allows you to create a professional-looking break in the wainscoting without any visible gaps or disruptions.
How do you hide beadboard seams?
To hide beadboard seams, careful installation is key. When installing beadboard panels, make sure to butt them tightly together to minimize any gaps. Apply wood filler or caulking to the seams, and use a putty knife or finger to smooth it out. Allow the filler or caulk to dry completely, and then sand it down until it is smooth and flush with the beadboard surface. Finish off by painting or staining the beadboard to blend the seams seamlessly with the rest of the paneling.
Is wainscoting outdated?
Absolutely not! Wainscoting is a classic architectural feature that has stood the test of time. While interior design trends may come and go, wainscoting remains a timeless element that can elevate the look of any space. With its versatility and ability to add depth and visual interest to walls, wainscoting continues to be a popular choice for homeowners and interior designers alike. So fear not, wainscoting is here to stay!
How do you install wainscoting on a door?
Installing wainscoting on a door requires careful measurement and preparation. First, determine the height at which you want the wainscoting to start on the door. Measure and mark this height on the door. Cut the wainscoting panels to the appropriate size, allowing for any necessary adjustments around the door frame. Apply construction adhesive to the back of the panels and carefully press them onto the door at the marked height. Secure the panels in place with finishing nails or a brad nailer. Finally, paint or stain the wainscoting to match the overall look of the door and surrounding space.