Are you looking to give your wooden furniture or floors a stunning new look without the hassle of sanding? You’re in luck! In this comprehensive guide, we’ll walk you through the process of staining wood without sanding, answering all your burning questions along the way.
Do you ever wonder if you have to remove varnish before staining? Or why your stain doesn’t seem to penetrate the wood? We’ve got you covered. We’ll also tackle whether you can stain over already stained wood or even go over a dark stain with a lighter one. And for those looking to refinish wood without stripping it, we’ll share some handy tips and techniques.
So, if you’re ready to transform your wood surfaces with a beautiful, new color without all the sanding fuss, let’s dive right in!
How to Stain Wood Without Sanding
So, you’ve decided to give your wooden furniture or floors a fresh new look with a beautiful stain. But here’s the catch – you don’t want to go through the tedious process of sanding. Well, fret not, my friend, because I’ve got a nifty little trick up my sleeve that will save you both time and effort. In this guide, I’ll show you how to stain wood without sanding. Let’s dive right in!
The Magic of Chemical Strippers
Ah, chemical strippers – the superheroes of the staining world. These magical potions can make your sanding woes disappear faster than a magician pulling a rabbit out of a hat. How do they work, you ask? Well, it’s quite simple. Chemical strippers contain powerful agents that dissolve the existing finish on your wood, allowing you to skip the sanding step altogether.
Step 1: Prep and Protect
Before unleashing the power of chemical strippers, it’s crucial to prep your work area and protect yourself. Lay down a drop cloth to catch any drips, and make sure to wear gloves and safety glasses to shield your precious skin and eyes from any potential mishaps. Safety first, my friend!
Step 2: Apply the Stripper
Now, it’s time to give that wood a taste of the magic potion. Apply a generous amount of the chemical stripper to the surface, making sure to cover every nook and cranny. Let the stripper work its magic for the recommended time, which is usually around 15-30 minutes. During this waiting period, you can whip up a tasty sandwich or perform an impromptu dance routine – the choice is yours!
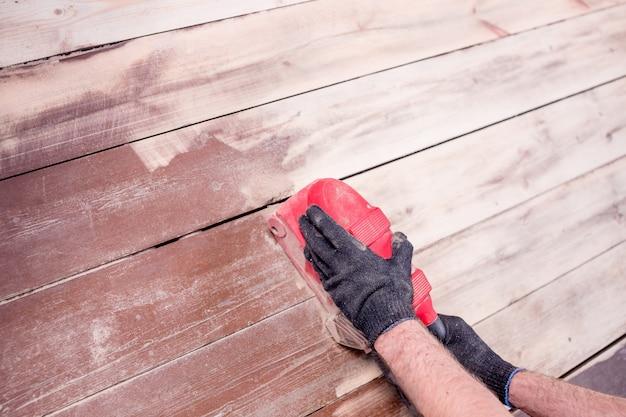
Step 3: Scrub or Scrape
Once the stripper has had enough time to do its thing, it’s time to get a little physical. Grab a scrub brush or a scraping tool and start removing the old finish from the wood. You’ll be amazed at how easily it comes off, almost as if by magic! If you encounter any stubborn spots, don’t give up – apply a little more stripper and let it work its charm for a bit longer.
Step 4: Clean and Dry
Now that you’ve successfully banished the old finish, it’s time to give your wood a little TLC to ensure a clean slate for your stain. Grab a clean cloth or sponge and dampen it with some mineral spirits. Give the wood a good wipe-down to remove any residue or lingering chemicals. Once you’re satisfied, let the wood dry completely before moving on to the next magical step.
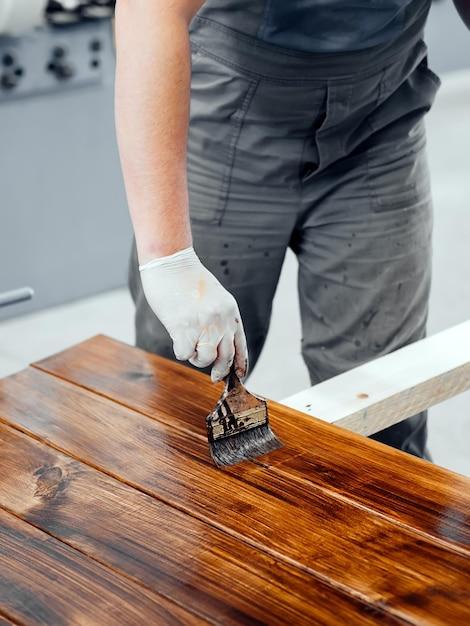
Step 5: Apply Your Stain of Choice
Ah, the grand finale is here – time to apply that luscious stain! Grab a high-quality brush or a clean cloth and dip it gently into the stain. Now, lovingly stroke the wood with long, even strokes, as if you’re brushing the mane of a majestic unicorn. Take your time and make sure every inch of the wood is coated. If you want a deeper color, you can apply multiple coats, allowing each one to dry before adding the next.
Step 6: Seal the Deal
After letting your stain dry for the recommended time (usually 24 hours), it’s time to lock in that beautiful color with a protective coat of sealer. You can use a clear polyurethane or lacquer to give your wood a glossy or matte finish, depending on your preference. Just like a knight in shining armor, the sealer will shield your stained wood from the wear and tear of daily life.
And voila! You’ve successfully stained wood without the hassle of sanding. Now sit back, relax, and admire your handiwork. Remember, my friend, with a little bit of magic and the right tricks up your sleeve, you can transform any piece of wood into a stunning work of art. Happy staining!
Note: Always remember to follow the instructions provided by the manufacturer of the chemical stripper and stain for the best results and safety precautions.
FAQ: How To Stain Wood Without Sanding
Do You Have to Remove Varnish Before Staining
Yeah, you definitely should. Think of it like trying to paint a wall that’s already coated with a thick layer of wallpaper. The stain won’t penetrate the wood properly, and you’ll end up with a lackluster finish. So do yourself a favor and strip off that varnish before staining. Believe me, your wood will thank you.
Why Is My Stain Not Penetrating the Wood
Well, there could be a few reasons for that. Maybe your wood is too smooth, and the stain is just sliding off like a penguin down a snowy hill. Or perhaps there’s old stain or finish still hanging around, repelling the new stain like a determined mosquito. Whatever the case, you might need to rough up the surface a bit or use a wood conditioner to help the stain find its way in. Don’t worry, you’ll get the hang of it!
Can You Stain Over Already Stained Wood
Well, technically you can, but it’s not always the best idea. It’s like trying to put on a new coat of nail polish on top of chipped polish. It’s not gonna look smooth and fabulous, is it? If you really want to stain over already stained wood, make sure to thoroughly clean and lightly sand the surface first. And hey, maybe consider trying a new shade to spice things up.
Can You Stain Over Dark Stain
Sure thing! Think of it as giving your wood a makeover. But hold your horses, cowboy! You can’t just slap on a lighter stain and call it a day. You’ll need to put some elbow grease into it—and by that, I mean sanding like there’s no tomorrow. Remove as much of the dark stain as possible before applying the lighter shade. It’ll take some time, but hey, beauty knows no sacrifice.
How Do You Refinish Wood Without Stripping It
Ah, the mystery of refinishing without stripping. It’s like finding a unicorn in your backyard. Here’s the secret: choose a gel stain, my friend. This magical stuff works wonders on existing finishes. Just clean the wood thoroughly, apply the gel stain, and voila! You’ve given your wood a brand new lease on life. Easy peasy, lemon squeezy.
Can You Go Over a Dark Stain with a Lighter Stain
In theory, yes. It’s like coloring over dark lines with lighter shades to brighten up a drawing. But remember, Wood Picasso, you’ll need to sand away as much of the dark stain as possible first. Once you’ve achieved a blank canvas, feel free to apply that lighter shade and let your creativity shine. Just be prepared to put in some elbow grease to make the magic happen.
What Is the Easiest Way to Remove Varnish from Wood
Oh boy, removing varnish is like trying to peel off a stubborn sticker from your favorite coffee mug. But fear not! A trusty chemical stripper will come to your rescue. Apply it, let it work its magic, and then scrape off that gunky varnish with a putty knife. Rinse and repeat if necessary. And remember, patience is a virtue, my friend.
How Much Should You Sand Wood Before Staining
As much as your biceps can handle, my fellow wood warrior! Seriously though, give that wood a good sanding session. Start with a coarse-grit sandpaper to remove any rough spots, then graduate to a fine-grit sandpaper for a smoother finish. Just make sure you don’t overdo it and end up with biceps the size of tree trunks. Balance is key!
Does a Second Coat of Stain Darken Wood
Absolutely! It’s like adding a second layer of flavor to your favorite dish—more richness and depth. If you want to darken the wood, go ahead and apply that second coat of stain. Just make sure to let the first coat dry completely before jumping in like a kid in a puddle. Oh, and remember to do it in a well-ventilated area. No one likes a dizzy woodworker.
What Do I Do If My Stain Is Too Dark
Oops! Did the stain party get a little too wild? No worries, my friend. You can lighten things up a bit. You’ll need to grab some fine-grit sandpaper and gently sand away the excess stain. Think of it as therapy for both you and your wood. Just be cautious not to overdo it, or you might end up with an uneven complexion. Nobody wants that.
What Happens If You Stain Unsanded Wood
Ah, staining unsanded wood—like throwing a party without sending out invites. The stain won’t adhere properly, and your wood will look like it’s wearing an ill-fitting suit. Don’t be that person. Set aside some time to sand that wood, making it smooth and ready for its stain makeover. Trust me, the end result will be worth the extra effort.
Can You Stain Over Varnished Wood Without Sanding
Well, you could try, but it’s like expecting a plant to grow without water. The stain just won’t penetrate the varnished surface properly. If you want to achieve a beautiful, long-lasting finish, it’s best to give that varnish the boot and sand the wood underneath. Don’t worry, it’ll be worth it in the end. Your wood will thank you with a dazzling new look.
Can You Stain Without Sanding
In some rare cases, my friend, you can skip the sanding. But beware, it’s like playing Russian roulette with your stain. You’ll need to meticulously clean the wood, use a quality wood conditioner, and pray to the stain gods that everything turns out fine. It’s a risky move, but hey, some people like living on the edge. Just brace yourself for any surprises that might come your way.
Should You Sand Wood Before Staining
Well, unless you want your wood to end up looking like it just rolled out of bed, a pre-stain sanding session is a must. Sanding smooths out any rough patches, removes old finishes, and helps the stain penetrate the wood more evenly. So grab that sandpaper and unleash your inner perfectionist. Your wood will thank you for the TLC.
How Can I Refinish My Furniture Without Sanding
Ah, the dream of refinishing without sanding. I hate to break it to you, but unless you stumble upon a genie who grants amazing DIY wishes, sanding is often unavoidable. But fear not, my furniture-loving friend! You can opt for a chalk paint or a milk paint that requires minimal sanding. It’s like a shortcut to furniture bliss. Just make sure to follow the instructions and let your inner artist shine.
What Happens If You Don’t Sand Wood Before Staining
Oh boy, hold onto your hats because it’s about to get ugly. When you skip the sanding step, the stain will cling to rough patches and old finishes like a clingy ex. It won’t penetrate the wood properly, resulting in an uneven and blotchy mess. Trust me, you’ll be staring at your wood in despair, wondering how it all went so wrong. So do yourself a favor and sand that wood. Your future self will thank you.
Can You Stain a Dark Wood Lighter
Absolutely! Think of it as giving your dark wood a sun-kissed glow. But fair warning, my friend: you’re in for some hard work. You’ll need to sand that dark wood until it’s pale and delicate, like a Victorian lady’s complexion. It won’t be easy, but hey, nothing great ever is. Once you’ve achieved that perfect canvas, apply a lighter stain, and watch your wood transform into something magical.
How Do You Darken Already Stained Wood
Ah, the allure of darkening already stained wood—it’s like adding a touch of mystery to the familiar. First things first, lightly sand the existing stain to remove any gloss or dirt that might hinder the darkening process. Then, my friend, it’s time to unleash the power of a darker stain. Apply it, let it work its magic, and witness your wood embrace its dark side. Just remember to do it in a well-ventilated area, because nobody wants to get high on wood stain fumes.
How Can I Change the Color of My Hardwood Floors Without Sanding
Oh, the hardwood floor drama! If you want to change the color without sanding, your best bet is using a stain that’s specifically designed for floors. These magical potions penetrate the wood without requiring the laborious sanding process. Just make sure to clean and prepare your floors properly before applying the stain. And remember, patience and attention to detail will lead you to floor nirvana.
How Do You Stain Over Existing Stain
Well, well, well, you rebel stain-artist, you! Staining over existing stain can be done, but it’s like trying to paint over a masterpiece—it better be worth it. Here’s the game plan: clean the wood, lightly sand to remove any gloss, prepare the surface with a wood conditioner if needed, and apply your new stain like a boss. Just remember, the previous stain will influence the final color, so choose wisely, my friend.
And there you have it, my wood-staining enthusiast! A comprehensive FAQ-style guide to staining wood without sanding. Now go forth and turn your wood into a work of art. Happy staining!
Disclaimer: This blog post offers general information and instructions. Please ensure to read and follow the specific guidelines provided by the stain manufacturer and consider the characteristics of your wood before proceeding with any staining project.