Are you struggling with water damage on your interior doors? Don’t worry, you’re not alone! Whether it’s a bathroom door frame that has been affected or a swollen door from water damage, this blog post will guide you on how to repair and restore your water damaged doors. From understanding the consequences of wet interior doors to practical solutions for repairing damaged MDF doors and frames, we’ve got you covered. So let’s dive in and learn how to give your doors a new lease on life!
Repairing Water Damaged Interior Doors
Water damage can be a real pain, especially when it affects your lovely interior doors. Don’t worry, though – we’ve got you covered! In this subsection, we’ll walk you through the process of repairing water damaged interior doors, step by simple step.
Assess the Damage
First things first – you need to assess the extent of the water damage. Look for any warping, discoloration, or swelling on your door. It’s like giving your door a mini check-up, just without the white coat and stethoscope.
Dry it Out
Time to dry out that poor, soggy door. Open it up and let the air work its magic. Maybe put on some upbeat tunes to cheer it up – “Don’t Stop Believin’” by Journey should do the trick. You can also use a dehumidifier or a fan to speed up the drying process. Just make sure not to blow it away!
Sand it Smooth
Once your door is dry and ready for the next step, grab some sandpaper and gently sand down any rough or swollen areas. Smooth it out like a magician doing a card trick. Abracadabra, water damage be gone!
Apply Some TLC
Now that your door is all sanded and smooth, it’s time to show it some tender loving care. Apply a wood conditioner to nourish the wood and bring back its vibrant glow. Think of it as a rejuvenating spa treatment for your beloved door.
Fill in the Gaps
If there are any cracks or holes caused by the water damage, fear not – there’s a filler for that! Grab some wood filler and carefully apply it to those affected areas. Smooth it out like you’re frosting a cake, but please don’t eat it.
Give It a Fresh Coat
Last but not least, it’s time to give your door a fresh coat of paint or stain. Choose a color that complements your interior décor and get creative with your brush strokes. Just remember, this is your chance to make your door shine like a superstar.
And voila! With a little time, effort, and some tender loving care, your water damaged interior door will be feeling like a brand new VIP. So, go ahead and tackle that repair like the DIY superhero you are. Your door will thank you – probably not vocally, but we promise it’ll be grateful.
Repairing Water-Damaged MDF Doors
Getting Rid of Moisture
When it comes to dealing with water damage on your beloved MDF doors, the first step is to get rid of any moisture that may still be lingering. You don’t want to leave any room for mold or further damage to develop, do you? To kickstart the drying process, wipe down the door with a clean, absorbent cloth. Alternatively, you can channel your inner magician and try using a hairdryer on low heat. Abracadabra, moisture be gone!
Filling in the Gaps
Once your door is moisture-free, take a closer look for any cracks or gaps that may have formed as a result of the water damage. We don’t want any uninvited drafts or critters making their way in, right? To seal those unsightly gaps, grab some wood filler and apply it generously. Smooth it out with a putty knife until it looks as good as new. Voila! Magic, right?
Sanding the Scars
Water damage can leave behind some unsightly scars on your poor MDF door. But fear not, we have a secret weapon – sandpaper! Grab a piece of fine-grit sandpaper and gently sand the affected areas. Keep going until the scars disappear, just like that embarrassing haircut you got in middle school. Dust off the excess residue and marvel at the transformation!
Time for Some Makeup
Now that your door is looking smooth and scar-free, it’s time to give it a brand new coat of paint or varnish. Choose a color that matches your style and start applying it with a brush or roller. Make sure to take your time and apply thin, even coats for a flawless finish. Your door will thank you for the makeover!
Prevention is Key
To avoid future water damage, it’s important to take preventive measures. Place a doormat by the entrance to catch any excess moisture from those rainy days. Install a waterproof seal at the bottom of the door to keep water at bay. And always remember, a little maintenance goes a long way in keeping your MDF door happy and water-damage free!
Repairing water-damaged MDF doors may seem like a daunting task, but with a little patience and a touch of magic, you can bring them back to their former glory. Say goodbye to those unsightly scars and embrace the beauty of a restored door. Remember, prevention is key, so take care of your doors and keep water damage at bay. Now go forth, armed with your newfound repair knowledge, and save those doors from the clutches of water damage!
Water Damage at the Bottom of the Door
Why Water Damage at the Bottom of the Door Is No Laughing Matter
When it comes to water damage, the bottom of the door is no exception. It may seem like a small issue, but if left untreated, it can lead to bigger problems. So, let’s dive into why water damage at the bottom of the door should be taken seriously.
The “Drippy Drip”
You may think that water damage at the bottom of the door is just a result of a few splashes here and there. But let me tell you, that “drippy drip” can cause some serious damage over time. Water can seep into the wood, causing it to warp and swell. Before you know it, your once perfectly functional door won’t even close properly.
The Sneaky Mold Monster
Ah, mold. The uninvited guest that thrives on moisture and humidity. And guess what? Water damage at the bottom of the door creates the perfect environment for our unwelcome friend. If you thought dealing with water damage was bad, just wait until mold starts to rear its ugly head. It not only looks unsightly but can also pose a health risk. Nobody wants that, right?
Stop the Water Invasion!
Now, don’t worry, my friend! There are some easy ways to repair and prevent water damage at the bottom of your door. Firstly, make sure to address any leaks or plumbing issues that may be causing the problem. Then, give your door some TLC by sanding down the damaged areas, applying a waterproof sealant, and repainting if necessary.
Prevention is Better Than a Door Repair Party
The best way to deal with water damage at the bottom of the door is to prevent it altogether. Install a splash guard or door sweep to keep water from sneaking in. And don’t forget to regularly inspect your doors and fix any issues before they become major headaches.
Water damage at the bottom of the door may not be the end of the world, but it’s certainly not something to take lightly. By addressing the issue promptly and taking preventive measures, you can keep your doors looking beautiful and functional for years to come. So, say goodbye to that “drippy drip” and keep the mold monster at bay!

Bathroom Door Frame Water Damage
Assessing the Damage
So, you’ve got some water damage on your bathroom door frame. Well, that’s just dandy! But fear not, my friend, because we’re about to tackle this problem head-on, with a smile on our faces and some handy tools in our hands. First things first, let’s assess the damage. Take a good look at the affected area and try to determine the extent of the problem. Is it just a small patch of discoloration, or is the wood starting to resemble a soggy piece of bread? The severity of the damage will determine the level of repairs needed.
Drying Out the Mess
Now that we have a clear picture of what we’re dealing with, it’s time to dry out the mess. Grab some dry towels and start mopping up the water. If the damage is more extensive, you might need to bring in some reinforcements, like a dehumidifier or a fan. The idea is to get rid of any moisture lurking around, as that could lead to further issues down the line. So, let’s get our drying game on and bid farewell to the dampness!
Filling the Gaps
Once everything is nice and dry, it’s time to fill in those pesky gaps. Nobody likes a gappy door frame, right? You can use some wood filler to even out the surface and make it look as good as new. Apply the filler and smooth it out with a putty knife, making sure to follow the instructions on the product. Once it’s dry, sand it down gently, and voila! Say goodbye to unsightly gaps and hello to a seamless bathroom door frame.
Adding a Fresh Coat
Now that we’ve taken care of the repairs, why not give our bathroom door frame a little makeover? Revamp it with a fresh coat of paint or stain, and watch it transform right before your eyes! Choose a color that complements your bathroom decor and start painting away. Don’t forget to protect the surrounding areas with painter’s tape and lay down a drop cloth, unless you’re aiming for a masterpiece on the floor too! Remember, a little paint can go a long way in giving your bathroom a fresh, new look.
Prevention is Key
Last but certainly not least, let’s talk prevention. Water damage can be a real downer, but there are steps you can take to avoid future mishaps. Make sure to keep an eye out for any signs of leaks or water damage in your bathroom and address them promptly. Regularly inspect the seals around your shower or bathtub and ensure they’re in tip-top shape. Additionally, adequate ventilation in your bathroom can help prevent excess moisture buildup, which could lead to damage over time. So, let’s wave goodbye to water damage and say hello to a happier, drier bathroom!
And there you have it! A comprehensive guide to repairing water-damaged bathroom door frames. Remember, a little humor and a positive attitude can go a long way when dealing with household mishaps. Now go forth and fix those door frames like the DIY superhero I know you are!
How to Repair a Damaged Bathroom Door
Introduction
So your bathroom door has seen better days, huh? Maybe your clumsy friend swung it open a little too forcefully or your toddler decided to take their artistic talents to the door with a permanent marker. Whatever the case, fear not! In this section, we’ll walk you through the steps to repair that damaged bathroom door with a sense of humor and a can-do attitude.
Assess the Damage
First things first, take a good look at the damage. Is it a small scratch or a huge hole? Determining the extent of the damage will help you gauge the amount of effort required for the repair. It will also give you a chance to prepare yourself mentally for the task ahead. Deep breaths, my friend, you’ve got this!
Gather Your Supplies
Now that you know what you’re up against, it’s time to gather your supplies. We’re talking sandpaper, wood filler, a putty knife, paint, and a brush. Oh, and a delightful playlist to keep your spirits high during the process. Remember, repair work doesn’t have to be dull and boring. Let the rhythm guide your sanding skills!
Sand It Smooth
Grab that sandpaper and get to work. Smooth out any rough edges or imperfections on the damaged area of the bathroom door. Pretend you’re at a beach, enjoying a leisurely stroll. Just you and the sandpaper, making beautiful music together. Embrace the zen, my friend.
Fill in the Gaps
Once the damaged area is smooth, it’s time to whip out that wood filler. Apply it generously to any holes or cracks, just like you’re baking a delicious cake. Smooth it out with your trusty putty knife, ensuring a seamless finish. Remember, perfection is overrated. Embrace the quirks and imperfections, just like life itself.
Paint with Confidence
Now comes the fun part – painting! Choose a color that speaks to your soul and let your creative juices flow. Apply the paint with confidence, brush strokes as smooth as a baby’s bottom. Celebrate the transformation as you watch the damaged bathroom door become a work of art. Picasso would be proud.
Repairing a damaged bathroom door doesn’t have to be a dull and laborious task. With a little humor and a can-do attitude, you can turn it into an enjoyable DIY project. So, embrace the sandpaper, fill those gaps like a master chef, and paint with reckless abandon. Your bathroom door will thank you for it, and you’ll have a newfound appreciation for the beauty of imperfections. Now, go forth and conquer that damaged door like the DIY guru you were born to be!
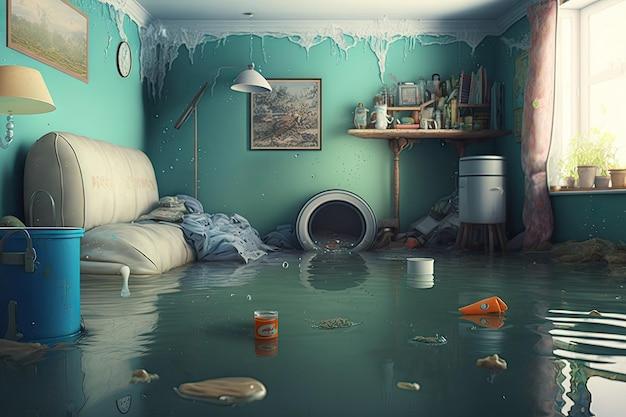
What Happens if Interior Doors Get Wet
The Dreaded Water Encounter
So, picture this: you wake up one morning, eager to start your day, but as soon as you step out of bed, you feel a little splash beneath your feet. Oh no, you think, as your heart sinks faster than the Titanic. You’ve got a water emergency, and unfortunately, your beloved interior doors have become victims of the watery wrath. But fear not, my waterlogged friend, for I am here to enlighten you on what happens when those doors get wet!
Warped Wonders
When interior doors come face to face with water, a peculiar phenomenon occurs – they can twist and warp like a contortionist at a circus! It’s like they’ve been possessed by some moisture-loving specter, determined to taunt you with its shapeshifting skills. Suddenly, your once pristine doors have transformed into wonky, uneven obstacles, causing you to question reality itself.
Swollen Surprises
If you thought your interior doors couldn’t surprise you anymore, think again! When water penetrates their delicate wooden fibers, they swell up faster than a squirrel hoarding nuts for the winter. You’ll be amazed at how these seemingly innocent doors can bulk up and make squeezing through them an Olympic-level challenge! It’s like they’ve gone on a secret mission to test your agility and flexibility.
Soggy Sagas
Prepare yourself for a soggy saga of epic proportions! When moisture invades your interior doors, it can soak into the very depths of their being, leaving them waterlogged and miserable. They might start drooping like a melted ice cream cone in the summer heat or developing unsightly stains that even the most powerful stain remover can’t handle. It’s a tragic tale of dampness and despair.
Mold Mischief
Oh, the horrors of mold! With water-damaged interior doors, you might find yourself face to face with this uninvited guest. Mold loves nothing more than a damp environment to call home, and your soggy doors provide the perfect breeding ground. It’s like a horror movie unfolding in your own home, complete with spooky black spots and an eerie musty smell. It’s time to grab your detective hat and unleash your inner Sherlock Holmes to tackle this moldy mystery.
In the battle against water-damaged interior doors, it’s essential to arm yourself with knowledge and a sense of humor. Warping, swelling, and mold are just some of the misadventures your doors may face, but fear not! Repairing water damage is not an insurmountable task. So, dry those tears, put on your handyman cape, and get ready to say goodbye to those water-induced nightmares. It’s time to restore your doors to their former glory, one playful repair at a time!
Repairing Water Damaged Interior Doors and Frames
The Surprising Consequences of Water Damage on Doors and Frames
Ah, water, the giver of life. It quenches our thirst, nourishes our plants, and… wreaks havoc on our interior doors and frames? Yes, you read that right. Water damage is no joke, and when it comes to our beloved doors and frames, it can leave quite a mark.
Peekaboo! Water Damage Can Be Sneaky
So, you had a little accident with water, huh? Maybe your toddler turned on the bathroom sink and forgot to turn it off. Or maybe your ever-so-helpful pet knocked over their water bowl directly onto your hardwood floors. Whatever the case may be, water has a way of seeping into places it shouldn’t, causing hidden damage to your interior doors and frames.
Identifying Water Damage – Don’t Let It Hide!
Now, before we dive into the repair process, we need to play detective and identify the extent of the water damage. Keep an eye out for swollen or warped doors, peeling paint or finish, and moldy or musty smells. Trust your nose, it knows!
A Splash of DIY Magic – Repairing Water Damaged Interior Doors
Fear not, intrepid DIY-er, for there is hope for your waterlogged doors and frames! Here’s a step-by-step guide to bring them back to life:
1. Assess the Damage: Time to roll up those sleeves and inspect the affected areas. Are the doors salvageable, or are they beyond repair? Determine what needs fixing and what needs replacing.
2. Dry, Dry, Dry: You didn’t think we’d forget about removing moisture, did you? Grab a fan, a dehumidifier, and let them work their magic. Make sure everything is bone dry before proceeding.
3. Sand It Smooth: Embrace the smooth operator within you and grab some sandpaper. Gently sand down any rough or damaged spots on the doors and frames to prepare them for their makeover.
4. Fill the Gaps: Time to patch things up! Use wood filler to fill in any cracks, gouges, or holes in the wood. Smooth it out, let it dry, and give it another sanding for that flawless finish.
5. Paint and Polish: Get your artistic groove on and apply a fresh coat of paint to your repaired doors and frames. Choose a color that complements your space and let it dry. Finish off with a protective clear coat for added durability.
Preventing Future Water Escapades – You’re On Guard Now!
Congratulations, you’ve successfully repaired your water damaged doors and frames! But let’s not stop there. Take a few preventive measures to keep water at bay in the future:
- Install water alarms near high-risk areas, like bathrooms and kitchens.
- Encourage your furry friends to drink from spill-proof bowls.
- Keep an eagle eye on your little ones during bath time or any water-related adventures.
Now that you’ve armed yourself with the knowledge of repairing water damaged interior doors and frames, go forth and conquer those water woes with confidence! Your doors will thank you, and your home will be watertight once again.
How Do You Fix a Swollen Door from Water Damage
The Struggle is Real: Dealing with Water-Damaged Doors
So, you’ve got yourself a swollen door, huh? Well, don’t you worry, my friend, because I’ve got a few tricks up my sleeve to help you fix it and make it as good as new. We all know how annoying and frustrating water damage can be, but with a little bit of know-how, you’ll have that door back to its normal shape in no time.
Step 1: Assess the Damage – No, Seriously, Give it the Once-Over
Alright, before we jump headfirst into fixing this thing, let’s take a moment to assess the damage. Take a good, hard look at your poor, swollen door. Check for any cracks or splintering, because, you know, we don’t want the thing to fall apart on us. If everything looks okay (fingers crossed), then move on to the next step.
Step 2: Get Your Tools Ready – It’s Time to Play Handyman
Grab your trusty friend, Mr. Sandpaper, and get ready for some serious action. Start by gently sanding down the areas of the door that are swollen. Don’t go too crazy, though – we don’t want to end up with a door that looks like it went through a blender. Just a little TLC should do the trick.
Step 3: Moisture? No More! – Drying Out the Door
Now, this might sound like common sense, but it’s worth mentioning – get rid of any moisture that might be lingering around. Grab yourself a handy-dandy fan or dehumidifier and let it work its magic. We want that door bone dry before we move on to the next step.
Step 4: The Smackdown – Let’s Straighten Things Out
This is where the fun really begins! Get yourself a dry piece of cloth and dampen it with warm water. Gently place the cloth over the swollen areas and give it a little pressure. But remember, we’re not Hulk-smashing here, just a gentle coaxing will do. Keep the cloth in place for a few minutes and let it work its magic. Voila! Hopefully, your door will start to regain its usual shape.
Step 5: The Finishing Touch – Give it Some Polish
Alright, we’re in the home stretch now. Once your door has dried off, give it a light sanding using some fine-grit sandpaper. This will smooth out any rough spots left behind from the swelling. After that, wipe the door down with a damp cloth to remove any excess dust. Finally, you can give it a fresh coat of paint or varnish to make it look brand spanking new.
Conclusion: Mission Accomplished!
And there you have it – your water-damaged, swollen door repaired by your very own hands! Who needs to call in the professionals, right? With a little perseverance and a touch of elbow grease, you’ve rescued your door from its soggy fate. Take a step back, admire your handiwork, and pat yourself on the back, champ. You did it!
So next time you come face-to-face with a swollen door from water damage, don’t panic. Just follow these steps, keep a positive attitude, and remember that you’re one handy individual. Now go forth and spread your newfound door-fixing knowledge to the world!