Are you tired of your old thermostat and want to replace it with a new one? Or maybe you just need to remove the thermostat cover to access the inner components for maintenance or cleaning. No matter the reason, we’ve got you covered with this comprehensive guide on how to remove a thermostat cover.
In this blog post, we will walk you through the process of removing a thermostat cover, step by step. We’ll answer frequently asked questions like, “Is it hard to change a thermostat?” and provide helpful tips on how to remove different thermostat models, including Honeywell and White Rodgers. So, whether you’re a DIY enthusiast or simply looking to save some money on calling an electrician, read on to learn everything you need to know about removing a thermostat cover.
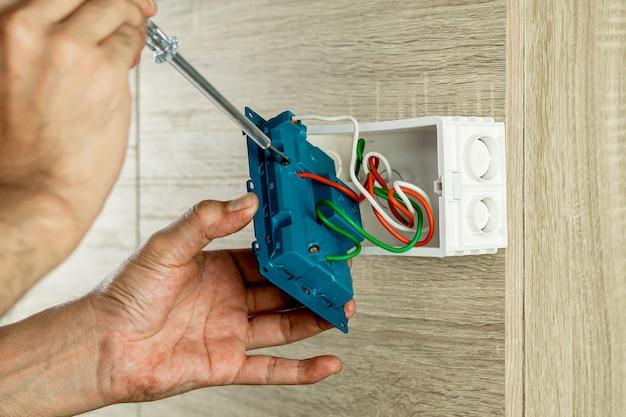
How to Remove Your Thermostat Cover
So, you’ve decided it’s time to get your hands dirty and remove that pesky thermostat cover. Well, you’re in luck because I’ve got all the steps laid out for you. Just follow along, and before you know it, you’ll have that cover off and be one step closer to a perfectly functioning thermostat.
Gather Your Tools
Before we dive in, let’s make sure we have all the necessary tools on hand. You’ll need a screwdriver, preferably a Phillips head, and a little bit of patience. Oh, and don’t forget to turn off the power to your thermostat before attempting any of this. Safety first, folks!
Step 1: Locate the Screws
Take a good look at your thermostat cover. You’ll notice a few screws holding it in place. These sneaky little screws love to hide, so you might need to do some exploring. Once you’ve found them, grab your screwdriver and get ready for some unscrewing action.
Step 2: Unscrew the Cover
Now that you’ve located the screws, it’s time to free that cover. Apply gentle pressure while turning the screws counterclockwise to loosen them. Be careful not to strip the screws in the process. Nobody likes a stripped screw, especially when it comes to something as important as your thermostat cover.
Step 3: Release the Cover
With the screws fully loosened, gently lift the cover away from its snug little spot. Give it a little wiggle if it’s being stubborn, but remember, we want to be gentle here. No need for any thermostat cover casualties.
Step 4: Marvel at Your Success
Take a moment to admire your handiwork. You’ve successfully removed that thermostat cover! Give yourself a pat on the back and do a little victory dance if you’re feeling extra accomplished. It’s the little things in life, right?
Wrapping It Up
Removing your thermostat cover doesn’t have to be a daunting task. With the right tools and a little know-how, you can tackle this job like a pro. Remember to always put safety first and take your time. Now that you’ve conquered this mini DIY project, you can move on to tackling bigger challenges around your home. Good luck, and happy thermostat-ing!
Keywords: Removing thermostat cover, unscrewing thermostat cover, releasing thermostat cover, thermostat cover removal, tools for removing thermostat cover
FAQ: How to Remove a Thermostat Cover
Welcome to our comprehensive FAQ guide on removing thermostat covers! In this section, we will answer the most frequently asked questions on this topic. So, let’s dive in and discover the ins and outs of removing a thermostat cover like a pro!
How do you remove a Honeywell faceplate
Removing a Honeywell faceplate is a breeze. Start by locating the small tab at the bottom of the thermostat. Gently push it upwards to release the faceplate. Once it is loose, carefully lift it off, revealing the inner workings of your thermostat.
Is it hard to change a thermostat
Not at all! Changing a thermostat is a DIY task that can be tackled without breaking a sweat. With a little patience and the right tools, you’ll be swapping out your old thermostat for a new one in no time.
Do I need an electrician to replace a thermostat
For most homeowners, replacing a thermostat does not require an electrician. However, always refer to your local regulations and consult a professional if you are unsure or uncomfortable working with electrical components.
How do you replace a White Rodgers thermostat on a Honeywell thermostat
Replacing a White Rodgers thermostat with a Honeywell thermostat might sound daunting, but fear not! Start by turning off the power to your HVAC system. Then, using a screwdriver, remove the mounting screws holding the White Rodgers thermostat in place. Once removed, follow the manufacturer’s instructions for installing your new Honeywell thermostat.
Can I replace my thermostat myself
Absolutely! Replacing your thermostat is a DIY project that allows you to take control of your home’s comfort. Just make sure to follow the manufacturer’s instructions and take necessary safety precautions.
How do I move my thermostat without rewiring
Moving your thermostat without rewiring is possible with the help of wireless thermostats. These clever devices communicate with your HVAC system wirelessly, eliminating the need for complex rewiring. Simply install the wireless thermostat according to the manufacturer’s instructions and enjoy the freedom of placing it wherever you desire.
What tools do I need to change a thermostat
To perform a smooth thermostat swap, you’ll need a few basic tools: a screwdriver (usually a Phillips-head), a leveler to ensure your new thermostat is straight, and possibly a small drill if you need to mount your new thermostat on the wall.
How do I move my heating thermostat
To move your heating thermostat, follow these steps:
- Turn off the power to your HVAC system.
- Remove the thermostat cover, usually by gently pulling it away from the wall.
- Carefully disconnect the wires from the back of the thermostat.
- Unscrew the mounting plate from the wall.
- Install the mounting plate in your desired location.
- Reconnect the wires to the new thermostat and attach it to the mounting plate.
- Restore power to your HVAC system, and you’re good to go!
What replaces Honeywell CM907
If you’re looking to replace your Honeywell CM907 thermostat, there are several excellent options on the market. The Honeywell T6 Pro is a popular choice, offering advanced features and a sleek design that will enhance your home’s comfort.
How much does a thermostat replacement cost
Thermostat replacement costs can vary depending on the brand and model you choose. On average, expect to spend between $50 and $250 for a basic to high-end thermostat. Keep in mind that this estimate excludes any professional installation fees, should you choose to hire someone.
How do you take the cover off a Honeywell thermostat
Taking the cover off a Honeywell thermostat is a simple process. Look for a small notch or tab on the top or bottom edge of the cover. Gently insert a flathead screwdriver or your fingernail to release the tab, then lift the cover away from the thermostat.
Can removing the thermostat cause overheating
No, removing the thermostat will not cause overheating. However, without a functioning thermostat, your HVAC system will not know when to turn on and off, potentially leading to temperature fluctuations. It is essential to have a thermostat installed to maintain a comfortable indoor environment.
Is it easy to replace a thermostat in a house
Replacing a thermostat in your house is a relatively easy task, especially with the abundance of user-friendly thermostats available today. Just follow the instructions provided by the manufacturer, exercise caution when dealing with electrical components, and soon you’ll be enjoying precise control of your home’s temperature.
Why is there no display on my Honeywell thermostat
If your Honeywell thermostat is not displaying anything, check the following:
- Ensure the thermostat is properly powered and connected.
- Confirm that the circuit breaker controlling the HVAC system is not tripped.
- Check the batteries if your thermostat requires them.
- Check for any loose or damaged wiring connections.
What are the symptoms of a bad thermostat
A malfunctioning thermostat can exhibit various symptoms, including:
- Inaccurate temperature readings.
- Constant temperature fluctuations.
- HVAC system not turning on or off when it should.
- Unresponsive buttons or touchscreens.
- Excessive energy usage.
- Uneven heating or cooling throughout your home.
What does a blinking snowflake mean on a White Rodgers thermostat
A blinking snowflake icon on a White Rodgers thermostat indicates that the system is in a “wait” mode, typically associated with a time delay feature. It means the system is temporarily inactive, usually after a call for heating or cooling.
Can you replace a car thermostat yourself
Replacing a car thermostat can be a DIY task if you have the necessary skills and tools. However, it’s essential to consult your vehicle’s service manual or seek professional assistance to ensure the replacement is done correctly and matches your car’s specific requirements.
How do I reset my T6 Pro Honeywell thermostat
To reset your T6 Pro Honeywell thermostat, follow these steps:
- On the thermostat, press and hold the center blank button and the bottom button simultaneously.
- After a few seconds, the screen will display “Installer Settings.”
- Use the arrow buttons to navigate to the “Reset” option.
- Press the center blank button to select the “Reset” option.
- Confirm the reset by selecting “Yes” when prompted.
- Your T6 Pro thermostat will reset to its default settings.
What to do after replacing a thermostat
After replacing a thermostat, complete the following steps:
- Set the desired temperature on your new thermostat.
- Check that the HVAC system is functioning correctly by turning on the heating or cooling.
- Monitor the temperature to ensure it reaches your desired setting and maintains it.
- Make any necessary adjustments to the programming or settings to optimize comfort and energy efficiency.
Should a thermostat be in the hallway
While a hallway can be a suitable location for a thermostat, it’s not the only option. Ideally, a thermostat should be placed in a room that represents the average temperature of your home, away from direct sunlight, drafts, and heat sources. It’s best to consult the manufacturer’s recommendations for optimal placement in your specific model.
How do you unlock a thermostat lock box
To unlock a thermostat lock box, follow these steps:
- Locate the key or combination for your lock box. It is often provided by the manufacturer or the installer.
- Insert the key or enter the combination as instructed.
- Turn the key or open the lock to release and remove the lock box.
Can you move a wired thermostat
Moving a wired thermostat is possible, but it requires rewiring unless you opt for a wireless thermostat. If you’re comfortable with electrical work and have knowledge of thermostat wiring, you can relocate the thermostat by disconnecting the wires, removing the mounting plate, and reinstalling it in the desired location. However, be cautious when working with electrical connections and consider consulting a professional for assistance.
That concludes our FAQ guide on removing thermostat covers. We hope these answers have provided the information you were seeking. If you have any further questions or need assistance, feel free to reach out. Happy thermostat tinkering!