When it comes to maintaining a lush and beautiful lawn, a well-functioning riding lawn mower is an essential tool. Whether you’re getting your trusty steed ready for the spring or dealing with the aftermath of neglected old gas, knowing how to properly prime your riding lawn mower can make all the difference in starting it up smoothly.
In this blog post, we’ll cover everything you need to know about priming a riding lawn mower. From understanding the role of the primer bulb and the carburetor to troubleshooting issues like air in the fuel line or excessive priming, we’ll equip you with the knowledge and step-by-step instructions to ensure your lawn mower starts with ease.
So, whether you’re a seasoned lawn maintenance enthusiast or a beginner in need of guidance, let’s dive into the world of priming a riding lawn mower and get your machine ready to tackle your lawn care needs in the year 2023 and beyond!
How to Prime a Riding Lawn Mower
So you’ve got yourself a fancy riding lawn mower, ready to tackle the unruly jungle that is your lawn. But before you can rev up that engine and start mowing like a pro, you need to know how to prime your trusty steed. Fear not, my friend, for I shall bestow upon you the wisdom of how to prime a riding lawn mower like a true grass-hunting warrior.
Step 1: Find the Prime Spot (No, Not That Kind)
Before we get down to business, locate the prime spot for priming your mower. You’ll want to park your mower on a flat and level surface, ideally near your fuel source. And don’t forget to engage the parking brake, unless you want your sprightly steed to take off on a wild grass-chewing rampage!
Step 2: Unleash the Beast (Well, Not Quite)
Now it’s time to unleash the beast within your mower’s fuel tank. Locate the fuel tank cap, usually situated somewhere near the rear of the machine. Pop that bad boy open and let the sweet scent of gasoline and lawn-mowing dreams fill your nostrils.
Step 3: Kill the Beast (Ah, the Sweet Release)
With the fuel tank open, it’s time to put an end to the beast within. No, you don’t need to sacrifice a goat or perform any dark rituals. Instead, locate the engine’s kill switch or ignition key and give it a swift twist or press. This will silence the roaring engine and prepare it for the priming process.
Step 4: Master the Art of the Squeeze (Squeeze, Don’t Hug)
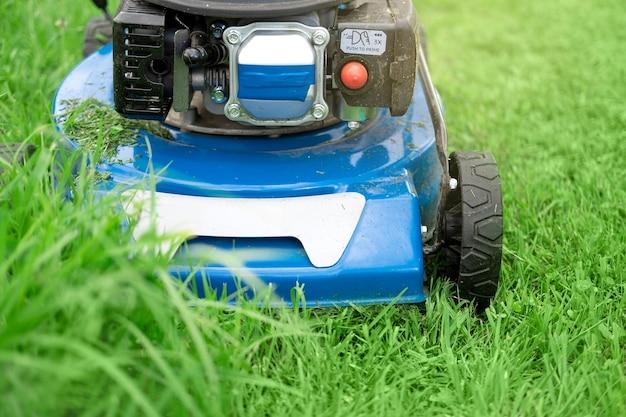
Now, here comes the fun part – squeezing! Find the primer bulb, a small rubbery friend that’s usually attached to the side of the engine. Give it a gentle squeeze or two, just enough to send fuel rushing through the mighty veins of your mower. But remember, my friend, don’t squeeze too hard, lest you want to drown your poor mower in a sea of fuel.
Step 5: Indulge in the Sweet Noises (Okay, Kinda Loud Noises)
Once you’ve squeezed the life out of that primer bulb, it’s time to turn the engine back on. Retrieve the ignition key or locate the engine’s kill switch once again and bring your mower back to life. Revel in the symphony of mechanical sounds as the engine roars back to action. Oh, the sweet music of progress!
Step 6: Breathe Life into the Beast (Well, Almost)
But don’t get too carried away with the noise – there’s still a little more priming to be done. Grab that primer bulb once more and give it a few more loving squeezes. This will ensure a steady flow of fuel to the engine, priming it for the ultimate grass-mowing extravaganza.
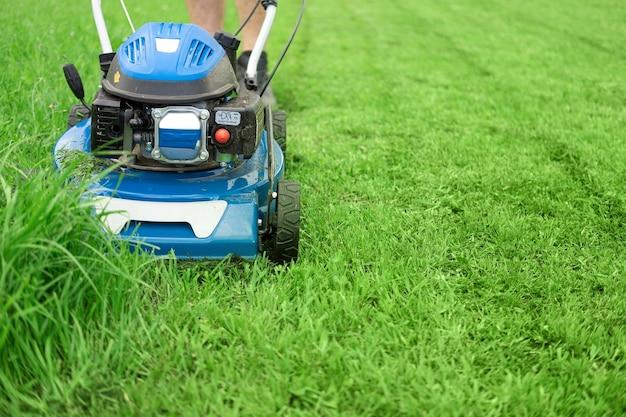
Step 7: Get Your Mow On! (Grass, Beware)
With the priming process complete, it’s time for the moment you’ve been waiting for – the grand mowing spectacle! Grab hold of the controls, release the parking brake, and let your mower glide across your lawn like a majestic stallion in a grassy meadow. It’s mowing time, my friend, and you are the captain of this floating beauty.
So, there you have it, the art of priming a riding lawn mower in all its glory. Follow these steps, my grass-loving friend, and your mower shall be forever grateful. Happy mowing, and may the grass be forever in your favor!
FAQ: How to Prime a Riding Lawn Mower
Welcome to our comprehensive FAQ-style guide on how to prime a riding lawn mower. Whether you’re reviving an old gas-powered mower or preparing it for the spring season, we’ve got you covered. In this article, we’ll answer some of the most common questions about priming your lawn mower, providing you with the knowledge you need to keep your mower running smoothly. So, let’s dive right in!
How do you start a lawn mower with old gas
Starting a lawn mower with old gas can be a bit challenging, but fear not – we have a solution for you. First, drain the old gas from your mower and dispose of it properly. Then, refill the tank with fresh gasoline. After that, follow the manufacturer’s instructions for starting your specific mower model. In many cases, this involves priming the carburetor, which we’ll cover in more detail later.
How do I get my lawn mower ready for spring
Spring is the perfect time to give your lawn mower some TLC. To get your mower ready for the season, follow these steps:
- Change the oil: Replace the old oil with fresh oil to ensure smooth operation.
- Replace the spark plug: A new spark plug can improve starting and performance.
- Clean the air filter: A clean air filter promotes optimal engine performance.
- Inspect the blades: Sharpen or replace dull blades for a clean cut.
- Check the tires: Inflate the tires to the recommended pressure.
Once you’ve completed these steps, your lawn mower will be ready to tackle the lush greenery of spring!
Should there be gas in the primer bulb
Yes, there should be gas in the primer bulb. The purpose of the primer bulb is to provide a quick and easy way to inject fuel into the carburetor, priming the engine for startup. The bulb should be filled with gasoline when you press it, helping to create the necessary fuel-air mixture for combustion. If the primer bulb is empty or dry, it may indicate a problem with the fuel line or carburetor, and you should address the issue before attempting to prime the mower.
How do you prime a lawn mower without a primer bulb
While most modern lawn mowers come equipped with a primer bulb, there are still some older models that don’t have this feature. If your mower doesn’t have a primer bulb, you can manually prime it by following these steps:
- Locate the carburetor: It’s usually attached to the side of the engine.
- Remove the air filter: This will give you access to the carburetor.
- Drip some fuel: Using a small dropper or syringe, carefully drip some fuel directly into the carburetor.
- Reinstall the air filter: Once you’ve primed the carburetor, put the air filter back in its place.
- Start the mower: Follow the manufacturer’s instructions for starting your specific mower model.
By priming the carburetor manually, you’re ensuring that the engine receives the fuel it needs to start and run smoothly.
Is there a primer on a riding lawn mower
Yes, some riding lawn mowers do have a primer. However, it’s worth noting that not all riding mowers are equipped with a primer bulb. The presence of a primer bulb varies depending on the make and model of the mower. If your riding lawn mower has a primer bulb, it will be located somewhere on the engine, typically near the carburetor.
Can you prime a lawn mower too much
While it’s important to prime your lawn mower properly, you can indeed overdo it. Excessive priming can flood the engine with fuel, causing it to stall or fail to start altogether. To ensure you’re not priming too much, follow the manufacturer’s recommended instructions for your specific mower model. If you’re unsure, it’s always better to err on the side of caution and avoid excessive priming.
How do you prime a carburetor
Priming a carburetor is a crucial step in starting a lawn mower. Here’s how you can do it:
- Locate the primer bulb: It’s usually a small, rubber bulb located on or near the carburetor.
- Press the primer bulb: Gently press and release the bulb several times until you see fuel flowing through the clear fuel line.
- Stop priming: Once you see fuel flowing, stop priming the carburetor.
- Start the mower: Follow the manufacturer’s instructions for starting your specific mower model.
By priming the carburetor, you’re ensuring that the engine receives the fuel it needs to start efficiently.
What happens if you don’t prime a lawn mower
If you neglect to prime your lawn mower, it may fail to start or experience difficulty starting. Priming the mower helps to create the necessary fuel-air mixture needed for combustion. Without proper priming, the engine won’t receive sufficient fuel, resulting in a lack of combustion and, ultimately, a failure to start.
How many times do you prime a lawn mower
The number of times you should prime a lawn mower varies depending on the specific model and manufacturer’s instructions. However, as a general rule of thumb, priming the mower two to three times is usually enough to ensure proper fuel flow and combustion. Over-priming can flood the engine, causing issues with starting and performance.
What are the symptoms of having air in the fuel line
Having air in the fuel line of your lawn mower can lead to various symptoms, including:
- Difficulty or inability to start the engine
- Rough or uneven engine idling
- Engine stalls or runs for only a short time before cutting off
- Reduced engine performance and power
If you suspect there may be air in your fuel line, it’s important to address the issue promptly to prevent further damage to your mower.
How do you prime a carburetor on a riding lawn mower
Priming the carburetor on a riding lawn mower is a similar process to priming a push mower. Simply follow these steps:
- Locate the primer bulb: On a riding lawn mower, the primer bulb is usually located on the engine near the carburetor.
- Press the primer bulb: Gently press and release the bulb several times until you see fuel flowing through the clear fuel line.
- Stop priming: Once you see fuel flowing, stop priming the carburetor.
- Start the mower: Follow the manufacturer’s instructions for starting your specific riding mower model.
By priming the carburetor on your riding mower, you’re ensuring that it has the necessary fuel for a smooth and efficient start.
Do all lawn mowers have a primer bulb
Not all lawn mowers have a primer bulb. While many modern push mowers and some riding mowers come equipped with a primer bulb, older models and certain budget-friendly options may not have this feature. If your lawn mower doesn’t have a primer bulb, you can manually prime the carburetor, as mentioned earlier, to achieve the same effect.
Why is gas pouring out of my primer bulb
If you notice gas pouring out of the primer bulb, it could indicate a problem with either the bulb itself or the fuel line connected to it. The primer bulb could be cracked or damaged, causing fuel leakage. Alternatively, there may be a blockage or misalignment in the fuel line. It’s best to inspect the primer bulb and the fuel line for any visible issues and address them accordingly. If you’re unsure or unable to resolve the problem yourself, it’s advisable to seek professional assistance.
Which fuel line goes to the primer bulb
Typically, there are two fuel lines connected to a primer bulb – one is the fuel supply line, and the other is the return line. The fuel supply line brings fuel from the gas tank to the carburetor, while the return line allows excess fuel to return to the tank. The fuel supply line is usually connected to the side of the primer bulb with a small arrow or marking indicating the direction of fuel flow.
Why is my riding lawn mower not getting gas
If your riding lawn mower isn’t getting gas, there could be several reasons for this issue. Some potential causes include a clogged fuel line, a dirty fuel filter, a faulty carburetor, or issues with the fuel pump. To address this problem, you can start by checking for any visible blockages in the fuel line or filter and cleaning or replacing them if necessary. If the issue persists, it’s recommended to consult a professional for further diagnosis and repair.
Why do I have to prime my carburetor
Primarily, the purpose of priming the carburetor is to ensure that the engine receives an adequate amount of fuel when starting. By manually injecting fuel into the carburetor or using a primer bulb, you’re helping to create the proper fuel-air mixture for combustion. This process makes it easier for the engine to start and run smoothly, especially after the machine has been idle for an extended period or if you’re dealing with colder temperatures.
Having a clear understanding of how to prime a riding lawn mower is essential to its proper functioning. By following the FAQ-style guide we’ve provided, you’ll be well-equipped to start your mower confidently, whether you’re dealing with old gas or preparing it for the spring season. Remember to always refer to the manufacturer’s instructions specific to your mower model for the best results. Happy mowing!