Are you tired of stepping on cold floor vents or constantly rearranging furniture to avoid obstructing the airflow? Moving your heat vent from the floor to a wall can solve these issues and enhance the overall aesthetics of your space. Whether you’re renovating or simply looking to improve the functionality of your heating system, this blog post will guide you through the process.
In this guide, we will discuss how to reroute a heating duct, remove a floor register, and tap into existing ductwork for basement heat. We’ll also address common questions like whether you can put a bench over a floor vent, add ductwork to a house, or split an air duct. Additionally, we’ll explore the costs involved in moving air ducts and the effectiveness of vent extenders.
Ready to reclaim your floor space and optimize your home’s heating system? Let’s dive in and learn how to move your heat vent from the floor to the wall.
(Introduction word count: 99)
How to Move Heat Vent from Floor to Wall
So, you’ve got a heat vent on your floor, and you’ve decided it’s time for a change. Maybe you’re tired of accidentally covering it with furniture, or perhaps you’re just feeling a bit rebellious and want to shake things up. Whatever the reason, you’re ready to move that heat vent from its humble spot on the floor to a more elevated position on the wall. Fear not, intrepid DIY-er, for we have the answers you seek!
Assess Your Situation – Is Moving the Vent a Good Idea
Before you start unscrewing anything, take a moment to reflect on your decision. Moving a heat vent from the floor to the wall may seem like a fantastic idea, but it’s essential to consider a few factors before diving in headfirst.
First, you’ll want to check the type of heating system you have. If you have a forced-air system, it’s relatively easy to move the vent. On the other hand, if you have a hydronic heating system or baseboard heating, relocating the vent might not be such a breeze.
Second, consider the layout of your room. Ask yourself, “Is there a suitable wall for the vent to go on? Will it disrupt any furniture placement or room functionality?” It’s also essential to ensure the wall you choose doesn’t contain any electrical wiring, plumbing, or other hidden surprises that could make your DIY project turn into a nightmare.
Lastly, think about the impact moving the vent might have on your heating system’s efficiency. Heat naturally rises, so by moving the vent to a higher position, you may be altering the airflow. This could potentially cause your room to heat unevenly or put additional strain on your HVAC system.
Gather Your Tools – The Essentials of Vent Moving
Now that you’ve pondered the pros and cons, it’s time to gather your trusty toolkit and get to work. Here’s what you’ll need for this vent-moving adventure:
1. Screwdriver
A reliable screwdriver will be your best friend throughout this process. Make sure you have one that fits the screws on your existing vent cover, as well as any new screws you may need for the wall installation.
2. Measuring Tape
To ensure precise placement of your new vent, you’ll need a measuring tape. This tool will help you determine the appropriate distance from the floor and ensure your vent is centered on the wall.
3. Level
If you’re a stickler for straight lines (like Chandler from Friends), a level is a must-have. It will ensure your vent sits perfectly perpendicular to the wall, leaving no crooked corners to haunt your dreams.
4. Drywall Saw
Moving a vent from floor to wall often involves cutting a hole in the wall, and that’s where a drywall saw swoops in to save the day. Just be careful not to channel your inner Picasso while you’re at it!
Open Sesame – Removing the Old Vent
Now that you’re armed with the right tools, it’s time to bid farewell to the vent on the floor. Here’s a step-by-step guide on removing the old vent and making way for its grand wall debut:
1. Unscrew the Old Vent Cover
Grab your trusty screwdriver and start unscrewing the old vent cover. Take note of any screws that may be holding the ductwork in place as well. Keep those screws in a safe place for later.
2. Disconnect the Ductwork
If your vent is connected to ductwork, it’s important to disconnect it carefully. You might need to use a pair of pliers or a wrench to loosen any clamps or fittings. Pay attention to how it’s connected, as reconnecting it properly later will be crucial.
3. Patch the Floor Hole
Since the vent is moving on up, you’ll be left with a hole in your floor. Don’t worry; we’ve got you covered! Using a small piece of plywood or drywall, patch up the hole. Secure it in place and make sure it’s flush with the surrounding floor.
Hello, Wall – Installing the New Vent
Congratulations on conquering the removal! Now, let’s dive into the installation process for your shiny new wall vent. Take a deep breath and let’s get this show on the road:
1. Choose the Perfect Spot
Survey your wall and choose the ideal location for your vent. Consider the height, airflow, and aesthetic appeal. Remember, this is your moment to shine, so make sure it’s in a spot that makes your heart leap with joy.
2. Mark Your Territory
Take your measuring tape and mark the center of where you want the vent to be. Use a pencil to make a small crosshair on the wall, indicating the exact spot for your vent.
3. Cut a Hole in the Wall
This is the moment your drywall saw has been waiting for! Use it to carefully cut a hole in the wall, following the size specifications of your new vent. Remember to take measurements twice and cut once (unless you have extra drywall lying around).
4. Secure the New Vent
With the hole cut, it’s time to place your vent. Insert the vent into the hole, making sure it fits snugly. Use a level to check if it’s straight, adjust as needed, and then secure it in place using screws. Don’t forget to reconnect the ductwork if necessary!
Bask in the Warmth – Enjoying Your New Vent
Just like that, you’ve successfully moved your heat vent from floor to wall! Stand back, admire your handiwork, and revel in the cozy warmth that will now grace your room. You’re a vent-moving master, and your days of toe-stubbing and furniture-blocking are now a thing of the past. Happy heating, my friend!

FAQ: How To Move Heat Vent From Floor To Wall
Moving a heat vent from the floor to the wall can be a daunting task, but fear not! We’ve compiled a list of frequently asked questions to guide you through the process. Whether you’re looking to reroute ductwork or add ducts to an existing system, we’ve got you covered. Let’s dive in and demystify the world of heat vent relocation!
How do you reroute a heating duct
Rerouting a heating duct is a project that requires some skill and patience. Here’s a step-by-step guide on how to do it:
- Identify the new location: Determine the most suitable spot on the wall where you want to relocate the heat vent. Make sure it’s away from any obstructions.
- Turn off the HVAC system: Before you begin any work, turn off your heating, ventilation, and air conditioning system to ensure your safety.
- Cut an opening in the wall: Measure and mark the dimensions of the new vent opening on the wall. Using a drywall saw or reciprocating saw, carefully cut out the opening.
- Disconnect the existing ductwork: Locate the existing ductwork connected to the floor vent. Using appropriate tools, carefully disconnect the ductwork from the vent.
- Extend the ductwork: Using flexible ductwork, extend it from the existing ductwork to the newly cut opening. Secure the joints with metal foil tape or screws for a tight seal.
- Install a wall vent cover: Attach a wall vent cover over the new opening, ensuring it fits snugly and complements your interior décor.
- Test the new vent: Once everything is securely in place, turn on your HVAC system and test the airflow to ensure the vent is functioning properly.
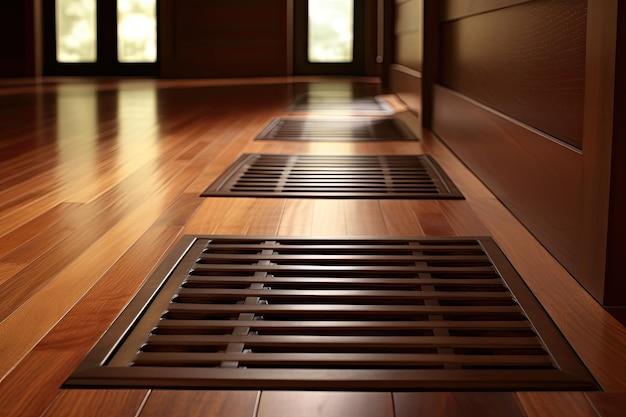
How do you remove a floor register
Removing a floor register doesn’t have to be a struggle. Follow these simple steps:
- Locate the screws: Most floor registers are held in place by screws. Look for the screws on the face or side of the register.
- Unscrew the register: Using a screwdriver or drill, remove the screws and set them aside in a safe place.
- Lift the register: Gently lift the register cover straight up, taking care not to damage the surrounding flooring.
- Clean the area: Remove any debris or dust around the opening and clean the register cover before reinstalling or replacing it.
How much does it cost to reroute ductwork
Costs for rerouting ductwork can vary depending on the complexity of the project and your location. On average, homeowners can expect to spend between $1,500 and $4,000 for a ductwork rerouting job. Factors that influence the cost include the distance of the new route, the size of the ducts, and the labor involved. It’s always best to consult with a professional HVAC contractor to get an accurate estimate for your specific needs.
Can I tap into existing ductwork for basement heat
Yes, you can tap into existing ductwork to provide heat to your basement. This is a practical and cost-effective solution compared to installing a separate HVAC system. Here’s what you need to do:
- Evaluate the existing system: Determine if your current HVAC system has the capacity to handle the additional load of heating the basement.
- Identify access points: Locate accessible points in the existing ductwork near the basement area where you want to introduce heat.
- Install branch ducts: Using appropriately sized ducts, extend from the existing ductwork to the desired locations in the basement. Ensure a secure connection with metal foil tape or screws.
- Install floor or wall vents: Choose suitable floor or wall vents for the basement openings and install them securely.
- Adjust airflow balance: Consider consulting an HVAC professional to balance the airflow throughout your home, ensuring proper distribution of heat to the basement.
Can I reroute air vent
Rerouting an air vent is indeed possible, but it may require some effort. Here’s how you can tackle the task:
- Plan the new route: Determine the new location for your air vent, considering factors such as airflow, accessibility, and aesthetics.
- Cut a new opening: Using appropriate tools, cut a new opening in the desired wall location. Ensure it aligns with the floor joists for proper vent alignment.
- Extend the ductwork: Connect new flexible ductwork to the existing duct near the original vent. Extend it to the newly cut opening, securing the joints.
- Install a wall vent cover: Attach a wall vent cover over the new opening, ensuring a secure and visually pleasing fit.
- Test the vent: Once everything is in place, turn on your HVAC system and test the airflow to ensure proper functioning.
Can I put a bench over a floor vent
While it may seem like a cozy idea, putting a bench over a floor vent is not advisable. Floor vents are designed to distribute heat evenly throughout a room, and obstructing them with a bench can disrupt airflow and reduce the effectiveness of your heating system. Instead, consider rearranging your furniture to ensure unobstructed airflow and optimal heat distribution.
Can you add ductwork to a house
Adding ductwork to a house is possible, but it can be a complex and costly endeavor. Here are the steps involved:
- Assess the current system: Evaluate your existing HVAC system to determine if it has the capacity to accommodate additional ductwork.
- Plan the new duct routes: Identify the areas where you want to install new ducts, considering accessibility, structural limitations, and aesthetic preferences.
- Calculate sizing requirements: Size the new ductwork appropriately to ensure proper airflow and distribution throughout the added areas.
- Install the new ducts: Cut openings in walls, floors, or ceilings to accommodate the new ductwork. Route the ducts from the main supply or return lines to the desired locations.
- Connect and seal the ducts: Ensure that all connections are secure and use metal foil tape or screws with appropriate duct connectors to seal joints.
- Test the system: Once installation is complete, test the system for proper airflow and performance. Make any necessary adjustments.
Keep in mind that adding ductwork requires technical expertise, so consulting a professional HVAC contractor is highly recommended.
How much does it cost to replace ductwork in a house
The cost of replacing ductwork in a house can vary significantly depending on various factors such as the size of the house, the extent of the replacement, accessibility, and the contractor’s rates in your area. On average, homeowners can expect to spend between $2,000 and $6,000 for a complete ductwork replacement. It’s always best to get multiple quotes from reputable contractors to ensure you’re getting the best value for your investment.
Can you split an air duct
In some cases, splitting an air duct can be done to improve airflow and heat distribution in specific areas. However, it’s important to approach this task carefully to avoid compromising the overall performance of your HVAC system. Here are the steps to splitting an air duct:
- Assess the current system: Evaluate the size and capacity of the existing air duct to determine if splitting it is feasible without negatively impacting airflow to other areas.
- Plan the split: Identify the location where you want to split the duct, ensuring it’s a suitable spot that aligns with structural considerations and airflow requirements.
- Cut the duct: Using appropriate tools, carefully cut the ductwork at the chosen location. Ensure clean and straight cuts for easy connection later.
- Install connectors and ducts: Attach appropriate connectors to both ends of the cut duct and connect new sections of ductwork as needed to reach the desired destination.
- Seal the joints: Secure all connections with metal foil tape or screws to ensure airtight seals and prevent air leakage.
- Test the system: Once completed, test the airflow in the newly split duct and adjust as necessary to maintain balanced airflow throughout the system.
It’s always recommended to consult with an HVAC professional before attempting to split an air duct to ensure it’s done correctly.
Is it expensive to move a floor vent
Moving a floor vent can have varying costs depending on factors such as the complexity of the relocation, accessibility, the need for additional ductwork, and local labor rates. On average, homeowners can expect to spend between $300 and $800 to move a floor vent. However, it’s crucial to obtain specific quotes from reputable HVAC contractors in your area to get an accurate estimation based on your unique circumstances.
How much does it cost to move air ducts
The cost of moving air ducts can vary widely depending on the complexity of the project, the length of the new duct run, the need for additional materials, and the labor rates in your area. Generally, homeowners can expect to spend between $800 and $2,500 for moving air ducts. To receive accurate pricing for your specific project, we recommend consulting with multiple HVAC contractors who can provide estimates tailored to your needs.
Do vent extenders work
Vent extenders can be a useful solution for redirecting airflow and improving comfort in specific areas of your home. These extenders attach to existing vents and help direct air towards desired locations. While they can work effectively in some scenarios, it’s important to consider the design and layout of your HVAC system and consult with professionals to ensure the best possible results. Vent extenders can be a cost-effective alternative to more extensive ductwork modifications.
How do I extend my AC ducts
Extending AC ducts requires careful planning and execution to ensure proper airflow and system performance. Here’s a general guideline on how to extend your AC ducts:
- Determine the new route: Identify the desired location to extend the AC ducts, considering factors such as accessibility, structural constraints, and room layout.
- Calculate duct sizing requirements: Calculate the appropriate duct size based on the airflow requirements and the length of the extension.
- Cut an opening: Using appropriate tools, create an opening in the ceiling or wall where the new duct will connect to the existing system.
- Connect the new duct: Extend the existing duct using approved materials and fittings, making sure to maintain airtight connections.
- Seal the joints: Secure all connections with metal foil tape or screws to prevent air leakage and maintain efficiency.
- Test the system: After installation, test the airflow for optimal performance and make any necessary adjustments.
It’s crucial to consult with a professional HVAC contractor for proper design and installation to ensure your AC duct extension works efficiently.
How do you cover a vent hole in the floor
If you no longer need a vent hole in the floor, covering it is a simple DIY task. Here’s what you can do:
- Measure the vent hole: Measure the dimensions of the opening to ensure you get the right size cover or plug.
- Choose a cover or plug: Visit your local home improvement store or search online for a cover or plug that matches the dimensions of the vent hole. Options include metal covers, wooden inserts, or plastic plugs.
- Install the cover or plug: Depending on the type you chose, follow the manufacturer’s instructions to install the cover or plug securely over the vent hole.
- Secure it in place: Use screws or adhesive, as recommended by the manufacturer, to keep the cover or plug firmly in place.
By covering the vent hole, you’ll restore a seamless appearance to your floor while ensuring no unwanted drafts or debris enter your home.
Is replacing ductwork worth it
Deciding whether to replace ductwork depends on various factors such as the age of the system, the extent of damage or deterioration, and the overall performance of your HVAC system. Here are some signs that indicate replacement might be worth considering:
- Age of ductwork: If your ductwork is more than 15-20 years old, it may be experiencing significant wear and tear.
- Poor performance: If your system struggles to heat or cool your home adequately, inadequate or leaky ducts could be the culprit.
- Frequent repairs: Constant repairs to your ductwork can add up over time, making replacement more cost-effective in the long run.
- Mold or pest infestation: If your ducts have experienced damage from moisture or pests, replacement may be necessary for better indoor air quality.
- Energy efficiency: Newer ductwork designs and materials can improve energy efficiency, reducing your heating and cooling costs.
Consulting with an HVAC professional can help assess whether replacing your ductwork is the best course of action for your specific situation.
Can you move heating vents
Yes, you can move heating vents within your home. By relocating heating vents, you can optimize airflow and enhance comfort in different areas. Follow the steps mentioned earlier in this FAQ to safely and effectively move your heating vents. Remember to consider factors like access points, structural limitations, and aesthetics when determining the new location. Consult with an HVAC professional if you have any concerns or doubts about relocating your heating vents.
How do you add ducts to an existing duct
Adding ducts to an existing system can improve comfort and airflow in a targeted area. Here’s a general guide on how to add ducts to an existing duct:
- Plan the new duct route: Identify where you want to add new ducts, considering access points, structural considerations, and airflow requirements.
- Choose the appropriate duct size: Calculate the required duct size based on the airflow requirements and the length of the extension. Ensure it matches the existing ductwork.
- Cut an opening: Cut an opening in either the ceiling or wall where the new duct will connect to the existing system.
- Install the new duct: Extend the existing duct using approved materials and fittings, making sure to maintain a secure and airtight connection.
- Test the system: After installation, test the airflow to ensure optimal performance and make adjustments as needed.
It’s recommended to consult with an HVAC professional to ensure proper design and installation specific to your home’s ductwork system.
Can you move a cold air return vent
Yes, moving a cold air return vent is possible. However, it’s important to understand that cold air return vents play a crucial role in maintaining proper airflow within your HVAC system. If you plan to relocate a cold air return vent, carefully consider the impact it may have on the overall system function. Consult with an HVAC professional to ensure the new location will facilitate efficient air circulation and proper system performance.
Is it hard to move a floor vent
Moving a floor vent can be a moderately challenging task, but with the right tools and know-how, it’s definitely doable. The difficulty level may vary depending on factors such as the complexity