Welcome to our step-by-step guide on how to install vinyl quarter round! If you’re considering adding this finishing touch to your baseboards or laminate flooring, we’ve got you covered. Vinyl quarter round is a popular choice due to its durability, versatility, and aesthetic appeal. Whether you’re a seasoned DIY enthusiast or a beginner, we’ll walk you through the process to ensure a professional-looking result.
In this blog post, we’ll answer common questions like: Do you need quarter round with vinyl? Do you have to put quarter round on baseboards? What size nails should you use for quarter round and baseboards? Should you nail or glue quarter round? Plus, we’ll share some tips for installing PVC quarter round without a nail gun and joining two pieces of quarter round seamlessly. So let’s dive in and learn how to transform your space with vinyl quarter round!

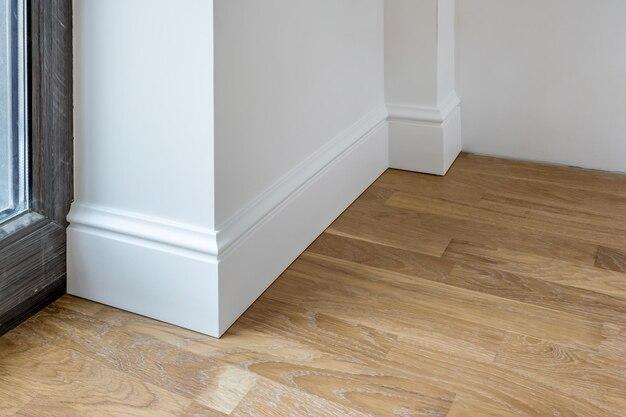
How to Easily Install Vinyl Quarter Round
Are you ready to add the perfect finishing touch to your vinyl flooring installation? Well, look no further because installing vinyl quarter round is as easy as pie! In this step-by-step guide, we will walk you through the process of installing vinyl quarter round like a pro. So let’s dive in and get that floor looking flawless!
Gather Your Materials
Before we start the installation, let’s make sure you have everything you need. Here’s your shopping list:
- Vinyl quarter round (obviously!)
- Measuring tape
- Miter saw or miter box and hand saw
- Power drill
- Nails or adhesive
- Hammer
- Safety goggles (optional, but who doesn’t love a little safety?)
Measure Twice, Cut Once
As the old saying goes, “measure twice, cut once.” And trust me, it’s a saying for a reason. Before you start cutting away at your beautiful vinyl quarter round, take accurate measurements of the areas where you’ll be installing it. Remember, precision is the name of the game here, so don’t rush and end up with wonky cuts.
Time to Cut Some Corners
Now that you have your measurements, it’s time to cut some corners, literally. If you have a miter saw, lucky you! This will make your life so much easier. Simply set the saw to a 45-degree angle, place the vinyl quarter round snugly against the saw’s fence, and voila! Perfectly angled corners in no time.
No miter saw? No problem! Grab yourself a trusty miter box and hand saw. With the measurements in mind, carefully cut the vinyl quarter round at a 45-degree angle using the miter box as your guide. It may take a bit more elbow grease, but you’ll still end up with those flawless corners.
Nail or Glue
Now it’s decision time. Will you go the traditional route and nail the vinyl quarter round in place, or will you embrace the wonders of modern technology and opt for adhesive bonding? Both options have their merits, so choose the one that tickles your fancy.
If you decide to go with nails, make sure to use appropriately sized finishing nails that won’t split the vinyl. Start by placing the vinyl quarter round against the wall, ensuring it is flush with both the floor and the baseboard. Then, carefully hammer the nails into the wall, making sure not to dent the vinyl.
If adhesive bonding is more your style, apply a small bead of construction adhesive to the back of the vinyl quarter round. Press it firmly against the wall, ensuring proper alignment. Hold it in place for a minute or two, channel your inner superhero, and boom! Your vinyl quarter round is securely bonded.
Let’s Wrap It Up!
Congratulations, my friend! You did it! Your vinyl quarter round is now installed and looking spectacular. Take a step back and admire your handiwork. Bask in the glory of a job well done. You deserve it!
So go ahead, invite your friends over to marvel at your seamless vinyl quarter round installation. Show off those perfectly angled corners like the rockstar DIY-er you are. And remember, if anyone asks how you became a vinyl quarter round installation expert, just give them a wink and say, “It’s all in the hips, baby!”
FAQ: How To Install Vinyl Quarter Round
Welcome to our comprehensive FAQ-style guide on how to install vinyl quarter round molding! We’re here to answer all your burning questions and provide you with some helpful tips and tricks along the way. Whether you’re a seasoned DIYer or a newbie looking to tackle this project, we’ve got you covered. So, let’s dive right in!
1. What size brad nails should I use
When it comes to installing vinyl quarter round molding, you’ll want to use the right size brad nails to ensure a secure and professional-looking finish. We recommend using 18-gauge brad nails that are around 1 inch in length. These nails are strong enough to hold the molding in place without causing any damage.
2. Can you use 18 gauge nails for baseboards
Absolutely! 18-gauge nails are suitable for baseboards as well. They offer a good balance between strength and ease of installation. Just make sure to choose a nail length that is suitable for your specific baseboard thickness. Remember, proper nail sizing is key to achieving a sturdy and durable installation.
3. Do you need quarter round with vinyl
While it’s not a requirement, using quarter round with vinyl flooring can provide a polished and finished look to your project. Quarter round molding helps cover the small gaps that often appear between the baseboards and the vinyl flooring. It also adds a touch of elegance by creating a smooth transition between the floor and the wall.
4. Do you have to put quarter round on baseboards
No, you don’t have to put quarter round on baseboards if you prefer a different aesthetic or have chosen a different type of flooring that doesn’t require it. Baseboards can look great on their own, and some modern flooring options don’t necessitate the use of quarter round molding. Ultimately, the decision is up to your personal taste and style preferences.
5. What size nails do you use for quarter round
When it comes to quarter round molding, it’s best to use 1 1/2-inch finishing nails. These nails provide ample holding power without the risk of splitting the molding. Just be sure to position the nails towards the top of the quarter round to ensure a snug and secure fit.
6. What is the best way to attach quarter round molding
The best way to attach quarter round molding is by using a nail gun or a hammer and nails. If you prefer using a nail gun, make sure to set it to the appropriate depth setting to avoid damaging the molding or the wall. Alternatively, you can use a hammer and finishing nails for a more traditional approach. Whichever method you choose, make sure the nails are driven in at a slight angle to prevent splitting.
7. How do you install PVC quarter round without a nail gun
If you don’t have access to a nail gun, fear not! You can still install PVC quarter round molding without one. One option is to use an adhesive specifically designed for PVC trim. Apply the adhesive to the back of the molding and press it against the wall until it sets. Another option is to use small screws instead of nails. Be sure to pre-drill pilot holes to prevent the PVC from cracking.
8. Do you nail or glue PVC trim
You can either nail or glue PVC trim, depending on your preference and the specific application. Nailing provides a secure and long-lasting bond, while gluing offers a cleaner and nail-free appearance. Remember to choose a high-quality adhesive specifically formulated for PVC trim if you opt for the glue method. Whichever method you choose, ensure that the PVC trim is properly aligned and tightly secured.
9. What size nails should I use for baseboards
For baseboards, it’s best to use 16-gauge finishing nails that are around 2 1/2 inches in length. These nails provide sufficient holding power to secure the baseboard to the wall. Remember to position the nails strategically, aiming for the thicker parts of the baseboard to prevent splitting.
10. Should you glue or nail quarter round
The decision to glue or nail quarter round molding ultimately depends on personal preference and the specific application. Nailing offers a classic and secure installation method, while gluing eliminates the need for nails and provides a cleaner appearance. Consider factors such as the type of flooring, the condition of the walls, and your desired aesthetic when making your decision.
11. Should I use quarter round when installing laminate flooring
It’s generally recommended to use quarter round when installing laminate flooring. Laminate flooring requires a small gap between the flooring and the wall to allow for expansion and contraction. Quarter round molding can help conceal this gap while adding a finishing touch to your installation. It’s important to ensure that the quarter round is properly installed to prevent any potential tripping hazards.
12. Can shoe molding be glued
Yes, shoe molding can be glued for installation. Similar to quarter round molding, using a high-quality adhesive specifically designed for this purpose will ensure a secure bond. Gluing shoe molding provides a clean and nail-free appearance, making it a popular choice for those looking for a more seamless finish.
13. How do you secure quarter round to baseboard
To secure quarter round to a baseboard, you can either use a nail gun or a hammer and finishing nails. Position the molding against the baseboard, making sure to leave a small gap for expansion. Use the nail gun or hammer to drive nails into the quarter round at a slight angle, aiming for the thicker areas to avoid splitting. Repeat this process along the entire length of the molding for a secure attachment.
14. Can you glue quarter round trim
Yes, quarter round trim can be glued as an alternative to nailing. Using an adhesive specifically formulated for molding or trim, apply a small amount to the back of the quarter round and press it firmly against the baseboard or wall. Be sure to wipe away any excess adhesive and use temporary supports, such as painter’s tape, to hold the molding in place until the adhesive sets.
15. Is it necessary to install quarter round
Installing quarter round molding is not necessarily mandatory, but it can greatly enhance the overall appearance and functionality of your floors. It helps cover gaps, protects edges, and provides a finished look to your flooring installation. Consider the specific requirements of your flooring type and your personal preference when deciding whether to install quarter round.
16. How do you join two pieces of quarter round
To join two pieces of quarter round molding, use a miter saw to cut them at a 45-degree angle. Ensure that the cuts are clean and precise for a tight fit. Apply a small amount of wood glue to the mitered ends and fit them together, creating a seamless joint. Use clamps or tape to hold the joint in place until the glue dries completely.
17. Can you use Liquid Nails for shoe molding
Yes, Liquid Nails is a popular adhesive choice for securing shoe molding. Apply a thin bead of adhesive along the backside of the molding, avoiding excessive amounts that can squeeze out when the molding is pressed against the wall. Ensure that the shoe molding is properly aligned and firmly pressed against the wall until the adhesive sets.
18. Can you glue trim to walls
Yes, trim can be glued directly to the walls using an appropriate adhesive. It’s essential to choose an adhesive specifically formulated for trim to ensure a secure bond. Apply the adhesive to the backside of the trim, press it firmly against the wall, and hold it in place until the adhesive dries. Remember to use temporary supports, such as tape or clamps, as needed.
19. Can I nail PVC Moulding
Absolutely! PVC molding can be nailed in place to provide a secure and lasting installation. Use a hammer and finishing nails, placing them strategically in the thicker portions of the molding to avoid any splitting. Ensure that the nails are driven in at a slight angle to enhance their holding power. Take your time to position the PVC molding correctly before nailing for a clean and professional finish.
We hope this FAQ-style guide has answered all your questions on how to install vinyl quarter round molding. Armed with this knowledge, you’re now ready to tackle your DIY project like a pro! Remember, take your time, work safely, and enjoy the sense of accomplishment when you see that beautifully installed quarter round molding. Happy renovating!
Note: All recommendations and guidelines provided are based on industry best practices and general knowledge. Always refer to manufacturer instructions and consult with professionals if unsure.