Are you looking to add a touch of elegance and warmth to your home? Installing a tongue and groove ceiling over drywall might be just what you need. This popular interior design trend can transform any room into a rustic retreat or a sleek and modern space. Whether you’re a seasoned DIY enthusiast or a newbie, this blog post will guide you through the process step by step.
In this comprehensive guide, we’ll cover everything you need to know about installing a tongue and groove ceiling over drywall. From the materials needed to the cost considerations, we’ve got you covered. We’ll even address common questions like whether drywall is required under tongue and groove, if furring strips are necessary, and the best way to attach the wood boards to the drywall. So, let’s grab our tools and get ready to create a stunning ceiling that will leave your guests in awe.

How to Install Tongue and Groove Ceiling Over Drywall
Preparing for the Tongue and Groove Ceiling Installation
Before diving into the exciting world of installing a tongue and groove ceiling over drywall, it’s crucial to gather all the necessary tools and materials. Trust me; it’s better to have everything ready than to find yourself halfway through and suddenly realize you’re missing a crucial widget. So, here’s your handy checklist:
Tools and Equipment
- A ladder (preferably a sturdy one, as we don’t want any unexpected high-flying acrobatics)
- A tape measure (because eyeballing it is not a recommended strategy)
- A saw (you know, the one that cuts things)
- A nail gun (cue the satisfying bang)
- A carpenter’s square (the right angles are our best buddies)
- Safety goggles and ear protection (safety first, folks!)
Materials
- Tongue and groove ceiling planks (the stars of the show)
- Construction adhesive (to keep those planks in place)
- Finishing nails (the unsung heroes of woodworking)
- Wood putty (to hide our mistakes)
- Sandpaper (because smooth is the way to go)
- Primer and paint (because ceilings need to look snazzy too)
- Patience and a sense of humor (trust me, it goes a long way)
Step 1: Measuring and Cutting the Tongue and Groove Planks
Now that you’ve armed yourself with the necessary tools and materials, it’s time to get your measuring game on. Measure the length and width of your ceiling to determine how many planks you’ll need. Math alert! Divide the length of the room by the width of the plank to figure out how many rows of planks you’ll have.
Once you have those calculations under control (you’ve got this!), use your saw to cut the first plank to the appropriate length. Pro tip: let the saw do the work and avoid trying to channel your inner superhero by applying unnecessary pressure. Safety goggles, please!
Step 2: Installing the First Row
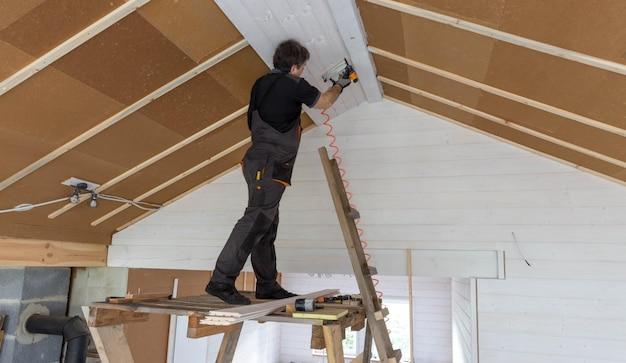
It’s time to kick-start the installation by nailing the first row of tongue and groove planks to the ceiling. Apply construction adhesive to the back of the first plank, then slide the tongue into the groove of the adjacent plank. To secure the planks, use your nail gun to drive nails through the tongue into the ceiling joists. Keep the nails at a slight angle and spaced approximately every 12 to 16 inches. This will ensure a tight and secure fit.
Step 3: Continuing the Installation
As you enter the wilderness of the second and subsequent rows, remember that variety is the spice of life. Stagger the joints between rows for visual appeal and to add structural strength. No one wants a straight line party, right?
Apply adhesive to the back of each plank and slide it into the previous row’s groove. Use your trusty nail gun to secure the planks just like you did before. Remember to maintain consistent spacing and that slight angle for the nails. Repeat these steps until your ceiling is covered in the beauty of tongue and groove.
Step 4: Filling the Gaps and Finishing Touches
In woodworking, like in life, mistakes happen. But fear not! That’s what wood putty is for. Fill any visible nail holes or gaps between the planks using wood putty. Smooth it over and let it dry according to the manufacturer’s instructions. Once dry, sand the filled areas to achieve a seamless and flawless surface.
Now, for the grand finale – it’s time to paint that ceiling and make it shine! Prime the entire tongue and groove ceiling, let it dry, and follow up with a coat (or two) of your preferred paint color. Go wild with your selection – after all, it’s your ceiling, and it deserves to be as unique as you are.
Congratulations, you tongue-and-groove-ceiling-over-drywall-installing champion! You’ve transformed a dull ceiling into a masterpiece. Take a step back, admire your work, and revel in the glory of your DIY triumph.
Note: Always follow manufacturer instructions and local building codes when installing tongue and groove ceiling over drywall. Safety goggles and ear protection are your new fashion accessories – wear them proudly.
Please note that this blog post is for informational purposes only and does not constitute professional advice. Happy tongue and groove-ing!
FAQ: How to Install Tongue and Groove Ceiling Over Drywall
How do you finish a tongue and groove ceiling
To finish a tongue and groove ceiling, you can follow these steps:
- Sand the boards: Start by sanding the tongue and groove boards to ensure a smooth surface for staining or painting.
- Apply a finish: Next, apply a wood stain or paint of your choice to enhance the natural beauty of the wood or match your desired aesthetic.
- Seal the boards: Finally, seal the boards with a clear polyurethane or similar sealant to protect the wood and provide a long-lasting finish.
What is used to attach the drywall to the studs
When attaching drywall to the studs of your ceiling, the most common method involves using drywall screws. These screws provide a secure and stable fastening point, ensuring the drywall stays in place.
How do you install shiplap over drywall
To install shiplap over drywall, you can follow these steps:
- Prepare the drywall: Make sure the drywall is clean, smooth, and free of any imperfections. You may need to sand or patch any damaged areas.
- Measure and cut the shiplap: Measure the length of the wall and cut the shiplap boards to size accordingly.
- Attach the shiplap: Starting from the bottom, use nails or a nail gun to attach the shiplap boards to the wall, leaving a small gap between each board for expansion.
- Continue row by row: Repeat the process for each row, making sure the boards are level and the gaps between them are consistent.
- Finishing touches: Once all the boards are in place, you can fill any nail holes and apply a finish to the shiplap if desired.
How much does it cost to install a tongue and groove ceiling
The cost of installing a tongue and groove ceiling can vary depending on factors such as the size of the room, the type of wood used, and the geographical location. On average, you can expect to spend around $6 to $12 per square foot for materials and installation.
How do you insulate a tongue-and-groove ceiling
Insulating a tongue-and-groove ceiling requires a careful approach to maintain the integrity of the wood. Here’s a general process:
- Remove existing ceiling: If there is already a ceiling in place, remove it carefully to expose the rafters.
- Install insulation: Place insulation batts or foam insulation boards between the rafters, ensuring a snug fit and covering the entire ceiling area.
- Vapor barrier: Install a vapor barrier, such as a plastic sheet or foil-faced insulation, on the warm side of the ceiling to prevent moisture buildup.
- Install tongue and groove ceiling: Once the insulation and vapor barrier are in place, install the tongue and groove ceiling as desired.
Is drywall required under tongue and groove
While it is not always necessary to install drywall under a tongue and groove ceiling, it can provide additional structural support and help with insulation and soundproofing. Drywall can also serve as a fire barrier. However, if you prefer the natural look of the tongue and groove wood, you can install it directly on the ceiling joists or rafters.
Are furring strips needed for ceiling
Furring strips are not typically needed for installing a tongue and groove ceiling over drywall. However, if you are installing directly on the joists or rafters, furring strips can help level the ceiling surface and provide additional support for the tongue and groove boards.
Can I install wood ceiling over drywall
Yes, you can install a wood ceiling over drywall. This method can add warmth and natural beauty to a room. However, keep in mind that the additional weight of the wood ceiling should be considered, especially if you are installing it in an older home or on a ceiling with inadequate support.
Can you glue tongue and groove to the wall
While it is possible to glue tongue and groove boards to a wall, it is not the recommended method for installing a tongue and groove ceiling. Gluing the boards can limit the ability to make adjustments or remove damaged boards in the future. It is generally better to use nails or screws for a secure and versatile installation.
How do you attach wood board to drywall
To attach wood boards to drywall, follow these steps:
- Locate the studs: Use a stud finder to locate the studs behind the drywall.
- Mark the stud locations: Use a pencil to mark the center of each stud along the top, middle, and bottom of where the wood boards will be installed.
- Pre-drill pilot holes: Drill pilot holes into the wood boards at the marked stud locations.
- Attach the wood boards: Securely screw the wood boards into the studs using the pre-drilled pilot holes, ensuring a tight and secure fit.
How do you attach a tongue and groove board
To attach a tongue and groove board, follow these steps:
- Apply adhesive: Apply a wood glue or construction adhesive to the back of the tongue of the first board.
- Insert the board: Insert the tongue of the first board into the groove of the adjacent board at an angle. Press it down to create a snug fit.
- Secure with nails: Use a nail gun or hand nailer to drive nails through the tongue of the board at a slight angle into the underlying support, such as the ceiling joists or furring strips.
- Continue installation: Repeat the process for each subsequent board, connecting the groove and tongue until the entire ceiling is covered.
Can you use a brad nailer for tongue and groove
Yes, a brad nailer can be used for installing tongue and groove boards. However, it is important to choose the right size and length of brad nails to ensure a secure attachment without splitting the wood. Additionally, it is recommended to pre-drill pilot holes before using the brad nailer to prevent any potential damage to the boards.
Can you put shiplap over drywall ceiling
Yes, you can put shiplap over a drywall ceiling. This can add texture and visual interest to the room. However, keep in mind that the additional thickness of the shiplap may affect the height of the ceiling, so plan accordingly.
Do you have to install shiplap over drywall
Installing shiplap over drywall is not a requirement. You can choose to install shiplap directly on the studs or other appropriate backing material. However, installing shiplap over drywall can provide a smoother surface and easier installation, especially if the drywall is already in place.
Should tongue and groove be glued
While tongue and groove boards can be glued for added stability, it is not always necessary. The interlocking design of the boards provides a secure fit, and nails or screws can further reinforce the installation. However, if you prefer additional adhesive support, you can apply a wood glue or construction adhesive to the boards during installation.
Can you put tongue and groove over drywall ceiling
Yes, you can put tongue and groove boards over a drywall ceiling. This method can provide a decorative and rustic look to your space. Ensure the drywall is secure and in good condition before installing the tongue and groove boards for the best results.
Can I use Liquid Nails on drywall
Yes, Liquid Nails is a brand of strong construction adhesive that can be used on drywall and other surfaces. It can provide added bonding strength for installing certain materials or securing objects to drywall. Follow the manufacturer’s instructions for proper application.
What is the best adhesive for drywall
The best adhesive for drywall is typically a specifically formulated drywall adhesive, such as those available in tubes or buckets. These adhesives are designed to provide strong bonding and prevent the drywall from separating or sagging over time. Consult with a local hardware store or professional for recommendations based on your specific needs.
What kind of nails do you use for tongue and groove
For tongue and groove installations, it is recommended to use finishing nails or brad nails. These nails have small heads that can be easily concealed within the tongue or groove of the boards. The length of the nails should be appropriate to penetrate the wood boards and secure them to the underlying support.
Which way should tongue and groove ceiling run
The direction in which your tongue and groove ceiling runs is a matter of personal preference and the layout of the room. You can choose to run the boards parallel or perpendicular to the longest wall, depending on the desired aesthetic or to enhance the visual proportions of the space. Consider the overall look and feel you want to achieve before deciding on the direction.