Are you a handy homeowner looking to upgrade your bathroom’s shower? Installing a shower pipe in the wall can be a fantastic way to achieve a sleek, modern look while optimizing available space. However, the thought of tackling such a project might seem daunting at first. Don’t worry! In this blog post, we will guide you through the process step by step, answering common questions like “How do you attach copper pipe to a concrete wall?” and “Can water leak through bathroom tiles?”
But before we dive into the nitty-gritty details, let’s address some fundamental concerns. How do you tell if pipes are leaking behind a wall, and is it possible to put water pipes in a wall? Don’t panic! We’ll clarify all your doubts and explore reasons why shower leaks occur behind walls. Moreover, we’ll share expert tips on stabilizing shower head pipes and securing water pipes to the wall effectively.
So grab your tools and get ready to transform your bathroom. This comprehensive guide will equip you with the knowledge and confidence to install a shower pipe in your wall like a pro. Let’s get started!
How to Install a Shower Pipe in the Wall
So, you’ve decided to take the plunge and install a shower pipe in your wall. Well, kudos to you for your bravery! This handy guide will walk you through the steps, ensuring your shower installation journey is smooth sailing from start to finish. Let’s dive right in!
Gathering the Tools and Materials
First things first, gather all the tools and materials you’ll need for this endeavor. Don’t worry; it’s not as daunting as it sounds. Here’s a quick rundown of what you’ll need:
- Shower pipe: The star of the show! Choose a sturdy and stylish option that suits your taste.
- Adjustable wrench: This tool will be your best friend throughout the installation process.
- Plumbing tape: A little tape goes a long way in ensuring leak-free connections.
- Pipe cutter: You’ll need this to precisely cut and shape the pipe to fit your desired length.
- Teflon paste: A small tube of teflon paste will help seal the connections securely.
- Wallboard saw: Time to channel your inner handyman (or handywoman) and cut the wall for installation.
- Plumber’s putty: This waterproofing compound will help seal the gaps and prevent any water seepage.
Preparing the Wall for Installation
Now that you have all the tools in your arsenal, it’s time to prepare the battlefield—erm, I mean, the wall—for the installation. Here’s what you need to do:
- Find the ideal spot: Locate the perfect position for your shower pipe in the wall. Consider the showerhead height and any other fixtures you plan to install.
- Measure and mark: Measure twice (or thrice) and mark the spot where you’ll cut the wall. Remember, accuracy is key here!
- Don your DIY armor: Put on some protective eyewear and gloves. Safety first, folks!
- Cutting the wall: Take your wallboard saw and carefully cut along the marked lines. Keep your superhero cape away from the saw for this part.
Installing the Shower Pipe
You’ve made it this far! Now let’s get down to business—installing that shower pipe like a pro:
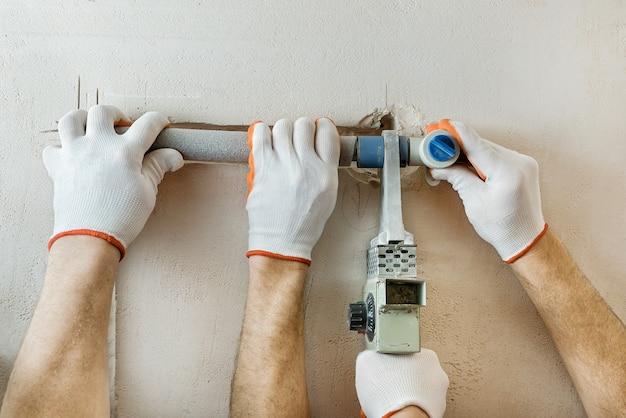
- Prepare the pipe: Wrap some plumbing tape around the male threads of the shower pipe. This will ensure a watertight connection. Don’t be shy with the tape; wrap it like a mummy!
- Apply the putty: Take some plumber’s putty and roll it into a thin, snake-like shape. Press it onto the backside of the escutcheon plate. It’s like giving the plate a little putty massage.
- Insert the pipe: Slide the shower pipe into the hole you proudly cut earlier. Make sure it fits snugly without any wobbling. No wobbling allowed in this DIY dance party!
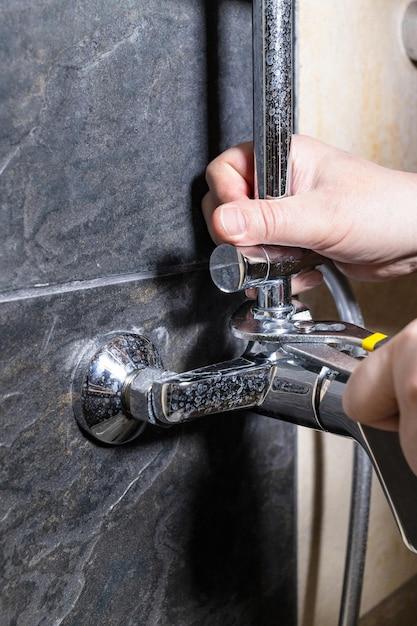
- Tighten and secure: Use your trusty adjustable wrench to tighten the pipe connection. Remember, just a gentle twist to make it snug—no need to channel your inner Hercules.
- Seal the deal: Apply teflon paste to the female threads on the shower arm. This extra layer of protection will keep those pesky leaks at bay.
- Attach the showerhead: Screw on the showerhead to the shower arm. Give it a gentle spin until it feels tight and secure. Voila! Your showerhead is now ready to unleash its water dance moves.
Wrapping Up
Congratulations, my DIY maestro! You’ve conquered the art of installing a shower pipe in the wall. Give yourself a well-deserved pat on the back and enjoy the fruits of your labor—an indulgent, refreshing shower experience that will make all your hard work worthwhile.
Remember, if you ever feel overwhelmed or unsure during the process, don’t hesitate to seek professional assistance. Now go forth and embrace your newfound plumbing prowess, one shower pipe at a time!
Disclaimer: The information provided in this blog post is for educational and entertainment purposes only. The author and the AI assistant take no responsibility for any damage caused during the installation process. Please consult a professional if you have doubts or lack experience in DIY projects.
FAQ: How To Install a Shower Pipe In Wall
How do you tell if there are leaks behind a wall
If you suspect leaks behind a wall, there are a few signs to look out for:
- Dampness or water spots: Keep an eye out for any signs of dampness or water spots on the wall’s surface, as they could indicate a hidden leak.
- Musty odor: If you notice a musty odor in a specific area, it might be a sign of mold growth due to moisture from a hidden leak.
- Peeling or bubbling paint: Moisture can cause paint to peel or bubble on the surface of the wall, indicating a possible leak issue.
- Unusual mold or mildew growth: Mold or mildew growth that appears in unexpected places, such as on non-shower walls, might be an indication of hidden water leaks.
How do you attach copper pipes to a concrete wall
Attaching copper pipes to a concrete wall requires a few steps:
- Prepare the surface: Ensure that the concrete wall is clean and free of debris or loose materials.
- Mark insertion points: Identify the locations where you want to attach the copper pipes to the wall.
- Drill holes: Use a masonry drill bit to create holes in the concrete at the marked insertion points.
- Insert anchors: Insert concrete anchors into the drilled holes. These anchors provide stability for attaching the pipes.
- Secure the pipes: Use suitable fasteners, such as conduit straps or clamps, to secure the copper pipes to the concrete wall at the anchor points.
Can water leak through bathroom tiles
Bathroom tiles are designed to be water-resistant, but they are not entirely waterproof. Over time, damaged or improperly grouted tiles can allow water to seep through. Additionally, if there are cracks in the shower base or damaged caulking around the shower fixtures, it can contribute to water leakage. So, while bathroom tiles provide some protection, it’s essential to maintain them properly.
What are pipe sleeves
Pipe sleeves, commonly made of materials like foam or rubber, are protective coverings that slide over pipes to shield them from damage. These sleeves act as insulation against moisture, heat, or cold and provide a protective barrier that helps prevent pipe leaks from occurring. Pipe sleeves also help reduce condensation and minimize the risk of pipes freezing in colder climates.
How does water get behind shower tiles
Water can get behind shower tiles due to various reasons:
- Cracked or damaged grout: If the grout between the tiles is cracked or damaged, water can seep through the gaps and reach the wall behind.
- Insufficient waterproofing: If the shower waterproofing membrane is improperly installed or compromised, water can penetrate the wall.
- Shower fixture leaks: Leaks in shower fixtures, such as the faucet, showerhead, or diverter valve, can allow water to flow behind the tiles.
- Improper tile installation: Inadequate tile installation techniques that do not provide a proper moisture barrier can lead to water penetration.
Is it OK to bury copper pipes
Yes, it is acceptable to bury copper pipes in the ground. Copper is highly durable and resistant to corrosion, making it an excellent choice for underground pipe installations. However, it’s essential to consult local building codes and regulations to ensure compliance and follow proper burial depth guidelines. Additionally, using protective sleeves or wraps during the burial process can provide extra protection against potential damage.
How do you stick PVC pipe to the wall
To stick PVC pipe to a wall, you can use an adhesive specifically designed for PVC materials. Here’s how to do it:
- Prepare the surface: Ensure that the wall surface is clean and free from dirt, oil, and debris.
- Cut the PVC pipe: Cut the PVC pipe to the desired length using a PVC pipe cutter or a fine-toothed saw.
- Apply PVC primer: Use PVC primer on both the pipe and the area of the wall where you want to attach it. This helps improve the adhesion.
- Apply PVC glue: Apply a generous amount of PVC glue to both the pipe and the primed wall area.
- Join and hold: Press the pipe firmly against the wall, aligning it properly. Hold it in place for a few seconds until the glue sets.
How do you stabilize a shower head pipe
To stabilize a loose or wobbly shower head pipe, you can follow these steps:
- Identify the issue: Determine whether the instability is caused by a loose connection between the shower arm and the water pipe or if the issue lies within the wall.
- Tighten the connection: Use an adjustable wrench or pliers to firmly tighten the connection between the shower arm and the water pipe. Ensure not to overtighten and risk damaging the pipe.
- Add a support bracket: If the instability persists, install a support bracket that attaches to the water pipe and provides additional stability. Depending on the setup, you may need to access the area behind the wall to secure the bracket properly.
Can you put shower plumbing on an outside wall
Yes, it is possible to install shower plumbing on an outside wall. However, there are a few considerations to keep in mind:
- Insulation: Exterior walls are more exposed to temperature variations, so it’s crucial to insulate and protect the plumbing adequately to prevent freezing during colder months.
- Access: Installing shower plumbing on an outside wall may require additional planning to ensure access for maintenance or repairs in the future.
- Building codes: Always check local building codes and regulations to ensure compliance before proceeding with any plumbing installations.
Why is my shower leaking behind the wall
A leak behind the shower wall can occur due to several reasons:
- Pipe leaks: Plumbing pipes behind the wall, such as supply or drain pipes, can develop leaks over time due to corrosion, aging, or damage.
- Faulty seals: Improperly sealed connections, such as those around shower fixtures or pipe joints, can allow water to escape behind the wall.
- Waterproofing issues: Insufficient or deteriorated waterproofing behind the tiles can lead to water penetration and subsequent leaks.
- Leaking shower fixtures: Faulty components within the shower fixtures, such as valves or cartridges, can cause water leakage that extends behind the wall.
How do you secure a water pipe to the wall
To secure a water pipe to a wall, you can follow these steps:
- Prepare the surface: Ensure that the section of the wall where you plan to attach the pipe is clean and free from any obstacles.
- Position the pipe: Position the water pipe in the desired location against the wall.
- Mark anchor points: Mark the anchor points on the wall where you will attach the pipe supports or clamps.
- Drill holes: Use an appropriate-sized drill bit to create holes in the wall at the marked anchor points.
- Insert anchors: Insert wall anchors into the drilled holes to provide stability for attaching the pipe supports.
- Secure the pipe: Use suitable pipe supports or clamps, such as pipe straps, to secure the water pipe to the wall at the anchor points.
Do plumbers fix shower leaks
Yes, plumbers can fix shower leaks. Plumbing professionals have the expertise to troubleshoot and repair various shower leak issues, such as pipe leaks, faulty seals, water fixture problems, or waterproofing failures. If you’re experiencing a persistent shower leak or are unsure of the cause, it’s advisable to contact a licensed plumber to ensure proper and long-lasting repairs.
How do you hide exposed bathroom pipes
If you want to conceal exposed bathroom pipes, you can consider the following options:
- Boxing-in: Build a custom-made box or enclosure around the pipes using materials such as wood, drywall, or plastic. Ensure adequate access for future maintenance or repairs.
- Pipe covers: Install pre-made pipe covers or sleeves that fit over the exposed pipes. These covers are often available in various decorative designs and can easily hide the unsightly appearance.
- Camouflage with decor: Strategically place decorative elements, such as curtains, shelving units, or artworks, to divert attention from the exposed pipes and create a more aesthetically pleasing bathroom.
Can you put copper pipes in the wall
Yes, copper pipes are commonly used for plumbing installations behind walls. Copper is durable, resistant to corrosion, and has excellent heat transfer properties, making it a popular choice for various plumbing applications. Ensure to follow local building codes and guidelines when installing copper pipes.
Can you put plastic pipes in walls
Yes, plastic pipes, such as PVC (polyvinyl chloride) or PEX (cross-linked polyethylene), can be installed in walls for plumbing purposes. Plastic pipes are lightweight, easy to handle, and resistant to corrosion. They are often used for drains, vents, and water supply lines. Always consult local codes and regulations to ensure the appropriate use and installation practices for plastic pipes.
How do you install a water pipe in the wall
To install a water pipe in the wall, follow these general steps:
- Plan the route: Determine the path the water pipe will take within the wall, ensuring it avoids any obstructions or potential damage areas.
- Cut an opening: Cut an opening in the wall to access the area where you will install the water pipe.
- Secure the pipe: Use appropriate pipe supports or clamps to secure the water pipe to the studs or joists within the wall.
- Connect to the water supply: Connect the water pipe to the existing water supply lines using compatible fittings and connectors.
- Seal and test: Properly seal all connections and joints, then test the water pipe for leaks before closing the wall opening.
Can you put water pipes in a wall
Water pipes can be installed within walls, providing an efficient and concealed plumbing system. These pipes supply water to various fixtures and outlets throughout the building. It’s crucial to follow proper installation practices, comply with building codes, and use suitable materials to ensure safe and reliable water distribution behind walls.
Can a shower leak through grout
Though grout plays a role in preventing water from penetrating behind shower tiles, it is not entirely waterproof. Over time, grout can degrade, crack, or develop signs of wear, allowing water to seep through. This can lead to water leaks behind the tiles and potentially cause damage to the wall or surrounding areas. Proper installation, regular maintenance, and periodic regrouting are essential to prevent shower leaks caused by compromised grout.