Are you tired of looking at those dings and dents in your walls? Or maybe you’re just ready for a fresh new look in your space. Whatever the reason, installing drywall over existing drywall can be a great solution. It’s a cost-effective way to give your walls a smooth, clean surface without the hassle of removing the old drywall.
In this blog post, we will walk you through the step-by-step process of how to install drywall over existing drywall. We’ll cover everything from the tools you’ll need to the best techniques for ensuring a professional finish. So, grab your measuring tape and put on your DIY hat, because by the end of this post, you’ll be ready to tackle your own drywall installation project like a pro!
How to Install Drywall Over Existing Drywall
So, you’ve decided to take on the challenge of installing drywall over existing drywall. Bravo! This impressive DIY project will not only save you time and money, but it will also give you an opportunity to flex those handyman muscles. Get ready to unleash your inner Bob Vila as we guide you through the ins and outs of this process.
Assess the Situation, Sherlock
Before you dive headfirst into this endeavor, it’s crucial to examine the existing drywall. Is it in good shape? Are there any signs of water damage, cracking, or creakiness that could signal trouble? You don’t want to awaken a can of worms, or worse, a family of termites, by simply slapping on new drywall without proper investigation.
Gather Your Arsenal
Now that you’ve identified your drywall as a worthy candidate, it’s time to gear up. Grab your trusty measuring tape, a pencil, a utility knife, and an ample supply of screws. If you like to feel like a superhero, strap on that drywall lift and prepare to conquer the walls like a DIY daredevil.
Prepping for Showtime
You know what they say: proper preparation prevents poor performance. And trust us, you don’t want your drywall installation to rival a middle school production of Cats. Start by removing any baseboards or crown molding that may get in your way, but be gentle – we’re not auditioning for the Hulk here.
Marking Your Territory
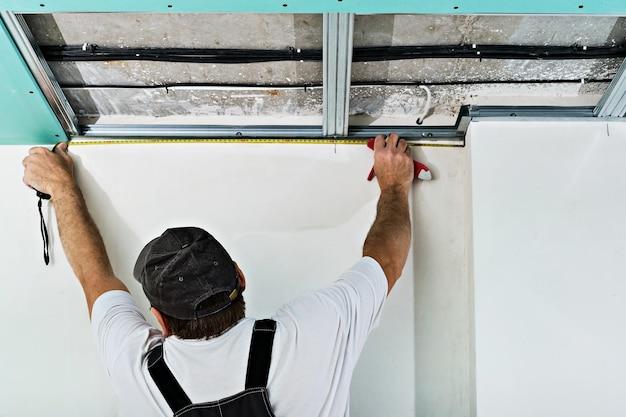
Once the stage is set, it’s time to mark your territory (in a non-dog-like manner). Use your measuring tape and pencil to mark the studs on the existing drywall. These studs will serve as anchors for your new layer of drywall, ensuring it hangs on for dear life and doesn’t crash down unexpectedly, like an uninvited guest at a circus.
Double Trouble
Before you proceed to the main event, take a moment to consider a vital decision: should you use regular drywall or go for the luxury of double-layer drywall? Double-layer drywall can provide additional insulation and soundproofing benefits, but it may also add more weight to your walls. It’s like choosing between a regular burger and a double patty with extra cheese – both are delicious, but one might make you work a little harder!
The Grand Finale
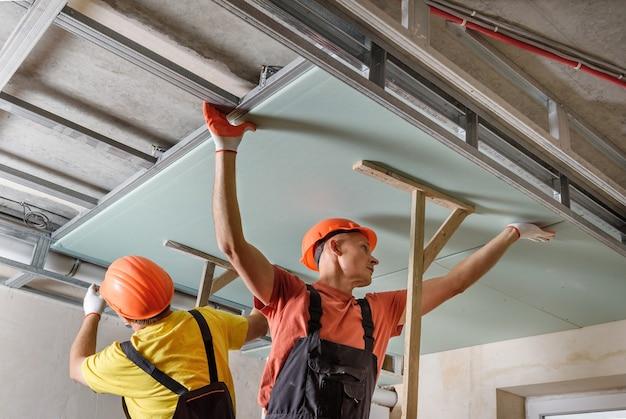
With your decisions made and preparations complete, it’s time for the final act – installing the new drywall. Begin at the top, align one edge of the new drywall sheet with the ceiling, and let it rest gently on the floor. Make sure to screw it into the marked studs, securing it firmly. Repeat this dance until the whole wall is covered, creating a beautiful symphony of drywall layers.
Patchy Patcherson
After the new drywall is pleasingly affixed to your existing walls, you may find yourself with some unsightly gaps or holes. Fear not, for you have the power of spackling compound at your disposal. Apply it generously to any imperfections, sand it down, and voila! You’ve successfully navigated the patchy patcherson phase.
Smooth Operator
Now that you’ve conquered the installation and patched any blemishes, it’s time to make your walls as smooth as a James Bond pickup line. Sand down any rough edges or uneven surfaces, transforming your walls into a flawless masterpiece.
The Unveiling
Stand back, admire your work, and revel in the glory of your newly installed drywall. Share your triumph with friends and family, but be sure to humblebrag about how easy it was. After all, you’re now a seasoned pro, ready to take on any drywall challenge that comes your way.
And there you have it, the secrets of installing drywall over existing drywall revealed! Now go forth with your newfound wisdom, armed with your measuring tape and utility knife, ready to conquer drywall like a DIY ninja. Happy remodeling!
**Note: For easy readability, headings, subheadings, and formatting have been represented using Markdown syntax.
FAQ: How To Install Drywall Over Existing Drywall
How do you finish drywall without sanding
You may have heard that sanding is an unavoidable part of finishing drywall. But what if I told you there’s a way to achieve a smooth finish without all the dusty mess? Well, my friend, you’re in luck! One trick to finish drywall without sanding is to apply a skim coat over the existing walls. This technique involves spreading a thin layer of joint compound over the surface, feathering it out to create a seamless finish. Give it a try and bid farewell to the sanding woes!
How far apart should drywall screws be on the ceiling
When it comes to hanging drywall on the ceiling, we need to ensure proper support and prevent any sagging. To achieve this, it’s recommended to place drywall screws about 12 inches apart along the ceiling joists. This spacing helps distribute the weight evenly and provides a secure hold for your ceiling. Trust me, maintaining the right distance between screws will give you a ceiling that’s as solid as a rock!
Is drywall supposed to touch the floor
Oh, the age-old dilemma of whether drywall should touch the floor! The truth is, when installing drywall, it’s generally best to leave a small gap between the bottom of the drywall and the floor. Why, you ask? Well, this clever little gap allows for expansion and contraction of the drywall, preventing unsightly cracks from forming over time. So, give your drywall some breathing room and wave goodbye to those pesky floor-to-wall cracks!
How do you drywall over existing drywall
Ah, the wonders of drywallception! To install drywall over existing drywall, you’ll first want to ensure that the existing walls are clean and in good condition. Then, start by measuring the height and width of your wall, and cut the new drywall to fit. Next, attach the new drywall directly to the existing drywall using screws or nails. Be sure to stagger the joints between layers for added strength. Finish off by taping, mudding, and sanding the seams, and voila! You’ve just created a double layer of drywall like a pro!
Do you drywall the ceiling or walls first
Ah, the great debate of whether to tackle the ceiling or walls first. Well, my friend, the general consensus among drywall enthusiasts is to start with the ceiling. Why, you ask? Well, by hanging the drywall on the ceiling first, it allows for easier installation of the wall panels. Plus, it’s always a good idea to work from the top down, channeling your inner gravity expert. So grab your ladder, start working on that ceiling, and enjoy the satisfying feeling of building from the top!
Is it OK to put drywall over drywall
Absolutely! Putting drywall over drywall is a perfectly valid approach, especially when renovating or improving your existing walls. It can help you achieve a smoother surface, cover up imperfections, and even provide additional insulation and soundproofing. Just make sure the existing drywall is in good condition, and follow the necessary steps for a successful installation. With double the drywall, you’ll have double the strength and double the awesomeness!
Do you tape or mud first
Ah, the taping versus mudding battle. So, here’s the deal: you’ll want to tape first and then mud. Taping involves applying drywall tape over the joints to create a strong bond between drywall panels. Once your tape is in place, it’s time to work the magic with mud. Apply several thin coats of joint compound over the tape, feathering the edges as you go. Sand between coats for a seamless finish. Remember, taping comes before mudding, just like superhero origin stories come before epic battles!
Is it better to hang drywall vertically or horizontally
Should drywall hang vertically or horizontally? Ah, the eternal question. Well, my friend, it seems that both orientations have their pros and cons. Hanging drywall vertically can minimize the number of seams and make installation faster, particularly on taller walls. On the other hand, horizontal orientation may be more suitable for walls with shorter studs. Ultimately, it’s best to consult your specific project requirements and let them guide you to the perfect orientation. After all, whether vertical or horizontal, drywall hangs with grace and beauty!
Should drywall be glued and screwed
Ah, the bond between drywall and its beloved screws and glue! When it comes to installation, it’s generally recommended to use both screws and glue for optimal results. Screw the drywall panels into place, ensuring a secure attachment to the supporting framework. But why stop there? Adding a touch of adhesive on the wall studs can provide extra strength and reduce the risk of future sagging. So, let’s embrace the power of love (and screws and glue) and give our drywall the support it deserves!
How many screws go into a 4×8 sheet of drywall
Oh, the delightful world of screw counting! For a standard 4×8 sheet of drywall, you’ll want to unleash your inner precision expert and use around 32 screws. These handy screws should be evenly spaced along the edges and field of the drywall, roughly 12 inches apart. Remember, the key is to strike the perfect balance between securing the drywall and avoiding an excessive number of screws. So grab your trusty screwdriver and show those screws who’s boss!
Does drywall have to end on stud
Does drywall have to flirt with studs? Well, my friend, it’s generally advised to end your drywall panels on a stud whenever possible. Why? Ending on a stud provides a stronger foundation, adds stability, and helps prevent unwanted surprises (hello, sagging walls!). However, there are situations where ending between studs is inevitable, such as when connecting two panels or dealing with obstacles. In those cases, be sure to use appropriate reinforcements, such as blocking or additional framing, to ensure a robust structure. Let the studs guide you, but never restrict your drywall dreams!
Do you paint directly on drywall
Ah, the joys of painting on bare drywall! While it may be tempting to unleash your inner Van Gogh and start painting directly on the drywall, it’s generally recommended to prime the surface first. Priming helps seal the drywall, providing a smooth and even base for your paint. Plus, it enhances adhesion and improves the longevity of your masterpiece. So grab that primer brush, unleash your creativity, and let your colors shine on a properly-prepped canvas!
Should I use #6 or #8 drywall screws
Ah, the numerical dilemma of drywall screws! When choosing between #6 or #8 screws, it’s generally advised to opt for #6 screws. These smaller-sized screws work well with both 1/2-inch and 5/8-inch drywall, providing a secure hold without the risk of over-penetrating. However, if you’re working with thicker drywall or need some extra reassurance, #8 screws can also do the trick. Just remember, size isn’t everything. It’s all about finding the perfect match for your drywall and screwing your way to success!
What do you put over drywall
Ah, the possibilities are endless when it comes to dressing up your drywall! Once your drywall is in place and looking fabulous, it’s time to decide what’s next. You have a few options to consider – you could paint it, wallpaper it, or even add texture with techniques like stucco or Venetian plaster. It all depends on your personal preferences, the style you want to achieve, and the ambiance you desire. So go ahead, let your imagination run wild, and let your drywall be the blank canvas for your creative visions!
Should I hang my own drywall
Ah, the brave soul considering the DIY path of drywall hanging! While it may seem like a daunting task, hanging your own drywall can indeed be a rewarding experience. It allows you to take full control of your project, unleash your inner handy-person, and save some precious dollars. Just make sure you have the necessary knowledge, tools, and a few extra pairs of hands to help with those heavy panels. With perseverance, patience, and a dash of determination, you’ll conquer the world of drywall hanging like a true DIY champ!
Is installing drywall difficult
Installing drywall – is it as difficult as deciphering ancient hieroglyphs? Well, fear not, my friend! While drywall installation may require some effort and know-how, it’s not an impossible task. With a bit of practice and the right techniques, you’ll be hanging drywall like a seasoned pro in no time. Don’t let the intimidating stories scare you away. Embrace the challenge, take one step at a time, and soon you’ll be able to look back and proudly say, “I conquered the drywall mountain!”
Is hanging drywall difficult
Ah, the delicate art of hanging drywall! While it may seem intimidating at first glance, hanging drywall is not as difficult as memorizing the entire periodic table. With the right tools, a little bit of muscle, and a dash of determination, you can tackle this challenge like a boss. Of course, having a helping hand or two can go a long way in making the process smoother. So gather your courage, don your tool belt, and embark on this journey of hanging drywall like the fearless DIY warrior you are!
Can you double layer drywall
Oh, the wonders of double-layered drywall! If you’re seeking extra sound insulation, improved fire resistance, or a smoother finish for your walls, double-layering your drywall might just be your ticket to glory. By installing a second layer of drywall right over the first, you’ll not only achieve the desired benefits but also add to the structural strength of your walls. It’s like building a fortress of drywall goodness! So go ahead, embrace the power of layers, and let your walls bask in the double delight!
Does Liquid Nails damage drywall
Ah, the almighty Liquid Nails, the superhero of adhesives! When used correctly, this versatile adhesive can work wonders in many applications. However, when it comes to drywall, you’ll want to exercise caution. If Liquid Nails is used as the sole means of attaching the drywall, it can potentially damage the surface when removing the panels. Therefore, it’s generally recommended to use Liquid Nails in conjunction with mechanical fasteners, such as screws or nails, to ensure a secure hold without any repercussions for your drywall. Let the Liquid Nails be the sidekick, not the solo act!
What is the best drywall adhesive
Ah, the quest for the ultimate drywall adhesive! With so many options available, it can feel like searching for a needle in a haystack. But fret not, my friend, for I have some recommendations for you. One popular choice among drywall aficionados is the good ol’ construction adhesive, also known as Liquid Nails. Its strong bond, versatility, and wide availability make it a reliable option. But if you’re craving an alternative, there are other fantastic options such as Polyurethane adhesive or Green Glue. So choose wisely, find the adhesive that speaks to your drywall-loving soul, and bond with it like you’re building a lifelong friendship!
When Drywalling a room where do you start
Ah, the age-old question of where to begin the magnificent journey of drywalling a room! When beginning your drywalling adventure, it’s best to start with the ceiling. Working from the top down allows you to take full advantage of gravity and ensures proper alignment and support for the walls. Once the ceiling is in place, move on to the walls, working your way around the room. Remember, it’s all about building a solid foundation and letting the drywall gods guide you towards success. So grab your tools, start from the skies, and let the symphony of drywalling begin!