If you’re a fan of ceramic art, you know how it can effortlessly enhance the beauty of any space. Whether it’s a delicate ceramic plate or a magnificent wall plaque, finding the perfect way to display these art pieces is essential. But with so many questions about hanging ceramic art, it’s easy to feel uncertain about where to start.
In this comprehensive guide, we’ll answer all your burning questions about hanging ceramic art. From the basics of what makes something a ceramic to the best methods for hanging heavy plates, you’ll discover practical tips and creative ideas to showcase your collection with style and confidence. So, let’s dive in and find out how to create stunning displays that will captivate and inspire!
Seo-optimized title: How to Hang Ceramic Art: A Complete Guide for Stunning Displays
How to Hang Ceramic Art
So, you’ve invested in some gorgeous ceramic art pieces, and now you’re faced with the exciting challenge of hanging them on your walls. Fear not! We’re here to guide you through the process, step by step, ensuring your art is displayed safely and beautifully. Let’s dive in!
Check Your Wall Strength
Before you start wielding hammers and nails, give your wall a little love. You want to make sure it’s sturdy enough to hold your prized ceramics. Tap on the wall and listen for any hollow sounds, indicating weak spots. If your wall feels strong and confident, let’s move on. If not, consider reinforcing it or choosing a different location.
Choose the Right Hanging Hardware
Not all hanging hardware is created equal, my friends. For your delicate ceramic pieces, we recommend using picture hooks or adhesive hooks specifically designed for heavier objects. These options provide more stability and minimize the risk of your art crashing to the ground in a dramatic and heartbreaking fashion.
Measure Twice, Hang Once
Ah, the golden rule of hanging art: measure twice, hang once. Grab your trusty tape measure and calculate the ideal height for your ceramic art display. You wouldn’t want a beautifully crafted piece to end up awkwardly positioned above your eye level, right? Take a moment to find that sweet spot, keeping in mind the overall layout and balance of your wall decor.
Get Your Level On
Nobody likes crooked art, unless your goal is to create some avant-garde, abstract statement. We won’t judge. But if you’re aiming for a more traditional approach, grab your level to ensure everything hangs straight and true. No tilted vases or lopsided plates here, we’re aiming for perfection!
Show Some Patience
Patience is a virtue, my friend, especially when it comes to hanging delicate ceramic art. Take your time, go slow, and double-check every step along the way. Rushing through this process may lead to unforeseen accidents or unnecessary holes in your walls. Let’s avoid both of those, shall we?
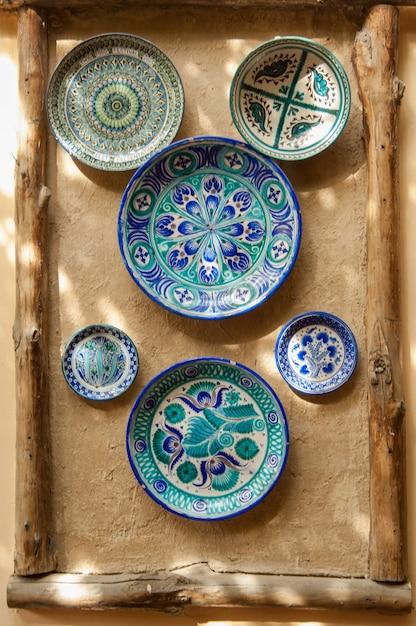
Displaying Multiple Pieces
If you’re feeling bold and want to create a ceramic art gallery wall, go for it! Just remember to plan out your arrangement before diving in headfirst. Lay your pieces on the floor, experimenting with different layouts until you find the perfect configuration. Once you’re satisfied, transfer your plan onto the wall, ensuring proper spacing and alignment between each piece.
Consider Lighting
Lighting can make or break the impact of your ceramic art. When choosing a spot to hang your pieces, pay attention to natural and artificial light sources. Avoid placing your art in direct sunlight to prevent color fading or heat damage. Instead, opt for well-placed spotlights or wall sconces to highlight the beauty of your ceramics.
Embrace the Quirk
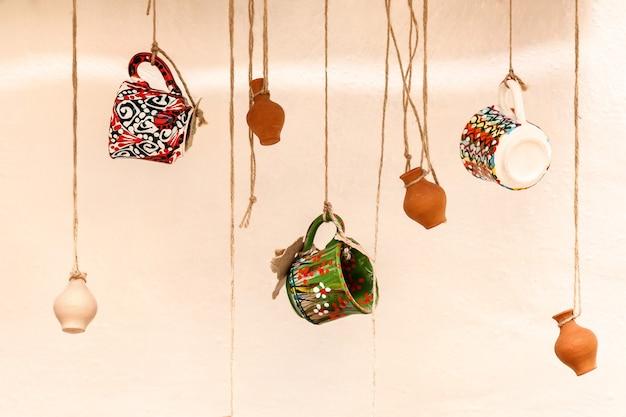
Ceramic art is all about embracing the quirks and unique imperfections in each piece. So why not match the spirit with some unconventional hanging methods? For example, you can attach multiple pieces to a wooden board and hang it as a cohesive unit. Just imagine the conversations it will spark when guests admire your unconventional display.
Share the Joy
Once you’ve successfully hung your ceramic art, take a moment to bask in the glory of your efforts. Share your masterpiece with friends and family, and let the compliments pour in. Don’t forget to mention your newfound expertise in hanging ceramic art. Who knows, you might just become the go-to advisor for all things art-related among your circle!
There you have it, dear reader! With our handy guide, hanging ceramic art has become a breeze. So grab your tools, embrace the quirks, and get ready to transform your walls into a showcase of beauty and creativity. Cheers to your newfound ceramic art hanging prowess!
FAQ: How To Hang Ceramic Art
Can You Hang Plates with Command Strips
Yes, definitely! Command Strips are a fantastic option for hanging plates. They work like magic and save you from the hassle of drilling holes into your walls. Simply follow the instructions on the package, clean the back of your plate, attach the Command Strips, and then stick the plate to the wall. Voila! Your plate will be securely hung without any fuss.
What Makes Something a Ceramic
Ah, the mysteries of ceramics! To put it simply, ceramics are crafted from clay that is shaped into various forms and hardened through a process called firing. It involves subjecting the clay to high temperatures to remove any remaining moisture and to chemically transform it into a sturdy, durable material. So, whether it’s a delicate porcelain teacup or a sturdy stoneware vase, if it’s made from clay and fired, it’s ceramic!
Does Hobby Lobby Have Plate Hangers
Absolutely! Hobby Lobby is a treasure trove for all your DIY needs, including plate hangers. They offer a variety of plate hangers that are designed to securely display your ceramic plates on the wall. Whether you have a small decorative plate or a large dinner plate, Hobby Lobby has got you covered!
How Do You Hang a Large Ceramic Plate
Hanging large ceramic plates can be a bit challenging, but fear not! One option is to use plate hangers specifically designed for larger and heavier plates. These hangers usually come with adjustable brackets that can accommodate different plate sizes. Another option is to use adhesive plate discs. These discreet discs attach to the back of the plate and allow for easy and secure hanging. Whichever method you choose, make sure to follow the manufacturer’s instructions for a successful display.
What Adhesive Sticks to Ceramic Tile
When it comes to sticking things to ceramic tile, there’s one adhesive that reigns supreme: epoxy adhesive. Epoxy adhesive is incredibly strong and forms a rock-solid bond, ensuring your ceramic art stays firmly in place. Just make sure to clean the tile surface thoroughly before applying the adhesive and follow the instructions provided. With epoxy adhesive, your ceramic art will be as secure as Fort Knox!
Can I Make Ceramics Without a Kiln
Absolutely! The lack of a kiln should never deter your creative spirit. One popular method is air-drying clay. This type of clay is designed to dry and harden in the air, eliminating the need for kiln firing. Simply shape your masterpiece, let it air dry for a few days or weeks depending on the clay, and voila! You have a beautiful ceramic creation without ever stepping foot near a kiln.
What Is the Difference Between Pottery and Ceramics
Ah, the age-old conundrum! Pottery and ceramics are like two peas in a pod but with a few distinctions. Pottery refers specifically to objects made from clay that has been shaped and fired, such as pots, vases, and mugs. On the other hand, ceramics is a broader term that encompasses all objects made from clay or other inorganic non-metallic materials, including pottery. So, think of it this way: all pottery is ceramics, but not all ceramics are pottery. Fascinating, isn’t it?
How Do You Hang a Heavy Ceramic Plate
When it comes to heavy ceramic plates, you’ll want to ensure rock-solid hanging. One option is to use heavy-duty picture hangers. These hangers are specially designed to hold more weight and provide extra stability. Alternatively, you could use a combination of adhesive and a wire holder. Simply attach the wire holder to the back of the plate using epoxy adhesive and hang it on a heavy-duty nail or hook. With these methods, your heavy ceramic plate will stay securely displayed, no matter its weight.
How Do You Hang Ceramic Wall
Hanging ceramic wall art can be a delightful project. The best method depends on the weight and size of the ceramic piece. For smaller and lighter pieces, adhesive hooks or picture hanging strips are terrific options. These allow for easy installation and removal without damaging your walls. If you have larger or heavier ceramic art, consider using screws and wall anchors for a more robust and secure display. Whichever method you choose, make sure to double-check the weight-bearing capacity and follow the manufacturer’s instructions for a worry-free installation.
Is Tile Adhesive Better Than Thinset
Ah, the eternal battle of tile adhesion! While both tile adhesive and thinset are commonly used, each has its own strengths. Tile adhesive is a premixed adhesive that offers easy application and provides a strong bond for lightweight ceramic art. On the other hand, thinset mortar is a powdered adhesive mixed with water to create a cement-like paste. It is more suitable for heavy-duty applications, like installing floor tiles. So, choose your weapon wisely based on the weight and location of your ceramic art.
How Do You Hang Things on Tile Without Drilling
Drilling into tile can be intimidating, but fear not, for there are alternative options! One popular method is to use adhesive hooks or strips designed specifically for tile surfaces. These hooks provide a strong bond and are easily removable without leaving any residue or damaging the tile. Another option is to use suction cup hooks that can be pressed onto the tile for a temporary hanging solution. So, no drilling required and your tile remains unscathed!
Can You Use Liquid Nail on Tile
While Liquid Nail is known for its excellent adhesion, it is not the best choice for tile. Liquid Nail is intended for porous surfaces, and that includes ceramic and porcelain tiles. Using Liquid Nail on tile may result in a weaker bond or even damage the tile surface when removed. So, it’s best to explore other adhesive options, specifically designed for tile, to ensure a secure and worry-free hanging experience.
Which Clay Is Used for Wall Art
When it comes to clay for wall art, the tried-and-true choice is earthenware clay. Earthenware clay is versatile, allowing you to create intricate designs and textures. It is also known for its vibrant colors and smooth surface finish, making it perfect for wall art. So, grab some earthenware clay, let your imagination run wild, and create stunning clay wall art that will be the envy of all your friends.
What Can You Make Out of Polymer Clay
Oh, the possibilities with polymer clay are virtually endless! From jewelry to figurines to decorative tiles, you can create a myriad of beautiful creations. Polymer clay is pliable, easy to work with, and comes in a vast array of colors. Create intricate pendant necklaces, adorable animal sculptures, or even design your own unique decorative tiles. Let your creativity soar with the wonders of polymer clay!
How Do You Secure Plates on a Shelf
Ah, the delicate balancing act of displaying plates on a shelf! To secure plates on a shelf, consider using plate stands or plate easels. These delightful little stands provide support and stability for your plates, allowing them to be showcased without fear of slipping or toppling over. Another option is to use clear plate display discs. These discs discreetly adhere to the back of the plate, anchoring it to the shelf. Whichever method you choose, your plates will be proudly displayed without any wobbling mishaps.
How Do You Display Decorative Tiles
Decorative tiles are too lovely to be tucked away in a drawer! To display them, you have a few options. One popular choice is to use plate stands or display easels designed for tiles. These stands showcase your beautiful tiles in an upright position, allowing their intricate designs to shine. Another option is to create a stunning tile tableau on a wall using adhesive hooks or plate hangers. Arrange your decorative tiles in an eye-catching pattern and transform any wall into a work of art!
How Do You Make a Clay Wall Plaque
Creating a clay wall plaque is a delightful project that will brighten up any space. Start by rolling out a slab of clay to your desired thickness. Next, cut out your desired shape, whether it be a circle, square, or something more creative. Add texture, carve designs, or imprint meaningful words into the clay. Allow the clay to dry and then fire it according to the clay’s instructions. Finally, paint or glaze your plaque to bring it to life. Hang it on the wall using your preferred method, step back, and admire your handmade masterpiece!
How Do You Tile Upcycle
Ah, the art of tile upcycling! Instead of throwing away old tiles, why not give them a new lease on life? There are endless possibilities for tile upcycling. Consider turning plain tiles into unique coasters by adding your own designs with paint or decoupage. Frame a beautiful tile to create a one-of-a-kind piece of wall art. Or take it a step further and create a mosaic masterpiece using broken or mismatched tiles. With tile upcycling, your imagination is the limit, and you’ll be creating stunning pieces while reducing waste. Go forth and tile upcycle with gusto!