Dealing with a leaky pipe can be frustrating, especially when it’s hidden within the confines of a concrete wall. Whether it’s a sewer pipe in your basement or a PVC pipe passing through the foundation, finding and fixing the leak requires a bit of know-how. In this comprehensive guide, we’ll walk you through the process of waterproofing around pipes, sealing a pipe through a cement wall, and repairing water pipe leaks in concrete slabs. So, if you’re wondering what to do if a pipe in your wall is leaking, or how to fix a leaking pipe under concrete, you’ve come to the right place. Let’s dive in and tackle that pesky leak once and for all!
How to Fix a Leaking Pipe in a Concrete Wall
Introduction
Dealing with a leaking pipe in a concrete wall can be quite a nightmare. Not only does it cause water damage, but it also poses a challenge when it comes to fixing it. However, fear not, as we’re here to guide you through the process of fixing that pesky leak. In this article, we’ll show you some effective and user-friendly methods to repair a leaking pipe in a concrete wall. Let’s dive in!
Locating the Leak
The first step in fixing a leaking pipe is finding the source of the problem. Start by identifying any visible signs of water damage, such as dampness on the wall, pooling water, or mold growth. Once you’ve identified the general area of the leak, you need to pinpoint the exact location. A helpful trick is to use a stethoscope or even a simple plastic tube to listen for the sound of water rushing through the pipe. This will help you narrow down the area that needs repair.
Shutting Off the Water Supply
Before you start making any repairs, it’s crucial to turn off the water supply. Locate the main water valve for your house and shut it off to prevent any further water flow through the leaking pipe. This will prevent more damage from occurring and create a safe environment for the repair process.
Preparing the Work Area
To ensure a successful repair, you need to properly prepare the work area. Start by clearing away any obstructions or debris around the leaking pipe. Use a wire brush to clean the surface of the concrete wall around the leak. This will remove any loose particles and create a clean and smooth surface for the patching material to adhere to.
Repairing the Pipe
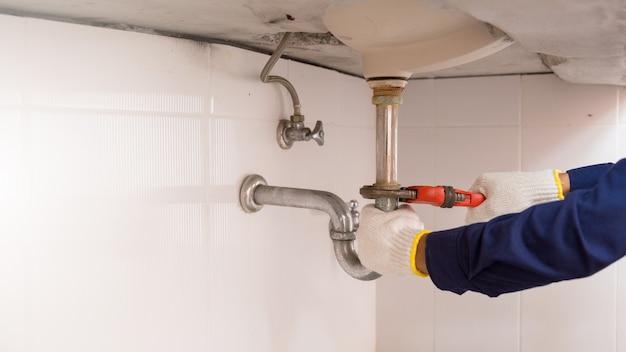
Now that the preparation is complete, it’s time to fix that leaking pipe. One effective method is using a pipe repair clamp, also known as a pipe sleeve. This device wraps around the damaged section of the pipe, providing a secure and watertight seal. Simply place the clamp over the leak, ensuring it covers the affected area completely. Tighten the screws until the clamp is firmly in place, and voila! Your leaking pipe is now repaired.
Fixing a leaking pipe in a concrete wall may seem like a daunting task, but with the right approach, it can be easily accomplished. Remember to locate the leak, shut off the water supply, prepare the work area, and apply the appropriate repair method. By following these steps, you’ll be able to tackle that leak head-on and prevent any further damage. Feel empowered and confident in your ability to repair that leak yourself. Good luck!
Waterproofing Around Pipes
Why is Waterproofing Around Pipes Important
When it comes to fixing a leaking pipe in a concrete wall, one important aspect we shouldn’t overlook is waterproofing around pipes. This step is crucial to prevent future leaks and water damage. By properly waterproofing around pipes, we can ensure that water doesn’t find its way into our walls and cause further headaches down the line.
Understanding the Challenges
Waterproofing around pipes in a concrete wall can be a bit tricky. Concrete is a porous material, which means it can absorb water. This makes it even more important to take the necessary steps to protect our walls and keep water out. After all, we don’t want our homes to turn into indoor swimming pools, do we?
Selecting the Right Waterproofing Materials
To effectively waterproof around pipes, we need to choose the right materials. There are various products available in the market, such as waterproofing membranes, sealants, and adhesives. These products act as barriers, preventing water from seeping into the wall from around the pipes.
Step 1: Clean and Prep the Area
Before we start waterproofing, it’s essential to clean and prep the area around the pipes. Remove any dust, debris, or loose material from the surface. This will ensure better adhesion of the waterproofing materials and improve the overall effectiveness of the process.
Step 2: Apply Waterproofing Membrane
Next, we need to apply a waterproofing membrane around the pipes. This membrane, often made of a rubberized or bituminous material, creates a watertight barrier. Carefully follow the manufacturer’s instructions while applying the membrane, ensuring complete coverage around the pipes.
Step 3: Seal Any Gaps
Now it’s time to seal any gaps or joints that might exist around the pipes. Use a high-quality sealant to fill in these gaps, ensuring that there are no openings for water to sneak through. Pay close attention to areas where the pipes penetrate the concrete wall, as these can often be problematic spots.
Step 4: Test for Leakage
After completing the waterproofing process, it’s always a good idea to run a simple test to check for leakage. Turn on the water supply and observe the pipes closely. Look for any signs of water seepage or moisture buildup. If everything looks good, congratulations – you’ve successfully waterproofed around the pipes!
Remember, waterproofing around pipes is an essential step in fixing a leaking pipe in a concrete wall. By taking the necessary precautions and following these simple steps, you can save yourself from future headaches and ensure a dry and worry-free living environment. So, grab your tools and get ready to protect your walls from unwanted water intrusion!
PVC Pipe Through Foundation Wall
Leaking pipes can be a real nightmare, especially when they are hidden behind concrete walls. One common scenario is a PVC pipe running through the foundation wall, which can develop leaks over time. But fear not, because I’m here to guide you through the process of fixing this pesky issue.
Locating the Leaky Spot
The first step in fixing a leaking PVC pipe through a foundation wall is to locate the exact spot where the water is seeping through. This can be a bit tricky, as the water may not show itself immediately. Look out for damp patches, discoloration, or even droplets of water if you’re lucky. Once you’ve identified the area, mark it for further action.
Clearing the Surrounding Area
To properly access the pipe and fix the leak, you’ll need to clear the area around it. This may involve removing any obstructions such as shelves, furniture, or decorative items. Safety should always be a priority, so be cautious and ensure a clutter-free workspace.
Epoxy Putty to the Rescue
Now that you have a clear path to the leaking pipe, it’s time to fix it. One reliable and easy-to-use solution is epoxy putty. This magical substance can seal up small leaks like a charm. Start by following the instructions on the pack and kneading the putty until it becomes malleable. Apply it generously to the leaky spot and smooth it out to create a tight seal.
Reinforcement is Key
While epoxy putty is great for sealing up leaks, it’s also essential to reinforce the pipe for long-lasting results. One handy trick is to wrap the affected section with rubber tape. This will provide additional support and prevent the leak from reoccurring. Make sure to tightly secure the tape around the pipe, ensuring there are no gaps or loose ends.
Testing, Testing, One Two Three
With the leak fixed and the pipe reinforced, it’s time to put your repair skills to the test. Turn on the water supply and carefully monitor the previously leaky spot. If all goes well, you should see no more signs of water seepage. Congratulations, you’ve successfully fixed a leaking PVC pipe through a foundation wall!
Wrapping It Up
Fixing a leaking PVC pipe through a foundation wall may seem like a daunting task, but with the right knowledge and a touch of perseverance, it can be easily accomplished. Remember to take your time, follow the steps carefully, and always prioritize safety. Don’t hesitate to seek professional help if the leak persists or if you’re uncertain about any part of the process.
Now that you know how to handle this pesky problem, go ahead and impress everyone with your newfound DIY plumbing skills!
How to Seal a Sewer Pipe in the Basement
Understanding the Severity of a Leaking Sewer Pipe
When it comes to dealing with a leaking sewer pipe in your basement, it’s crucial to act quickly. Ignoring the problem can lead to water damage, foul odors, and even potential health hazards. So, before we delve into the steps of sealing a sewer pipe in the basement, let’s first understand the severity of the issue.
Assessing the Damage
The first step in fixing a leaking sewer pipe is to assess the extent of the damage. Is the leak caused by a minor crack or a major rupture? Inspecting the area thoroughly will allow you to determine the best course of action.
Gathering the Necessary Tools and Materials
To effectively seal a sewer pipe in your basement, you’ll need a few essentials. Make sure you have a hacksaw, PVC primer, PVC cement, rubber couplings, and a pipe cutter at your disposal. These items will play a crucial role in the repair process.
Step-by-Step Guide to Sealing a Sewer Pipe in the Basement
Step 1: Safety First
Before getting your hands dirty, it’s important to wear protective gloves and eyewear to keep yourself safe throughout the repair process.
Step 2: Cutting the Damaged Section
Carefully use a pipe cutter to remove the damaged section of the sewer pipe. Ensure that the cut is clean and straight to avoid any further complications.
Step 3: Preparing the Pipes
Smooth the edges of the cut pipes using sandpaper or a file, allowing for better adhesion of the sealing materials.
Step 4: Applying PVC Primer and Cement
Apply PVC primer to the outside of the existing pipe and the inside of the rubber coupling to guarantee a strong bond. Follow up by applying PVC cement to both surfaces.
Step 5: Attaching the Rubber Coupling
Insert the rubber coupling over the pipe ends, making sure it fits tightly. This connection will create a waterproof seal, preventing any future leaks.
Wrapping Up
Sealing a sewer pipe in your basement may seem like a daunting task, but with the right tools and knowledge, you can tackle the issue successfully. Remember to prioritize safety, assess the damage, and follow each step diligently. By doing so, you’ll not only save yourself from potential headaches but also ensure a well-functioning plumbing system for years to come.
Water Leak Around Pipe Basement Wall
Having a water leak around a pipe in your basement wall can be a real headache. Not only can it damage your property, but it can also cause mold and other issues. But fear not, because I’m here to guide you through the process of fixing that pesky leak.
Identify the Source of the Leak
The first step is to identify where exactly the leak is coming from. Grab a flashlight and inspect the area around the pipe. Look out for any signs of moisture or water stains on the wall. Don’t worry if you can’t find the exact spot just yet, sometimes leaks can be sneaky!
Check for Loose Connections
One possible cause of the leak could be loose connections. Check if any of the pipes are not properly sealed or if there are any loose fittings. If you spot any, tighten them with a wrench. Sometimes a simple fix can do wonders!
Apply Waterproofing Sealant
To prevent future leaks, it’s important to apply a waterproofing sealant. This will create a barrier between the pipe and the wall, keeping any water away. Make sure to clean the area thoroughly before applying the sealant, and follow the manufacturer’s instructions for the best results.
Use Pipe Insulation
Another effective way to prevent leaks is by using pipe insulation. It not only provides protection against leaks but also helps to regulate the temperature of the pipes. Plus, it’s easy to install! Just measure the length of the pipe, cut the insulation to size, and wrap it around the pipe. Ta-da, you’re done!
Call in the Professionals
If you’ve tried all the DIY methods and the leak still persists, don’t hesitate to call in the professionals. Sometimes a leak can be a sign of a bigger problem that requires expert attention. They’ll be able to locate the source of the leak and provide a long-term solution.
Dealing with a water leak around a pipe in your basement wall can be frustrating, but with some patience and a bit of know-how, you can fix the problem. Remember to identify the source of the leak, check for loose connections, apply a waterproofing sealant, and consider using pipe insulation. And if all else fails, don’t hesitate to call in the professionals. Good luck with fixing that leak!
Fixing a Leaking Pipe in a Concrete Wall: How to Seal Around a PVC Pipe
If you’ve discovered a leaking pipe in a concrete wall, it’s important to act quickly to prevent any further damage. One common culprit for these leaks is a PVC pipe passing through the concrete. In this subsection, we’ll explore how to effectively seal around a PVC pipe in a concrete wall, so you can put an end to that pesky leak.
Assessing the Leak
Before diving into the fix, it’s crucial to accurately identify the location and extent of the leak. Start by examining the area around the pipe for any visible signs of water or dampness. Remember, leaks can sometimes travel along the pipe, so don’t be surprised if the actual source isn’t directly above the moisture.
Gather Your Tools and Materials
Now that you’ve pinpointed the leak, it’s time to gather your tools and materials. You’ll need a few items to properly seal the pipe:
Tools:
- Safety goggles
- Gloves
- Steel brush or sandpaper
Materials:
- Hydraulic cement or epoxy sealant
- PVC primer and cement
- Waterproof tape or wrap
Preparing the Area
To ensure a successful seal, the area around the pipe needs to be properly prepared. Start by removing any loose debris or chipped concrete around the leak using a steel brush or sandpaper. This will help create a clean surface for the sealant to adhere to.
Applying the Sealant
Once the area is prepped, it’s time to apply the sealant. For smaller leaks, hydraulic cement can be a reliable option. Mix the cement according to the manufacturer’s instructions and apply it around the pipe, making sure to cover the leak and create a watertight seal.
Alternatively, if the leak is more significant, you may want to use an epoxy sealant. Epoxy sealants are easy to apply and provide a strong bond. Follow the instructions provided with your chosen sealant to ensure proper application.
Securing the Seal
After applying the sealant, it’s essential to secure the seal for optimal effectiveness. One way to do this is by using PVC primer and cement. Apply the primer to the PVC pipe and the surrounding area. Next, apply the cement to both surfaces and quickly join them together. This step will reinforce the seal and minimize the potential for future leaks.
Additional Protection
For added protection and peace of mind, consider using waterproof tape or wrap around the sealed area. This extra layer acts as an additional barrier against water infiltration.
Now that you know how to seal around a PVC pipe in a concrete wall, you can confidently tackle that leaking pipe head-on. Remember to be patient and thorough in your approach, and don’t hesitate to seek professional help if needed. Happy sealing!
What to Do if You Find a Leaking Pipe in Your Wall
So, you’ve just discovered a leaking pipe in your wall. Not exactly what you were hoping for, right? But fear not, my friend! We’re here to guide you through this pesky predicament and show you exactly what to do if you find yourself in this watery mess.
Assess the Situation: Is It Really a Pipe Leak
First things first, before you jump to conclusions, make sure you’ve correctly identified the problem. Is it definitely a pipe leak? Check for any obvious signs like water stains, dampness, or a funky smell. If you’re unsure, it’s always best to call in a professional to confirm the issue.
Turn Off the Water Supply
Alright, now that you’re certain it’s a leaky pipe, it’s time to take action. The first step is to turn off the water supply. Locate your main water valve and shut it off. This will prevent any further water from flowing and causing more damage.
Safeguard Your Belongings
Leaks can be a messy business, so it’s essential to protect your valuables. Move furniture, electronics, and anything else that could be damaged by water away from the affected area. It’s better to be safe than soggy!
Make Some Space
To access the leaking pipe hidden in the wall, you’ll need to create some space. Carefully remove any obstacles like shelves, paintings, or cabinets that may be blocking your path. Remember to handle them with care so you can put everything back together once the pipe is fixed.
Catch the Drip
Now, it’s time to catch that pesky drip. Place a bucket or a large container under the leak to prevent water from pooling on the floor. Don’t forget to keep an eye on it and empty it whenever needed. Hey, at least you’re practicing your aim, right?
Call a Plumber
Unless you happen to be a superhero plumber, it’s time to call in the professionals. A qualified plumber will be able to assess the situation, provide the necessary repairs, and prevent any further water damage. Don’t be afraid to ask for recommendations or read reviews to find a reliable plumber.
Document the Damage
While you’re waiting for the plumber to work their magic, be sure to document the damage. Take photos or videos of the leak, any affected areas, and items that have been damaged. This evidence might be useful for insurance purposes later on. Plus, it gives you a chance to show off your amateur photography skills!
Patience is a Virtue
Unfortunately, fixing a leaking pipe in a concrete wall can be a time-consuming process. Stay patient and try to remain calm while the professionals do their thing. In the meantime, focus on learning some water-themed jokes to keep the mood light and bubbly.
Learn from the Experience
Although dealing with a leaking pipe isn’t exactly a walk in the park, there’s always something to learn from every experience. Take this opportunity to educate yourself on plumbing maintenance, prevention tips, and early leak detection methods. Who knows, you might just become your own handy plumber!
So, there you have it! When faced with a leaking pipe in your wall, take a deep breath and follow these steps like a pro. Remember, it’s just a bump in the plumbing road, and it will soon become another amusing story to share at dinner parties. Stay dry, my friend!
Repairing a Water Pipe Leak in a Concrete Slab
Concrete slabs can be a tricky place to have a water pipe leak. Dealing with this issue requires some detective work and a bit of elbow grease, but fear not! I’m here to guide you through the process of repairing a water pipe leak in a concrete slab.
Inspecting and Locating
The first step is to identify the source of the leak. Look for any visible signs like damp patches or water stains on the concrete surface. It’s helpful to turn off the water supply to the affected area to prevent further damage. Once you’ve located the leak, mark the spot with a piece of tape or a bright marker.
Preparing for the Fix
Now that you’ve found the leak, it’s time to prepare for the repair. Before you begin any work, make sure to gather all the necessary tools and materials. You’ll need a jackhammer or a concrete saw to access the pipe, a pipe cutter to remove the damaged section, and replacement fittings or couplings. Don’t forget safety gear like goggles and gloves to protect yourself during the process.
Breaking Through
With your tools in hand, it’s time to break through the concrete slab to get to the pipe. Start by making a small hole near the marked spot using a drill with a masonry bit. Then, use your trusty jackhammer or concrete saw to carefully chip away at the concrete until you have enough space to work. Remember to work slowly and patiently to avoid damaging the pipe further.
Fixing the Leak
Once you have access to the damaged section of the pipe, it’s time to fix that leak! First, use a pipe cutter or a hacksaw to remove the affected portion of the pipe. Ensure that you make clean cuts to ensure a proper fit for the replacement fittings. Next, attach the new fitting or coupling to the existing pipeline using appropriate connectors and clamps.
Patching it Up
After the repair is complete, it’s time to patch up the hole in the concrete slab. Mix the concrete patching compound according to the manufacturer’s instructions and fill the hole, making sure to smooth it out evenly with a trowel. Allow the patch to dry completely before walking or placing any weight on it.
Testing the Fix
Once everything is dry, it’s time to test your handy work! Turn on the water supply and check for any signs of leakage. Keep an eye on the repaired area for a few days to ensure that there are no further issues. If all looks good, give yourself a pat on the back for a job well done!
Repairing a water pipe leak in a concrete slab may seem like a daunting task, but with a little patience and the right tools, you can tackle it like a pro. Remember to always prioritize safety and take your time to ensure a successful repair. Now go forth and fix that leak like the handy homeowner you are!
How to Fix a Leaking Pipe Under Concrete
So, you’ve got a leaky pipe under your concrete floor? Don’t panic! It might sound like a daunting task, but with a little know-how and some elbow grease, you can tackle this problem like a pro. In this section, we’ll walk you through the steps to fix that pesky pipe and put an end to your watery woes.
Assess the Situation
Before you start taking apart the floor, it’s essential to assess the extent of the problem. Is the leak minor or major? Can you pinpoint the exact location? Take some time to inspect the area and determine the scope of the damage. You might want to grab a flashlight, put on your detective hat, and search for any signs of water damage or dampness.
Shut Off the Water
This step is crucial! Before you start any repair work, make sure you turn off the water supply. You don’t want to create a mini water park in your basement or flooded living room. Locate the main shutoff valve and twist it clockwise until it’s fully closed. This step will save you from facing a whole new set of water-related problems.
Digging Deeper
Once the water is off, it’s time to break out the trusty shovel and start digging. We know, it’s not the most glamorous task, but it’s a necessary evil. Start by removing the layer of concrete covering the leaky pipe. Be careful not to damage any surrounding pipes or the foundation itself. Take your time, and don’t rush this step. You’ll want to create enough space to work comfortably.
Fix the Pipe
Now that you’ve uncovered the pipe, it’s time to get to the root of the problem. Examine the damaged area and determine the best course of action. If it’s a small leak, you can patch it up using epoxy putty or a pipe repair clamp. For larger leaks or burst pipes, you may need to cut out the affected section and replace it with a new piece.
Testing, Testing
After the repair work is complete, it’s time to put your handiwork to the test. Slowly turn the water supply back on and check for any signs of leakage. Keep a close eye on the repaired area and surrounding pipes. If everything looks dry and happy, congrats – you’ve successfully fixed a leaking pipe under concrete!
Fixing a leaking pipe under concrete might seem like a daunting task, but with the right approach, you can tackle it like a pro. Remember to assess the situation, shut off the water, dig carefully, fix the damaged pipe, and test the repair thoroughly. By following these steps and taking your time, you’ll have that leak under control in no time. Good luck with your DIY plumbing adventure!
What is the Best Sealing Around a Pipe Through a Cement Wall
If you’re dealing with a leaky pipe in a concrete wall, finding the best sealing method is crucial to prevent any further damage. Luckily, there are a few options that can effectively seal the pipe and keep water where it belongs. Here are some of the top sealing methods to consider:
Using Hydraulic Cement
Hydraulic cement is a popular choice for sealing pipes in cement walls due to its durability and strength. This cement mix expands as it sets, creating a tight seal around the pipe. To use hydraulic cement, first, clean the surface around the pipe and moisten it. Then, mix the cement according to the manufacturer’s instructions and pack it tightly around the pipe, ensuring there are no gaps. Let it set and cure completely before testing for leaks.
Using Epoxy Putty
Another effective sealing method is using epoxy putty, which is a versatile and easy-to-use product. Epoxy putty comes in two parts that you mix together to activate. Once activated, you can mold and shape the putty around the leaking pipe, creating a tight seal. The putty will harden and provide a long-lasting fix. Make sure to thoroughly clean the area around the pipe before applying the putty for optimal adhesion.
Choosing Pipe Repair Clamps
If the leak is more significant, or if you prefer a temporary fix, pipe repair clamps can come to the rescue. These clamps are designed to stop leaks in pipes and provide a sturdy seal. They consist of a metal band that wraps around the pipe, applying pressure to the area of the leak. Tighten the clamp using a wrench until the leak stops. While this method may not be as aesthetically pleasing, it is quick and effective.
Applying Waterproof Sealant
For smaller leaks or pipes that don’t bear a lot of pressure, using a waterproof sealant can be a convenient solution. Look for a sealant specifically designed for use in concrete, as regular sealants may not adhere well. Clean the area around the leak and apply the sealant generously, ensuring it covers and seals the leaking area. Allow the sealant to dry completely before testing for leaks.
Seeking Professional Help
If you’re uncertain about which sealing method to choose or if the leak is too severe, it’s always a good idea to seek professional help. Plumbers have the expertise and knowledge to fix leaking pipes in concrete walls effectively. They can assess the situation, recommend the best sealing technique for your specific pipe, and provide a long-term solution to your leaking pipe woes.
Remember, choosing the best sealing method ultimately depends on the severity of the leak and your personal preferences. Consider the factors mentioned above and select the method that suits your situation best. By addressing the issue promptly and using the right sealing technique, you can fix a leaking pipe in a concrete wall and prevent any further damage.