Is your shower head holder causing you headaches? Don’t worry, we’ve got you covered! In this comprehensive guide, we will walk you through the steps to fix a broken shower head holder and provide answers to all your burning questions about shower heads. Whether you’re wondering how to remove a shower head with plumbers tape, change your shower head to a handheld model, or even if shower head mounts are universal, we’ve got all the answers you need.
With our easy-to-follow instructions and helpful tips, you’ll be able to replace a fixed shower head with a handheld one, prevent your shower head from dropping, and even tackle common issues like a dripping shower head. We’ll also dive into the technical details, like shower hose bore sizes, installing a wall-mounted shower arm, and whether all shower head holders are the same size. Plus, we’ll cover must-know topics like using plumbers tape and putty for installation, and whether you can add a handheld shower head to your existing setup.
If you’re ready to transform your showering experience, keep reading for the ultimate guide on fixing a broken shower head holder and much more!
How to Fix a Broken Shower Head Holder
Understanding the Struggle: A Shower Without a Head Holder
So, you’ve found yourself in the unfortunate predicament of a broken shower head holder. We feel your pain, because who doesn’t enjoy a refreshing shower where the water streams down from the perfect height? There’s no doubt that a broken shower head holder can turn your soothing sanctuary into a wet and wild wrestling ring. But fear not, fellow shower enthusiasts, for we have the ultimate guide on how to fix this common bathroom woe.
Step 1: Assess the Damage (Don’t Panic!)
When faced with a broken shower head holder, take a deep breath and repeat after me: “I will conquer this shower war!” The first order of business is assessing the extent of the damage. Is it a minor crack? Is it completely shattered? Is it hanging on by a thread? Understanding the level of chaos will help us determine the best course of action. Don’t worry, we’ve got your back (and your shower head).
Step 2: Gather Your Tools (Not Your Wits)
Before diving headfirst into battle, arm yourself with the right tools. This isn’t a faceoff with a mythical sea creature, but it might require a bit of elbow grease. Grab a trusty toolbox filled with a screwdriver, pliers, and perhaps even a roll of duct tape (because duct tape fixes everything, right?). Channel your inner handyman or handywoman and let’s get ready to fix this holder like a boss.
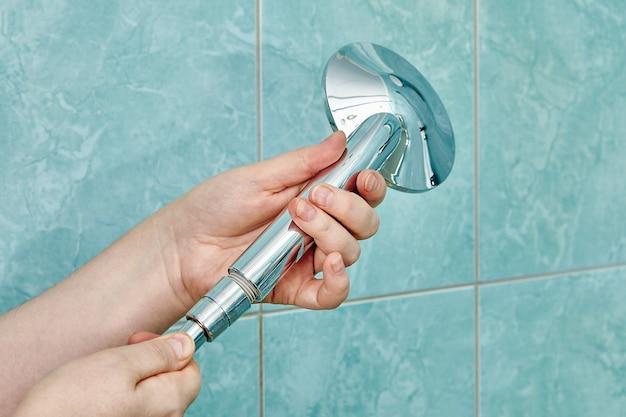
Step 3: Remove the Broken Holder (Release the Kraken!)
Time to bid farewell to the shattered remains of your shower head holder. Locate the screws or bolts holding the broken pieces in place. Carefully unscrew or unfasten them, and gently remove the broken holder from its position. If the screws are giving you a hard time, don’t be shy about using a little muscle. We’re not encouraging any “Hulk smash” moments, but a firm grip might do the trick.
Step 4: Clean Up the Battlefield (Tidy Up, Soldier!)
Now that the battlefield has been cleared, it’s time to tidy up. Give the area a thorough cleaning, removing any debris or remnants left behind by the broken holder. This will ensure a clean slate for the installation of the new and improved version. It’s like giving your shower a fresh start—a chance to wash away the broken dreams of the past.
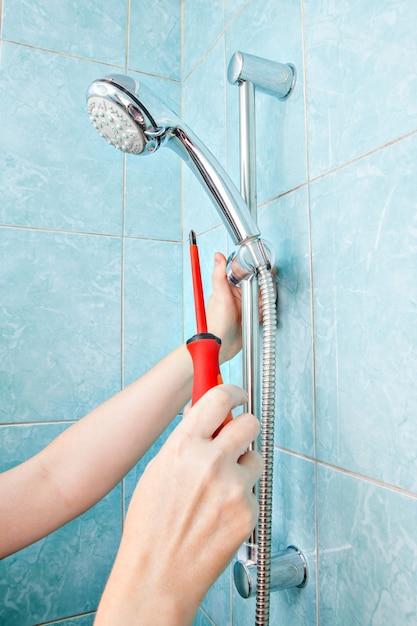
Step 5: Install the New Holder (Bring on the Reinforcements!)
It’s showtime! With the old holder out of the way, it’s time to bring in the reinforcements. Position the new holder in place, making sure it aligns perfectly with your shower head. Secure it tightly using the screws or bolts that came with the new holder. Remember, we’re aiming for stability and longevity, not a holder that decides to play limbo halfway through your shower.
Step 6: Test the Resilience (Winning the Shower Battle)
The moment of truth has arrived. Turn on the shower and observe your handiwork. Is the new holder standing strong, supporting the weight of your glorious shower head? If yes, victory is within your grasp! Pat yourself on the back, my brave shower warrior. You’ve conquered the broken shower head holder battle and emerged triumphant. It’s time to enjoy a well-deserved victory shower.
Step 7: Celebrate & Share Your Wisdom (Shouting from the Shower Tops!)
Go forth and spread the word of your triumph! Shout it from the shower tops, my friend. Share your newfound wisdom with fellow shower-goers who may find themselves tangled in a similar predicament. Remember, a broken shower head holder doesn’t have to be the end of the world. With a little know-how and a dash of determination, you can restore order and harmony to your daily cleansing routine.
Additional Tips and Tricks (Because Knowledge is Power!)
- If you’re unsure about what type of holder to purchase, consult with a friendly hardware store expert who will guide you to shower head holder nirvana.
- Consider upgrading to a sturdier and more versatile shower head holder that can withstand the trials and tribulations of time.
- Don’t forget to periodically check the tightness of the screws or bolts to ensure your shower head holder remains steadfast in its commitment to showering excellence.
Remember, shower time is your time to relax and rejuvenate. A broken shower head holder might try to rain on your parade, but armed with our guide, you’ll come out victorious. So embrace your DIY spirit, unleash your inner plumber, and fix that broken shower head holder like the jubilant bathroom conqueror that you are!
Now go forth and shower like it’s 2023!
FAQ: How To Fix A Broken Shower Head Holder
How do you remove a shower head with plumbers tape?
To remove a shower head with plumbers tape, you’ll need some elbow grease and a little bit of patience. First, make sure the water supply to the shower is turned off. Then, grab a wrench and carefully loosen the shower head by turning it counterclockwise. If it’s stubborn, wrap some plumbers tape around the shower head’s threading to provide extra grip. Once loose, unscrew the shower head completely by hand. Remember, lefty loosey, righty tighty!
How do I change my shower head to handheld?
Transforming your shower head into a handheld wonder doesn’t require the skills of a contortionist. First, remove the existing shower head using the method mentioned above. Next, attach a shower arm diverter valve to the main shower arm. Connect the handheld shower head to the diverter valve according to the manufacturer’s instructions. Finally, turn the water supply back on and enjoy the freedom of directing the water exactly where you want it!
Are shower head mounts universal?
Ah, the age-old question of universality! While shower head mounts may seem like they belong in the United Nations of Plumbing, unfortunately, they are not all created equal. Shower head mounts come in various shapes and sizes, making it essential to check compatibility before buying a replacement. Remember, not everything in life is one-size-fits-all, much to the chagrin of our bank accounts.
What kind of tape do you use on a shower head?
When it comes to shower head installations, plumbers tape is our trusty sidekick. Also known as Teflon tape, it is the superhero of leak prevention. To use it, simply wrap a few layers of tape in a clockwise direction around the threading of the shower arm before attaching the new shower head. This tape is like a trustworthy assistant, ensuring a tight seal and saving you from any unexpected waterworks.
How do you replace a fixed shower head with a handheld model?
Say goodbye to shower head monotony and hello to flexibility! To replace a fixed shower head with a handheld model, begin by following the steps to remove the existing shower head. Next, attach a handheld shower head bracket or slide bar to the shower arm and secure it in place. Finally, attach the handheld shower head to the bracket or slide bar, and voila! You’ve upgraded your shower game like a pro.
Do all shower heads come off?
While we’d love to live in a world where shower heads pop off on command, sadly, not all shower heads are detachable. Fixed shower heads, as the name suggests, are securely fastened and cannot be removed without proper tools and know-how. So, unless you’re a professional plumber or have a secret love for wrestling inanimate objects, it’s best to stick to detachable shower heads if you crave versatility.
What is shower hose bore size?
Ah, the bore size – the inner diameter that determines water flow! Most standard shower hoses have a bore size of around 1/2 inch. However, it’s crucial to check the specifications of your specific shower hose, as bore sizes may vary. The size of the bore affects water pressure, so choose wisely and never underestimate the importance of an ample flow for those sings-in-the-shower sessions!
How do you install a wall-mounted shower arm?
Installing a wall-mounted shower arm requires a bit of precision and the ability to follow instructions without going cross-eyed. First, turn off the water supply and remove the existing shower arm, if present. Apply some Teflon tape to the male threads on the shower arm, as mentioned before, to ensure a watertight connection. Carefully screw the new shower arm into the wall until snug. Turn the water supply back on, and let the soothing cascade of water wash away any lingering stress – just be mindful not to sing too loud and bother the neighbors!
Are all shower head holders the same size?
Oh, if only all shower head holders were as predictable as your Sunday morning coffee order! Alas, much like coffee sizes, shower head holders vary in size. Different manufacturers have different designs and measurements, so ensure you choose a shower head holder that matches your existing system. It’s always better to measure twice and purchase once, saving you from the heartache of a mismatched shower head holder.
Are shower arms universal?
Ah, the curious case of shower arm universality! Shower arms are not always universal, as their design can differ depending on factors like length, shape, and threading. Before diving headfirst into a shower arm replacement project, it’s essential to pay attention to the specific requirements of your shower system. Remember, while we’re all connected in the grand tapestry of life, shower arms play by their own plumbing rules.
Can you replace a shower head holder?
Absolutely! If your current shower head holder has seen better days or simply isn’t fulfilling its duty, fear not. Shower head holders can be easily replaced with a few simple steps. First, detach the existing holder from the shower arm by unscrewing it counterclockwise. Then, install the new shower head holder by screwing it onto the shower arm in a clockwise direction. Tighten it securely, but be careful not to go Hulk on it and strip the threads. Now you can enjoy a reliable holder that keeps your shower head where it belongs – above your head and not on your toes!
How do I stop my shower head from dropping?
Ah, the wonderful dance of the drooping shower head – a true delight during your relaxing shower time. To prevent this haphazard performance, use an adjustable wrench to tighten the swivel joint or connection point between the shower arm and the shower head. Remember, steady hands are the key to success here. If the issue persists, consider replacing the shower head holder or consulting a professional, because no one wants an impromptu shower head massage while reaching for the soap!
What does the shower arm screw into?
The shower arm, that humble perpendicular extension from the wall, screws into the shower pipe or water supply outlet. This pipe is usually concealed within the wall and connects to the main water supply, ensuring a steady flow of H2O goodness. The shower arm is the bridge that brings that liquid magic into our lives. It’s like the unsung hero of showers, quietly doing its job without asking for recognition or applause.
What causes a shower head to drip?
Drip, drip, drip – the symphony of a leaking shower head! Several factors can contribute to this frustrating phenomenon. One common cause is a worn-out or damaged O-ring seal inside the shower head. Another culprit might be a loose connection between the shower arm and the shower head. Sediment buildup or mineral deposits can also obstruct the flow, leading to leaks. So, if your shower head has acquired a musical talent, it’s time to grab your toolbox and restore order to the water symphony!
Where is the O ring in a shower head?
Ah, the elusive O-ring – the shower head’s tiny guardian of watertight glory! This little hero can usually be found inside the shower head itself, nestled within the assembly where the shower head connects to the shower arm. To access it, carefully unscrew the shower head and peer inside its mystical depths. If you find a worn or damaged O-ring, replace it with a new one and bask in the satisfaction of a drip-free shower experience!
Do I need plumbers tape to install a shower head?
Much like a superhero cape, plumbers tape is a vital accessory during shower head installations. This magical tape helps create a watertight seal, preventing leaks and ensuring the shower head stays firmly in place. So, for a successful installation without any unexpected water surprises, make sure to grab that trusty roll of plumbers tape before transforming into the DIY hero of your bathroom!
What is a shower rail?
A shower rail, the unsung hero of handheld shower heads! This trusty device is a wall-mounted bar that holds your handheld shower head, allowing you to adjust its height and angle. Think of it as the gymnastics coach of your shower routine, providing effortless flexibility and ensuring optimal water coverage. With a shower rail, you can bid farewell to awkward bending and twisting while trying to rinse those hard-to-reach places – our acrobatic dream come true!
Can I use plumbers putty on a shower head?
Ah, plumbers putty, the malleable magician of the plumbing world! While this multipurpose material works wonders for certain applications, a shower head installation is not one of them. Plumbers putty is commonly used to create a watertight seal for drains and fixtures, but it’s not suitable for shower heads. Instead, opt for the superhero duo of plumbers tape and a wrench for a secure and leak-free shower head installation.
Can I add a handheld shower head to my existing shower head?
Absolutely, my shower-loving friend! Adding a handheld shower head to your existing setup is like introducing a new dance partner into the shower tango. To achieve this seamless fusion, you’ll need to install a diverter valve or a shower arm diverter. Once installed, you can easily switch between the existing shower head and the shiny new handheld wonder, giving you the best of both worlds – because variety is the spice of life, even in the shower!
And there you have it, my fellow shower enthusiasts! A comprehensive FAQ-style guide on fixing a broken shower head holder. Armed with this newfound knowledge and a touch of DIY courage, you’re now ready to conquer those plumbing woes and enjoy the blissful symphony of cascading water to your heart’s content. Happy showering, my friends!
Disclaimer: This article is for informational purposes only. If you’re uncertain or uncomfortable with any DIY plumbing tasks, it’s always best to consult a professional plumber to ensure proper installation and avoid potential mishaps.