Is your water heater taking ages to drain? Is it not clearing out even after using the drain hose? Have you noticed black sediment in the hot water? That’s a sure sign of a clogged water heater. Don’t panic, draining a clogged water heater isn’t rocket science. With just a few simple steps, you can clear your water heater and restore its functionality.
If you’re wondering how to clear a clogged black water tank, or how to drain a water heater without a floor drain, we’ve got you covered. In this comprehensive guide, you’ll learn everything you need to know about draining a clogged water heater. We’ll be providing tips and tricks on how to drain it quickly, how to solve common drainage issues, and when to call in a professional.
But, before we dive into how to drain a clogged water heater, let’s explore why it’s essential to drain your water heater occasionally. Over time, sediment builds up in water heaters, reducing their efficiency and increasing energy consumption. Draining your water heater periodically helps to clear out sediment, prolonging the life of your appliance, and saving you money in the long run.
So, let’s get started! We’ve gathered some of the best practices to help you drain a clogged water heater quickly and efficiently. Whether your water heater only drains with cold water on, or it doesn’t drain at all, this guide will help you troubleshoot the issue and get you on your way to enjoying hot showers once again.
How to Drain a Clogged Water Heater
If you have a water heater at home, clogs are inevitable. Over time, sediment, rust, and other debris accumulate at the bottom of the water heater tank. This buildup can reduce the efficiency of the heater, which leads to higher energy costs and shorter lifespan. Additionally, a clogged water heater can pose a safety hazard if left unfixed. That’s why it’s essential to know how to drain a clogged water heater.
Turn Off the Power Supply
Before starting any maintenance work on your water heater, the first step is to turn off the power supply. You don’t want to get shocked or electrocuted while handling the unit. Electric heaters should be unplugged, while gas heaters need to have the gas valve turned off. If you’re unsure about how to do this, consult the owner’s manual or call a professional.
Allow Time to Cool Down
Water heaters operate at high temperatures, so it’s vital to let the unit cool down before draining any water from it. This allows the water to reach a safe temperature, making it less dangerous to handle. Wait at least an hour before proceeding with the next step.
Locate the Drain Valve
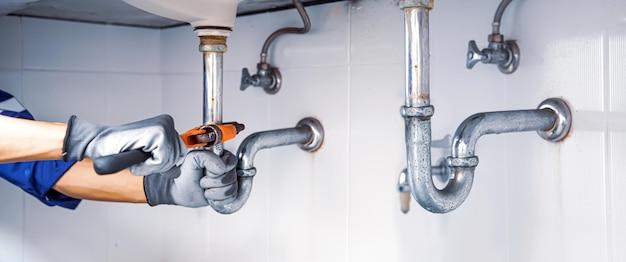
The drain valve is a spigot at the bottom of the water heater tank. It’s usually made of plastic or brass and has a hose connector. If you don’t know where it is, consult the owner’s manual or look for it near the bottom of the tank.
Connect a Hose to Drain Valve
Connect a hose to the drain valve and make sure the other end of the hose is pointed towards a drain or outside the house. This prevents any mess or damage to your home. Make sure the hose is securely attached to avoid any leaks.
Start Draining the Water Heater
Open the valve by turning it counterclockwise. The water will start draining out of the tank and into the hose. Expect the water to be hot, so handle the hose with care. Be patient as it can take some time to drain the water heater entirely. Once it’s done draining, close the valve by turning it clockwise.
Refill the Tank
After draining the water heater, refill the tank with clean water. Turn the water supply back on and let the tank fill up. Check for any leaks at the drain valve or anywhere else before proceeding.
Draining a clogged water heater is a simple process that can be done at home. Doing it regularly can increase the lifespan of the heater and reduce your energy costs. Additionally, a clean water heater ensures safe and healthy hot water flow in your home. If you’re not confident in performing this task, consult a professional.
Water Heater Draining Slowly
A water heater draining slowly is a common problem that many homeowners encounter. Various factors can cause this issue, including sediment buildup, mineral deposits, and rust. Fortunately, there are some simple steps you can take to fix this problem.
Turn off the Power Supply
Before you begin, ensure that you turn off the power supply to the water heater. This step is essential as it prevents any accidents or shocks from happening during the draining process. You can do this by turning off the breaker or gas valve that controls the water heater.
Connect a Hose
Next, locate the drain valve at the bottom of the water heater tank and connect a hose to it. Ensure that the other end of the hose runs to a drainage area safely. You can place a bucket underneath the hose to catch any residual water that comes out first.
Open the Drain Valve
Once the hose connection is secure, open the drain valve by turning it with pliers or a wrench. This step is vital in releasing the water from the tank, and it should take around 20-30 minutes to complete. You can check the progress by observing the color of the water that flows through the hose. If the water is cloudy or brown, it indicates that there is sediment buildup in the tank.
Close the Drain Valve
Once all the water has drained, close the drain valve and disconnect the hose. Ensure that you tighten the valve to prevent any leaks from occurring. Afterward, turn on the water supply and let it run for a few minutes to flush out any sediment that remains.
In conclusion, a water heater draining slowly can be fixed by following the above-highlighted steps. Regularly draining your water heater can also prevent sediment buildup and prolong its lifespan. By doing so, you can also reduce your energy bills by enhancing the efficiency of your water heater.
Troubleshooting a Water Heater That Won’t Drain Through Hose
If you’re trying to drain your water heater but find that it won’t fully drain through the hose, don’t worry. This is a common issue that can be fixed by taking some troubleshooting steps. Here are some of the most common reasons your water heater won’t drain through the hose and what you can do to address them.
The Hose is Clogged
The first and most obvious reason your water heater won’t drain through the hose is that the hose is clogged. Before you take any other troubleshooting steps, try to clear the hose by using a garden hose or pipe cleaner to remove any obstructions.
The Drain Valve is Broken
If the hose isn’t clogged and you still can’t drain your water heater, the issue may be with the drain valve itself. Over time, these valves can become damaged or wear out, preventing proper drainage. In this case, you’ll need to replace the valve to fix the issue.
The Water Heater Isn’t Level
Another common reason your water heater won’t drain through the hose is that the unit isn’t level. If the water heater is off-balance, it can prevent water from flowing through the hose properly. To fix this issue, simply adjust the leveling feet on the unit until it’s even.
Air is Stuck in the Tank
Finally, it’s possible that air is caught inside your water heater tank, preventing proper drainage. To address this issue, you’ll need to open the pressure relief valve at the top of the tank and allow the air to escape. This should allow water to flow freely through the hose.
In conclusion, a water heater that won’t drain through the hose can be frustrating, but it’s a common issue that can be fixed with some simple troubleshooting steps. Try clearing the hose, replacing the drain valve, adjusting the unit’s balance, or releasing trapped air from the tank. With some patience and persistence, you should be able to get your water heater draining properly again in no time.
Hot Water Heater Clogged with Sediment
Hot water heaters are essential for keeping us comfortable in our homes. Unfortunately, sediment buildup is a common issue that can cause your hot water heater to become clogged. Sediment buildup happens over time, as minerals in the water settle at the bottom of the tank. This can lead to reduced efficiency and even damage to your hot water heater. In this section, we’ll discuss how to drain a clogged water heater that’s been affected by sediment buildup.
Symptoms of a Clogged Water Heater
If you suspect that your hot water heater is clogged with sediment, there are a few signs to look out for. The first sign is reduced hot water pressure or flow. This is a common symptom of sediment buildup, as the sediment can block the flow of water through the pipes. Another symptom is a popping or cracking sound. This happens when the sediment at the bottom of the tank is heated and expands, causing the tank to crackle. If you notice any of these symptoms, it’s time to drain your water heater.
Draining a Clogged Water Heater
Before you begin, turn off the power to your hot water heater. This will prevent any accidents from happening while you’re working. Next, locate the drainage valve at the bottom of the tank. Connect a hose to the valve and run it to a nearby drain. Open the valve and let the water drain out of the tank. You’ll also need to open the pressure relief valve to allow air into the tank, which will help the water flow out.
Once the water has drained out, you can remove the sediment from the tank. You can do this by either using a wet/dry vacuum or by flushing the tank out with clean water. To flush the tank, turn on the cold water supply and let it run until the water coming out of the drain valve is clear.
Preventing Sediment Buildup
Now that you’ve drained your clogged water heater, it’s important to prevent sediment buildup in the future. One way to do this is to install a sediment filter on your hot water heater. This will filter out any minerals in the water before they have a chance to settle at the bottom of the tank. Another way to prevent sediment buildup is to flush your tank regularly. This will help remove any sediment before it has a chance to build up.
In conclusion, if you’re dealing with a hot water heater clogged with sediment, draining the tank is a simple solution. Keep an eye out for the symptoms of sediment buildup, and remember to flush your tank regularly to prevent future problems.
How to Clear a Clogged Black Water Tank
If you’ve ever experienced a clogged black water tank in your RV, then you know it can be a smelly, messy, and altogether unpleasant situation. However, with the right tools and a little bit of know-how, you can fix the problem and get back to enjoying your RV vacation in no time. Here’s how to clear a clogged black water tank:
Step 1: Gather Your Tools
Before you can start clearing the clog, you’ll need to gather the necessary tools. You’ll need:
– A pair of rubber gloves
– A sewer hose
– A flushing wand
– A bucket
– A flashlight
Step 2: Prepare Your RV
Park your RV in a designated dumping station and connect the sewer hose to the dump valve. Make sure the other end of the hose is properly lined up with the dumping station’s inlet.
Step 3: Flush the Tank
Now, put on your rubber gloves and remove the black water tank’s cap. Use your flashlight to inspect the tank for any obvious obstructions. Then, stick the flushing wand into the tank until you reach the clog. Turn on the water and use the wand to break up the clog until it flows freely through the sewer hose. Repeat if necessary.
Step 4: Rinse the Tank
After you’ve cleared the clog, rinse out the tank several times using the flushing wand and the bucket of water, making sure to empty the tank completely. This will help prevent future clogs and keep your RV smelling fresh.
Step 5: Clean Up
Disconnect the sewer hose and properly dispose of it and the rubber gloves. Put the black water tank’s cap back on and close up your RV’s dumping station. You’re now ready to hit the road again!
In conclusion, clearing a clogged black water tank is never a fun experience, but with the right tools and a little bit of elbow grease, you can get the job done quickly and easily. Remember to always wear rubber gloves and be prepared for a little bit of mess. Happy RVing!
How to Drain a Clogged Water Heater
How Do You Drain a Clogged Water Heater
Draining a clogged water heater is not rocket science. It’s a simple process that you can do within an hour or two. All you need is to follow a few steps and have the necessary tools. Here’s how to do it.
Step 1: Turn Off the Water and the Power
Before you begin the draining process, you need to turn off the power and the water supply to your water heater. This will prevent any accidents and ensure you can work safely. To turn off the power, locate the breaker box and switch off the circuit breaker that powers your water heater. Then, turn off the water supply to your water heater by closing the shut-off valve.
Step 2: Attach a Garden Hose to the Drain Valve
Locate the drain valve on your water heater. It’s usually located at the bottom of the tank and looks like a small spigot. Attach a garden hose to the valve and make sure the other end of the hose is in a safe place where the hot water can drain without causing any damage.
Step 3: Open the Drain Valve and Let the Water Flow
Once you have attached the hose, open the drain valve and let the water flow out of your water heater. You can open the pressure relief valve on the top of the water heater to allow the water to flow out more smoothly. If the water heater is clogged, the water will take longer to flow out.
Step 4: Flush Out the Sediment
Let the water flow out of the water heater until it runs clear. This is an indication that all the sediment has been flushed out of the tank. If the water is still cloudy, you may need to repeat the process a few more times until it becomes clear.
Step 5: Close the Drain Valve and Turn on the Water Supply
Once the water is clear, turn off the drain valve and disconnect the garden hose. Make sure the pressure relief valve is closed. Turn on the water supply and let the tank fill up before turning on the power to the water heater.
Following these simple steps can help you drain a clogged water heater. Remember to do this at least once a year to prevent sediment buildup and prolong the life of your water heater.
Water Heater Only Drains with Cold Water On
If you notice that your water heater only drains with cold water on, you may be wondering what the problem is. There are a few reasons why this could be happening, but the good news is that it’s typically an easy fix. Here are some potential causes and solutions:
Sediment Buildup
Over time, sediment can build up in your water heater, which can cause all sorts of problems. If you have a lot of sediment in your tank, it could be blocking the drain valve, which means that only cold water will flow out when you try to drain your tank. To fix this issue, you’ll need to flush your water heater to remove the sediment. You can do this yourself or hire a professional plumber.
Clogged Drain Valve
Another reason why your water heater may only be draining with cold water on is that the drain valve is clogged. Sometimes debris can get stuck in the valve, preventing it from opening fully. To fix this, turn off the cold water supply to your heater, attach a hose to the valve, and flush it out with water. If this doesn’t work, you may need to replace the valve.
Faulty Heating Element
If the heating element in your water heater is faulty, it could cause the water to cool down quickly, which would result in you only being able to drain cold water. To verify if this is the case, use a multimeter to test the heating element for continuity. If it’s not working correctly, you’ll need to replace it.
In conclusion, if your water heater only drains with cold water on, the issue is likely due to sediment buildup, a clogged drain valve or faulty heating element. Fortunately, these problems are relatively easy to fix, and you don’t need to be an expert plumber to do it. By following the tips outlined in this article, you can keep your water heater in good working order and enjoy hot water whenever you need it.
How to Drain a Water Heater with No Floor Drain
Draining a water heater can be a daunting task, and it becomes even more challenging when your water heater doesn’t have a floor drain. A floor drain is usually found in the basement or utility room and allows the water to drain away easily. However, don’t worry, in this section, we’ll show you how to drain your water heater without a floor drain.
1. Turn off the power or gas
Before draining your water heater, you must first turn off the power or gas supply to the appliance. You can either unplug the unit from the electrical outlet or switch off the circuit breaker. If you have a gas water heater, turn off the gas valve.
2. Shut off the cold water supply valve
Next, locate the cold water supply valve that leads to the water heater and turn it off. This will prevent new water from entering the tank while you’re draining it.
3. Attach a hose to the drain valve
Attach a hose to the drain valve located near the bottom of the water heater. The hose should be long enough to reach a drain point. Ensure that the other end of the hose is lower than the drain valve to allow gravity to do its job.
4. Open the drain valve
Open the drain valve slowly and let the water flow through the hose and out of the water heater. Be careful as the water will be hot.
5. Drain the tank
Once the water has started to flow through the hose, you can open the hot water taps in your home to help speed up the draining process. Continue to drain the tank until no more water comes out, indicating that the tank is empty.
6. Close the drain valve
After draining the tank, close the drain valve and remove the hose from the valve.
7. Refill the tank
Now that your water heater is drained, you can refill it. Open the cold water supply valve and turn on the hot water taps in your home. This will allow the air to escape from the tank.
8. Turn on the power or gas
Finally, turn on the power or gas supply to the water heater and wait for it to heat up the water.
Draining a water heater without a floor drain is not complicated. However, it can be time-consuming, so make sure you allocate enough time to complete the task. Following this guide will help you drain your water heater safely and efficiently.
What is the Fastest Way to Drain a Hot Water Heater
Are you tired of waiting hours to drain your water heater? Here are some tips to speed things up:
Turn Off the Water and Gas/Electricity Supply
Before you begin the draining process, make sure to turn off the water supply and the gas or electricity supply. This will prevent any damage to the heater and ensure a safe and successful draining process.
Open the Drain Valve
Once the supplies are shut off, it’s time to open the drain valve. This valve is located at the bottom of the heater. Attach a garden hose to the valve and run it to a nearby drain. Make sure the hose is tightly attached to the valve.
Open a Hot Water Faucet
To allow air into the tank and facilitate the draining process, open a hot water faucet somewhere in your house. This will reduce the pressure inside the tank and help the water flow out faster.
Flush the Tank
To speed up the process, you can also flush the tank. To do this, turn on the cold water supply to the tank while the hot water faucet is still running. This will force water through the tank and push out any remaining sediment.
Professional Help
If you’re still having trouble draining your water heater, it might be time to call in the professionals. A plumber can diagnose any issues and ensure a quick and efficient draining process.
By following these tips, you can save time and get your water heater draining in no time. Always make sure to prioritize the safety of yourself and your property. Happy draining!