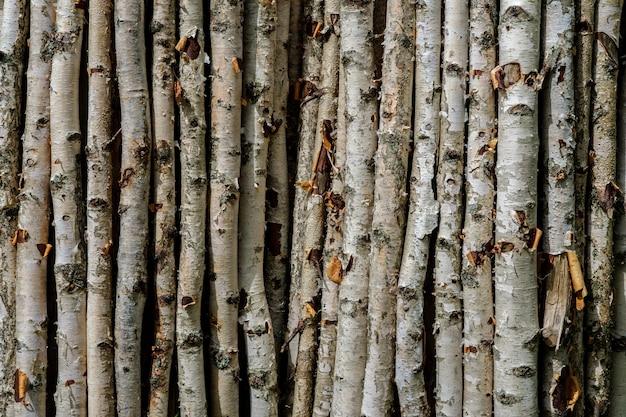
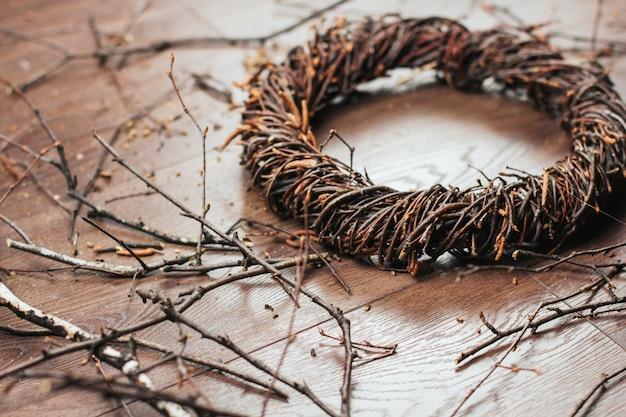
Birch branches are a popular element in various crafts and DIY projects. Their unique texture and natural beauty make them a perfect choice for creating rustic decorations, wreaths, centerpieces, and more. However, before using birch branches in your crafts, it is important to properly clean and preserve them to ensure their longevity and prevent any potential pests or contaminants from being brought into your home.
In this blog post, we will provide you with a comprehensive guide on how to clean birch branches for crafts. We’ll cover topics like disinfecting large branches, preserving twigs, cleaning birch wood, drying tree branches, sealing them for decorations, and much more. Whether you found the branches in your backyard or purchased them from a local supplier, these tips and techniques will help you prepare your birch branches for a variety of creative projects.
So, if you’re excited to start using birch branches in your crafts or simply curious about the process of cleaning and preserving them, this guide is for you. Let’s dive in and learn how to transform these natural beauties into stunning additions to your home decor!
How to Clean Birch Branches for Crafts
Crafting with birch branches can add a touch of rustic charm to your home decor or DIY projects. But before you can unleash your creativity, you need to know how to properly clean those birch branches. Don’t worry, we’ve got you covered! In this guide, we’ll walk you through the steps to clean birch branches for crafts, so you can start crafting like a pro.
Gather Your Supplies
First things first, you’ll need to gather your supplies. Here’s what you’ll need:
1. Birch Branches
Well, of course, you’ll need some birch branches! Look for branches that are relatively straight and free from any signs of damage or decay. You can collect fallen branches from your garden or purchase them from a local craft store.
2. Gloves
Protect those delicate hands of yours by wearing a pair of gloves. Not only will they shield you from any dirt or sap, but they’ll also add an extra touch of style to your cleaning routine.
3. Pruning Shears or Garden Scissors
To trim the branches to your desired length, you’ll need a trusty pair of pruning shears or garden scissors. Remember, safety first! So, wear protective eyewear if you have it and take your time to avoid any accidents.
Step 1: Inspect and Trim the Branches
Before we dive into the cleaning process, take a closer look at the branches. Trim off any unwanted twigs or leaves using the pruning shears or garden scissors. Achieve that clean and polished look by trimming the branches to your desired length. Get creative and experiment with different sizes for various crafting projects. Just make sure not to go overboard and accidentally turn your beautiful birch branches into tiny toothpicks.
Step 2: Remove Loose Debris
Now that your branches are looking prim and proper, it’s time to eliminate any loose debris. Start by gently brushing the branches with your gloved hands to remove any dirt, dust, or spider webs. If you’re feeling particularly fancy, you can even use a soft-bristle brush to give your branches a spa-like treatment. Remember, cleanliness is next to craftiness!
Step 3: Give ‘Em a Bath
It’s bath time for your birch branches! Fill a bucket or basin with warm water and add a dash of mild dish soap. Gently place your branches into the soapy water, ensuring they are completely submerged. Let them soak for a few minutes, allowing the soap to work its magic. Don’t be tempted to join them for a relaxing soak – this party is for birch branches only.
Step 4: Scrub-a-dub-dub
Time to roll up your sleeves and get scrubbing! Take a soft brush or sponge and gently scrub the branches to remove any remaining dirt or sap. Be thorough but gentle, as birch branches can be delicate and we don’t want any casualties. If you encounter stubborn dirt or sap, you can try using a mixture of equal parts water and vinegar for some extra cleaning power. Give those branches a spa retreat they won’t forget!
Step 5: Rinse and Dry
Once you’re satisfied with the cleanliness of your branches, it’s time to give them a good rinse. Fill another bucket or basin with clean water and rinse off any soap residue. Make sure to remove all the suds, as they can leave an unpleasant film on your branches. Then, gently pat the branches dry with a clean towel or let them air dry, basking in the warmth of your craft room.
And voila! You now have perfectly clean birch branches ready to be transformed into stunning crafts. Remember, crafting is all about creativity, so have fun and let your imagination run wild. Whether you’re making a rustic centerpiece or a whimsical wall hanging, these clean birch branches will be the star of the show. Happy crafting!
FAQ: How To Clean Birch Branches For Crafts
How do you clean birch wood for crafts
Cleaning birch wood for crafts is a crucial step to ensure a smooth and polished finished product. To clean birch wood, follow these simple steps:
-
Begin by removing any loose dirt, dust, or debris from the branches. Gently brush them off or use a soft cloth to wipe away the particles.
-
Fill a bucket with warm water and a mild detergent. Avoid harsh chemicals that may damage the wood or its natural beauty.
-
Dip a clean cloth or sponge into the soapy water mixture. Wring out any excess liquid to prevent over-saturation.
-
Gently scrub each birch branch, paying close attention to any stubborn stains or grime. Use circular motions to effectively lift away dirt and debris.
-
Rinse the branches thoroughly with clean water to remove any soapy residue. Ensure all cleaning agents are thoroughly washed away.
-
Pat dry the branches with a clean towel or allow them to air dry completely before using them in your crafts.
How do you preserve twigs for crafts
Preserving twigs not only extends their lifespan but also enhances their durability and appearance in crafts. Here are effective ways to preserve twigs for your creative projects:
-
Before preservation, ensure the twigs are clean and free of any dirt or debris by following the cleaning steps mentioned earlier.
-
One popular method of preserving twigs is by using a wood preservative or sealer. Apply a thin, even coat of wood preservative using a brush or cloth, ensuring all surfaces are covered.
-
Another preservation technique is air drying. Simply place the twigs in a dry, well-ventilated area, away from direct sunlight. Allow them to air dry for at least two to three weeks until they become dry and hardened.
-
If you prefer a natural preservation method, consider using a clear, water-based polyurethane sealant. Apply a thin layer using a brush, allowing it to dry completely before applying additional coats.
How do you disinfect a large branch
Disinfecting a large branch is essential to remove any germs, bacteria, or pests that may reside on its surface. Here’s a step-by-step guide to disinfecting a large branch effectively:
-
Start by wearing appropriate protective gear, such as gloves and a face mask, to avoid direct contact with chemicals or potential allergens.
-
Inspect the branch for any visible signs of pests, mold, or decay. Trim away any damaged or decaying sections using pruning shears or a saw, ensuring a clean and healthy surface.
-
Mix a disinfectant solution using one part bleach to ten parts water in a large bucket or container. Stir well to thoroughly combine the ingredients.
-
Submerge the branch into the disinfectant solution, ensuring it is fully immersed. Allow the branch to soak for approximately 15-20 minutes to effectively kill any microorganisms.
-
After the designated soaking time, remove the branch from the solution and rinse it thoroughly with clean water. This will help remove any residual bleach or disinfectant.
-
Lastly, let the branch air dry completely in a well-ventilated area before using it for crafts or decorations.
How do you clean birch wood
Cleaning birch wood is a straightforward process that helps maintain its natural beauty and durability. Follow these steps to effectively clean birch wood:
-
Firstly, remove any loose dirt or debris from the surface of the wood using a soft-bristled brush or a clean cloth. Gently brush away any particles without scratching the wood.
-
Create a cleaning solution by mixing mild dish soap or wood cleaner with warm water. Avoid using harsh chemicals or abrasives that may damage the wood.
-
Dip a clean cloth or sponge into the cleaning solution and wring out any excess liquid. Begin gently wiping down the birch wood, ensuring all surfaces are thoroughly cleaned.
-
Pay extra attention to any stains or stubborn spots. For tougher stains, use a soft brush or toothbrush to scrub the area gently.
-
Rinse the cloth or sponge and dampen it with clean water. Wipe down the birch wood again to remove any soapy residue.
-
Finally, pat the wood dry with a clean towel or allow it to air dry completely before using or applying any finishes.
Does birch need wood conditioner
Birch wood, like many other types of wood, can benefit from the use of a wood conditioner. Wood conditioner helps to ensure an even application of wood stain or finish by preventing blotching or uneven absorption. Although not mandatory, using a wood conditioner for birch wood is highly recommended, especially if you plan on staining or finishing the wood. Apply the conditioner according to the manufacturer’s instructions before staining or finishing the birch wood for optimal results.
How do you disinfect wood from outside
Disinfecting wood from outside is essential to eliminate any potential contaminants and keep it looking its best. Here’s a simple guide to disinfecting exterior wood:
-
Begin by removing any loose dirt, leaves, or debris from the wood surface, using a broom or a brush. Gently sweep away any particles to ensure a clean starting point.
-
Mix a solution of equal parts vinegar and water in a bucket or spray bottle. Vinegar is a natural disinfectant that effectively kills bacteria and germs.
-
Dip a cloth or sponge into the vinegar solution and wring out any excess liquid. Wipe down the exterior wood, ensuring all surfaces are thoroughly cleaned.
-
For tougher stains or mildew, create a stronger solution by mixing three parts water with one part bleach. Apply the solution to the affected areas using a cloth or sponge.
-
After disinfecting, rinse the wood thoroughly with clean water to remove any remaining vinegar or bleach.
-
Allow the wood to air dry completely before applying any finishes, such as sealants or paints.
How do you preserve birch branches for decorations
Preserving birch branches for decorations will ensure they stay sturdy and visually appealing for an extended period. Here’s how you can preserve birch branches effectively:
-
First, clean the birch branches by following the general cleaning steps provided earlier. Remove any dirt, dust, or debris that may hinder the preservation process.
-
Trim the birch branches to the desired length using sharp pruning shears or a saw. Make clean cuts to promote healthy growth and prevent splintering.
-
Apply a wood preservative or sealer to the birch branches. Use a brush or cloth to coat all exposed surfaces evenly. This will help protect the branches from moisture, decay, and pests.
-
Allow the preservative or sealer to dry according to the manufacturer’s instructions. This drying process will ensure the preservation agent fully penetrates the wood.
-
Store the preserved birch branches in a cool, dry location away from direct sunlight. This will prevent them from warping or losing their natural color.
-
Before using the preserved branches for decorations, check for any signs of decay or damage. If any issues arise, trim or replace the affected areas before incorporating them into your craft projects.
How do you preserve tree bark in crafts
Preserving tree bark in crafts adds a natural and rustic touch to your creations. Follow these steps to preserve tree bark effectively:
-
Start by finding a tree branch or log with intact bark. Carefully remove any loose or peeling sections of bark using a sharp knife or chisel.
-
Clean the bark by gently brushing away any dirt or debris with a soft brush. Ensure all surfaces are clean before proceeding with preservation.
-
Apply a wood sealer or clear polyurethane finish to the bark using a brush or sponge. Make sure to cover the entire surface of the bark evenly.
-
Allow the sealer or finish to dry according to the manufacturer’s instructions. This drying process will ensure the preservation agent fully coats and protects the bark.
-
Once the bark is completely dry, lightly sand it with fine-grit sandpaper to smooth out any rough edges or imperfections.
-
Use the preserved tree bark in your crafts by incorporating it into various projects such as frames, coasters, or wall art. The preserved bark will add a natural and organic element to your creations.
How long does it take for small tree branches to dry out
The drying time for small tree branches can vary depending on several factors, including the type of wood and the surrounding environment. On average, small tree branches can take anywhere from a few weeks to several months to dry out completely. Factors that can influence drying time include the moisture content of the wood, humidity levels, airflow, and temperature. To ensure proper drying, it is best to allow the small tree branches to air dry naturally in a well-ventilated area. Regularly monitor the branches for any signs of warping or cracking, and adjust the drying conditions as needed to promote even and thorough drying.
How do you preserve sticks and twigs
Preserving sticks and twigs for crafts will help maintain their strength and appearance over time. Here’s how to effectively preserve sticks and twigs:
-
Begin by cleaning the sticks and twigs using the cleaning steps mentioned earlier to remove any dirt, dust, or debris.
-
Optional: If desired, you can bleach the sticks and twigs to lighten their color. Mix a solution of equal parts water and bleach, and immerse the sticks and twigs for a short period. Rinse them thoroughly with water after bleaching and allow them to dry completely.
-
Apply a wood preservative or sealer to the sticks and twigs. Use a brush or cloth to evenly coat all surfaces, ensuring complete coverage.
-
Allow the sticks and twigs to dry in a well-ventilated area, away from direct sunlight, until the preservative or sealer is fully dry.
-
Store the preserved sticks and twigs in a cool, dry location to prevent any moisture accumulation that could lead to decay or warping.
How do you dry tree branches with leaves
Drying tree branches with leaves intact can be a beautiful way to preserve the natural aesthetic for crafts or decorations. Follow these steps to effectively dry tree branches with leaves:
-
Begin by selecting healthy branches with vibrant leaves. Avoid branches with signs of disease or damage.
-
Trim the branches to the desired length using sharp pruning shears or a saw. Make clean cuts to promote healthy drying and prevent splintering.
-
Bundle the branches together, securing them with twine or rubber bands. This will help maintain the shape and integrity of the leaves during the drying process.
-
Hang the bundled branches upside down in a cool, dry location with good airflow. A well-ventilated area will aid in the drying process and prevent the growth of mold or mildew.
-
Regularly check the branches for any signs of decay or insects. Remove any affected branches promptly to prevent further damage.
-
Allow the branches to dry for several weeks or until the leaves feel crisp and papery. Once fully dry, the branches can be used for various crafts or displayed as natural decor.
How do you seal a tree branch for decorations
Sealing a tree branch for decorations is essential to enhance its longevity and protect it from moisture, pests, and decay. Here’s how to effectively seal a tree branch:
-
Start by cleaning the branch using the cleaning steps mentioned earlier. Remove any dirt, dust, or debris from the surface to ensure a smooth sealing process.
-
Trim the branch to the desired length using sharp pruning shears or a saw. Create clean cuts to promote a polished appearance.
-
Sand the exposed ends and any rough areas using sandpaper. This will ensure a smooth finish and prevent any splintering.
-
Apply a wood sealer or clear polyurethane finish to the branch using a brush or sponge. Ensure all surfaces are evenly coated to provide maximum protection.
-
Allow the sealer or finish to dry completely according to the manufacturer’s instructions, typically 24-48 hours. Avoid touching or moving the branch during this drying time.
-
Once the branch is fully dry, it is ready to be used for decorations. Incorporate it into various projects, such as wreaths, centerpieces, or wall art, to add a natural and rustic charm.
How do you seal birch wood
Sealing birch wood is crucial to protect it from moisture, cracking, and warping. Follow these steps to effectively seal birch wood:
-
Begin by cleaning the birch wood using the cleaning steps mentioned earlier. Remove any dirt, dust, or debris from the surface to ensure optimal sealing results.
-
Sand the birch wood using fine-grit sandpaper to create a smooth and even surface. This will help the sealer adhere properly and provide a polished finish.
-
Wipe away any sanding residue with a clean cloth to ensure a clean working surface.
-
Apply a wood sealer or finish specifically designed for birch wood. Use a brush, cloth, or roller to evenly coat the wood, ensuring all surfaces are covered.
-
Allow the sealer or finish to dry according to the manufacturer’s instructions. This drying time will vary depending on the product used, so be sure to follow the recommended drying times.
-
Once the birch wood is fully dry, it is ready for use in your crafts or woodworking projects. The sealant will protect the wood and enhance its natural beauty.
How do you treat decoration logs
Treating decoration logs is essential to maintain their appearance, prevent deterioration, and protect against pests. Here’s how to effectively treat decoration logs:
-
Start by cleaning the logs using the cleaning steps mentioned earlier. Remove any dirt, dust, or debris from the surface to prepare them for treatment.
-
Inspect the logs for signs of pests, such as wood-boring insects or termites. If any pests are present, consult with a professional exterminator before proceeding with treatment.
-
Apply a wood preservative or water-based borate treatment to the logs. Follow the manufacturer’s instructions to ensure proper dilution and application.
-
Use a brush or spray bottle to evenly coat the logs with the treatment solution, ensuring all surfaces are covered.
-
Allow the treatment solution to penetrate the logs according to the recommended soaking time. This will vary depending on the product used, so refer to the specific instructions.
-
After the designated soaking time, allow the logs to air dry completely in a well-ventilated area. This drying process will help the treatment solution fully penetrate the wood