Have you ever wondered how to tell if your UV resin is properly cured? Whether you’re a resin art enthusiast, a jewelry maker, or simply someone who enjoys experimenting with craft projects, understanding the curing process is essential to achieving the desired results.
In this comprehensive blog post, we will explore the answers to all your burning questions about UV resin curing. From the difference between cured and live resin to why your resin might still be sticky after the curing process, we’ve got you covered. We’ll also dive into the various factors that can affect the curing time and finish of your UV resin prints.
So, if you’re ready to gain some valuable insights into the world of UV resin curing, let’s jump right in!
How Do You Tell If UV Resin Is Cured
So you’ve just finished a project using UV resin and now you’re left wondering, “Is it cured yet?” We totally get it! Waiting for something to dry can feel like watching paint dry, only worse. But fear not, we’ve got you covered with some foolproof ways to tell if your UV resin is truly cured.
Check for a Solid, Hard Finish
One surefire way to tell if your UV resin is cured is by giving it a gentle prod with your finger. If it feels tacky or sticky, it’s definitely not cured yet. But if it feels solid and hard to the touch, congratulations – you’ve got yourself a cured resin masterpiece! Just be careful not to leave any fingerprint evidence behind.
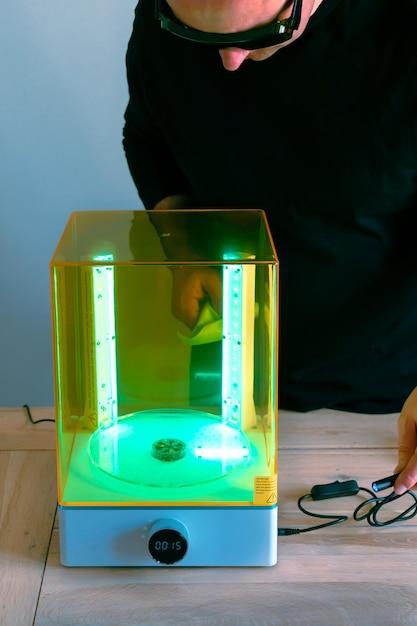
Shine a Light on the Subject
Another clever way to check if your UV resin has fully cured is to use a UV flashlight or lamp. Simply shine the light onto the resin surface and observe any changes. If it remains clear and no longer appears cloudy or milky, then you can be confident that the resin is cured. Plus, it’s kind of cool to have a secret detective tool on hand, just in case.
The Smell Test (No, Not That Kind)
One indicator of a successfully cured UV resin is the lack of any strong chemical smell. When UV resin is first applied, it usually emits a potent odor that can make your nose scrunch up like a prune. But as it cures, that smell dissipates. So, take a whiff and if you’re hit with a pleasant, odorless scent, you can stop holding your breath – your resin is good to go!
Time Is on Your Side
Patience is a virtue they say, and it definitely rings true with UV resin curing. Most UV resins will have a recommended curing time provided by the manufacturer. Ensure you allow your project enough time to cure fully based on these guidelines. It’s like waiting for a fine wine to mature or a pizza to be delivered – good things come to those who wait.
Put It to the Test
If you’re still unsure about the curing status of your UV resin, there’s always the final test: put it to good old-fashioned use! If it holds up under normal wear and tear without any signs of cracking or bending, then you can rest assured that your UV resin has successfully cured. Nothing says confidence like using your creation, whether it’s a stunning piece of jewelry or a mesmerizing resin art piece.
Now that you know exactly how to tell if your UV resin is cured, you can stop playing the waiting game and start enjoying the fruits of your labor. So go ahead, bask in the glory of your fully cured UV resin creations, and pat yourself on the back for a job well done!
Keep in mind that different brands and types of UV resins may have specific instructions for curing, so always refer to the manufacturer’s guidelines for the best results. And remember, the art of resin crafting is all about experimentation and exploration, so don’t be afraid to get creative and try new things. Happy curing!
FAQ: How Do You Tell If UV Resin Is Cured
Welcome to our FAQ-style guide on how to tell if UV resin is cured. UV resin is a fantastic material for creating beautiful and durable crafts, jewelry, and prints. However, figuring out if your resin is fully cured can sometimes be a bit tricky. In this comprehensive guide, we aim to answer all your burning questions and provide you with clear insights on how to determine if your UV resin is cured or not. So, without further ado, let’s dive right in!
How Long Should I Cure My Resin Prints
The curing time for UV resin can vary depending on factors such as the thickness of your print and the power of your UV light source. As a general guideline, it’s recommended to cure your resin prints for around 4 to 8 minutes per layer. However, be sure to refer to the manufacturer’s instructions for the specific resin you are using, as curing times can vary.
Does Tacky Epoxy Ever Cure
If your epoxy resin feels tacky or sticky even after the recommended curing time, it may be due to incorrect mixing ratios or inadequate curing conditions. Make sure to thoroughly mix your epoxy resin according to the manufacturer’s instructions and ensure proper curing conditions, such as sufficient UV exposure or heat. If the tackiness persists, it may be necessary to reapply a fresh layer and cure it again.
What’s the Difference Between Cured and Live Resin
Cured resin refers to resin that has undergone the complete curing process and is fully hardened and stable. On the other hand, live resin refers to resin that has not yet fully cured and may still be soft or tacky. Cured resin is ready for further handling, polishing, or finishing touches, while live resin requires additional curing to reach its full hardness and stability.
What is the Difference Between Hard and Soft UV Resin
Hard UV resin becomes rigid and solid after curing, making it suitable for creating sturdy objects and jewelry pieces. Soft UV resin, on the other hand, retains some flexibility even after curing, making it ideal for projects that require a certain level of elasticity, such as creating flexible molds or crafting items with intricate details.
Why is My UV Resin Still Sticky After Curing
If your UV resin is still sticky after curing, it may be due to underexposure to UV light or using an insufficiently powerful UV light source. Insufficient curing can leave the resin surface tacky and uncured. To resolve this issue, ensure that your resin receives adequate UV exposure by increasing the curing time or using a stronger UV light source.
Why is My Resin Rubbery
Resin that turns out rubbery instead of fully cured can be a result of using the wrong type of resin or an incorrect resin-to-hardener ratio. It’s essential to use the appropriate resin for your intended application and precisely follow the recommended mixing ratios. Additionally, ensure proper curing conditions, including adequate UV exposure or heat, as insufficient curing can also lead to a rubbery finish.
Is UV Resin for Jewelry Toxic
UV resin formulated for jewelry is generally considered safe when used as directed. However, it’s crucial to follow safety precautions such as wearing gloves and working in a well-ventilated area. If you have specific concerns, always refer to the manufacturer’s safety recommendations and product labeling for detailed information.
How Do You Know When Resin is Cured
To determine if your resin is fully cured, you can perform a simple touch test. Gently press your fingernail against an inconspicuous area of the resin surface. If it leaves an indent or feels tacky, the resin may not be fully cured. Alternatively, you can refer to the recommended curing time provided by the manufacturer and ensure that your resin has been exposed to the required UV light or heat for the specified duration.
Does UV Resin Cure Instantly
UV resin cures through a photopolymerization process triggered by UV light exposure. While it may appear to cure quickly due to its rapid hardening, it does not cure instantly. Curing times can range from a few minutes to several hours, depending on the resin’s thickness, the type of UV light used, and other variables. Always follow the recommended curing times provided by the manufacturer to achieve optimal results.
Why is My UV Resin Not Shiny
A lack of shine in cured UV resin can be attributed to several factors, such as inadequate curing conditions, improper mixing, or using a low-quality resin. To ensure a glossy finish, make sure you’ve mixed the resin thoroughly according to the manufacturer’s instructions. Additionally, double-check that your curing conditions, including UV light exposure and curing time, are sufficient to promote complete curing and achieve the desired shine.
What Do You Use to Clean Resin Prints
To clean resin prints, you can use isopropyl alcohol (IPA) or specialized resin cleaners. Simply soak the print in the cleaning solution for a few minutes, then gently scrub away any uncured resin residue using a soft-bristle brush or toothbrush. Rinse the print thoroughly with clean water and allow it to dry before proceeding with the curing process.
Can I Use a Blacklight to Cure UV Resin
Although blacklight emits UV radiation, it may not be sufficient to fully cure UV resin. For optimal results, it’s recommended to use a UV light specifically designed for resin curing. These lights emit a specific wavelength of UV that matches the resin’s curing requirements, ensuring proper and thorough curing.
Do I Have to UV Cure Resin Prints
UV curing is essential to ensure your resin prints achieve maximum hardness, stability, and durability. While some resins may have alternative curing methods, such as heat curing, UV curing generally provides the best results. To ensure the best possible outcome for your resin prints, it is highly recommended to follow the UV curing process specified by the resin manufacturer.
Does UV Resin Dry Hard
UV resin undergoes a chemical reaction upon exposure to UV light, resulting in a solid and hardened state. Therefore, properly cured UV resin does dry hard. However, it’s important to note that different UV resin formulations may exhibit varying levels of hardness. Some resins may remain slightly flexible or exhibit a rubbery texture even after curing.
Do You Need to Wash and Cure Resin Prints
Washing resin prints is an essential step to remove any excess uncured resin and ensure clean and high-quality results. After washing, the prints should undergo the curing process to achieve maximum hardness and stability. Skipping either of these steps can lead to unsatisfactory prints that may be brittle, tacky, or prone to breakage.
Can You Over Cure UV Resin
While it’s generally challenging to over cure UV resin, excessive exposure to UV light may cause the resin to become brittle and prone to cracking. It’s crucial to follow the recommended curing times provided by the resin manufacturer. If you accidentally overexpose your resin to UV light, consider reducing the curing time for subsequent prints until you achieve the desired results.
How Long Does it Take for UV Resin to Fully Cure
The time required for UV resin to fully cure can vary depending on factors such as resin type, curing conditions, and the thickness of the resin layer. Typical curing times range from a few minutes to several hours. However, it’s essential to refer to the manufacturer’s instructions for the specific resin you are using, as cure times can vary greatly.
How Safe is UV Resin
When used as directed, UV resin is generally considered safe. However, it’s important to follow safety precautions such as wearing gloves, working in a well-ventilated area, and avoiding direct skin contact or ingestion of the resin. If you have specific health concerns or sensitivities, consult the manufacturer’s safety data sheet (SDS), and consider using additional protective measures such as a respirator or protective eyewear.