Is your sump pump not draining properly? Are you worried about water pooling in your basement? Don’t fret! In this comprehensive guide, we’ll explore everything you need to know about fixing sump pump drainage issues. From understanding the causes of poor drainage to implementing effective solutions like sump pump extension hoses and drainage system repairs, we’ve got you covered. Let’s dive in and ensure your sump pump is working at its best to keep your basement dry and your worries at bay.
Fixing Sump Pump Drainage
Signs of Sump Pump Drainage Problems
If you’ve noticed some strange happenings with your sump pump lately, it may be trying to tell you something. Here are a few signs that your sump pump drainage system might need some attention:
1. Mysterious Puddles
Is your basement mysteriously turning into a water park? If you notice unexplained puddles forming around your sump pump or in other areas of your basement, it’s a red flag that something isn’t quite right with your drainage system.
2. Unpleasant Odor
Nobody wants their basement to smell like a swamp, right? If a funky odor is starting to emanate from your sump pump area, it could mean that water is not flowing away as it should. The stagnant water might be causing that unpleasant aroma.
3. Strange Noises
Granted, sump pumps aren’t exactly known for their sweet serenades, but if your pump starts making new and unusual sounds, it could be an indication of a problem. Gurgling, grinding, or rattling sounds can mean there’s an obstruction or improper drainage.
DIY Solutions for Sump Pump Drainage Woes
Before calling in the professionals, there are a few things you can try on your own to fix sump pump drainage issues. Here are a couple of handy hacks to get you started:
1. Double-Check the Discharge Line
Make sure your sump pump’s discharge line is properly connected and free from debris. Sometimes, the drainage problem is as simple as a clogged or disconnected pipe. So, put on those rubber gloves and give it a thorough inspection!
2. Extend the Pipe
If your sump pump’s discharge pipe doesn’t extend far enough away from your home, it could be causing water to flow right back into your basement. Consider adding an extension to ensure that the discharged water is carried far away from your foundation.
3. Install a Dry Well
A dry well can be an excellent solution for sump pump drainage problems. It acts as a reservoir that collects excess water and gradually disperses it into the surrounding soil. Plus, it’s a fun DIY project to tackle during your free time!
The Importance of Professional Help
While DIY solutions can work wonders in many cases, sometimes it’s best to call in the pros. If you’ve tried the above tips and your sump pump drainage problems persist, it’s time to seek assistance from a professional plumber or basement waterproofing expert. They have the knowledge and tools to assess the situation accurately and offer a suitable solution tailored to your specific needs.
Remember, a properly functioning sump pump drainage system is key to keeping your basement dry and your house safe from water damage. So don’t hesitate to take action if you suspect any issues. Your basement will thank you for it!
Sump Pump Extension Hose: Find the Perfect Solution
The Problem of Short Drainage Lengths
Are you tired of dealing with a sump pump that has a limited drainage range? The frustration of a short hose length can make maintaining proper water flow a challenge. But fear not! There is a simple and effective solution that can save you from soggy situations – the sump pump extension hose.
Extend Your Drainage Reach with Ease
The sump pump extension hose is a game-changer when it comes to fixing drainage problems. By connecting it to your existing sump pump hose, you can easily extend the length and reach of your drainage system. Whether you need a few extra feet or a significant extension, this hose has got you covered.
Quality and Durability
When purchasing a sump pump extension hose, it is important to invest in a high-quality product. Look for hoses made from durable materials such as reinforced PVC or heavy-duty rubber. These materials ensure that your hose can withstand the demands of regular use and adverse weather conditions.
Easy Installation and Versatility
Installing a sump pump extension hose is a breeze. The majority of these hoses come with universal fittings that easily connect to your existing hose. Simply slide the fittings together, secure them in place, and you are good to go. It’s that simple!
A Multitude of Options
Sump pump extension hoses come in various lengths, diameters, and styles. Whether you need a flexible hose that can navigate tight spaces or a rigid one for long-distance drainage, you can find an option that suits your specific needs.
Avoiding Potential Issues
While sump pump extension hoses are incredibly useful, it is essential to note that using excessively long hoses can impact the overall performance of your sump pump. Make sure to balance your desired extension length with the pump’s capacity to maintain optimal drainage efficiency.
Don’t let a short drainage length dampen your spirits. With a sump pump extension hose, you can say goodbye to water troubles and enjoy peace of mind. Investing in a high-quality hose will ensure durability and enable seamless installation. So, why wait? Extend your drainage reach today!
Sump Pump Drainage System
If you’ve got a sump pump, you probably know how important it is to keep it functioning properly. One key aspect of maintaining your sump pump is ensuring that the drainage system is in good shape. In this section, we’ll take a closer look at the sump pump drainage system and how to fix any issues that may arise.
Signs of a Drainage System Problem
So, how do you know if your sump pump’s drainage system is experiencing difficulties? Well, there are a few telltale signs to watch out for. Firstly, if you notice an unusual amount of water pooling around your sump pump or in the area where it discharges the water, that’s a red flag. Another sign is if you hear gurgling or bubbling noises coming from the drainage system. These signs indicate that something isn’t quite right, and it’s time to take action.
Clearing the Drainage Pipes
Oftentimes, the culprit behind a malfunctioning sump pump drainage system is a clogged or blocked pipe. Before you panic and call a professional, try clearing the pipes yourself. Start by disconnecting the pump’s discharge pipe and removing any debris that may have accumulated. You can then use a plumbing snake or a garden hose with a high-pressure nozzle to flush out the remaining obstructions. Just be cautious and don’t use excessive force that could damage the pipes.
Extending the Drainage Line
If your sump pump drainage system is constantly overwhelmed with water, it may be time to consider extending the drainage line. By doing so, you’ll provide the excess water a better escape route, preventing any potential backup. When extending the drainage line, make sure it slopes away from your home’s foundation to avoid water seepage issues. Remember, the goal here is to redirect the water as far away from your property as possible.
Investing in a Backup Pump
To enhance the reliability of your sump pump drainage system, consider investing in a backup pump. This secondary pump kicks in if the primary pump fails or becomes overwhelmed. It provides an extra layer of protection and helps prevent basement flooding. When choosing a backup pump, opt for one with battery backup functionality. This way, you won’t have to worry about power outages rendering your sump pump useless during heavy storms.
Now that you know the importance of a well-functioning sump pump drainage system, you’re better equipped to tackle any issues that may arise. By keeping an eye out for signs of trouble, clearing any clogs, extending the drainage line, and investing in a backup pump, you can ensure that your sump pump is prepared to handle whatever mother nature throws its way. So, be proactive, grab your tools, and keep your basement dry and flood-free!
How to Fix a Sump Pump Drain
Assess the Situation
Before you dive headfirst into fixing your sump pump drain, take a moment to assess the situation. Is the problem with the drain itself or with the pump? Knowing this will help you determine the best course of action. Having a clear understanding of the issue will prevent you from wasting time and effort on unnecessary fixes.
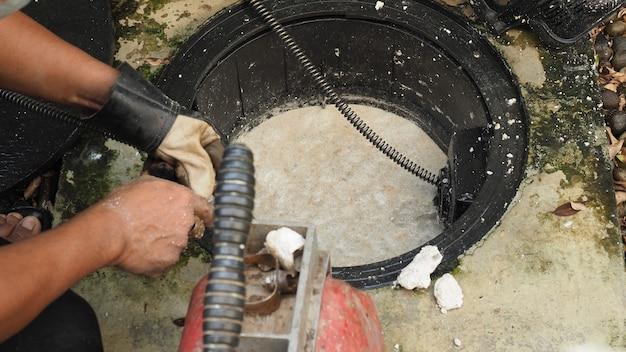
Clear the Blockage
If you’ve determined that the drain is the culprit, it’s time to get your hands dirty (or at least gloved) and clear that blockage. Start by removing any debris or obstructions from the drain entrance. Sometimes a good old-fashioned plunge can do the trick, just like unclogging a toilet. If that doesn’t work, a drain snake or auger can help dislodge any stubborn remnants. Remember to exercise caution and avoid exerting too much force to avoid damaging the drain or the pump.
Check the Pump Discharge Line
Another common issue with sump pump drainage is a clogged or improperly installed pump discharge line. This line carries the water away from your home, so it’s crucial that it functions properly. Inspect the line for any kinks, clogs, or damage. Ensure that it is securely attached to the pump and properly positioned to allow for effective drainage. If necessary, use a drain snake or pipe cleaner to clear any debris from the line. If the line is damaged, consider replacing it for optimal performance.
Ensure Proper Slope and Drainage
Proper slope and drainage are essential for an efficient sump pump system. Ensure that the drain pipe has a slight slope away from your home to encourage proper water flow. Additionally, check that the drain outlet or discharge point is clear and not obstructed by landscaping or other structures. A clear outlet ensures that water is effectively directed away from your home, preventing any potential water damage.
Test and Maintain Regularly
Finally, don’t forget to test your sump pump and perform regular maintenance. Testing your sump pump periodically will help you identify any issues before they escalate. Pour some water into the sump pit to activate the pump and observe how well it drains. If the drainage is slow or non-existent, you know there’s still work to be done. Additionally, make it a habit to clean the pump and pit regularly, removing any debris or sediment that may accumulate.
Fixing a sump pump drain doesn’t have to be a daunting task. With the right knowledge and a little bit of elbow grease, you can ensure that your sump pump system is in top shape, ready to handle any water influx. So roll up your sleeves, put on your fixer-upper hat, and get ready to conquer that drain!
How to Fix Sump Pump Pipe Outside
Assess the Drainage Problem
First things first: you need to figure out what’s causing the issue with your sump pump pipe outside. Is it a clog? Maybe it’s a damaged pipe that’s causing all the trouble. Take a close look at the pipe and try to identify any obvious signs of damage or blockage.
Clear Out the Blockage
If you’ve determined that a clog is to blame, it’s time to roll up your sleeves and get your hands dirty. Before you start, make sure you have a pair of gloves and some basic plumbing tools handy. Once you’re prepared, remove any debris or buildup that’s obstructing the flow of water in the sump pump pipe. This could be anything from leaves and twigs to small toys (if you have curious kids running around).
Repair or Replace the Damaged Pipe
Sometimes, the issue lies not with a blockage but with a damaged pipe. If you notice any cracks, leaks, or other visible signs of damage, it’s time for some repair work. Depending on the severity of the damage, you may be able to patch it up using waterproof sealing tape or epoxy. In more serious cases, you might need to replace the entire section of the pipe. Remember, it’s important to fix these issues as soon as possible to ensure proper drainage and avoid any further complications.
Redirect the Pipe’s Direction
Another solution to consider is redirecting the sump pump pipe’s direction. This can be particularly helpful if the current setup is causing water to pool near your foundation or other critical areas. By extending the pipe or changing its angle, you can ensure that the water is being effectively diverted away from your home. Just be sure to consider the slope and terrain to ensure proper drainage.
Add Extensions and Accessories
If you’re looking to improve the performance and efficiency of your sump pump drainage, you can explore different accessories and extensions. For example, you may want to install a sump pump check valve to prevent water from flowing back into the pump. Alternatively, a downspout extension can help redirect the water even further away from your home. These little add-ons can make a big difference in how your sump pump system operates.
Fixing the sump pump pipe outside doesn’t have to be a daunting task. By taking a systematic approach and troubleshooting the issue, you can ensure that your sump pump is working at its best. Remember to assess the problem, clear out any blockages, repair or replace damaged pipes, redirect the pipe’s direction if necessary, and consider adding extensions or accessories for better performance. With these tips in mind, you’ll be well on your way to a properly functioning sump pump system.
Sump Pump Discharge Pipe Repair Cost
Introduction
Welcome back to our comprehensive guide on fixing sump pump drainage! In this section, we will discuss the often-overlooked aspect of sump pump maintenance: sump pump discharge pipe repair cost. When it comes to keeping your basement dry, it’s important to ensure that the discharge pipe is in good working condition. Let’s dive in and explore what you can expect in terms of repair costs.
Factors Affecting Repairs
Several factors can affect the cost of repairing a sump pump discharge pipe. The type of repair needed, the extent of the damage, and the materials required will all play a role in determining your final repair bill. Additionally, labor costs and the geographic location of your home can impact the overall cost. It’s essential to understand these factors to budget effectively for the repair.
Common Repair Cost Range
On average, homeowners can expect to pay anywhere from $150 to $500 for sump pump discharge pipe repairs. This range includes both materials and labor costs. Keep in mind that the total cost can vary depending on the specific repair needed and the local market rates. It’s always a good idea to obtain multiple quotes from reputable professionals to compare prices and ensure you are getting a fair deal.
Repair Options
The cost of repairing a sump pump discharge pipe will differ depending on the repair option you choose. If the damage is minor and only requires patching or sealing, you can expect to pay on the lower end of the cost range. However, if the entire pipe needs to be replaced, the cost will be higher due to materials and labor involved.
DIY vs. Professional Repair
While some homeowners may opt to tackle sump pump discharge pipe repairs themselves, it’s important to weigh the pros and cons. DIY repair may save you some money, but it requires adequate knowledge and skills. Improper repairs can lead to further damage and ultimately cost you more in the long run. Hiring a professional ensures the job is done correctly and reduces the risk of future issues.
When it comes to fixing sump pump drainage, don’t forget to consider the cost of repairing the sump pump discharge pipe. Understanding the factors that can influence the repair cost is key to budgeting effectively. Whether you decide to go the DIY route or hire a professional, addressing any issues promptly will help keep your basement dry and secure. Stay tuned for our next subsection, where we will discuss common sump pump discharge pipe problems and how to troubleshoot them effectively.
Remember, maintaining a functional sump pump drainage system is vital for protecting your home from water damage. So, stay informed and take the necessary steps to ensure your sump pump discharge pipe is in excellent working condition.
Why is my sump pump not draining properly
Does your sump pump seem to be slacking off when it comes to draining water? Well, fear not! We’re here to shed some light on this common issue and help you figure out why your sump pump might not be draining properly.
The Float Switch Floats…But Your Worries Don’t
First things first, let’s talk about the float switch. This nifty little device is responsible for activating your sump pump when the water level reaches a certain point. If your sump pump isn’t draining properly, it could be due to a malfunctioning or stuck float switch. Make sure it moves freely, and if it doesn’t, it might be time for a little DIY magic or a call to the handy plumber down the street.
Clogs, Clogs Everywhere!
Ah, clogs. If your sump pump isn’t doing its job, it could be dealing with some pesky debris blocking its drainage system. Leaves, twigs, and gunk can find their way into the pump and hinder the smooth flow of water. Time to flex those DIY muscles again! Grab your trusty gloves, remove the pump, and give it a thorough cleaning. Just be careful not to damage anything while playing the role of a pump surgeon.
Pump Overwhelm: Too Much, Too Soon
Picture the scene: a heavy downpour saturates the ground around your home, causing an influx of water to invade your basement. Your sump pump, trying its best, might struggle to keep up with the sudden deluge. It’s like asking an office intern to handle the workload of ten employees – it’s just not fair! Consider upgrading your pump to a more powerful model if you frequently experience overwhelming water influxes.
The Power of Electricity…Or Lack Thereof
When it comes to sump pumps, electricity is its best friend. Without a steady flow of power, your pump won’t be able to do its job effectively. So, if you find your sump pump not draining properly, check if it’s plugged in and receiving electricity. Sometimes, a tripped circuit breaker or a faulty outlet might be causing all the trouble. Don’t forget to put on your electrical safety hat while you investigate!
Pump, Pump, Hooray!
Now that you have some insight into why your sump pump might not be draining water as it should, you can tackle the issue with confidence. Whether it’s a simple fix like cleaning out debris or a more complex task like replacing a faulty float switch, addressing the problem promptly will save you from potential basement flooding headaches. So, grab your tools and let’s get that sump pump back in action!
Remember, a little troubleshooting can go a long way when it comes to keeping your sump pump in tip-top shape. Happy draining!
Sump Pump Discharge Line Underground Clogged
What Causes a Clogged Sump Pump Discharge Line
A clogged sump pump discharge line underground can cause all sorts of headaches. Not only can it prevent your sump pump from effectively draining water away from your home, but it can also lead to damaging water backups in your basement. So, what actually causes this annoying problem?
1. Debris Buildup
One common culprit for a clogged sump pump discharge line is debris buildup. It’s amazing how many leaves, sticks, and other yard waste can find their way into the discharge line. These sneaky little things can easily accumulate over time and cause a blockage in the line, disrupting the flow of water.
2. Frozen Discharge Line
If you live in a colder climate, another potential issue you might face is a frozen sump pump discharge line. When the temperature drops, the water in the line can freeze, blocking the passage for further drainage. Trust me, no one wants to deal with a frozen mess when it comes to sump pumps.
3. Tree Roots
Believe it or not, those beautiful trees that enhance the curb appeal of your home can also be the cause of a clogged sump pump discharge line. Tree roots have a habit of seeking out moisture, and if they find their way into the discharge line, they can wreak havoc by blocking the flow of water.
How to Fix a Clogged Sump Pump Discharge Line
Now that we know what can cause a clogged sump pump discharge line underground, it’s time to tackle the issue head-on. Here are a few tips to help you unclog that stubborn line:
1. Clear Out Debris
Start by removing any visible debris from the discharge line. You can use a plumber’s snake or a garden hose to carefully flush out any blockages. Be patient and persistent, as it may take a few tries to completely clear the line.
2. Thaw the Frozen Line
If you’re dealing with a frozen discharge line, it’s essential to thaw it out. You can use a heat gun or wrap the line with heat tape to gradually melt the ice. Remember, patience is key here, as rushing the process can cause damage to the line.
3. Cut Tree Roots
If tree roots are the problem, you may need to take more drastic measures. Hire a professional to carefully cut and remove the intrusive roots, ensuring they don’t cause further damage to the line or your home’s foundation.
Prevention is Key
Now that you’ve successfully fixed your clogged sump pump discharge line, it’s time to take steps to prevent future occurrences. Regularly inspect and clean the discharge line, install a protective grate to keep debris out, and consider rerouting the line away from trees if possible.
Remember, a well-maintained sump pump discharge line is crucial for keeping your basement dry and your home protected. So, don’t neglect this essential task, or you may find yourself dealing with a soggy mess when you least expect it!
Should I Drill a Hole in the Sump Pump Discharge Pipe
Introduction
When it comes to fixing sump pump drainage issues, you might consider drilling a hole in the sump pump discharge pipe as a possible solution. But is it really necessary? In this section, we’ll explore whether drilling a hole in the sump pump discharge pipe is a good idea and what benefits it might bring.
Understanding the Purpose of a Sump Pump Discharge Pipe
Before we dive into the question of drilling a hole in the sump pump discharge pipe, let’s first understand its purpose. The sump pump discharge pipe is responsible for carrying excess water away from your home’s foundation. It’s designed to protect your basement or crawl space from flooding and water damage.
The Case for Drilling a Hole
Some argue that drilling a hole in the sump pump discharge pipe can help prevent the pipe from freezing. During colder months, the water inside the pipe can freeze, causing blockages and potential damage to your sump pump system. By drilling a hole in the pipe, the theory goes, you can allow water to escape, lowering the risk of freezing.
Weighing the Pros and Cons
While drilling a hole in the sump pump discharge pipe might seem like a convenient solution, it’s essential to consider both the pros and cons before proceeding.
On the one hand, drilling a hole can help prevent freezing and potential damage to your sump pump system during winter. It can also make it easier to remove any debris or clogs that may accumulate in the pipe over time.
On the other hand, drilling a hole can introduce other issues. The hole may become an entry point for pests, such as insects or rodents, seeking shelter or nesting. Additionally, if the hole is too large, it may allow excessive water to escape, potentially leading to erosion or water damage in your yard.
Alternative Solutions
Instead of drilling a hole in the sump pump discharge pipe, there are alternative solutions worth considering. One option is to insulate the discharge pipe to prevent freezing. By using insulation sleeves or heat tape, you can protect the pipe during colder months without the need for drilling.
Another solution is to redirect the discharge pipe away from your home’s foundation. Extending the pipe further from your house can minimize the risk of water pooling near the foundation, reducing the chances of basement flooding.
While drilling a hole in the sump pump discharge pipe might offer some benefits in certain situations, it’s not always the best solution. Before taking any action, evaluate the pros and cons, and consider alternative methods such as insulation or redirecting the pipe. As always, consulting with a professional plumber can provide valuable insights tailored to your specific drainage needs.