Are you considering tiling over a wooden surface but unsure if tile adhesive will stick? You’ve come to the right place! In this blog post, we’ll dive into the fascinating world of tiling on wood and explore whether tile adhesive is a suitable option.
Many questions arise when it comes to using tile adhesive on wood. Can you tile directly on plywood? Will tile adhesive adhere to varnished wood? What about using ready-mixed tile adhesive? We’ll address these queries and more, providing you with all the information you need to ensure a successful tiling project on wood.
Whether you’re dealing with plywood, varnished wood, or even ceramic tiles on wood, we’ll cover the necessary steps, techniques, and precautions. So, let’s get started and unveil the secrets behind tile adhesion on wood surfaces!
Does Tile Adhesive Stick To Wood
Tile adhesive is a magical substance that can make your dreams of a beautiful tiled floor or wall come true. But what about wood? Can you trust tile adhesive to stick to this classic, sturdy material? Let’s find out!
The Wood and the Tile Adhesive Tango
Surprise, surprise! Tile adhesive can indeed stick to wood! It may seem like an odd pairing, but with the right preparation, your wood and tile adhesive can dance together in perfect harmony. Just like Fred Astaire and Ginger Rogers…well, maybe not that graceful, but you get the idea!
Prepping the Wood
Before diving into the tile adhesive extravaganza, you need to prepare the wood surface properly. First, ensure that the wood is clean and free from dust, grease, or any other pesky residue. Give it a thorough wipe-down, because nobody wants dirty dancers on the dance floor!
Next, make sure the wood is smooth and even. Sand down any rough patches or bumpy areas. Remember, a smooth surface is the key to a successful bond between the wood and tile adhesive. It’s like finding the perfect partner who moves with the rhythm effortlessly.
Choosing the Right Tile Adhesive
Not all tile adhesives are created equal, and not all of them are meant for wood. So, when you’re shopping for the adhesive, keep an eye out for the ones specifically designed for wood surfaces. These adhesives are like expert dance instructors who know all the right moves.
Look for adhesive products labeled as “wood-friendly” or “suitable for wood substrates.” These adhesives are formulated to grip onto wood surfaces without causing any damage or separation. It’s like finding a partner who knows exactly how to hold you tight without crushing your toes!
Applying the Tile Adhesive
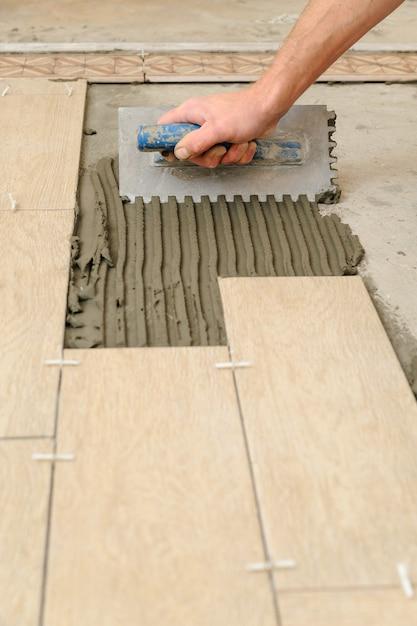
Now comes the fun part – applying the tile adhesive to the wood surface! Grab your notched trowel (your dance partner in this tango) and start spreading the adhesive evenly. But hold your horses! Don’t apply too much adhesive at once; it’s not a competition to see who can use the most. A thin, even layer is all you need—just like the perfect layer of icing on a cake.
Remember, patience is key here. Let the adhesive dry for the recommended time specified on the adhesive product. Like a good wine, it needs time to mature and become tacky to the touch. You might be tempted to rush this step, but remember, good things come to those who wait!
The Grand Finale: Installing the Tiles
With the tile adhesive prepped and ready, it’s time for the grand finale – installing the tiles on the wood surface. Drumroll, please! Gently press the tiles into the adhesive, making sure they’re aligned and snugly in place. Don’t forget to leave some space between the tiles for grout, just like dancers maintaining a perfect distance for a graceful twirl!
After you’ve installed all the tiles, let them rest for a bit. Give them time to bond with the adhesive and form a strong connection. Keep them undisturbed for the recommended curing period, usually around 24 hours. No dancing on the tiles just yet!
So, my friends, the verdict is in – tile adhesive does stick to wood! With proper preparation and the right adhesive, you can create stunning tiled surfaces even on wood. It may not be the most conventional dancefloor pairing, but sometimes the unexpected duos are the ones that steal the show.
Now that you know the secret to making tile adhesive and wood work together, go ahead and embrace your inner interior designer. Create the perfect dancefloor for your home with the confidence of knowing that your tiles will stay put, ready to groove to the rhythm for years to come!
Now, if you’ll excuse me, I need to practice my own dance moves. Maybe I’ll even take lessons from the tile adhesive and wood – they seem to have quite the chemistry!
FAQ: Does Tile Adhesive Stick To Wood
When it comes to tiling, the type of surface you’re working with plays a crucial role in ensuring a successful installation. Many DIY enthusiasts wonder if tile adhesive, the hero of tile bonding, is suitable for wood. In this FAQ section, we’ll answer some burning questions about whether tile adhesive sticks to wood, plywood, or even varnished wood. So, let’s get down to the nitty-gritty and clear up any confusion you might have!
What happens if you use too much tile adhesive
Using too much tile adhesive can lead to a sticky situation – pun intended! Excessive adhesive squeezed out between the tiles can create unsightly ridges and bumps, affecting the overall appearance and potentially causing problems with grout application. Additionally, an overabundance of adhesive may take longer to dry, prolonging the installation process. It’s essential to follow the manufacturer’s instructions and apply the adhesive in the recommended thickness to achieve optimal results.
Can you tile on 18mm plywood
Absolutely! Tiling on 18mm plywood is a popular method for achieving a sturdy and reliable tile installation. However, it’s crucial to ensure the plywood is securely fixed to the subfloor and meets the manufacturer’s specifications before proceeding with tiling. Remember to take into account the size, weight, and type of tiles you’ll be using, as this might influence the thickness and type of plywood needed for proper support.
Can you tile directly to plywood
While tiling directly onto plywood might seem tempting, it’s not the recommended approach. Plywood tends to expand and contract with changes in humidity and temperature, which can lead to cracks in the tiles or grout lines over time. To prevent such issues, it’s best to use a suitable underlayment material, like cement board or an uncoupling membrane, as an intermediary layer between the plywood and the tiles. This helps to minimize movement and ensure a long-lasting tile installation.
Do I need to seal plywood before tiling
Sealing plywood before tiling is highly recommended. Plywood is susceptible to moisture absorption, which can weaken its structure and compromise the adhesive bond with the tiles. Applying a suitable waterproofing or sealing agent, such as a penetrating primer or a liquid-applied membrane, helps to create a moisture barrier and improve the overall durability of the installation. Remember, a little extra preparation can go a long way in preventing potential headaches down the road!
What is the best underlayment for tile
When it comes to choosing the best underlayment for tile, you have a couple of reliable options. Cement board, also known as backer board, is a popular choice due to its strength and ability to withstand moisture. Another excellent option is an uncoupling membrane, which helps to absorb movement and prevent cracks caused by subfloor shifts. Both choices offer excellent support and longevity, so it ultimately depends on your preferences and specific project requirements.
How thick should plywood be under tile
The thickness of plywood required under tile depends on various factors, such as the joist spacing, subfloor composition, and tile size. As a general rule of thumb, a minimum thickness of 5/8 inch is recommended for plywood underlayment. However, thicker plywood, such as 3/4 inch, provides enhanced stability and is often preferred, especially for larger tiles or irregular subfloors. Remember to consult the manufacturer’s guidelines and consider the specific requirements of your project to determine the appropriate plywood thickness.
Will tile adhesive stick to varnished wood
Ah, the glossy allure of varnished wood! While it may be captivating, tile adhesive might struggle to form a strong bond with a smooth and finished surface. To ensure a proper adhesive bond, it’s crucial to roughen the varnished wood using sandpaper or a sander, creating a textured surface that the adhesive can adhere to securely. So, before diving headfirst into tiling, take a moment to roughen up that varnished wood to maximize the chances of a successful installation.
How do you attach ceramic tile to wood
To attach ceramic tile to wood, you’ll need a solid foundation and the right technique. Here’s a step-by-step breakdown:
-
Prepare the surface: Ensure the wood surface is clean, dry, and free from any loose debris or contaminants that could interfere with the adhesive bond.
-
Apply a suitable primer: Applying a primer specifically designed for bonding tile to wood surfaces helps create a strong foundation for the adhesive and enhances its ability to bond with the wood.
-
Choose your adhesive: Select a high-quality tile adhesive suitable for wood bonding and follow the manufacturer’s instructions for proper mixing and application.
-
Apply the adhesive: Use a notched trowel to apply a consistent layer of adhesive onto the wood surface, ensuring full coverage.
-
Place and press: Carefully place the ceramic tiles onto the adhesive, gently pressing them down to ensure a secure bond and proper alignment.
-
Grout and seal: After the adhesive has cured, apply grout between the tiles and seal them as needed to protect against moisture or staining.
By following these steps and channeling your inner tile maestro, you’ll be well on your way to a successful ceramic tile installation on wood!
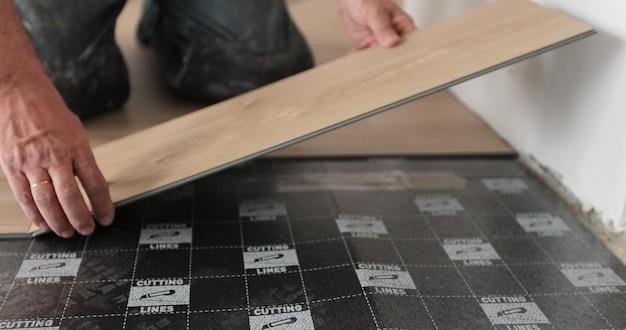
How do you tile over a wooden floor
Tiling over a wooden floor requires careful preparation to ensure a successful and long-lasting installation. Here’s a quick guide to get you started:
-
Evaluate the condition: Check for any signs of damage or movement in the wooden floor. It’s crucial to address any issues before proceeding with tiling to avoid problems down the road.
-
Stabilize the subfloor: If the wooden floor shows signs of movement, reinforce it by adding screws or adhesive to secure any loose boards and minimize the risk of future tile cracking.
-
Apply an underlayment: To achieve a stable surface for tiling, install a suitable underlayment such as cement board or an uncoupling membrane. Follow the manufacturer’s guidelines for proper installation instructions.
-
Prime the underlayment: Apply a recommended primer to the underlayment surface to enhance the adhesive’s bond and prevent potential moisture-related issues.
-
Apply the adhesive: Select a tile adhesive suitable for wooden subfloors and follow the manufacturer’s guidelines for proper mixing and application. Use a notched trowel to ensure proper adhesive distribution and coverage.
-
Tile installation: Set the tiles into place, ensuring proper alignment and spacing. Apply even pressure to achieve a secure bond between the adhesive and the tiles.
-
Grout and seal: Once the adhesive has cured, apply grout between the tiles and seal them if necessary. This helps to protect against moisture and maintain the tiles’ appearance.
With these steps in mind, you’ll be well-equipped to tackle tiling over a wooden floor like a seasoned pro!
What does tile adhesive stick to
Tile adhesive is a versatile bonding agent that can stick to a range of surfaces, including concrete, cement board, ceramic, natural stone, and even plywood. However, it’s essential to ensure that the surface you’re working with is clean, dry, and free from any contaminants that could hinder the adhesive’s effectiveness. It’s always wise to consult the manufacturer’s guidelines and recommendations when deciding which surface to bond your tiles to.
Is cement board stronger than plywood
When it comes to strength and durability, cement board takes the crown over plywood. Cement board is specifically designed for tile installations, offering excellent resistance to moisture, mold, and other potential damages. Unlike plywood, cement board doesn’t expand or contract with temperature changes, providing a more stable and reliable base for your tiles. While plywood can be suitable for certain applications, opting for cement board ensures a stronger and longer-lasting tile installation in most cases.
Can tile adhesive be used on wood
Yes, tile adhesive can be used on wood surfaces, including plywood, provided that the necessary precautions and preparation steps are taken. Roughening the wood surface, applying a suitable primer, and using a high-quality tile adhesive formulated for wood bonding are essential for achieving a strong and long-lasting bond. Remember, proper surface preparation is key to ensuring tile adhesive’s adhesive powers work their magic on wood!
Will tile adhesive stick to plywood
Absolutely! Tile adhesive can stick to plywood surfaces effectively if the proper surface preparation and adhesive application techniques are followed. Roughening the plywood, applying a suitable primer, and using a high-quality tile adhesive specifically designed for plywood bonding are vital for achieving optimal results. With the right preparation and adhesive, your tiles will be securely bonded to the plywood, ready to withstand the test of time.
Is ready mixed tile adhesive any good
Ready mixed tile adhesive has its perks, offering convenience and ease of use, especially for smaller tiling projects. However, it’s important to note that ready mixed adhesive may not provide the same level of strength and durability as a traditional powdered adhesive when it comes to larger or more demanding installations. If you’re tackling a significant tiling project or working with heavy or large-format tiles, investing in a high-quality powdered adhesive mixed on-site could be a wiser choice for achieving a robust and reliable bond.
Does tile adhesive go off
While tile adhesive doesn’t necessarily “go off” in the way perishable items do, it does have a limited working time known as the pot life. This refers to the period during which the adhesive remains in a usable state after it’s mixed. The pot life can vary depending on the type of adhesive and manufacturer’s specifications. It’s crucial to mix and apply the adhesive within the designated pot life to ensure optimal bonding properties. Once the pot life has expired, it’s best to mix a fresh batch to maintain the adhesive’s effectiveness.
What do I seal plywood with before tiling
Before tiling, it’s essential to seal the surface of plywood to prevent moisture penetration and improve the adhesive bond with the tiles. To achieve this, you can apply a suitable wood primer or a penetrating sealer specifically designed for plywood. These sealers create a protective barrier, minimizing the risk of plywood warping or delaminating due to moisture absorption. Ensure the sealer is fully cured before proceeding with the tile installation for optimal results.
Does grout stick to wood
While grout is primarily designed for filling and sealing gaps between tiles, it doesn’t typically stick well to wood surfaces. Wood has a porous and flexible nature that can lead to movement, expansion, and contraction, causing grout to crack or break away over time. To avoid potential issues, it’s advisable to use a flexible caulk or an elastomeric sealant instead of grout when dealing with joints or transitions between wood and tile surfaces. This helps to accommodate movements and maintain the integrity of the installation.
Can you tile onto varnished wood
While tiling onto varnished wood may seem like a viable option, it’s not ideal due to the smooth surface of the varnish. As mentioned earlier, it’s crucial to roughen the varnished wood before applying tile adhesive, allowing for a better grip and improving the adhesive bond. By sanding or using a sander to create a textured surface, you enhance the chances of a successful tile installation on varnished wood. So, it’s time to bid farewell to that glossy finish and embrace a tile-friendly texture!
What adhesive will stick to ceramic tile
When it comes to sticking ceramic tile, you’ll want to use a high-quality ceramic tile adhesive or thin-set mortar. These specially formulated adhesives offer superior bonding properties, ensuring your ceramic tiles stay firmly in place. Be sure to select an adhesive that matches your project requirements, considering factors like tile size, substrate, and environmental conditions. Following the manufacturer’s instructions for mixing and application allows you to harness the full adhesive potential and achieve fantastic ceramic tile results.
What tile adhesive should I use
Choosing the right tile adhesive can make a world of difference in the success of your installation. Different tile types, substrates, and project requirements call for specific types of adhesive. For most standard tile installations, a cement-based thin-set mortar is a reliable choice, offering excellent strength and versatility. However, always double-check the manufacturer’s recommendations for your specific tile and substrate to ensure optimal adhesive selection. When in doubt, don’t hesitate to consult with a professional for expert guidance tailored to your project.
Do you need to seal self-leveling compound before tiling
Sealing self-leveling compound before tiling is generally not required. Self-leveling compounds are designed to create a smooth, level subfloor for tile installation. However, it’s important to verify the specific recommendations provided by the compound manufacturer. In some cases, they may recommend applying a primer or sealer before tiling to enhance the bonding properties or prevent potential compatibility issues. Always check the product instructions for the optimal approach to ensure your tile installation’s success.
Can you use Liquid Nails to adhere tile to wood
While Liquid Nails is a versatile construction adhesive suitable for various applications, it may not be the best choice for adhering tile to wood. Liquid Nails is not specifically formulated for tile bonding, and its adhesive strength may not meet the requirements for a long-lasting tile installation. To ensure a successful tile-to-wood bond, it’s best to rely on high-quality tile adhesives explicitly designed for this purpose. By selecting the appropriate tile adhesive, you’ll be laying the foundation for a reliable and visually stunning tile installation.
Phew! We’ve addressed some of the burning questions surrounding tile adhesive’s relationship with wood, plywood, and varnished wood. From understanding the importance of proper surface preparation to knowing the right adhesive to use, you’re now armed with the knowledge to tackle your tiling project responsibly. Just remember to follow the manufacturer’s instructions, take the necessary precautions, and unleash your inner DIY guru. Happy tiling!