Are you tired of your old carpet and craving a fresh look for your floors? Say goodbye to those stained and worn-out fibers, and hello to sleek and resilient vinyl flooring. Whether you’re looking to revamp a single room or your entire home, this comprehensive guide has got you covered! From the carpet removal process to installing beautiful sheet vinyl or trendy vinyl plank, we’ll walk you through each step. Discover cost-effective options, answers to common questions, and tips to make your DIY project a breeze. So, grab your tools and let’s transform your floors together!
Removing Carpet and Installing Vinyl Flooring
So you’ve decided it’s time to ditch that old, worn-out carpet and upgrade to sleek and durable vinyl flooring. Good for you! But before you can enjoy your new floors, you need to navigate the process of removing carpet and installing vinyl flooring. Don’t worry, though. We’re here to guide you through it step by step.
Preparing for the Switch
First things first, gather your tools. You’ll need a utility knife, pliers, pry bar, a vacuum cleaner, and some good old elbow grease. Start by clearing the room of any furniture and giving the carpet a good vacuuming. Trust me, you don’t want dust bunnies hopping around while you’re working.
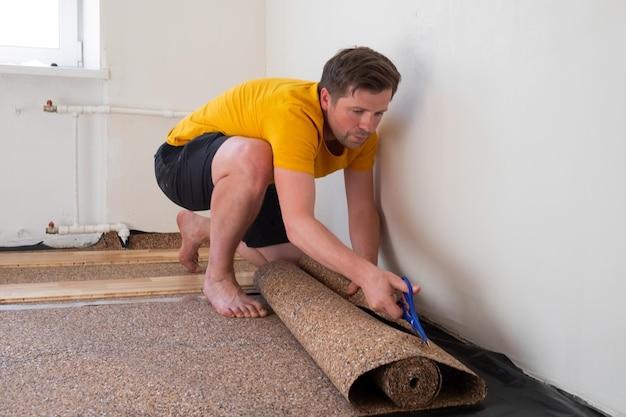
Bye Bye Carpet
Now it’s time to bid farewell to that carpet. Starting at one corner of the room, use your utility knife to cut the carpet and pad into manageable sections. Roll them up and set them aside for disposal later. Pro tip: wear gloves to protect your hands from any lingering carpet fibers or tacks.
Sayonara Tacks and Staples
With the carpet gone, it’s time to deal with the tacks and staples that held it in place. This is where your pliers and pry bar come in handy. Grab those tacks with the pliers, give them a good tug, and out they go. For stubborn staples, use the pry bar to carefully lift them up and out of the floor. Your fingers will thank you later.
Prepping the Subfloor
Now that you’ve cleared the room of carpet, tacks, and staples, it’s time to prep the subfloor for the vinyl flooring. Give the floor a thorough cleaning, removing any dirt or debris. If you encounter any uneven spots, use a floor leveling compound to create a smooth surface. Remember, a little extra effort now will pay off in the long run.
Installing the Vinyl
Finally, it’s time for the main event – installing the vinyl flooring. Start by measuring the room, allowing for a 2-3 inch overlap at each wall. Cut the vinyl accordingly using your trusty utility knife. Lay down the vinyl, smoothing out any wrinkles or bubbles as you go. Trim the excess vinyl at the edges and voila! You’re one step closer to flooring bliss.
Final Finishing Touches
With the vinyl flooring in place, all that’s left is the finishing touches. Install baseboards or trim along the edges to give your new floors a polished look. Now step back and admire your handiwork – you’ve successfully removed carpet and installed vinyl flooring like a pro!
Removing carpet and installing vinyl flooring may seem like a daunting task, but with the right tools and a little know-how, you can tackle it with confidence. So get ready to say goodbye to that old carpet and hello to stylish and practical vinyl flooring. Trust us, your feet will thank you. Happy renovating!
Sheet Vinyl Flooring: The Perfect Choice for a Stylish and Durable Home
When considering a flooring upgrade, sheet vinyl is an excellent option that offers both style and durability. Its versatility and affordability make it a popular choice for homeowners looking to revamp their spaces without breaking the bank. In this section, we will delve into the world of sheet vinyl flooring, uncovering its features, benefits, and installation process.
Features of Sheet Vinyl Flooring
Sheet vinyl flooring is known for its seamless appearance, creating a sleek and polished look in any room. This type of flooring is available in a wide range of patterns and colors, allowing you to find the perfect match for your home’s aesthetic. Whether you prefer a classic wood grain or a striking mosaic design, sheet vinyl can meet your style requirements effortlessly.
Additionally, sheet vinyl is highly resistant to water, making it an ideal choice for moisture-prone areas such as bathrooms and kitchens. Its moisture-resistant properties help prevent warping and damage, ensuring a long-lasting flooring solution for your home.
Benefits of Sheet Vinyl Flooring
The benefits of sheet vinyl flooring extend beyond its appearance and water resistance. One major advantage is its durability, making it suitable for high-traffic areas. Whether you have pets, children, or frequently host social gatherings, sheet vinyl can withstand the wear and tear of everyday life while maintaining its beauty.
Another advantage of sheet vinyl is its low maintenance requirements. Unlike other flooring options, sheet vinyl does not require extensive cleaning or sealing. Regular sweeping and occasional mopping are all that is needed to keep your floors looking pristine.
Installing Sheet Vinyl Flooring
Installing sheet vinyl flooring is a relatively straightforward process that can be done by most DIY enthusiasts. However, it is essential to follow proper installation techniques to ensure a flawless result. Here is a general overview of the installation process:
-
Preparation: Begin by thoroughly cleaning and leveling the subfloor to create a smooth surface for installation. Remove any existing carpet, adhesive residue, or debris.
-
Measure and Cut: Measure the dimensions of the room and cut the sheet vinyl accordingly, leaving a slight overhang along the edges to be trimmed later.
-
Adhesive Application: Apply a recommended adhesive to the subfloor using a trowel. Start in one corner and work your way across the room, ensuring even coverage.
-
Installation: Carefully lay the sheet vinyl onto the adhesive, smoothing out any wrinkles or air bubbles as you go. Use a roller to press the flooring firmly into place.
-
Trimming and Finishing: Once the sheet vinyl is in position, trim the excess material along the edges using a utility knife. Install molding or transition strips to create a seamless transition between the vinyl flooring and adjacent surfaces.

With the right tools and a little patience, you can achieve professional-looking results when installing sheet vinyl flooring.
In conclusion, sheet vinyl flooring offers an array of features and benefits that make it an attractive choice for any homeowner. Its seamless appearance, durability, water resistance, and easy installation process make it a stylish and practical option for any room in your home. Consider sheet vinyl when removing carpet and upgrading to a flooring solution that combines both functionality and aesthetics.
Carpet Removal Made Easy with the Right Machine
If you’re considering removing your carpet and installing a new vinyl floor, the first step is to get rid of your old carpet. But don’t worry, with the right carpet removal machine, this task can be a breeze. Let’s dive into the world of carpet removal machines and see how they can make your life easier.
Choosing the Right Carpet Removal Machine
When it comes to carpet removal, not all machines are created equal. You need to choose a machine that suits your specific needs. Here are a few factors to consider:
Power and Efficiency
Look for a machine that packs a punch. You want something powerful enough to handle even the toughest carpet without breaking a sweat. A machine with strong suction and cutting capabilities will make the process faster and more efficient.
Maneuverability
Carpet removal can be a physically demanding task, so you’ll want a machine that is easy to maneuver. Opt for a machine that is lightweight and has wheels, allowing you to move around effortlessly.
Versatility
If you have different types of carpet in various areas of your home, a versatile machine is essential. Look for one that can handle different carpet thicknesses and textures.
Types of Carpet Removal Machines
Now that you know what to look for in a carpet removal machine, here are a few types to consider:
Carpet Puller
A carpet puller is a powerful tool specifically designed to remove carpet. It uses a set of gripping teeth to grab hold of the carpet and pull it up from the floor. This machine is perfect for large areas and can save you a lot of time and effort.
Carpet Stripper
A carpet stripper is another handy machine that makes carpet removal a breeze. It features a blade that cuts through the carpet, allowing you to strip it away from the floor effortlessly. This type of machine is great for stubborn carpets and glue-down installations.
Safety Tips
As with any DIY project, it’s essential to follow a few safety guidelines to protect yourself and your property:
Wear Protective Gear
Before you start using a carpet removal machine, make sure to wear safety goggles, gloves, and sturdy footwear. This will protect your eyes, hands, and feet from any potential hazards.
Prepare the Area
Clear the room of furniture and any other obstacles before starting the carpet removal process. This will ensure a smooth and safe operation.
With the right carpet removal machine by your side, removing your old carpet can be a hassle-free experience. Remember to choose a machine that is powerful, easy to maneuver, and versatile. And most importantly, follow safety precautions to avoid any accidents. Now that you have all the necessary information, it’s time to bid farewell to your old carpet and welcome your brand-new vinyl flooring!
Replace Carpet with Vinyl Flooring DIY
Reasons to Ditch the Carpet
If you’re tired of dealing with stubborn stains, endless vacuuming, and lurking allergens, it might be time to say goodbye to your old carpet. Installing vinyl flooring can bring a breath of fresh air into your home and provide a sleek, modern look. Plus, it’s a DIY project that can save you some serious cash.
Vinyl Flooring: The DIY Dream
Replacing carpet with vinyl flooring is a task that most enthusiastic DIYers can tackle with ease. With a few basic tools and a little know-how, you can transform your floors in no time. Plus, the satisfaction of completing the project yourself is unbeatable!
Save Your Bank Account
Let’s face it, hiring professionals to replace your carpet can be a budget buster. But fear not, intrepid DIYers, vinyl flooring is a cost-effective alternative that won’t break the bank. By doing it yourself, you can save even more money to spend on other home improvements or a well-deserved treat.
Step-by-Step Guide
1. Prepare the Subfloor
Before you can install your shiny new vinyl flooring, you’ll need to make sure the subfloor is clean, dry, and level. Sweep away any debris and repair any damaged areas. This solid foundation will ensure a smooth installation process.
2. Measure and Cut
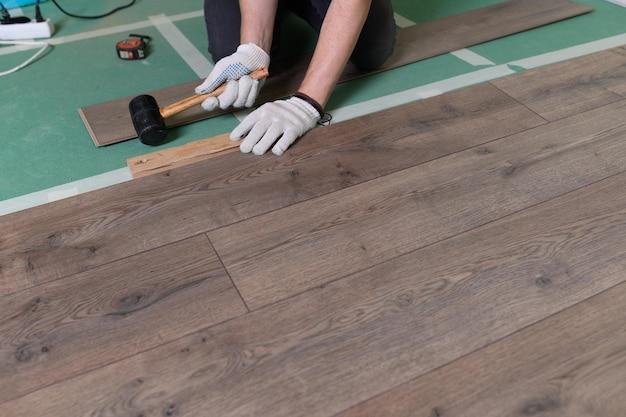
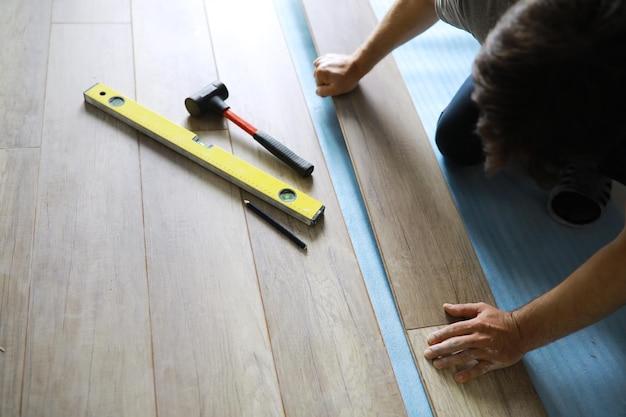
Vinyl flooring comes in various planks or tiles, so measure your floor space accurately before making any cuts. Remember, it’s always better to measure twice and cut once. Using a sharp utility knife, carefully cut the vinyl to fit your room’s dimensions.
3. Lay the Vinyl Flooring
Starting in one corner, lay your first plank or tile in place, ensuring it’s aligned correctly. As you go, interlock the planks or tiles, installing them firmly and securely. Take your time to avoid any unsightly gaps or uneven edges.
4. Finishing Touches
Once you’ve installed all the flooring, it’s time to add the finishing touches. Trim any excess vinyl around the edges, and install baseboards or moldings to give your room a polished look. Admire your handiwork and revel in the fact that you did it all yourself!
Enjoy Your Vinyl Haven
By replacing carpet with vinyl flooring DIY style, you’ve transformed your home into a modern, low-maintenance paradise. No more worrying about spills or stains – just wipe away the mess and enjoy your stylish new floors. Plus, you can bask in the pride of a successful DIY project and impress your friends with your newfound skills. Vinyl flooring for the win!
Carpet Removal and Floor Installation Cost
The Price Tag of a Dream Floor
So, you’ve finally decided to kick that old, worn-out carpet to the curb and upgrade to sleek and stylish vinyl flooring? Great choice! But before you can start dancing on your new floor, you need to know how much it’s going to cost you. Let’s break down the expenses and get a clear picture of what to expect.
Assessing the Damage
First things first, you’ll need to remove the carpet. If you’re a DIY enthusiast, you can save yourself some money by tackling this task on your own. However, if you don’t fancy playing a game of tug-of-war with stubborn carpet fibers, it’s best to hire a professional carpet removal service to ensure a smooth and efficient process. On average, the cost of removing carpet and disposing of it can range from $1 to $3 per square foot, depending on the size of the area and the complexity of the job.
Prep Work is Key
Once the carpet is out of the picture, it’s time to prepare the floor for its shiny new upgrade. This step may involve cleaning, leveling, or repairing the subfloor to ensure a solid foundation for your vinyl flooring. Again, you have the option of doing it yourself or hiring professionals. Factor in an additional $1 to $2 per square foot for prep work, depending on the extent of the required repairs.
Selecting the Perfect Vinyl
Now comes the fun part: choosing the vinyl flooring that speaks to your style and fits your budget. Vinyl comes in various styles, including sheets, planks, and tiles, with different prices for each. While sheet vinyl can cost as low as $0.50 per square foot, the more popular luxury vinyl planks and tiles can range anywhere from $2 to $7 per square foot. Keep in mind that additional costs may be incurred for underlayment, adhesive, and other installation materials.
A Helping Hand
If you’re not a seasoned DIYer, it’s highly recommended to hire a professional to install your new vinyl flooring. Improper installation can lead to costly repairs down the road, so investing in a skilled installer is a smart move. The installation cost will vary depending on your location, the complexity of the job, and the contractor’s expertise. On average, you can expect to pay around $2 to $5 per square foot for vinyl flooring installation.
Crunching the Numbers
Let’s do some quick math to get an estimate. Suppose you’re looking to replace the carpet in a 500-square-foot room:
- Carpet Removal: 500 sq ft x $1/sq ft = $500
- Prep Work: 500 sq ft x $1/sq ft = $500
- Vinyl Flooring: 500 sq ft x $3.50/sq ft = $1,750
- Installation: 500 sq ft x $4/sq ft = $2,000
In this scenario, the total cost for removing carpet and installing vinyl flooring would amount to $4,750. Always keep in mind that prices can vary significantly depending on factors such as your location, the condition of your subfloor, and the specific type of vinyl flooring you choose.
Your Dream Floor Awaits
While the cost of removing carpet and installing vinyl flooring may seem significant, think of it as an investment in your home’s aesthetic appeal and long-term durability. Not only will vinyl flooring elevate the overall look and feel of your space, but it will also stand the test of time, providing you with a low-maintenance and hard-wearing floor for years to come. So go ahead, take the leap, and bid farewell to that tired old carpet. Your dream floor awaits!
Replacing Carpet with Vinyl Plank on Stairs
So, you’ve decided to take the plunge and replace the carpet on your stairs with stylish and durable vinyl plank flooring. Good choice! Not only will this upgrade give your home a fresh new look, but it will also make maintenance a breeze. Say goodbye to the days of scrubbing out carpet stains and hello to easy-to-clean vinyl planks.
Preparation is Key
Before you jump into the installation process, it’s important to do some prep work. Start by clearing the stairs of any obstacles, such as furniture or decor. Then, remove the old carpet, padding, and tack strips. Don’t forget to wear gloves to protect your hands from those pesky carpet staples!
Measure Twice, Cut Once
When it comes to installing vinyl plank on stairs, accuracy is key. Take precise measurements of each step and riser to ensure a perfect fit. Keep in mind that stairs can have tricky angles, so take your time and double-check your measurements. It’s always better to be safe than sorry!
Choose the Right Type of Vinyl Plank
Vinyl plank comes in a variety of styles, thicknesses, and installation methods. For stairs, it’s best to opt for a thicker and more rigid vinyl plank. This will provide better stability and reduce the risk of slips and falls. Additionally, look for vinyl planks with a slip-resistant surface for added safety.
Installation Tips and Tricks
Now that you have your measurements and vinyl plank ready, it’s time to start the installation process. Begin by installing the vinyl plank on the stair treads, starting from the bottom and working your way up. Use a high-quality adhesive designed specifically for vinyl flooring to ensure a strong bond.
For the risers, measure and cut the vinyl plank to fit snugly against the tread. Apply adhesive to the back of the plank and press it firmly into place. Repeat the process for each step, making sure to align the planks properly.
Finishing Touches
Once you’ve installed vinyl plank on all the stairs, it’s time for the finishing touches. Use a vinyl transition strip to cover the joint between the stair tread and the flooring on the landing. This will give your stairs a polished, professional look.
To further enhance the safety and appearance of your new vinyl plank stairs, consider adding stair nosing. This specialized trim piece provides an extra layer of protection to the edge of the steps and adds a touch of elegance.
Enjoy Your Stylish and Functional Stairs
Congratulations! You’ve successfully replaced the carpet on your stairs with vinyl plank flooring. Now, sit back, relax, and enjoy your beautiful, low-maintenance stairs. Whether you’re hosting a dinner party or chasing after little ones, you can now do it all without worrying about carpet stains or wear and tear. Cheers to your vinyl plank stairway to heaven!
Keyphrases: replacing carpet with vinyl plank flooring, vinyl plank on stairs, vinyl plank installation, replacing stair carpet with vinyl, upgrading stairs, vinyl plank stairs.
Is it Cheaper to Replace Carpet or Install Vinyl
Cost Comparison: Carpet vs Vinyl Flooring
When it comes to choosing between replacing your old carpet or installing vinyl flooring, one of the most important factors to consider is cost. Let’s break down the expenses and find out whether carpet removal or vinyl installation is the more affordable option.
Carpet Removal Costs
When you decide to replace your carpet, the first expense you’ll encounter is the cost of removing the old carpet. Hiring professionals to do the job can cost you anywhere from $1.50 to $3 per square foot. If you have a large space to cover, this cost can add up quickly. However, if you’re up for a little DIY action, you can save some bucks by taking on the challenge yourself.
Vinyl Flooring Installation Costs
On the other hand, vinyl flooring comes with its own installation costs. The price of installing vinyl flooring can vary depending on factors like the type of vinyl you choose, the complexity of the installation, and whether you hire professionals or take the DIY route. On average, you can expect to pay between $2 and $8 per square foot for installation.
The Cost Comparison Verdict
When considering the overall costs, it’s important to think beyond the initial expenses. While vinyl flooring installation may have a higher upfront cost, it tends to last longer than carpet and requires less maintenance. Carpet, on the other hand, may be cheaper to install initially, but needs to be replaced more frequently, leading to additional expenses in the long run.
Other Factors to Consider
Apart from cost, there are other factors to consider when deciding between carpet and vinyl flooring. These include durability, aesthetics, comfort, and ease of cleaning. So, before making your final decision, think about how each flooring option aligns with your specific needs and preferences.
Conclusion
Ultimately, the decision between replacing your carpet or installing vinyl flooring boils down to your budget and personal preferences. While carpet removal may seem cheaper upfront, consider the long-term costs and benefits of vinyl flooring. Make your choice based on what suits your style and lifestyle. Happy flooring!
How Long Does It Take to Remove Carpet and Install Vinyl Plank Flooring
Preparing for the Transformation
So, you’ve finally decided to bid farewell to your old carpet and embrace the stylish allure of vinyl plank flooring. But before you can revel in the beauty of your new floors, you’re probably wondering: “How long is this transition going to take?” Let’s delve into the process, step-by-step, to give you a better understanding of the time frame involved.
Step 1: Bye Bye Carpet
The first phase of this transformation involves removing the carpet. This process, depending on the size of the area, can take anywhere from a few hours to a full day. While it may seem like a straightforward task, you’ll want to allow some extra time for any unexpected surprises lurking beneath your carpet – those pesky staples and tack strips that love to stick around!
Step 2: Prepping the Subfloor
With the carpet now bid adieu, it’s time to prep the subfloor for its new vinyl companion. This typically involves ensuring the floor is clean, level, and free of any debris. If your subfloor requires repairs or leveling, you’ll want to factor in additional time for this step. Depending on the condition of your subfloor, this can take anywhere from a few hours to a day.
Step 3: Laying the Foundation
Next up, it’s time to lay the foundation for your vinyl plank flooring – the underlayment. This layer helps provide cushioning, insulation, and a smooth surface for the vinyl planks to adhere to. The installation of the underlayment usually takes a few hours, but keep in mind that drying times for adhesive may vary depending on the product used.
Step 4: The Main Attraction
Finally, it’s time for the star of the show – the installation of your vinyl plank flooring! The amount of time this step takes will largely depend on the size of the area, the complexity of the pattern, and your experience with this type of installation. For an average-sized room, you can expect this process to take a day or two. Of course, if you’re new to vinyl plank installation, you might want to allow some extra time for trial and error. Remember, practice makes perfect!
The Waiting Game
Once the vinyl plank flooring is installed, you’re not quite done. Depending on the type of flooring adhesive used, there may be a curing period before you can fully enjoy your new floors. This can range anywhere from 24 hours to several days, so try to resist the temptation to do a victory dance right away.
Time to Revel in Your New Floors
So, in total, the process of removing carpet and installing vinyl plank flooring can take anywhere from a few days to a week, depending on the size of the area and any unforeseen challenges that may arise. But fear not! Just think about the incredible upgrade and the joy your new floors will bring to your space. So roll up your sleeves, tackle those carpet removal blues, and get ready to embrace the transformative power of vinyl plank flooring. Your floors will thank you!