Welcome to our comprehensive guide on the four basic techniques for forming clay! Whether you’re a beginner or a seasoned artist, understanding the fundamentals of clay formation is essential to creating stunning ceramic artwork. In this blog post, we will delve into the various methods used to transform raw clay into beautiful ceramic vessels.
From handbuilding techniques like pinching and coiling to the ancient art of pottery wheel throwing, we will explore the step-by-step process of each technique. We’ll also answer common questions like how long clay can be left before firing, the different stages of clay, and the types of pottery you can create. So, grab your favorite clay tools and let’s dive into the fascinating world of clay formation!
So, let’s get started on this hands-on adventure and uncover the secrets of working with clay. By the end of this blog post, you’ll have a solid foundation of knowledge and a newfound appreciation for the incredible versatility of clay. Whether you’re longing to create functional pottery or intricate sculptures, understanding these techniques will undoubtedly elevate your artwork. So, roll up your sleeves, dust off your kiln, and let your creativity take shape as we explore the four basic techniques for forming clay!
What Are the Four Basic Techniques for Forming Clay
If you’ve ever wanted to get your hands dirty and channel your inner artist, clay forming is the perfect outlet for your creative energy. But where do you start? Don’t worry, we’ve got you covered with four basic techniques that will have you shaping clay like a pro in no time.
1. Pinching Technique: Giving Clay a Squeeze
Forget about pinching yourself to make sure it’s real; instead, pinch that clay! The pinching technique is as straightforward as it sounds. Take a ball of clay and use your fingers to gently squeeze and shape it into your desired form. It’s like molding Play-Doh, but cooler (because it’s clay, duh!).
2. Coiling Technique: Clay Snakes, No Venom Included
No need to hiss or slither around to master the coiling technique. Grab some clay, roll it into long snake-like coils, and start stacking them on top of each other to build your desired shape. It’s like playing with clay Legos, except without the sharp corners. Embrace your inner architect and create coil-built masterpieces!
3. Slab Technique: Clay Pancakes, Without the Maple Syrup
You don’t need a breakfast griddle for this technique, but it does involve creating flat clay slabs. Roll out a layer of clay, just like you would roll out dough for your favorite pastry. Cut out shapes, join them together, and voila! You’ve built the foundation of your clay creation. Forget about playing with your food; it’s time to play with clay pancakes!
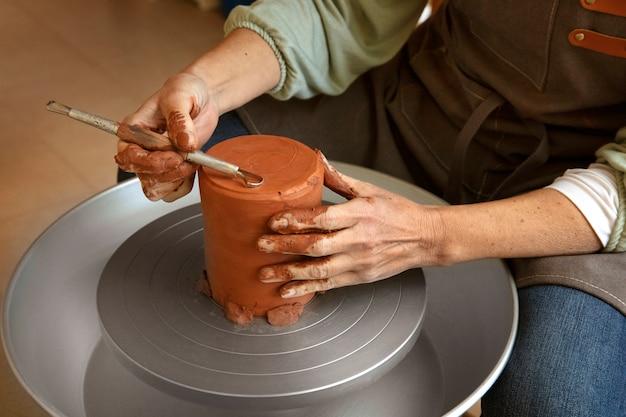
4. Wheel Throwing Technique: Get Spinning, Potter!
If you’ve ever dreamed of reenacting scenes from the famous pottery-wheel scene in “Ghost,” this technique is for you. Get yourself a potter’s wheel, place a ball of clay on it, and let the spinning begin! With your hands and some water, shape the clay to create bowls, vases, or any other spinning sensation you desire. Just make sure you’re not wearing your favorite white shirt, or it might end up resembling an abstract masterpiece!
So there you have it—the four basic techniques for forming clay, ready to be mastered and unleashed upon the world. Whether you choose to pinch, coil, slab, or wheel your way to clay perfection, remember to let your creativity flow and have fun along the way. Happy clay forming!
Keywords: clay forming techniques, basic clay forming techniques, pinching technique, coiling technique, slab technique, wheel throwing technique.
FAQ: What Are Four Basic Techniques for Forming Clay
How long can I let clay sit before firing
You can let clay sit indefinitely before firing it. However, it’s important to keep in mind that clay may dry out and become more prone to cracking if left for too long. To avoid this, it’s recommended to store clay in an airtight container or cover it with a damp cloth to maintain its moisture.
What is the term for fired clay
Fired clay is commonly referred to as ceramics. This term encompasses a wide range of objects that have been shaped from clay and hardened through the firing process. From delicate pottery to durable tiles, ceramics have been an integral part of human civilization for thousands of years.
What is the best clay for Handbuilding
When it comes to handbuilding, different types of clay can yield different results. However, one popular choice among handbuilders is earthenware clay. Its low firing temperature and pliability make it ideal for handforming and creating intricate details. Additionally, stoneware clay and porcelain clay are also commonly used for handbuilding due to their strength and versatility.
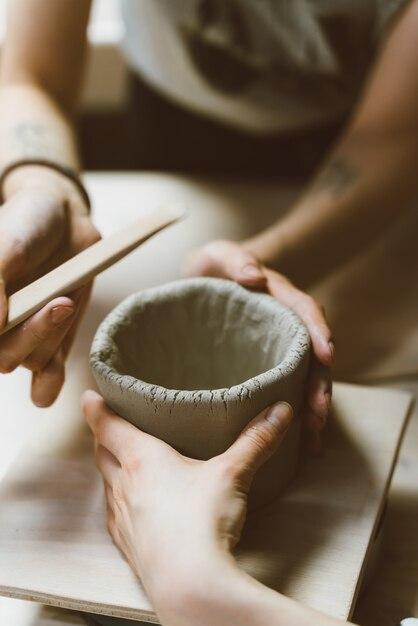
What is the initial step in the pinch technique
The pinch technique is a straightforward and hands-on way to create ceramic vessels. The first step involves taking a small piece of clay and using your fingers to pinch and shape it into a basic form. This initial pinching sets the foundation for further refinement and detailing in the later stages of the process.
What are the three categories of pottery
Pottery can generally be classified into three main categories based on its intended use and characteristics:
1. Earthenware: This type of pottery is fired at low temperatures and is known for its porous nature. It is often used for decorative pieces and functional items, such as flower pots.
2. Stoneware: Fired at higher temperatures, stoneware pottery is denser and more durable than earthenware. It is commonly used for dishes, mugs, and other everyday items.
3. Porcelain: Porcelain pottery is fired at the highest temperatures, resulting in a smooth and translucent finish. It is highly valued for its delicate beauty and is often used for fine china and decorative objects.
How long can clay last
Clay, in its raw and unfired state, can last indefinitely if stored properly. However, once clay has been fired, its lifespan becomes virtually limitless. Ceramic objects made from fired clay have been unearthed from ancient civilizations and can survive for thousands of years with proper care.
What are four techniques to transform clay into a ceramic vessel
- Handbuilding: Handbuilding techniques, such as pinch, coil, slab, and extrusion, allow artists to shape clay entirely by hand, bringing their creative visions to life.
- Wheel throwing: Using a pottery wheel, potters can throw and shape clay into symmetrical forms, such as bowls, vases, and cups, by utilizing centrifugal force and expert hand manipulation.
- Slip casting: Slip casting involves pouring liquid clay (slip) into a plaster mold, allowing the mold to absorb moisture and form a solid clay object. This technique is often used for creating multiples of the same design.
- Press molding: Press molding utilizes pre-designed molds, usually made of plaster, to shape clay into specific forms. Clay is pressed into the mold using pressure or a press machine to create consistent and detailed pieces.
What are the two methods of crafting handmade pottery
Handmade pottery can be crafted using two main methods:
1. Handbuilding: Handbuilding involves shaping clay directly with the hands and tools. It allows for more creativity and experimentation, as each piece can be uniquely formed.
2. Wheel throwing: Wheel throwing involves spinning a lump of clay on a pottery wheel while shaping it. This method requires skill and precision to create symmetrical and uniform vessels.
What are the four stages of clay
Clay goes through several stages during the pottery-making process:
1. Wet or plastic: Clay is soft, malleable, and easy to shape in its wet stage. It can be easily manipulated to form various shapes and structures.
2. Leather hard: As clay loses moisture, it becomes firmer and holds its shape better. At this stage, it can be carved, trimmed, and joined with other pieces.
3. Bone dry: When clay has completely dried out and lost all moisture, it is considered bone dry. It is extremely fragile and ready for the first firing.
4. Fired: Through the firing process, clay is transformed into a durable and permanent ceramic material. After firing, it can be glazed and fired again to achieve a desired finish.
What are the techniques used when working with clay
Working with clay involves various techniques to shape and manipulate it:
1. Handbuilding: Handbuilding includes pinch, coil, slab, and extrusion methods, where artists use their hands and simple tools to create forms.
2. Wheel throwing: Wheel throwing is a technique that utilizes a pottery wheel to shape rotating clay into symmetrical vessels.
3. Sculpting: Sculpting involves molding clay into three-dimensional forms, allowing artists to create freestanding sculptures or detailed relief work.
4. Decorating: After shaping the clay, artists can utilize different techniques like carving, glazing, and painting to add texture, color, and patterns to their creations.
What are the four hand building techniques for working with clay
Hand building encompasses four fundamental techniques for working with clay:
1. Pinch: By pinching and shaping a small piece of clay with your fingers, you can create vessels with organic and tactile qualities.
2. Coil: Coiling involves rolling out and stacking long, snake-like coils of clay. These coils are then gradually built up to form the desired shape.
3. Slab: Slab construction utilizes flat sheets of clay that are cut and joined together to construct larger and more angular forms.
4. Extrusion: Extrusion involves forcing clay through a shaped opening using an extruder. This allows for the creation of consistent, cylindrical shapes and intricate patterns.
What is a clay extruder and how is it used
A clay extruder is a handy tool used in ceramics to effortlessly create various shapes and patterns. It consists of a hollow barrel fitted with interchangeable dies that shape the clay as it’s forced through. It can be operated manually or powered by a hydraulic or pneumatic mechanism. The clay extruder is particularly useful for producing consistent coils or decorative elements, enhancing the possibilities in handbuilding and sculpting.
What is meant by leather hard clay
Leather hard clay refers to the stage in which clay has partially dried out, but still retains some moisture. It has a firm and leathery consistency, making it ideal for carving, joining pieces together, and adding finer details. At this stage, clay is no longer pliable enough to be easily reshaped but still retains enough moisture to allow manipulation.
What are the three hand building techniques using clay
Hand building offers a world of possibilities with three popular techniques for working with clay:
1. Pinch: With this technique, you use your fingers to pinch and mold the clay. It’s an intuitive method that allows for free-form and textured creations.
2. Coil: By rolling out coils of clay and stacking them, you can build intricate forms, such as pots, vases, or sculptures.
3. Slab: Slab construction involves using flat sheets of clay and cutting them into shapes to build boxes, plates, and other angular structures.
What is the pinch method in pottery
The pinch method is a classic handbuilding technique in pottery. It involves taking a small piece of clay and using your fingers to gently pinch and shape it into the desired form. This technique allows for greater control and produces organic and expressive results. With practice, the pinch method can be used to create anything from small decorative objects to larger vessels.
What were two early methods of forming pottery or sculpture from clay
In ancient times, two early methods of forming pottery and sculpture from clay were:
1. Coiling: Coiling involves building up walls by layering long coils of clay. This method was popular among early civilizations, such as the ancient Greeks and Native Americans.
2. Slabbing: Slab construction consists of cutting flat pieces of clay into shapes and assembling them together to create objects like bowls or simple sculptures. This method dates back to ancient Egypt and Mesopotamia.
What tool is commonly used to cut clay
A wire tool, also known as a clay cutter, is commonly used to cut clay. It consists of a loop or a flat wire stretched between two handles. By pressing or pulling the wire through the clay, it cleanly separates the clay into desired shapes. Wire tools come in various sizes and shapes, allowing artists to create both coarse cuts and fine details.
What are the stages of clay
Clay goes through several stages in its transformation into ceramics:
1. Clay in the bag: In this stage, clay is packaged and ready for use. It has a solid, compact form and is usually moist or plastic to facilitate shaping.
2. Wedging or kneading: Before working with clay, it is essential to wedging or knead it to ensure even consistency and remove air bubbles. This process prepares the clay for shaping and prevents future cracking.
3. Wet or plastic clay: When clay is wet or plastic, it is soft, malleable, and easily shaped. This stage is ideal for handbuilding and wheel throwing.
4. Leather hard clay: Clay becomes leather hard when it has partially dried and lost some moisture. It’s firm and holds its shape well, allowing for trimming, carving, and joining of pieces.
5. Bone dry clay: At this stage, all the moisture has evaporated, leaving the clay brittle and fragile. It is ready for the first firing.
6. Bisqueware: After the initial firing, the clay transforms into bisqueware. It’s a porous material that can absorb glaze.
7. Glazeware: Glazeware refers to clay that has been coated with a layer of glaze and is ready for the final firing. The glaze adds color, texture, and a protective finish to the ceramic piece.
What is clay composed of
Clay is primarily composed of fine particles of minerals, decomposed organic materials, and various metal oxides. The main mineral found in clay is called kaolinite, which is a clay mineral that gives clay its plasticity and workability. Other minerals, such as quartz and feldspar, are commonly present in clay as well. The specific composition of clay can vary depending on its source and location.
Can you fire leather hard clay
Leather hard clay can be fired, and in fact, it is often the preferred stage to fire it. When clay is leather hard, it has already dried enough to maintain its shape during the firing process. Firing leather hard clay helps to further remove any remaining moisture and strengthen the ceramic piece. However, it’s vital to ensure even heating and cooling to prevent cracking or warping.
What is a wire tool used for in clay
A wire tool is a versatile tool used in clay work for various purposes:
1. Cutting: Wire tools are commonly used to cut clay into specific shapes and sizes, allowing for precise sculpting and construction.
2. Trimming: When a ceramic piece is leather hard, a wire tool can be used to trim away excess clay and refine the shape and thickness of the object.
3. Slicing: Slicing through clay with a wire tool can create decorative effects or facilitate joining pieces together.
4. Removing from the wheel: In wheel throwing, a wire tool is used to cleanly cut a formed vessel from the potter’s wheel without damaging it.
What are five ways to shape clay
There are numerous ways to shape clay, but here are five common techniques:
1. Pinching: By gently squeezing and shaping clay with your fingers, you can create organic and unique vessels or sculptures.
2. Coil building: Rolling out coils of clay and stacking them allows you to build intricate forms layer by layer.
3. Slab construction: Using flat sheets of clay, you can cut and assemble them into various shapes to create angular and structured objects.
4. Wheel throwing: By spinning clay on a pottery wheel while shaping it, you can create symmetrical and balanced forms like bowls and vases.
5. Extrusion: Using a clay extruder, you can force clay through various dies to produce consistent shapes or patterned tubes.
What are the six stages of clay
Clay undergoes six main stages during its creative journey:
1. Raw clay: In its natural state, clay is found in deposits and contains impurities. It needs to be processed and refined before use.
2. Wedging: Wedging, or kneading, is the process of removing air bubbles and ensuring a consistent texture throughout the clay.
3. Plastic clay: At this stage, clay is soft, malleable, and easy to shape. It’s ideal for handbuilding and wheel throwing.
4. Leather hard clay: As moisture evaporates, clay becomes leather hard. It’s firm, holds its shape, and is ready for trimming and carving.
5. Bisqueware: Clay that has been fired once to a specific temperature is called bisqueware. It’s porous and ready for glazing.
6. Glazeware: Glazeware refers to clay that has been coated with glaze and fired again. This final firing brings out the vibrant colors and completes the transformation of clay into ceramic art.
Remember, clay is a fascinating medium that invites your creative touch. So, roll up your sleeves, get your hands dirty, and let your imagination run wild as you explore these techniques for forming clay!