Epoxy resin is a popular material known for its durability and versatility in various projects. Whether you’re working on a DIY furniture piece or creating intricate artwork, epoxy resin provides a glossy and professional finish. But what about attaching screws to epoxy resin? Can you securely fasten objects or fix cracked resin with screws? In this blog post, we’ll dive into these questions and explore the possibilities of using screws with epoxy resin.
From filling screw holes in wood to drilling through resin and attaching eye screws, we’ll cover various aspects of working with epoxy resin that involve screws. Along the way, we’ll address common concerns like potential cracking, messy application, and how to fix mistakes such as fisheyes or pinholes. So, if you’ve ever wondered whether you can screw into epoxy resin or how to handle screw-related issues in epoxy projects, keep reading to discover all the answers and tips you need for successful screw attachments in epoxy resin.
Can Screws and Epoxy Resin Form a Solid Bond
If you’re a DIY enthusiast or a professional handyman, you’ve probably encountered the dilemma of whether or not you can put screws into epoxy resin. It’s a burning question that has left many scratching their heads and wondering if this combination is a match made in heaven or an explosive disaster waiting to happen. Fear not, fellow craftspeople, for I am here to uncover the truth and shed light on this epoxy-tinged mystery!
The (Not So) Screwed-Up Truth
When it comes to epoxy resin, its primary purpose is to create a durable, high-strength bond, whether it’s for artistic endeavors, woodworking projects, or construction applications. But can it handle the mighty force of screws? The answer, my friends, is a resounding yes!
Exploring the Depths of Epoxy’s Bonding Abilities
Epoxy resin, with its exceptional adhesive properties, is more than capable of providing a secure hold for screws. By effectively gripping the threads of the screws and enveloping them in a strong bond, epoxy resin ensures they stay firmly in place, creating a steadfast connection.
Ensuring a Magnificent Union
To achieve a rock-solid bond between screws and epoxy resin, a few essential steps must be taken. First and foremost, it is vital to ensure that the surface you’re working with is clean and free from any dirt, grease, or other contaminants. This ensures optimal adhesion and prevents any nasty surprises down the road.
Next, it’s time to dive into the enchanting world of pre-drilling. By carefully creating pilot holes for your screws, you can prevent any cracking or splitting of the epoxy resin, allowing for a seamless integration of screw and resin.
The Power of Reinforcement
While epoxy resin alone can do wonders, incorporating reinforcements can take its bond with screws to a whole new level. Reinforcements like fiberglass cloth or carbon fiber can enhance the mechanical strength and overall durability of the epoxy, making it an unstoppable force in holding screws in place.
A Word of Caution: Avoiding Over-Tightening
In the realm of screws and epoxy resin, it’s important to exercise caution and avoid the temptations of over-tightening. Remember, my dear readers, epoxy resin is stubborn and unforgiving. Over-tightening screws can lead to stress on the bond, compromising its integrity and weakening it over time. So, let’s keep it snug, but not too snug!
The Verdict: A Match Made in Crafters’ Paradise
And there you have it, folks! You can confidently put screws into epoxy resin without fear of disaster. Armed with the knowledge of proper surface preparation, pre-drilling, and the power of reinforcements, you are now ready to embark on your epoxy-infused journey with screws like a true crafting warrior!
So go forth, my fellow artisans, and let the epoxy and screws dance harmoniously, creating masterpieces that will withstand the test of time. Happy crafting!
Keywords: bonding screws with epoxy resin, securely attaching screws with epoxy, epoxy resin and screw strength, reinforcing epoxy with fiberglass for screw attachment, avoiding over-tightening screws in epoxy resin
FAQ: Can You Put Screws into Epoxy Resin
Can you screw into epoxy resin?
Yes, you can screw into epoxy resin, but there are a few things to keep in mind. Firstly, make sure the epoxy resin has fully cured and hardened before attempting to drive screws into it. This usually takes anywhere from 24 to 72 hours, depending on the brand and type of epoxy resin used. Secondly, use a drill or screwdriver to create a pilot hole to guide the screw into the resin without causing any cracks. Finally, choose screws that are appropriate for the thickness and weight-bearing requirements of your project.
Can you fix cracked resin?
Yes, you can fix cracked resin. The first step is to clean the cracked area and remove any loose or damaged resin. Next, mix a small amount of epoxy resin according to the manufacturer’s instructions. Apply the mixed resin to the crack and use a toothpick or small brush to ensure it fills the entire crack. Allow the resin to cure completely, and then sand and polish the repaired area to match the surrounding finish.
What can I use to fill screw holes in wood?
To fill screw holes in wood, there are several options available. You can use a wood filler that matches the color and type of wood you’re working with. Another option is to use epoxy resin mixed with sawdust or wood shavings to create a custom-colored filler. Apply the filler to the hole, let it dry, and sand it down until it is level with the surface of the wood.
What do you cover resin with?
To cover resin and protect it while it cures, you can use a silicone mat or mold release film. These materials are non-stick and can be easily removed once the resin has hardened. Alternatively, you can construct a simple frame out of wood or PVC pipe and drape a plastic sheet over it to create a makeshift cover.
Can you drill into a stone resin shower tray?
It’s generally not recommended to drill into a stone resin shower tray. Stone resin shower trays are made of a mixture of stone particles and resin, which can be delicate and prone to cracking. Any modifications, such as drilling holes, should be done by a professional to ensure the structural integrity of the shower tray is not compromised.
Can you drill holes through resin?
Yes, you can drill holes through resin. However, it’s important to use the correct drill bit and technique to prevent cracking or shattering the resin. Start by marking the desired location of the hole on the resin surface. Use a drill bit specifically designed for drilling through hard materials like resin or glass. Apply light pressure and use a slow speed setting to gradually drill through the resin, lubricating with water or a coolant if necessary.
How do you put in eye screws with resin?
To put in eye screws with resin, follow these steps:
- Determine the desired location of the eye screw and mark it on the resin surface.
- Use a drill bit slightly smaller than the diameter of the eye screw.
- Drill a pilot hole into the resin surface, taking care not to drill too deep.
- Apply epoxy resin to the pilot hole and insert the eye screw, twisting it until fully seated.
- Allow the resin to cure completely before using the eye screw for any hanging or support purposes.
Can you repair resin tabletop?
Yes, you can repair a resin tabletop. If there are cracks or chips in the resin, you can use a clear epoxy resin to fill and level the damaged areas. Mix the epoxy resin according to the manufacturer’s instructions and apply it to the damaged spots. Use a toothpick or small brush to spread the resin evenly and remove any air bubbles. Allow the resin to cure fully, and then sand and polish the tabletop to restore its smooth finish.
Why am I getting holes in my epoxy?
There can be several reasons for holes forming in your epoxy. One common cause is air bubbles trapped in the epoxy during the mixing process. To minimize air bubbles, mix the epoxy slowly and avoid forcefully stirring or shaking it. Another cause can be dust or debris on the surface when pouring the epoxy. Ensure the surface is clean and free from debris before applying the epoxy. Additionally, temperature and humidity can affect the curing process, so it’s essential to work in a controlled environment within the recommended temperature range.
How do you fix fisheye in epoxy?
To fix fisheye in epoxy, follow these steps:
- Sand the affected area lightly with fine-grit sandpaper to remove any imperfections or contaminants.
- Clean the sanded area thoroughly to ensure it’s free from dust or debris.
- Mix a small amount of epoxy resin and apply it to the fisheye, filling it completely.
- Use a toothpick or small brush to spread the epoxy evenly and blend it with the surrounding surface.
- Allow the epoxy to cure fully, and then sand and polish the repaired area to match the rest of the surface.
Can you drill a hole in resin without cracking it?
Yes, you can drill a hole in resin without cracking it by following these steps:
- Mark the desired location of the hole on the resin surface.
- Use a drill bit specifically designed for drilling through hard materials like resin or glass.
- Apply light pressure and use a slow drilling speed to prevent heat buildup.
- Use a coolant or lubricant like water to keep the drill bit cool and reduce friction.
- Drill gradually, periodically removing the bit to clear out any debris.
- Take your time, be patient, and let the drill bit do the work.
Can you put a screw into a resin table?
Yes, you can put a screw into a resin table. However, it’s important to use the appropriate method to avoid damaging the resin. Start by pre-drilling a pilot hole using a drill bit slightly smaller than the diameter of the screw. Take care not to drill too deep or exert excessive force when driving the screw. Ensure the screw is suitable for the weight and purpose of the attachment to the resin table.
Does resin crack easily?
Resin can be durable, but it’s not immune to cracking. Factors such as improper mixing ratios, insufficient curing time, extreme temperature changes, or physical stress can contribute to resin cracking. To minimize the risk of cracking, follow the manufacturer’s instructions for the resin product you’re using, allow adequate curing time, and handle the cured resin with care.
Why is resin so messy?
Resin can be messy due to its liquid nature and the need for precise measurements and mixing. Spills, drips, and splatters are common occurrences when working with resin. Additionally, resin requires meticulous cleaning of tools and work surfaces to prevent unwanted drips or curing. It’s essential to prepare your workspace adequately, wear protective gear, and take your time to minimize the mess and enjoy the creative process.
How do you fix a screw hole that is too big?
To fix a screw hole that is too big, you have a few options. One approach is to use a larger screw to fill the hole. Another option is to use wooden dowels or toothpicks coated in wood glue. Insert the dowels or toothpicks into the hole, break them off flush with the surface, and allow the wood glue to dry. Once dry, you can drive the screw into the repaired hole, and it should hold securely.
Can I do resin in my room?
While it is possible to work with resin in your room, it’s essential to consider ventilation and safety precautions. Resin typically produces fumes during the curing process, which can be harmful if inhaled in high concentrations. Ensure your room has proper ventilation with open windows or a fan to circulate the air. Additionally, cover your work surfaces with protective sheets to prevent any spills or drips from damaging your furniture or flooring.
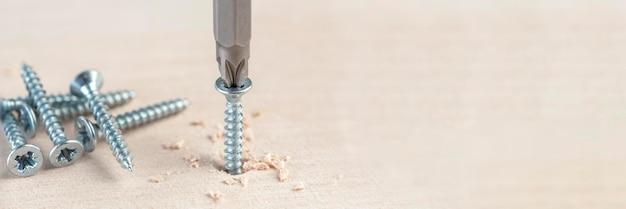
How do you drill screws into epoxy?
To drill screws into epoxy, follow these steps:
- Mark the desired location of the screw on the cured epoxy surface.
- Use a small drill bit to create a pilot hole slightly narrower than the diameter of the screw.
- Insert the drill bit into the pilot hole and drill using moderate speed and light pressure.
- Remove the drill bit and replace it with a screwdriver bit that matches the screw head.
- Drive the screw into the pilot hole using a screwdriver or power drill, taking care not to overtighten.
Can you put a screw into wood filler?
Yes, you can put a screw into wood filler as long as the filler has fully hardened. Wood filler is often used to repair damaged or missing wood, and it can provide a solid base for screwing in fasteners. However, it’s important to follow the manufacturer’s instructions for the specific wood filler product you’re using to ensure it is suitable for screwing.
Will plastic wood hold screws?
Plastic wood, also known as cellulose wood filler, can hold screws in some applications. However, it’s important to note that plastic wood is not as strong or durable as natural wood. If you’re using plastic wood to fill holes or repair surfaces, ensure it has fully hardened and can provide adequate support for the screws. If the load-bearing capacity is crucial, consider using alternative materials like real wood or epoxy resin-based fillers.
How hard is resin to work with?
Working with resin can be both exciting and challenging. While it doesn’t require advanced skills, it does demand attention to detail and careful execution. Mixing the correct ratios, avoiding air bubbles, and ensuring proper curing are essential steps in achieving successful resin projects. With practice and patience, you can master resin work and create stunning pieces that showcase your creativity.
How do you fill and reuse a screw hole?
To fill and reuse a screw hole, follow these steps:
- Remove the screw from the existing hole and clean the area.
- Use a drill bit slightly larger than the existing hole to create a new pilot hole beside the old one.
- Insert wooden dowels, toothpicks, or a plug made of the same type of wood into the new pilot hole.
- Cut off the excess dowels or toothpicks flush with the surface or trim the wooden plug to match the wood surface.
- Apply wood glue to the dowels, toothpicks, or wooden plug and press them firmly into the new hole.
- Allow the wood glue to dry completely, and then you can reuse the hole by inserting a new screw.
What causes pinholes in epoxy?
There are a few factors that can cause pinholes in epoxy. Improper mixing, excessive air bubbles, and inadequate surface preparation are common culprits. To minimize pinholes, ensure accurate resin and hardener measurements, mix thoroughly but without excessive agitation. Additionally, use a torch or heat gun to remove air bubbles that rise to the surface. Properly cleaning and degassing the surface before applying the epoxy can also help prevent pinholes.
Why are my resin keychains cracking?
Resin keychains can crack for several reasons. Uneven curing, high impact or stress, improper mixing ratios, or using a low-quality resin can all contribute to cracking. To prevent cracking, ensure that the resin is mixed properly, and follow the manufacturer’s instructions regarding curing time and temperature. Consider using a high-quality resin specifically formulated for small intricate projects like keychains.
What is the best wood filler for screw holes?
The best wood filler for screw holes depends on the specific application and type of wood used. Generally, epoxy-based wood fillers are considered to be strong and durable options for filling screw holes. They provide excellent adhesion and can be shaped and sanded for a seamless finish. Make sure to choose a wood filler that matches the color and type of wood you’re working with.
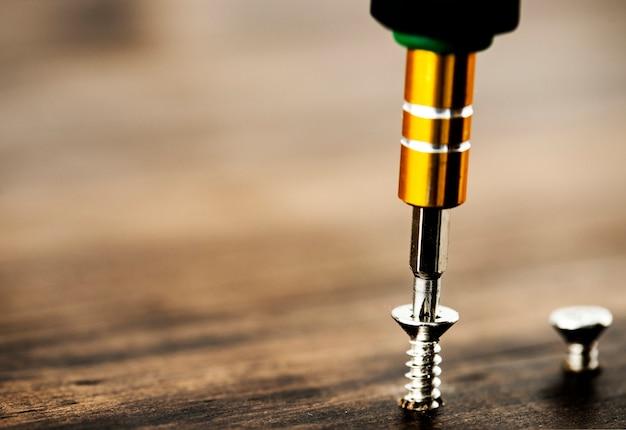
How do you screw into resin?
To screw into resin, follow these steps:
- Ensure the resin has fully cured and hardened.
- Mark the desired location for the screw on the resin surface.
- Use a small drill bit to create a pilot hole slightly smaller than the diameter of the screw.
- Insert the screw into the pilot hole and turn it clockwise with a screwdriver or power drill until fully seated.
- Take care not to overtighten the screw, as it may cause cracking or other damage to the resin.
With these frequently asked questions answered, you now have a better understanding of working with screws in epoxy resin. From repairing cracked resin to drilling holes and filling screw holes, you’ll be well-prepared to tackle your next epoxy resin project with confidence. Remember to follow the appropriate precautions and techniques to ensure the best results and enjoy the creative journey!