Can you transform your plywood walls with stylish ceramic tiles? If you’ve been pondering over this question, you’re in the right place! In this blog post, we will dive into the world of interior design to explore the possibilities of using ceramic tiles on plywood walls.
From whether you can tile on tongue and groove walls to the type of adhesive suitable for ceramic tiles, we will cover it all. And to make sure you have all the necessary information, we’ll also tackle topics like sealing plywood before tiling, the thickness of plywood required for tile installation, and even how to attach ceramic tiles to plywood.
So, if you’re ready to give your plywood walls a stunning makeover, let’s get started on this adventure of creativity, style, and practicality!
Can You Install Ceramic Tile on a Plywood Wall
So, you’re contemplating sprucing up your space and giving it a touch of elegance with some ceramic tiles. But wait a minute, can you actually put ceramic tile on a plywood wall? It sounds like a strange combination, doesn’t it? Let’s dive deeper into this question and uncover the truth.
The Great Tile Debate: Plywood vs. Cement Board
Before we proceed any further, let’s acknowledge the epic battle between plywood and cement board. Plywood enthusiasts say it’s the way to go for tiling walls, while cement board advocates argue that it’s the superior choice. So, who’s right and who’s just spreading glorious myths?
The answer lies in the humble plywood. Yes, folks, you can indeed put ceramic tile on a plywood wall! But before you go ahead, bear in mind that there are some crucial steps you need to follow to ensure everything stays intact, just like your patience when assembling furniture from that famous Swedish store.
Make it Sturdy – Plywood Thickness Matters
To achieve tiling success, you need to start with a sturdy foundation. That means using plywood with a minimum thickness of 1/2 inch. You don’t want your tile installation to mirror a shaky table during a thunderstorm, right? So, opt for 1/2 inch or thicker plywood and bid farewell to unnecessary wobbling.
Enhancing the Bond – Incorporating Cement Backer Board
Okay, here comes our wildcard – cement backer board. Now, while it might seem contradictory to the plywood game plan, it can actually work wonders when combined correctly. Stick with 1/4 inch thick cement board, and you’ll be well on your way to achieving a bond stronger than the average espresso addict’s attachment to their daily dose.
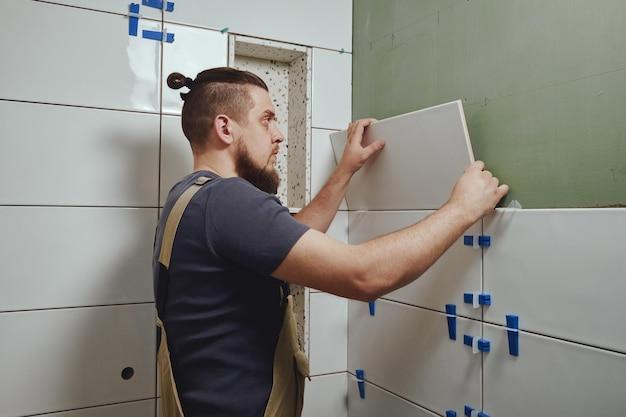
H3 – Proper Prepping: The Secret to Tile Success
Now that we’ve got our materials in place, it’s time to get down to the real business. And by business, I mean the tedious process of prepping your plywood wall. Trust me, this is crucial if you don’t want your beautiful tiles to start falling off like that friend who always flakes on plans.
1. Start with Cleanliness – Bob’s Mustache-Free Zone
First things first, ensure your plywood wall is clean and free from any debris or dust. Consider it your own mustache-free zone, just like Bob’s face after he went all clean-shaven for the first time in a decade. Give it a good wipe down and make sure it’s smooth and ready for tile action.
2. Waterproofing and Anti-Aging Serum?
Next up, we need to talk about waterproofing. No, we’re not discussing skincare routines here, but rather taking measures to shield your plywood from the moisture enemy. Apply a waterproofing membrane to ensure your plywood doesn’t get all wrinkly like your aunt’s forehead after she tried the latest anti-aging serum.
3. Time to Apply that Bonding Agent
To create an unbreakable bond between your plywood wall and the ceramic tile, it’s time to get that bonding agent out. Spread it carefully over the entire surface, just like you spread your favorite conspiracy theories all over social media. Let it dry completely before advancing to the tile installation itself.
Tile It Up – A Work of Art in Motion
Congrats! You’ve made it this far, and now it’s time to put your artistic skills into action. Begin tiling, keeping your desired pattern in mind. But remember, don’t let the tiles come too close to each other. Leave a small gap for expansion. You don’t want them getting all cozy and pushing each other away like strangers on a crowded subway station.
Grout-Filled Cracks and The Final Countdown
Once your tiles are happily in place, it’s time to get that grout out. Fill in the gaps between the tiles, ensuring a smooth and uniform look. Just like when you’re frosting a cake, aim for perfection and create a masterpiece that even Martha Stewart would approve of.
And there you have it! You’ve successfully installed ceramic tiles on your plywood wall. Now go ahead and enjoy your newly transformed space, but remember to appreciate the humorous journey it took to get there!
FAQ: Can You Put Ceramic Tile On Plywood Wall
Can you tile on tongue and groove walls
Yes, you can absolutely tile on tongue and groove walls! However, it’s important to prepare the surface properly before diving into the tiling adventure. Fill any gaps or cracks with a suitable filler and ensure that the tongue and groove boards are securely fastened. Once the wall is smooth and stable, you can proceed with tiling and turn those plain walls into a work of ceramic art!
Can you put mortar on plywood
Indeed, you can apply mortar directly on plywood! But hold on, there’s a catch, my friend. Before slapping on that mortar, make sure to use a latex-modified thinset mortar specially designed for plywood installation. This magical mixture helps ensure improved adhesion and minimizes the potential for cracks in your lovely new tile job.
Do you need to seal plywood before tiling
Ahoy! It’s always a smart move to seal plywood before tiling, matey! Plywood is a porous material, and without a protective seal, moisture can wreak havoc on your installation, causing the wood to swell and the tiles to crack. Yarr, seal it with a suitable waterproofing agent to keep your tiles sailing smoothly on the high seas of the plywood wall!
Will tile mortar stick to wood
Arr, fear not! Tile mortar can indeed stick to wood, but only with the help of a trusty companion called latex-modified thinset mortar. This versatile mortar mix provides excellent adhesion to wood surfaces, ensuring that your tiles stay in place like stowaways on a pirate ship.
How thick should plywood be under tile
As the wise sages of tile installation decree, plywood should be at least 3/4th of an inch thick before you lay down those tiles. This thickness ensures a sturdy foundation for your ceramic wonders, preventing any unwanted surprises like creaky floors or tiles taking an unexpected plunge.
Can you use thinset to level a plywood floor
Avast ye! If the waters of your plywood floor are not as level as the seven seas, fear not, for thinset can come to your rescue! This versatile material can be used to level out minor imperfections in your plywood floor before you commence your tile installation endeavor. Just remember, matey, keep it smooth and level, and your tile voyage shall be smooth sailing!
What adhesive will stick to ceramic tile
Arr, have no fear, for many adhesives are willing to walk the plank and bond with that ceramic tile of yours! Thinset mortar is the go-to adhesive for ceramic tiles, providing a secure and durable connection to your chosen surface. Just check the manufacturer’s instructions for the best thinset to match your specific tile and substrate.
Can you tile directly to plywood wall
Ahoy, mateys! You certainly can tile directly to a plywood wall, but it’s vital to follow a few steps to ensure a successful installation. First, make sure your plywood is sturdy and at least 3/4th of an inch thick. Secondly, seal the plywood to protect it from moisture. Finally, apply a latex-modified thinset mortar and let your ceramic treasures take their rightful place on the plywood wall!
What kind of subfloor is needed for ceramic tile
Ahoy, landlubbers! For ceramic tile installation, a suitable subfloor should be as sturdy as a ship’s mast. Backer board, cement board, or a layer of plywood, with a minimum thickness of 3/4th of an inch, will provide the solid foundation needed for your ceramic creations. Remember, a strong subfloor ensures that your tiles remain shipshape for years to come!
Can ceramic tile be installed on a plywood wall
Aye, matey! With the proper preparation, you can definitely install ceramic tiles on a plywood wall. Ensure the plywood is at least 3/4th of an inch thick and that the surface is thoroughly cleaned and sealed. Then, it’s all smooth sailing! However, don’t forget to use a latex-modified thinset mortar to ensure a secure bond between the plywood and your ceramic treasures.
Can you put bathroom tile on plywood
Ahoy, mateys! Battling the mighty sea of bathroom moisture is no small feat, but fear not, for bathroom tiles can indeed be installed on plywood! Just make sure your plywood is adequately prepared for the challenge. Use a waterproofing membrane to protect the wood from moisture, choose a latex-modified thinset mortar, and seal the tiles and grout lines properly. With these precautions in place, your bathroom tiles shall shine like the sun glinting off the ocean waves!
Can you put tiles on wood walls
Arr matey, there’s no need to walk the plank when it comes to tiling wood walls! You can absolutely adorn those timber wonders with beautiful ceramic tiles. Ensure that the wood is structurally sound, free from cracks or deformations, and properly sealed. Apply a latex-modified thinset mortar to facilitate a strong bond, and in no time, your wood walls will be transformed into magnificent works of art!
Does tile adhesive stick to plywood
Avast ye, it do! Tile adhesive can indeed stick to plywood, but don’t forget that a sealer is your trusty first mate in this endeavor. Applying a suitable sealer to the plywood before you begin tiling shall prevent any unruly moisture from sabotaging your ceramic installation. So, mark my words, matey, seal it tight and let that tile adhesive work its magic!
Can you tile on top of wood
Aye, you can sail the high seas of tiling on top of wood, but beware the treacherous storms of preparation! The wood must be a sturdy and stable ship, without any signs of rot or decay. Applying a cement backer board, such as wonderboard or durock, over the wood surface is advisable to reduce the likelihood of any unwanted flexing. With these precautions in place, set sail and tile your heart out!
Can you tile directly to the subfloor
Arr, tiling directly to the subfloor is not a recommended journey, matey! The subfloor, be it plywood or other materials, requires proper preparation and reinforcement before setting sail on the ceramic sea. Apply a suitable subfloor underlayment, such as cement backer board, to ensure a sturdy foundation upon which your tile dreams can prosper. Anchors aweigh, and may your tiles find smooth waters!
What do you put under tile in a bathroom
Ahoy, bathroom adventurers! Underneath the unforgiving waves of bathroom tile, a solid foundation awaits. Start with a sturdy subfloor, such as plywood or cement backer board, to ensure stability. Then, apply a waterproofing membrane to keep moisture at bay. Finally, spread a layer of thinset mortar, and your bathroom tile shall rise above the tide with grace and beauty!
How do you attach ceramic tile to plywood
Avast ye, fellow mateys! Attaching ceramic tile to plywood requires a bit of swashbuckling preparation. First, ensure that your plywood is sturdy, smooth, and adequately sealed. Next, apply a latex-modified thinset mortar to the plywood, using a notched trowel to achieve the desired thickness. Place your ceramic tiles upon the mortar, giving them a gentle wiggle to ensure a good bond. And voila! Your ceramic treasures are now securely affixed to the plywood deck!
Can you use Liquid Nails for tile
Ahoy, landlubbers! While Liquid Nails be a fine adhesive for various applications, tis not the best for tiling, I’m afraid. Tile installation requires a stronger grip, and that’s where thinset mortar comes to the rescue. Its adhesive properties be perfect for securing your ceramic tiles on their voyage. So, save the Liquid Nails for other adventures and let thinset be the captain of your tiling ship!
Ahoy, there! I hope this FAQ-style subsection has left you feeling prepared to hoist the anchor and embark on your tile installation journey. May your plywood walls be adorned with the finest ceramic treasures, your floors be as level as the calmest seas, and your tiles remain steadfast and true. Set sail, my friend, and may your tiling adventures be a grand success!