Have you ever accidentally dropped your favorite ceramic dish or mug, only to see it shatter into a million tiny pieces? It’s always a heart-wrenching moment. But what if I told you that there might be a way to fix your broken ceramics using a common household ingredient? Yes, you read that right – milk!
In this blog post, we’ll explore the age-old practice of using milk as a potential adhesive for broken ceramics. We’ll delve into the science behind this method and discuss whether it’s truly effective. So, if you’re eager to learn how to restore your beloved ceramic items and make them whole again, keep reading!
Keywords: How do you fix a broken ceramic dish?, How do you repair broken porcelain?, Can you Refire glazed ceramics?, How do you fix a broken ceramic dish soap?, How do you fix broken ceramic?, What is the strongest glue for ceramic?, Is breaking a ceramic plate a chemical change?, How do you fix broken china?, Is Gorilla Glue good for ceramics?, Can you fix a broken mug handle?, Can you glue a ceramic mug back together?, How do you glue glass to ceramic?, How do you fix a ceramic plate with milk?, Can warm milk really fix a broken plate?, What glue is best for porcelain?, How do you fix a hairline crack in a ceramic mug?, How does milk fix a broken plate?, How do you glue a broken plate?, How do you fix hairline cracks in ceramic?, How do you fix cracked glazed pottery?
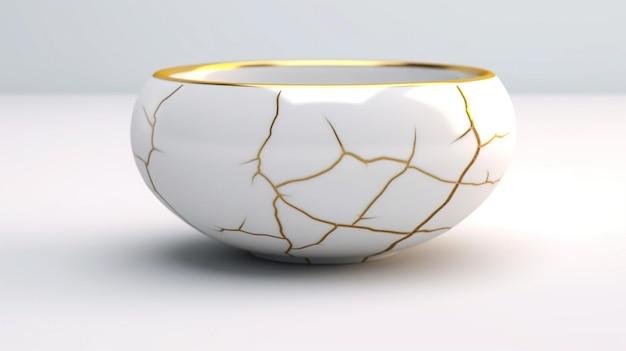
Does Milk Work Magic on Broken Ceramics
Are you tired of your favorite ceramic mug shattering into a hundred pieces? It’s a heart-wrenching moment watching your beloved drinkware crumble before your eyes. But fear not, because there’s a quirky solution that might just save the day – milk! Yes, you read that right – milk! Rumor has it that this humble dairy product could work its magic and fix your broken ceramic. Let’s explore whether this kitchen hack is a hidden gem or just another old wives’ tale.
The Milk Myth: Separating Fact from Fiction
As enticing as the idea of milk fixing broken ceramics sounds, it’s important to get to the bottom of this delightful rumor. Can a splash of milk truly resurrect your shattered pottery? Unfortunately, there is no scientific evidence to support this claim. While milk boasts a myriad of benefits, reconstructing broken ceramics doesn’t seem to be one of them. So, before you rush to the fridge and pour your finest dairy product onto your fractured teacup, let’s dive deeper into the truth.
The Science behind Ceramic Repairs
Repairing ceramics requires a little more than just a magical dairy potion. Traditional methods involve using strong adhesives specifically designed for the job. Epoxy resins, superglue, or ceramic-specific glues are the go-to products for most ceramic aficionados. These adhesives create a strong bond between the broken pieces, ensuring your treasured mug, plate, or vase gets a second lease on life. So, while milk has its merits, ceramic repair isn’t one of them.
Milk’s True Potential: Keeping Ceramics Clean and Shiny
Although milk may not possess some secret power to mend ceramics, it can still play a role in caring for them. While your once-broken ceramics may not be magically restored, you can prevent future damage and prolong their lifespan by using milk as a cleaning agent. Milk’s mild acidity can help dissolve stubborn stains and brighten up tired-looking surfaces. So, pour yourself a glass of milk, take out a soft cloth, and get to work buffing your ceramics back to their former glory. It may not be as exciting as reassembling them, but at least your ceramics will look spick and span!
The Quest for the Perfect Ceramic Superhero Continues
While the milk myth may not live up to its whimsical promise of restoring shattered ceramics, it hasn’t dampened the world’s spirit. People continue to search for innovative ways to solve life’s little mishaps, and that includes fixing broken pottery. So, until a new quirky kitchen hack emerges or scientists discover a way to breathe life back into our ceramic treasures, we’ll have to rely on more traditional methods to mend our beloved pieces.
As much as we’d love to believe in the magic of milk fixing broken ceramics, science reminds us to stay grounded. While milk has its uses in the world of ceramics, unfortunately, repairing shattered pieces isn’t one of them. So, the next time you experience a ceramic catastrophe, don’t reach for that gallon of milk hoping for a miracle. Instead, opt for the trusty adhesives and techniques that have stood the test of time. And remember, even though your ceramics may be broken, their charm and sentimental value will remain intact.
FAQ: Does Milk Fix Broken Ceramic
If you’ve ever broken your favorite ceramic dish or mug, you know the heartache that comes with it. But fear not! There are various methods for fixing broken ceramics, with one surprising technique involving a common household item: milk. In this FAQ-style guide, we’ll answer all your burning questions about milk as a potential ceramic fixer-upper. So let’s dive right in!
How Do You Fix a Broken Ceramic Dish
Repairing a broken ceramic dish might seem daunting, but it’s actually quite doable with the right approach. The first step is to gather the necessary materials: a strong adhesive, such as epoxy or super glue, and some patience. Here’s a step-by-step guide to get you started:
- Clean the broken pieces: Ensure that the broken edges are clean and free from dirt or debris.
- Apply glue: carefully apply your chosen adhesive to one of the broken edges. Remember, a little goes a long way!
- Join the pieces: gently attach the corresponding broken pieces, aligning them as accurately as possible.
- Hold it firmly: press the pieces together and hold them firmly to allow the adhesive to bond.
- Let it cure: depending on the glue used, follow the recommended curing time before handling or using the repaired dish.
How Do You Repair Broken Porcelain
The process of repairing broken porcelain is similar to fixing ceramic dishes. However, keep in mind that porcelain is often more delicate, so handling the pieces with extra care is essential. Here are some key steps to follow when repairing broken porcelain:
- Clean the broken edges: ensure that both the broken pieces and the edges are clean and free from any dirt or residue.
- Apply a porcelain adhesive: choose a specialized porcelain adhesive that is designed to work with this type of delicate material.
- Join the pieces: carefully attach the broken pieces together, aligning them as accurately as possible.
- Press and hold: firmly hold the pieces together, ensuring a tight bond.
- Allow proper curing time: follow the manufacturer’s instructions regarding curing time, as it may vary depending on the adhesive used.
Can You Refire Glazed Ceramics
Unfortunately, you can’t simply pop your broken glazed ceramic back in the kiln for a quick fix. The firing process is irreversible and strictly limited to the initial creation of the piece. Once a glazed ceramic has been fired and broken, it cannot be re-fired to mend the cracks. However, don’t worry – various adhesive options, including milk (more on that later), can still help you repair your beloved glazed ceramics.
How Do You Fix a Broken Ceramic Dish Soap
Oh no! The dreaded shattering of your ceramic dish soap dispenser. Not to worry, this is a common mishap, and repairs are within reach. Follow these steps to mend your broken ceramic dish soap:
- Gather the pieces: carefully collect all the broken fragments of your dish soap dispenser.
- Clean the edges: make sure all the edges are clean and free from soap residue or grime.
- Glue it together: apply a strong adhesive suitable for ceramics to one of the broken edges.
- Piece it back: align the corresponding pieces together, holding and pressing firmly.
- Let it set: allow the adhesive to dry completely according to the manufacturer’s instructions before using it again.
How Do You Fix Broken Ceramic
Wondering how to fix broken ceramics in general? No problem! Whether it’s a cherished teacup or a decorative vase, here’s a general step-by-step guide:
- Gather the pieces: collect all the broken fragments of your ceramic item.
- Clean the edges: ensure all the edges are clean and free from debris or dirt.
- Choose the adhesive: select a strong adhesive suitable for ceramics, such as epoxy or super glue.
- Apply the adhesive: carefully apply a small amount of adhesive to one of the broken edges.
- Reassemble: piece the corresponding fragments together, aligning them as accurately as possible.
- Press and hold: firmly hold the pieces in place, allowing the adhesive to bond properly.
- Patience is key: let the adhesive cure fully according to the manufacturer’s instructions before using or handling the repaired ceramic item.
What is the Strongest Glue for Ceramic
When it comes to repairing ceramics, you want a reliable adhesive that can withstand the test of time. Some of the strongest glues for ceramic repairs include epoxy adhesives, super glue (cyanoacrylate), and certain specialized ceramic adhesives. These options provide excellent bonding strength, ensuring that your repaired ceramic stays intact for years to come.
Is Breaking a Ceramic Plate a Chemical Change
While breaking a ceramic plate causes a physical change, it’s not considered a chemical change. A chemical change involves a transformation at the molecular level, leading to the formation of new substances with different chemical properties. Breaking a ceramic plate, however, only alters its physical state, leaving the chemical composition unchanged.
How Do You Fix Broken China
If your cherished china has suffered a mishap, don’t despair! By following a few simple steps, you can repair broken china and restore its former glory:
- Gather the pieces: carefully collect all the broken fragments of your China item.
- Clean the edges: ensure that all the edges are clean and free from any dirt or residue.
- Choose the adhesive: select a strong adhesive suitable for ceramics or porcelain.
- Apply the adhesive: carefully apply a small amount of adhesive to one of the broken edges.
- Reassemble: align the corresponding fragments, piecing them back together as accurately as possible.
- Press and hold: firmly hold the pieces in place, allowing the adhesive to bond properly.
- Let it cure: follow the adhesive manufacturer’s instructions regarding curing time before handling or using the repaired china.
Is Gorilla Glue Good for Ceramics
Yes, indeed! Gorilla Glue is known for its exceptional strength and versatility, making it an excellent choice for repairing ceramics. Whether you’re fixing a broken mug handle or patching up a decorative ceramic figurine, Gorilla Glue provides a reliable bond that can withstand the test of time.
Can You Fix a Broken Mug Handle
Absolutely! Don’t let a broken mug handle ruin your morning coffee routine. With the right adhesive and a little patience, you can fix a broken mug handle in no time. Here’s how:
- Clean the broken edges: ensure that both the broken mug handle and the main body of the mug are clean and free from any dirt or residue.
- Choose the glue: opt for a strong adhesive suitable for ceramics, such as epoxy or super glue.
- Apply the adhesive: carefully apply a small amount of adhesive to one of the broken edges of the handle.
- Line up the pieces: align the broken handle with the corresponding area on the mug, holding them in place firmly.
- Let it cure: allow the adhesive to cure completely as per the manufacturer’s instructions before using the mug.
Can You Glue a Ceramic Mug Back Together
Yes, you absolutely can! Gluing a ceramic mug back together is a practical way to salvage a favorite drinking vessel. Here’s a quick guide to help you out:
- Collect the pieces: gather all the broken fragments of your ceramic mug.
- Clean the edges: ensure that both the broken pieces and the edges of the mug are clean and free from any dirt or residue.
- Apply a strong adhesive: use a durable adhesive specially made for ceramics, like epoxy or super glue.
- Reassemble the puzzle: align the broken pieces together, taking care to fit them accurately.
- Hold it tight: press the pieces firmly together, maintaining a constant, gentle pressure.
- Allow proper drying time: follow the adhesive manufacturer’s instructions to determine the correct drying time before using the mug again.
How Do You Glue Glass to Ceramic
Gluing glass to ceramic can be a bit trickier than repairing ceramics alone, but with the right approach, it’s entirely possible. Here are the steps to bond glass and ceramic surfaces:
- Clean and prepare the surfaces: make sure both the glass and ceramic surfaces are clean and free from any dust, oil, or residue.
- Select a suitable adhesive: choose an adhesive that works for both glass and ceramics, such as epoxy or a specialized glass-to-ceramic adhesive.
- Apply adhesive: apply a thin, even layer of adhesive to one of the surfaces.
- Join the surfaces: carefully press the glass and ceramic surfaces together, aligning them accurately.
- Excess glue: wipe off any excess adhesive using a clean cloth or cotton swab.
- Allow curing time: follow the adhesive manufacturer’s instructions regarding curing time before handling the bonded glass and ceramic.
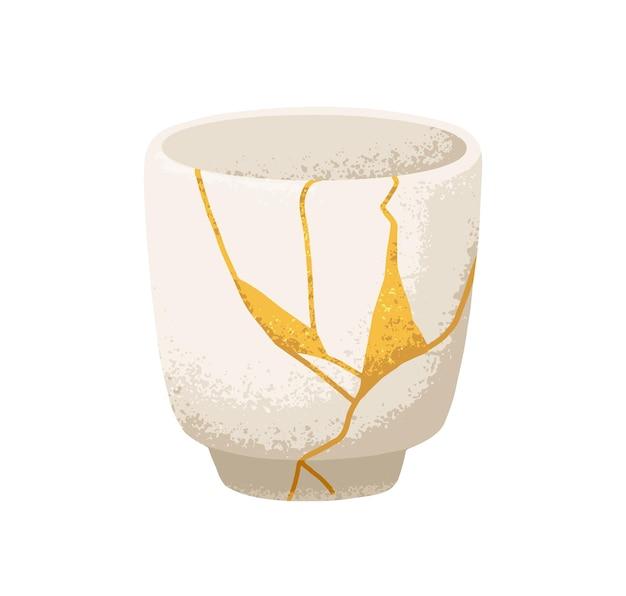
How Do You Fix a Ceramic Plate with Milk
Now, here’s where things get interesting! The milk method is an age-old technique for fixing ceramics, and it’s simpler than you might think. Follow these steps to give it a try:
- Gather the pieces: collect all the broken fragments of your ceramic plate.
- Clean the edges: ensure all the edges are clean and free from any dirt or residue.
- Heat the milk: warm the milk in a saucepan or microwave until it reaches a comfortable temperature.
- Soak the pieces: submerge the broken ends of the ceramic plate into the warm milk and let them soak for at least 12 hours.
- Reassemble and bind: after soaking, carefully align the broken pieces and hold them securely together.
- Allow drying time: allow the repaired ceramic plate to air dry for at least 24 hours before handling or using.
Can Warm Milk Really Fix a Broken Plate
Yes, warm milk can indeed serve as a useful aid in the ceramic repair process. The proteins present in milk help bind the broken edges of ceramics, acting as a natural adhesive. While it may not provide the same level of strength as specialized ceramic glues, the milk method can certainly be effective for simple or decorative repairs.
What Glue is Best for Porcelain
When it comes to porcelain repairs, selecting the right adhesive is crucial. Some of the best glues for porcelain repairs include specialized porcelain adhesives, epoxy resins, and certain super glues. These options provide strong bonding and are formulated specifically to work well with porcelain’s delicate nature.
How Do You Fix a Hairline Crack in a Ceramic Mug
A hairline crack in your favorite ceramic mug doesn’t mean it’s destined for the trash. You can still salvage it with a little repair work. Follow these steps to fix a hairline crack:
- Clean the crack: make sure the crack is clean and free from any dirt or residue.
- Apply adhesive: choose a product specifically designed for ceramics, such as an epoxy or super glue suitable for mending small cracks.
- Align and join the crack: carefully align the cracked edges and gently press them together, applying a small amount of adhesive.
- Wipe off excess glue: immediately clean off any excess adhesive to maintain a neat appearance.
- Cure and dry: allow the adhesive to cure and dry according to the manufacturer’s instructions before using the mug.
How Does Milk Fix a Broken Plate
Ah, the magical powers of milk! Milk contains proteins, like casein, which can act as a natural adhesive for ceramics. When you soak broken ceramic pieces in warm milk, these proteins help bond the broken edges together. Although not as strong as specialized glues, the milk method can be a handy option for simple repairs or when specialized adhesives are not readily available.
How Do You Glue a Broken Plate
If you don’t have milk on hand or prefer a traditional adhesive, gluing a broken plate requires a few essential steps:
- Clean the edges: ensure the broken edges of the plate are clean and free from any residue or debris.
- Choose the right adhesive: select a strong adhesive suitable for ceramics, such as epoxy or super glue.
- Apply the adhesive: carefully apply a thin, even layer of adhesive to one of the broken edges.
- Align the pieces: align the corresponding fragments, joining them together as precisely as possible.
- Gentle pressure: hold the pieces firmly together, applying gentle but consistent pressure.
- Allow curing time: follow the adhesive manufacturer’s instructions regarding curing time, and avoid using the plate until the adhesive has set properly.
How Do You Fix Hairline Cracks in Ceramic
Hairline cracks in ceramics can be tricky to fix, but with the right approach, you can prevent them from spreading further and restore the piece’s integrity. Here’s how to repair hairline cracks in ceramic:
- Clean the crack: make sure the crack is clean and free from any dirt or residue.
- Choose an appropriate filler: select a filler suitable for ceramics, such as a clear epoxy or specialized ceramic filler.
- Apply the filler: gently fill the crack with the chosen filler, ensuring it seeps into the crack fully.
- Wipe off the excess: wipe away any excess filler using a clean cloth or cotton swab.
- Let it cure: allow the filler to cure according to the manufacturer’s instructions before using or handling the repaired ceramic.
How Do You Fix Cracked Glazed Pottery
Repairing cracked glazed pottery requires a delicate touch to ensure the repair blends seamlessly with the glaze. Follow these steps to fix cracked glazed pottery:
- Clean the crack: ensure the crack is clean and free from any dirt or residue.
- Choose a suitable adhesive: select an adhesive that works well with glazed surfaces, such as an epoxy resin.
- Apply the adhesive: carefully apply a thin layer of adhesive along the crack, minimizing excess.
- Press and align: gently press the cracked edges of the pottery together, aligning them as accurately as possible.
- Wipe off any excess adhesive: immediately clean off any excess adhesive to avoid affecting the glazed finish.
- Allow curing time: follow the adhesive manufacturer’s instructions in terms of curing time before handling the repaired glazed pottery.
Now that you have a wealth of information on fixing broken ceramics, including the surprising milk method, you can put those shattered pieces back together with confidence. Remember to follow the recommended steps, select the appropriate adhesives, and approach the repair process with patience. With a little effort and a touch of creativity, your cherished ceramics will be back in action, ready to bring beauty and joy to your daily life. Happy repairing!