Troubleshooting Guide: Why is Your Outside Faucet Leaking Inside the House
Leaky faucets can be a frustrating problem, especially when they start leaking inside your home. If you’re experiencing this issue with your outside faucet, you’re in the right place! In this comprehensive blog post, we will tackle the common causes of an outside faucet leaking inside the house and provide you with practical tips on how to fix it. Whether it’s a hose leak, a leaking shut-off valve, or even a mysterious drip, we’ve got you covered. So let’s dive in and put an end to this annoying problem once and for all!
Why Is My Outside Faucet Leaking Inside the House
Potential Causes of an Outside Faucet Leaking Inside the House
If you’ve noticed water pooling in unexpected places inside your home, it could be a sign that your outside faucet is leaking. Several factors can contribute to this issue, ranging from minor to more severe problems. In this section, we’ll explore some potential causes of an outside faucet leaking inside the house.
1. Damaged Washer
Before diving into complicated repair solutions, it’s worth checking the basics. A damaged washer is a common culprit behind leaky faucets. Over time, this small yet vital component can wear out, leading to water leakage. Fortunately, replacing a washer is a simple and inexpensive fix that can solve the problem in many cases.
2. Loose Connections
Another possible explanation for an outside faucet leaking inside the house is loose connections. If the connections between the faucet and the pipe are not tightened correctly, water can seep through and find its way into your home. In such cases, ensuring a snug fit by tightening the connections can put an end to the leakage.
3. Cracked or Frozen Pipes
Extreme temperatures can wreak havoc on your plumbing system. Cracked or frozen pipes can cause water to leak from the outside faucet and make its way into your house. If you suspect that this might be the issue, it’s crucial to address it promptly to prevent further damage. A professional plumber can assess and repair any damaged pipes to restore your plumbing system.
4. Faulty Valve
A faulty valve can also be responsible for an outside faucet leaking inside the house. When the valve fails to close tightly, water can continue to flow even when the faucet is turned off. This not only leads to water wastage but can also result in leaks inside your home. Replacing a faulty valve is a job best left to a professional, as they can ensure the proper installation and functionality of the new valve.
5. Excessive Water Pressure
High water pressure can put stress on your plumbing system, leading to leaks. If the pressure is too high, it can cause water to push through the outside faucet and into your home. Installing a pressure regulator can help control the water flow and prevent leaks caused by excessive pressure.
An outside faucet leaking inside the house can cause inconveniences and potential water damage if left unaddressed. By familiarizing yourself with the different potential causes, you can better understand the issue and determine the appropriate course of action. Whether it’s a simple washer replacement or a more complex pipe repair, seeking professional help when needed ensures a proper and long-lasting solution. Remember, timely maintenance and addressing any leaks promptly can save you from costly repairs in the future.
Hose Leaking in House
Why Is My Hose Leaking Inside the House
If you’ve noticed water leaking inside your house from your hose, it’s definitely a cause for concern. So, what could be the possible reasons behind this leakage mishap? Let’s dive into some common culprits:
1. Hose Wear and Tear
One possible explanation is that your hose has simply seen better days. Over time, hoses can develop cracks, splits, or holes, especially if they’re often exposed to harsh weather conditions or rough handling. These tiny openings can result in water leaking into your house, leaving you with an unexpected indoor pool.
2. Loose Connection
Another reason for hose-induced indoor flooding is a loose connection between the hose and the outdoor faucet. If the connection isn’t tight enough, water can escape and find its way into your house. So, let’s make sure you turn that faucet off with a satisfyingly firm twist next time!
3. Faulty Washer or O-ring
Inside your hose’s connectors, there are small rubber washers or O-rings responsible for creating a watertight seal. If these little troublemakers become damaged, worn out, or misplaced, water can leak out, wreaking havoc inside your home. Those washers just can’t keep a secret!
How to Fix a Leaking Hose
Now that you have an idea of why your hose may be causing indoor leaks, let’s explore some solutions to put an end to this watery escapade!
1. Inspect and Repair
Start by thoroughly examining your hose for any visible signs of damage. If you spot any cracks, splits, or holes, you can try patching them up with a hose repair kit or sealing tape. Alternatively, if the damage is beyond repair or too extensive, consider replacing the hose altogether. Out with the old, in with the leak-free!
2. Tighten the Connection
If the leak is originating from a loose connection, it’s time for some good ol’ tightening action! Grab an adjustable wrench and ensure both the faucet and hose connectors are secure and snug. Sometimes, a little twist is all it takes to prevent an indoor water extravaganza.
3. Replace Washers or O-rings
If you suspect the washers or O-rings are causing the leak, first turn off the water supply and unscrew the connectors. Carefully inspect the rubber seals and replace any that are damaged. You can easily find suitable replacements at your local hardware store. After the replacement, screw the connectors back on and test for leaks. No loose ends, just leak-proof connections!
Keep Your House Dry!
Though a hose leaking inside your house can be quite the unwelcome surprise, fear not! By identifying the source of the problem and taking appropriate action, you can bid farewell to indoor waterworks. Remember to regularly inspect your hose, tighten connections, and replace worn-out parts to keep your home dry and your spirits high!
How to Fix a Leaky Outdoor Spigot
So you’ve noticed that your outdoor faucet is leaking, but don’t worry – you’ve come to the right place. In this section, we’ll guide you through the steps to fix that pesky leaky outdoor spigot. Grab your toolbox and let’s get started!
Assessing the Situation
Before you jump into fixing the leak, it’s important to assess the situation. Take a close look at the faucet and try to identify the source of the leak. Is it coming from the handle, the spout, or around the connection to your house? Understanding the source of the problem will help you tackle it more effectively.
Gathering the Tools
Now that you have a better idea of where the leak is coming from, it’s time to gather your tools. You’ll need an adjustable wrench, a screwdriver, some Teflon tape, and possibly some replacement parts like washers or O-rings. Having these tools handy will make the repair process smoother.
Shutting off the Water
Before you start tinkering with the faucet, make sure to turn off the water supply. Locate the shutoff valve, which is usually situated near the faucet or in your basement. Give it a good twist to stop the flow of water, preventing any unplanned indoor swimming sessions.
Disassembling the Faucet
Now it’s time to get our hands dirty. Using your trusty screwdriver, carefully remove the handle of the faucet. Once the handle is off, you’ll have access to the internal components. Inspect them for any signs of damage, such as worn-out washers or cracked O-rings.
Replacing the Faulty Parts
If you’ve discovered any damage, it’s time to replace those worn-out parts. Head to your local hardware store with the old components in hand to ensure you get the right replacements. Once you have the new parts, follow the reverse order of disassembly to put everything back together.
Wrapping it Up
With the new components in place, it’s time to wrap things up. Give everything a final check to ensure all connections are tight and secure. Grab your Teflon tape and wrap it around the threads of the faucet to create a watertight seal. This extra step will help prevent any future leaks.
Turn on the Water
The moment of truth has arrived! With the faucet assembled and Teflon tape in place, it’s time to turn the water supply back on. Slowly open the shutoff valve and listen for any signs of leaking. If all goes well, rejoice in your newfound plumbing skills!
Fixing a leaky outdoor spigot may seem intimidating at first, but with a little patience and some basic tools, you can save yourself from a dripping headache. By following these steps, you’ll conquer that leak and enjoy a well-functioning faucet once again.
Outside Faucet Leaking Behind Brick
Don’t let a leaking outside faucet ruin your day! If you’re experiencing some water woes and suspect the culprit might be a leaky faucet hidden behind a brick wall, fear not! We’ve got the lowdown on this pesky problem and how to tackle it head-on.
Identifying the Leaky Culprit
Before we dive into fixing the issue, let’s first make sure our suspicion about the leaky faucet behind the brick is correct. One surefire sign is finding wet patches or water seepage on interior walls located close to an external brick wall. If you’ve noticed sudden increases in your water bill or if there’s an unexplained decrease in water pressure, this could also be an indication of a concealed leak.
Unveiling the Leaky Secret
So, how do we access that sneaky faucet hidden behind the brick? First things first, locate the interior shut-off valve for the outside faucet. This valve is usually found in the basement or crawl space, preferably near the exterior wall where the faucet is situated. Once you’ve found the valve, turn it off to stop water flow to the faucet.
Braving the Brick
Now that we’ve turned off the water supply, it’s time to get down to business and expose the troublesome faucet. Grab your trusty tools, including a chisel, a hammer, and, of course, your favorite energetic playlist to keep you company!
Carefully chisel away at the brick surrounding the faucet until it’s exposed, baby! Take your time and be gentle to avoid damaging any pipes or causing further issues. Stay patient, my friend. Rome wasn’t built in a day, and fixing a leaky faucet takes time too!
Fixing That Darn Faucet
After finally unveiling the mischievous faucet, it’s time to assess the situation. Inspect the faucet for any visible cracks, damage, or worn-out parts that might need replacing. Tightly securing any loose fittings and replacing worn-out washers can often do the trick in stopping the leak.
But, hey, if you’re not feeling like a DIY superhero or if faucet repair isn’t your cup of tea, never hesitate to call a professional plumber to save the day. They’ll have the skills and expertise to fix that faucet in a jiffy.
Rebuilding the Brick Wall
Now that the faucet is fixed and the leaky culprit has been apprehended, it’s time to rebuild that brick wall like a boss! Don’t forget to gather all the loose bricks, apply mortar, and gently replace them. Once everything is in place, give it some time to dry and set before admiring your handy work.
Remember, dealing with leaks can be a pesky business, but with a little patience, a can-do attitude, and some tools, you can conquer any plumbing challenge that comes your way!
Alright, my fellow leak warriors, now you know how to tackle that outside faucet leak hidden behind a brick wall. It’s time to show that leak who’s boss and bid farewell to water damage and high bills. Happy fixing!
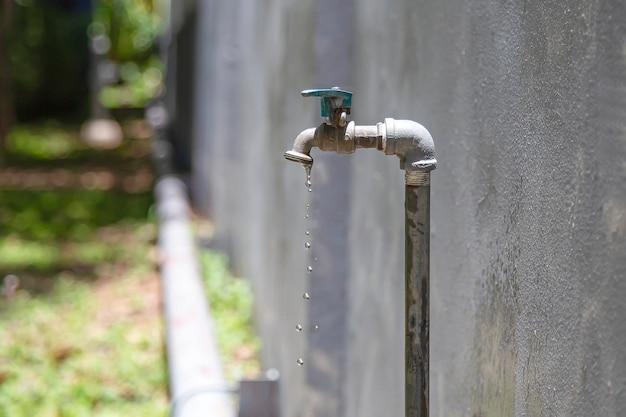
Outdoor Faucet Leaks When Turned On
Water gushing out unexpectedly from your outdoor faucet when you turn it on? Well, that’s definitely not what you were expecting, right? Don’t worry, you’re not alone in this watery predicament. Outdoor faucet leaks when turned on can be quite common and can leave you feeling like you’re being pranked by a mischievous water sprite. But fear not, for I am here to help you troubleshoot this plumbing conundrum! Let’s dive right in, shall we?
Check for Loose Connections
The first thing you want to do is give your outdoor faucet a little attention in the form of a gentle inspection. Check for any loose connections around the faucet, especially where the water pipe meets the faucet itself. Sometimes, over time, these connections can become loose and cause water to leak when the faucet is opened. If you notice any loose nuts or fittings, simply tighten them using a wrench. Remember, though, to not over-tighten, as that could cause further damage. Keep it snug, but not Hulk-like strong!
Replace the Washer
If you’ve tightened all the connections and the outdoor faucet is still leaking when turned on, it may be time to play doctor and fix that washer. Yes, the little heroic rubber ring inside the faucet that often goes unnoticed until trouble strikes. To replace the washer, turn off the water supply to the faucet, unscrew the faucet handle, and carefully remove the old washer. Head to your local hardware store, pick up a new one, and voila! Install the new washer, reassemble everything, and test whether your outdoor faucet is still playing tricks on you.
Don’t Be a Valve Bully
Is your outdoor faucet still leaking when turned on? Well, then it’s time for a little valve therapy. You see, sometimes our eagerness to turn on the water can lead to a phenomenon known as “valve bullying.” Be gentle and give the valve a slow turn instead of forcefully cranking it open. By opening the valve gradually, you can reduce the water pressure inside your pipes, which in turn can help prevent any leaks from occurring. So go ahead, be kind to your valve, and it might just stop its leaky tantrums.
Call a Professional Plumber
If all else fails and your outdoor faucet is still gleefully spraying water indoors, it might be time to throw in the towel and call in reinforcements. A professional plumber has the expertise and experience to diagnose and resolve the issue quickly and efficiently. Sometimes, underlying plumbing problems can be the root cause of the relentless outdoor faucet leaks, and only a professional eye can spot and fix them. So don’t be shy, seek professional help, and bid farewell to your leaky faucet once and for all.
Now that you’re armed with some troubleshooting tips, go forth and tame that leaky outdoor faucet like the plumbing superhero you are! Remember, these leaks may seem like a minor annoyance, but they can lead to bigger problems down the line. Stay vigilant, and keep an eye out for unwelcome water surprises. Good luck, dear faucet fixer!
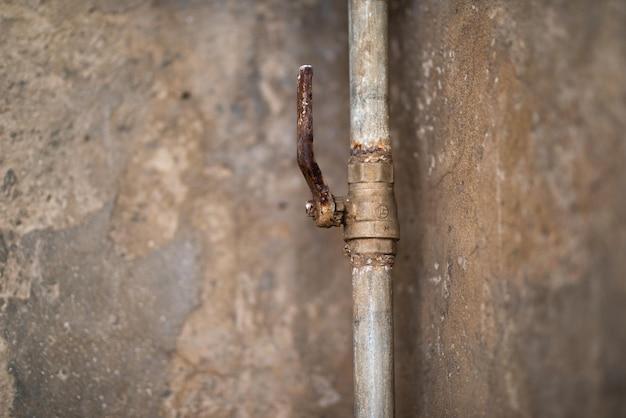
Shut Off Valve for Outside Faucet Leaking
Having a leaky outside faucet can be a real headache. Not only does it waste water and increase your utility bill, but it can also cause damage to your home if left unchecked. One important component to check when dealing with a leaky outside faucet is the shut off valve. In this section, we’ll explore the role of the shut off valve in preventing leaks and how to troubleshoot and fix any issues that may arise.
Understanding the Shut Off Valve
The shut off valve is a small but essential part of your outside faucet system. It controls the flow of water to your faucet, allowing you to stop or start the water supply as needed. When the shut off valve is open, water flows freely to the faucet, allowing you to use it. However, when it is closed, it prevents any water from reaching the faucet, effectively shutting off the water supply.
Troubleshooting a Leaky Shut Off Valve
If you’re experiencing a leaky outside faucet, there’s a good chance that the shut off valve may be the culprit. Before diving into any repairs, it’s important to ensure that the shut off valve is fully closed. Sometimes a loose valve handle or a worn-out seal can cause water to continue flowing, even when the valve is seemingly closed. Tightening the handle or replacing the seal can often solve this issue.
Another common problem with shut off valves is the development of leaks at the valve itself. This can happen due to corrosion, loose connections, or faulty seals. In such cases, you may need to replace the shut off valve altogether. This might seem like a daunting task, but with a few simple tools and a little bit of know-how, it’s a task that can easily be accomplished by any DIY enthusiast.
Fixing a Leaky Shut Off Valve
To fix a leaky shut off valve, you’ll first need to turn off the water supply to your house. This can usually be done by locating the main water supply valve, which is typically located near the water meter. Once the water is shut off, you can safely work on the shut off valve without the risk of flooding.
If the shut off valve is leaking due to a loose connection, tightening the nuts or fittings using a wrench can often solve the issue. However, if the valve is too corroded or damaged to be repaired, it will need to be replaced. This is a relatively straightforward process that involves removing the old valve and installing a new one in its place. Remember to follow the manufacturer’s instructions when installing the new shut off valve to ensure proper functionality.
In conclusion, the shut off valve plays a crucial role in preventing leaks from your outside faucet. By understanding how it works and knowing how to troubleshoot and fix any issues that may arise, you can ensure that your outside faucet remains in top-notch condition. So, don’t let a leaky shut off valve dampen your spirits – take control and fix it like a pro!
Why Is My Outside Faucet Leaking When I Attach a Hose
If you’ve ever experienced the frustration of turning on your outside faucet, attaching a hose, and then noticing water leaking inside your house, you’re not alone. This common issue can be both annoying and potentially damaging to your home. In this subsection, we’ll explore why your outside faucet may be leaking when a hose is attached and provide you with some tips on how to fix it.
1. The Rubber Washer Might Be Worn Out
One of the most common reasons for a leaking outside faucet when a hose is attached is a worn-out rubber washer. The rubber washer acts as a seal between the faucet and the hose, preventing water from escaping. Over time, the washer can deteriorate or become damaged, causing leaks. Luckily, replacing the rubber washer is a relatively simple and inexpensive fix.
2. Loose or Damaged Hose Connection
Another culprit for a leaking outside faucet could be a loose or damaged hose connection. If the connection between the hose and the faucet is not secure, water may leak out. Inspect the connection and make sure it’s tight. If the hose itself is damaged or has holes, it’s best to replace it to ensure a proper seal.
3. High Water Pressure
Sometimes, a leaking outside faucet when a hose is attached can be due to high water pressure. When the water pressure is too high, it can put strain on the faucet and cause leaks. Consider installing a pressure regulator to lower the water pressure and prevent future leaks.
4. Frost-Free Faucet Malfunction
If you have a frost-free faucet, which is designed to prevent freezing during the winter months, it may be the source of the leaking. The anti-siphon valve in a frost-free faucet can wear out over time, leading to leaks. In this case, it’s best to consult a plumber to repair or replace the faucet.
5. Over-Tightened or Under-Tightened Connections
Believe it or not, both over-tightening and under-tightening connections can cause leaks. If your faucet or hose connection is too tight or not tight enough, it can result in water seeping through. Finding the right balance is key, so try adjusting the tightness and see if it solves the issue.
By addressing these common causes of a leaking outside faucet when a hose is attached, you can fix the problem and enjoy hassle-free watering of your garden or lawn. Remember, if the issue persists or you’re unsure how to proceed, it’s always a good idea to consult a professional plumber for assistance.
Why Does My Outside Faucet Leak from the Top
If you’ve noticed water dripping from the top of your outside faucet, you might be scratching your head wondering what could be causing the problem. Don’t worry, you’re not alone! Many homeowners have experienced this issue, and there are a few common reasons why it happens. In this section, we’ll explore why your outside faucet might be leaking from the top and what you can do to fix it.
1. Loose or Damaged Packing Nut
One possible culprit is a loose or damaged packing nut. This nut is located just below the handle of your faucet and helps to create a watertight seal. Over time, the nut can become loose or worn out, causing water to leak from the top of the faucet. To fix this, you can try tightening the nut with a wrench. If that doesn’t solve the problem, it may be necessary to replace the packing nut altogether.
2. Faulty Washer
Another common cause of a top-leaking outside faucet is a faulty washer. The washer is a small rubber or plastic ring that sits inside the faucet’s valve. Over time, it can deteriorate or become damaged, leading to leaks. Replacing the washer is usually a straightforward fix. Turn off the water supply to the faucet, unscrew the handle and valve stem, and replace the old washer with a new one. Don’t forget to turn the water back on and check for any remaining leaks.
3. Cracked or Damaged Faucet Body
If the packing nut and washer are in good condition, the issue might lie within the faucet body itself. For example, the body could be cracked or damaged, allowing water to seep out from the top. Unfortunately, fixing this problem may require replacing the entire faucet. It’s best to consult a professional plumber for an accurate assessment and proper replacement of the faucet.
4. High Water Pressure
Sometimes, the water pressure in your home can be too high, causing your outside faucet to leak from the top. Excessive water pressure puts stress on the internal components of the faucet, leading to leaks. Installing a pressure regulator can help control the water pressure and prevent future leaks. A plumber can assist you with selecting and installing the right pressure regulator for your home.
Leaking from the top is a common issue with outside faucets, but now you know some of the main reasons why it may occur. Whether it’s a loose packing nut, a faulty washer, a cracked faucet body, or high water pressure, identifying the cause is the first step in resolving the problem. With proper maintenance and timely repairs, you can enjoy a leak-free outside faucet and save yourself from any unnecessary water wastage. Keep an eye on your faucet, and don’t hesitate to call a professional if you need assistance.
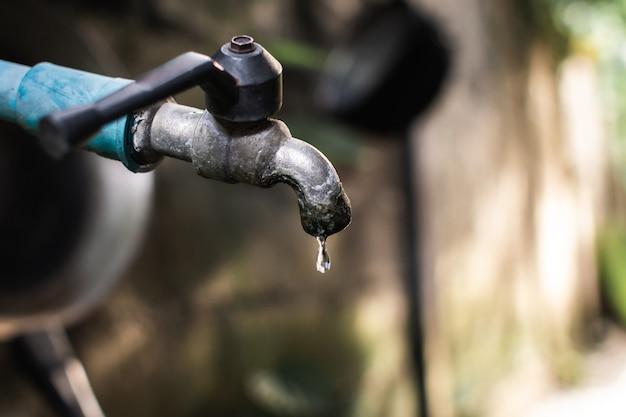
How to Stop Your Outside Faucet from Dripping
Are you tired of the constant drip-drip sound coming from your outside faucet? Not only is it annoying, but it’s also a waste of water and money. Luckily, there are a few simple steps you can take to put an end to this pesky problem. In this section, we’ll explore some effective methods to stop your outside faucet from dripping.
1. Inspect the Faucet for Leaks
The first step is to inspect the faucet for any visible signs of leaks. Take a close look at the handle, spout, and any connections for signs of water dripping or pooling. Don’t forget to check the area around the faucet for any water stains or dampness. If you notice any leaks, it’s time to take action.
2. Tighten Loose Connections

Sometimes, all it takes is a simple tightening to stop a faucet from dripping. Grab a wrench and gently tighten any loose connections you find. Be careful not to overtighten, as this can cause damage. Once you’ve tightened all the connections, give the faucet a test run to see if the dripping has stopped.
3. Replace the Washer
If tightening the connections didn’t solve the problem, it’s likely that the washer inside the faucet has worn out. To replace the washer, you’ll need to turn off the water supply to the faucet first. Once the water is off, remove the handle and unscrew the packing nut. Inside, you’ll find the old washer. Replace it with a new one of the same size and material, then reassemble the faucet. Don’t forget to turn the water supply back on!
4. Call a Professional
If you’ve tried all the DIY fixes and your outside faucet is still dripping, it may be time to call in the experts. A professional plumber will have the tools and expertise to identify and fix the underlying issue causing the leak. They can diagnose whether it’s a problem with the valve, the pipe, or another component, and provide the necessary repairs or replacements.
5. Prevent Future Drips
Once you’ve successfully stopped your outside faucet from dripping, it’s important to take steps to prevent future leaks. Regularly inspect and maintain your faucet to catch any potential problems early on. Additionally, consider installing a frost-proof faucet or using a foam insulator during colder months to protect your pipes from freezing and causing leaks.
Remember, taking care of your outside faucet not only saves you money but also conserves water and helps protect the environment. So don’t wait any longer – tackle that dripping faucet and enjoy a quiet, leak-free home!
Dripping outside faucets can be a nuisance, but they don’t have to be a permanent problem. By inspecting for leaks, tightening connections, replacing washers, or seeking professional help if needed, you can stop the annoying drips and save water in the process. Take action today and bid farewell to those pesky drips for good!
Why is My Outside Faucet Leaking Inside the House
Do you suddenly find water leaking inside your house from your outside faucet? Don’t panic, as this is a fairly common problem faced by many homeowners. There could be a few reasons behind this unexpected plumbing issue. Let’s dive into some possible causes and solutions:
Damaged Rubber Washer
One of the most common culprits for a leaking outside faucet is a damaged rubber washer. Over time, the washer can deteriorate or become worn out, causing water to leak through. Fortunately, replacing a rubber washer is a simple fix that can easily be done by yourself. Just make sure to turn off the water supply and unscrew the faucet handle to access the washer. Once replaced, your leak should be resolved!
Loose Connections
Another possible reason for water seeping into your home is loose connections. Check if any connections between the pipe and faucet are loose or improperly connected. If you notice any discrepancies, tighten the connections using an adjustable wrench. This should eliminate any leaks stemming from loose connections.
Freezing Temperatures
In colder climates, freezing temperatures can be the culprit for a leaky outside faucet. When water freezes inside the pipe, it expands and can cause cracks or bursts. To prevent this from happening, ensure that your outdoor faucet is properly insulated. You can use foam faucet covers that are readily available at most home improvement stores.
Excessive Water Pressure
High water pressure can also lead to leaks inside the house. The excessive force can cause the seals and connections to weaken, resulting in water seepage. Consider installing a pressure regulator on your main water line to reduce the pressure and protect your plumbing system from damage.
Cracked Pipe or Valve
If you’ve checked the washer, connections, and water pressure, and water is still leaking, the issue may lie with a cracked pipe or valve. In such cases, it’s best to seek the assistance of a professional plumber who can identify and fix the issue for you.
In conclusion, a leaking outside faucet can be an annoyance, but it’s usually a problem that can be resolved without too much hassle. By identifying the cause of the leak and implementing the appropriate solutions, you can keep your home dry and your faucet working as it should. Remember, if you’re unsure or uncomfortable with any DIY fixes, don’t hesitate to call a professional plumber who can expertly handle the situation and save you from further headaches.